


在前一篇SuperMap C++ 组件开发环境快速搭建(VS + Qt)中,讲述了如何进行SuperMap iObjects for C++ 二次开发工程的配置,以及创建地图窗口显示地图。本篇将介绍如何创建三维场景窗口,打开三维场景,以及加载模型数据。本篇仅以VS开发为例。
1. 创建一个基于对话框的MFC的应用项目:FirstSuperMap3D
工程配置此处就不再详细讲述了,使用三维需增加三维的链接库,如下:
SuGeometry3Dd.lib
SuGraphics3Dd.lib
SuRenderd.lib
SuScened.lib
SuSceneEditord.lib
SuFMELicensed.lib
SuNetToolkitd.lib
2. 创建三维场景类: SceneControl
SceneControl 主要用于封装 SuperMap 的场景,实现通用的功能,以方便在不同的窗口类中加载。
SeneControl.h 的部分内容如下所示:
#ifndef SCENECONTROL_H
#define SCENECONTROL_H

#include "MapEditor/UGMapEditorWnd.h"
#include "Graphics/UGGraphicsManager.h"
#include "Drawing/UGDrawParamaters.h"
#include "Scene/UGScene3D.h"
#include "SceneEditor/UGSceneEditorWnd.h"
#include "Scene/UGRoot3D.h"
#include "Graphics3D/UGRenderTarget.h"
#include "Scene/UGLayer3Ds.h"

using namespace UGC;

class  SceneControl
{
	//Constructor
public:
	/*
	 *@en
	 *@pWndHandle  window's handle, (HWND)CWnd::m_hWnd in MFC, (HWND)QWidget::winId() in Qt
	 *@dpiX        logical dpi in horizontal
	 *@dpiY        logical dpi in vertical
	*/
	SceneControl(void* pWndHandle, int dpiX, int dpiY);
	virtual ~SceneControl();

	// members
private:
	//@en the handle of view which providing a window for scene
	void* m_pWnd;

...
SceneControl.cpp 的部分内容如下:
#include "stdafx.h"
#include "SceneControl.h"

SceneControl::SceneControl(void* pWndHandle, int dpiX, int dpiY)
{
	m_pUGSceneWnd = NULL;
	//m_pRoot3D = NULL;
	m_pCameraWorld = NULL;

	m_IsMinSized = false;

	Initialize(pWndHandle, dpiX, dpiY);

	m_pInnerWorkspace = new UGWorkspace();
	m_pWorkspace = NULL;
	SetWorkspace(m_pInnerWorkspace);

	mIsInWorkspace = false;
}

...
3. 将 SceneControl 添加到窗口类 FirstSuperMap3DDlg 中
需要注意的是,三维场景的绘制,需要一个定时器,来定时刷新场景,并且在界面需要显示,才需要刷新场景,所以我们在OnSize()函数中开启定时器。
(1) 在 FirstSuperMap3DDlg.h 头文件中引入需要的头文件,定义需要的变量、绘制函数和鼠标事件函数等等,如下所示
#include "SceneControl.h"

// 定义TimerID
class TimerIDs
{
public:
	static const UINT_PTR ID_RENDER3D = 1;
	static const UINT  PERIOD_RENDER3D = 30;
};

...

	afx_msg void OnMouseMove(UINT nFlags, CPoint point);
	afx_msg BOOL OnMouseWheel(UINT nFlags, short zDelta, CPoint pt);
	afx_msg void OnLButtonDown(UINT nFlags, CPoint point);
	afx_msg void OnLButtonUp(UINT nFlags, CPoint point);
	afx_msg void OnLButtonDblClk(UINT nFlags, CPoint point);
	afx_msg void OnRButtonDown(UINT nFlags, CPoint point);
	afx_msg void OnRButtonUp(UINT nFlags, CPoint point);
	afx_msg void OnRButtonDblClk(UINT nFlags, CPoint point);
	afx_msg void OnSize(UINT nType, int cx, int cy);

	DECLARE_MESSAGE_MAP()

private:
	SceneControl* m_pSceneControl;
	UINT_PTR mRender3DTimerID;
	bool mIsVisible;

public:
	SceneControl* GetSceneControl();
	void RenderInTimer();
(2) FirstSuperMap3DDlg.cpp 中实现上述函数,部分内容如下:
...

void CALLBACK TimerRender3D(HWND hWnd, UINT nMsg, UINT_PTR nTimerid, DWORD dwTime)
{

	if (hWnd != NULL)
	{
		CWnd* pWnd = CWnd::FromHandle(hWnd);
		string targetName = "class SceneView";
		string wndName = typeid(*pWnd).name();
		if (typeid(*pWnd) == typeid(FirstSuperMap3DDlg))
		{
			FirstSuperMap3DDlg* pDlg = (FirstSuperMap3DDlg*)pWnd;
			pDlg->RenderInTimer();
		}
	}
}

// Message Handlers


void FirstSuperMap3DDlg::OnPaint()
{

	CPaintDC dc(this); // device context for painting
	CRect rect;
	GetClientRect(&rect);
	m_pSceneControl->OnDraw(rect.left, rect.top, rect.right, rect.bottom, dc.m_hDC);

	CDialogEx::OnPaint();

}


...
运行效果,如下图所示:

3. 打开工作空间和三维场景
这里我们打开iDesktop 提供的示例数据CBD,在 OnSize() 函数中初始化 SceneControl 后,打开CBD工作空间,打开其保存的场景,如下所示:
// Open workspace file
UGString wkPath = _U("F:\\JunSuperMap\\2 SuperMapData\\iDesktop\\10i\\SampleData\\3D\\CBDDataset\\CBD.smwu");

UGWorkspaceConnection wkCon;

wkCon.m_strServer = wkPath;
wkCon.m_nWorkspaceType = UGWorkspace::WS_Version_SMWU;

UGWorkspace* pWorkspace = m_pSceneControl->GetWorkspace();
if (pWorkspace->Open(wkCon))
{
	UGString sceneName = pWorkspace->m_SceneStorages.GetNameAt(0);

	m_pSceneControl->OpenScene(sceneName);

}
运行后如图所示:
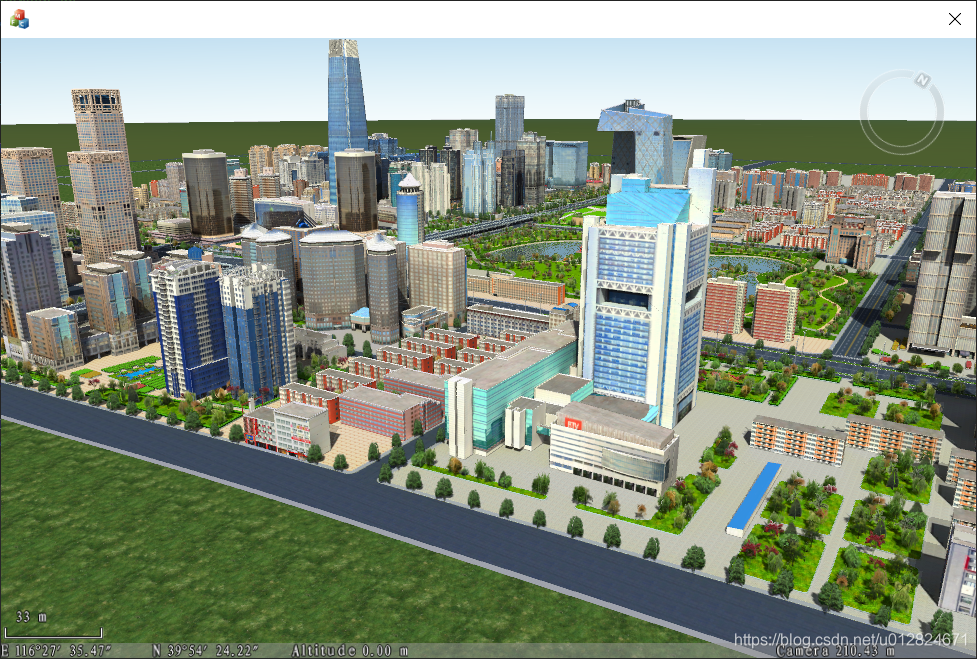
4. 添加模型数据集
有时我们可能需要添加自己的模型数据集,如我们打开一个空场景,然后添加一个模型数据集。因此我们将前面的打开场景,改为添加一个模型数据集。代码如下:
// 添加模型数据集
UGString ugDatasourceName = pWorkspace->m_DataSources.GetAliasAt(0);
UGDataset* pDataset = pWorkspace->GetDataSource(ugDatasourceName)->GetDataset(_U("Building"));
UGString ugDatasetName = pDataset->GetName();
UGString ugLayerName = ugDatasetName + _U("@") + ugDatasourceName; // 数据集名@数据源名,图层默认命名格式,也是通过该格式的名称获得关联数据

UGDataset::DatasetType datasetType = pDataset->GetType();
UGLayer3D* pLayer = m_pSceneControl->GetSceneEditWnd()->GetScene3D()->m_Layers.AddLayer(ugLayerName);

if (pLayer != NULL)
{
	// 显示到数据集范围
	m_pSceneControl->GetSceneEditWnd()->GetScene3D()->GetCamera(_U("Camera"))->FlyToBounds(pLayer->GetBounds(), 1);
	if (datasetType == UGDataset::/*DatasetType::*/Model || datasetType == UGDataset::/*DatasetType::*/CAD)
	{
		// 此处仅设置一个三维风格,以达到启用目的
		// 其他风格可根据需要设置
		UGStyle3D style3D;
		style3D.SetFill3DMode(UGC::/*UGFill3DMode::*/FILL_FACE);
		pLayer->SetStyle3D(style3D);
	}
}
运行效果如图所示:

5. 添加倾斜摄影
同样,我们使用 iDesktop 提供的示例数据(OSGB),直接将.scp文件添加到场景中。因为是添加倾斜摄影数据,有scp配置文件即可,就不用打开工作空间文件了。将前面的代码修改为:
// 添加倾斜摄影数据,使用scp配置文件
UGString scp(_U("F:\\JunSuperMap\\2 SuperMapData\\iDesktop\\10i\\SampleData\\3D\\OSGB\\compressed.scp"));

UGLayer3D* pLayerSCP = m_pSceneControl->GetSceneEditWnd()->GetScene3D()->m_Layers.AddLayer(scp);
if (pLayerSCP != NULL)
{
	// 显示到数据集范围
	m_pSceneControl->GetSceneEditWnd()->GetScene3D()->GetCamera(_U("Camera"))->FlyToBounds(pLayerSCP->GetBounds(), 1);
}
运行效果如图所示:

以上就是本篇的内容,希望通过本文的介绍,能帮助有需要使用SuperMap iObjects for C++ 产品进行开发的朋友,快速搭建起三维开发的环境。文中提到的数据,都来自 iDesktop 的示例数据,并且文件较大,这里就不提供了,有需要的朋友可以在超图软件的“技术资源中心”下载。当然,使用自己的数据也是可以的。示例程序请通过页面上方的资源下载。
更多功能,请参考GitHub项目https://github.com/Jun0x01/JunSuCpp


 928
928


 被折叠的 条评论
为什么被折叠?
被折叠的 条评论
为什么被折叠?
 到【灌水乐园】发言


