


一. 介绍
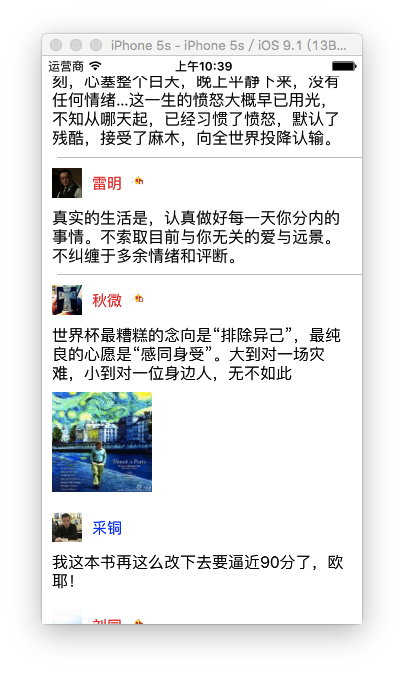
这几天正在做一个AppDemo,其中用到了评论功能,我打算用UITableView做,但是需要自定义cell的高度,总不能让用户就发固定行数的评论吧,更不要说还要上传图片了。所以我就上网查了下资料,做了这样一个Demo。这是效果图。
我是参照着文顶顶大神的博客做的,这是链接。大神写的有些地方和我的有些出入,我就重新整理一下,加上了一些注释和自己的理解。
二. 基本步骤(大神写的,对我而言,刚看的时候一头雾水,写了一遍代码才稍稍明白了)
1.新建一个继承自UITableViewCell的类
2.重写initWithStyle:reuseIdentifier:方法添加所有需要显示的子控件(不需要设置子控件的数据和frame, 子控件要添加到contentView中)进行子控件一次性的属性设置(有些属性只需要设置一次, 比如字体\固定的图片)
3.提供2个模型:
数据模型: 存放文字数据\图片数据
frame模型: 存放数据模型\所有子控件的frame\cell的高度
4.cell拥有一个frame模型(不要直接拥有数据模型)
5.重写frame模型属性的setter方法: 在这个方法中设置子控件的显示数据和frame
6.frame模型数据的初始化已经采取懒加载的方式(每一个cell对应的frame模型数据只加载一次)
三. 文件结构

这里需要多加注意这个plist文件。
四. 代码示例:
环境:Xcode7.1
1. Weibo.h:
//
//  Weibo.h
//  类微博正文Demo
//
//  Created by apple on 15/11/14.
//  Copyright © 2015年 apple. All rights reserved.
//

#import <Foundation/Foundation.h>

@interface Weibo : NSObject

@property (nonatomic, copy) NSString *text;         // 内容
@property (nonatomic, copy) NSString *icon;         // 头像图片名称
@property (nonatomic, copy) NSString *name;         // 昵称图片名称
@property (nonatomic, copy) NSString *picture;      // 配图图片名称
@property (nonatomic, assign) BOOL vip;             // 判断用户是不是Vip

-(id)initWithDict:(NSDictionary *)dict;
+(id)weiboWithDict:(NSDictionary *)dict;

@end
2. Weibo.m
//
//  Weibo.m
//  类微博正文Demo
//
//  Created by apple on 15/11/14.
//  Copyright © 2015年 apple. All rights reserved.
//

#import "Weibo.h"

@implementation Weibo

//为属性设置值
-(id)initWithDict:(NSDictionary *)dict{
    if (self=[super init]) {
        [self setValuesForKeysWithDictionary:dict];
    }
    return self;
}
/*  对上面的讲解:
 *  setValuesForKeysWithDictionary:方法,
 *  会为我们把和dict中的key名字相同的class proerty设置上dict中与key对应的value
 *  链接处有对该方面的相关讲解http://www.cocoachina.com/industry/20140224/7866.html
 */

+(id)weiboWithDict:(NSDictionary *)dict{
    return [[self alloc]initWithDict:dict];
}

@end
<span style="font-family: Arial, Helvetica, sans-serif;">
</span><span style="font-family: Arial, Helvetica, sans-serif;">
</span><span style="font-family: Arial, Helvetica, sans-serif;">
</span><span style="font-family: Arial, Helvetica, sans-serif;">
</span><span style="font-family: Arial, Helvetica, sans-serif;">3. WeiboFrame.h </span>//
// WeiboFrame.h
// 类微博正文Demo
//
// Created by apple on 15/11/14.
// Copyright © 2015年 apple. All rights reserved.
//
#import <Foundation/Foundation.h>
#import <UIKit/UIKit.h>
@class Weibo;
@interface WeiboFrame : NSObject
/*
* 数据模型提供所需要的子控件的内容,数据;frame模型计算,保存每个子控件的frame和cell行高
*/
/*
* 1.数据模型
*/
@property (nonatomic, strong) Weibo *weibo;
/*
* 2.frame模型
*/
//头像的frame
@property (nonatomic, assign) CGRect iconF;
//昵称的frame
@property (nonatomic, assign) CGRect nameF;
//vip的frame
@property (nonatomic, assign) CGRect vipF;
//正文的frame
@property (nonatomic, assign) CGRect introF;
//配图的frame
@property (nonatomic, assign) CGRect pictrueF;
//行高
@property (nonatomic, assign) CGFloat cellHeight;
@end
4. WeiboFrame.m //
// WeiboFrame.m
// 类微博正文Demo
//
// Created by apple on 15/11/14.
// Copyright © 2015年 apple. All rights reserved.
//
#import "WeiboFrame.h"
#import "Weibo.h"
#define NameFont [UIFont systemFontOfSize:15]
#define TextFont [UIFont systemFontOfSize:16]
@implementation WeiboFrame
- (void)setWeibo:(Weibo *)weibo
{
_weibo = weibo;
// 间隙
CGFloat padding = 10;
// 1.设置头像的frame
CGFloat iconViewX = padding;
CGFloat iconViewY = padding;
CGFloat iconViewW = 30;
CGFloat iconViewH = 30;
self.iconF = CGRectMake(iconViewX, iconViewY, iconViewW, iconViewH);
// 2.设置昵称的frame
// 昵称的x = 头像最大的x + 间隙
CGFloat nameLabelX = CGRectGetMaxX(self.iconF) + padding;
// 计算文字的宽高
CGSize nameSize = [self sizeWithString:_weibo.name font:NameFont maxSize:CGSizeMake(MAXFLOAT, MAXFLOAT)];
CGFloat nameLabelH = nameSize.height;
CGFloat nameLabelW = nameSize.width;
CGFloat nameLabelY = iconViewY + (iconViewH - nameLabelH) * 0.5;
self.nameF = CGRectMake(nameLabelX, nameLabelY, nameLabelW, nameLabelH);
// 3.设置vip的frame
CGFloat vipViewX = CGRectGetMaxX(self.nameF) + padding;
CGFloat vipViewY = nameLabelY;
CGFloat vipViewW = 14;
CGFloat vipViewH = 14;
self.vipF = CGRectMake(vipViewX, vipViewY, vipViewW, vipViewH);
// 4.设置正文的frame
CGFloat introLabelX = iconViewX;
CGFloat introLabelY = CGRectGetMaxY(self.iconF) + padding;
CGSize textSize = [self sizeWithString:_weibo.text font:TextFont maxSize:CGSizeMake(300, MAXFLOAT)];
CGFloat introLabelW = textSize.width;
CGFloat introLabelH = textSize.height;
self.introF = CGRectMake(introLabelX, introLabelY, introLabelW, introLabelH);
// 5.设置配图的frame
if (_weibo.picture) {// 如果有有配图
CGFloat pictureViewX = iconViewX;
CGFloat pictureViewY = CGRectGetMaxY(self.introF) + padding;
CGFloat pictureViewW = 100;
CGFloat pictureViewH = 100;
self.pictrueF = CGRectMake(pictureViewX, pictureViewY, pictureViewW, pictureViewH);
// 6.计算行高
self.cellHeight = CGRectGetMaxY(self.pictrueF) + padding;
}else{
NSLog(@"a");
// 6.没有配图情况下的行高
self.cellHeight = CGRectGetMaxY(self.introF) + padding;
}
}
/**
* 计算文本的宽高
*
* @param str 需要计算的文本
* @param font 文本显示的字体
* @param maxSize 文本显示的范围
*
* @return 文本占用的真实宽高
*/
- (CGSize)sizeWithString:(NSString *)str font:(UIFont *)font maxSize:(CGSize)maxSize
{
NSDictionary *dict = @{NSFontAttributeName : font};
// 如果将来计算的文字的范围超出了指定的范围,返回的就是指定的范围
// 如果将来计算的文字的范围小于指定的范围, 返回的就是真实的范围
CGSize size = [str boundingRectWithSize:maxSize options:NSStringDrawingUsesLineFragmentOrigin attributes:dict context:nil].size;
return size;
}
@end
5.WeiboCell.h
//
//  WeiboCell.h
//  类微博正文Demo
//
//  Created by apple on 15/11/14.
//  Copyright © 2015年 apple. All rights reserved.
//

#import <UIKit/UIKit.h>
#import "WeiboFrame.h"

@interface WeiboCell : UITableViewCell

/*
 *  接收外界传进来的模型(包括数据模型和frame模型)
 */
@property (nonatomic, strong) WeiboFrame *weiboFrame;

//声明一个类方法,用于在声明cell时添加我们所需要的子控件
+(instancetype)cellWithTableView:(UITableView *)tableView;

@end
6.WriboCell.m
//
//  WeiboCell.m
//  类微博正文Demo
//
//  Created by apple on 15/11/14.
//  Copyright © 2015年 apple. All rights reserved.
//

#import "WeiboCell.h"
#import "Weibo.h"


#define NameFont [UIFont systemFontOfSize:15]
#define TextFont [UIFont systemFontOfSize:16]

@interface WeiboCell ()

/**
 *  头像
 */
@property (nonatomic, weak) UIImageView *iconView;
/**
 *  vip
 */
@property (nonatomic, weak) UIImageView *vipView;
/**
 *  配图
 */
@property (nonatomic, weak) UIImageView *pictureView;
/**
 *  昵称
 */
@property (nonatomic, weak) UILabel *nameLabel;
/**
 *  正文
 */
@property (nonatomic, weak) UILabel *introLabel;

@end


@implementation WeiboCell


+(instancetype)cellWithTableView:(UITableView *)tableView{
    static NSString *identifier = @"status";
    //从缓存中取(重用机制)
    WeiboCell *cell = [tableView dequeueReusableCellWithIdentifier:identifier];
    //如果缓存中没有,就创建
    if (cell==nil) {
        cell = [[WeiboCell alloc] initWithStyle:UITableViewCellStyleDefault reuseIdentifier:identifier];
    }
    return cell;
}

/*
 * 构造方法(在初始化时会使用)
 *一般在这个方法中添加需要的空间
 */
-(id)initWithStyle:(UITableViewCellStyle)style reuseIdentifier:(NSString *)reuseIdentifier{
    //重写方法的第一步应该先继承原方法,使其原有功能不缺失
    self =[super initWithStyle:style reuseIdentifier:reuseIdentifier];

    if (self) {
        //让自定义的cell和系统cell一样,一创建出来就有一些控件供我们使用

        //1.创建头像
        UIImageView *iconView = [[UIImageView alloc] init];
        [self.contentView addSubview:iconView];
        self.iconView = iconView;

        //2.创建昵称
        UILabel *nameLabel = [[UILabel alloc] init];
        nameLabel.font = NameFont;
        [self.contentView addSubview:nameLabel];
        self.nameLabel = nameLabel;

        //3.创建vip
        UIImageView *vipView = [[UIImageView alloc] init];
        vipView.image = [UIImage imageNamed:@"vip"];
        [self.contentView addSubview:vipView];
        self.vipView = vipView;

        //4.创建正文
        UILabel *introLabel = [[UILabel alloc] init];
        introLabel.font = TextFont;
        introLabel.numberOfLines = 0;
        [self.contentView addSubview:introLabel];
        self.introLabel = introLabel;

        //5.创建配图
        UIImageView *pictureView = [[UIImageView alloc] init];
        [self.contentView addSubview:pictureView];
        self.pictureView = pictureView;
    }
    return self;
}

//重写setting方法
-(void)setWeiboFrame:(WeiboFrame *)weiboFrame{
    _weiboFrame = weiboFrame;

    //1.给子控件赋值数据
    [self settingData];
    //2.设置frame
    [self settingFrame];
}

-(void)settingData{
    Weibo *weibo = self.weiboFrame.weibo;

    //设置头像
    self.iconView.image = [UIImage imageNamed:weibo.icon];
    //设置昵称
    self.nameLabel.text = weibo.name;
    //设置vip
    if (weibo.vip) {
        self.vipView.hidden = NO;
        self.nameLabel.textColor = [UIColor redColor];
    }else{
        self.vipView.hidden = YES;
        self.nameLabel.textColor = [UIColor blueColor];
    }
    //设置内容
    self.introLabel.text = weibo.text;
    //设置配图
    if (self.pictureView) {
        self.pictureView.hidden = NO;
        self.pictureView.image = [UIImage imageNamed:weibo.picture];
    }else{
        self.pictureView.hidden = YES;
    }
}

/*
 *  设置子控件的frame
 */
-(void)settingFrame{
    self.iconView.frame = self.weiboFrame.iconF;
    self.nameLabel.frame = self.weiboFrame.nameF;
    self.vipView.frame = self.weiboFrame.vipF;
    self.introLabel.frame = self.weiboFrame.introF;
    if (self.weiboFrame.weibo.picture) {
        self.pictureView.frame = self.weiboFrame.pictrueF;
    }
}

#pragma mark--
- (void)awakeFromNib {
    // Initialization code
}

- (void)setSelected:(BOOL)selected animated:(BOOL)animated {
    [super setSelected:selected animated:animated];

    // Configure the view for the selected state
}

@end
7.ViewController.h
//
//  ViewController.h
//  类微博正文Demo
//
//  Created by apple on 15/11/14.
//  Copyright © 2015年 apple. All rights reserved.
//

#import <UIKit/UIKit.h>

@interface ViewController : UIViewController<UITableViewDataSource,UITableViewDelegate>

@end
8.ViewController.m
//
//  ViewController.m
//  类微博正文Demo
//
//  Created by apple on 15/11/14.
//  Copyright © 2015年 apple. All rights reserved.
//

#import "ViewController.h"
#import "WeiboCell.h"
#import "Weibo.h"
#import "WeiboFrame.h"

@interface ViewController ()

@property (nonatomic, strong) NSArray *statusFrames;

@end

@implementation ViewController

- (void)viewDidLoad {
    [super viewDidLoad];

}

#pragma mark--
#pragma mark  懒加载
-(NSArray *)statusFrames{
    if (_statusFrames==nil) {
        NSString *fullPath = [[NSBundle mainBundle] pathForResource:@"statuses.plist" ofType:nil];
        NSArray *dictArray = [NSArray arrayWithContentsOfFile:fullPath];
        NSMutableArray *models = [NSMutableArray arrayWithCapacity:dictArray.count];
        for (NSDictionary *dict in dictArray) {
            //创建数据模型
            Weibo *weibo = [Weibo weiboWithDict:dict];
            //根据数据模型创建frame模型
            WeiboFrame *wbF = [[WeiboFrame alloc] init];
            wbF.weibo = weibo;
            [models addObject:wbF];
        }
        self.statusFrames = [models copy];
    }
    return _statusFrames;
}

#pragma mark--
#pragma mark  UITableViewDataSource
- (NSInteger)tableView:(UITableView *)tableView numberOfRowsInSection:(NSInteger)section
{
    return self.statusFrames.count;
}

- (UITableViewCell *)tableView:(UITableView *)tableView cellForRowAtIndexPath:(NSIndexPath *)indexPath
{
    WeiboCell *cell = [WeiboCell cellWithTableView:tableView];
    //设置数据
    cell.weiboFrame = self.statusFrames[indexPath.row];

    return cell;
}

#pragma mark--
#pragma mark  UITableViewDelegate
- (CGFloat)tableView:(UITableView *)tableView heightForRowAtIndexPath:(NSIndexPath *)indexPath{
    //取出对应行的frame模型
    WeiboFrame *wbF = [_statusFrames objectAtIndex:indexPath.row];
    NSLog(@"height = %f",wbF.cellHeight);
    return wbF.cellHeight;
}

- (void)didReceiveMemoryWarning {
    [super didReceiveMemoryWarning];
    // Dispose of any resources that can be recreated.
}

@end
9. storyboard中放入一个UITableView,添加Delegate和DataSource;
五. 补充说明
由于系统提供的tableview可能并不能满足我们的开发需求,所以经常要求我们能够自定义tableview。
自定义tableview有两种方式,一种是使用xib创建,一种是使用纯代码的方式创建。那究竟该选择哪种方式呢?
对于样式一样的tableview,通常使用xib进行创建;对于高度不一样,内容也不完全一致的通常使用纯代码进行自定义。
(图片都是在我的微博上扒的,右键保存即可)


 5829
5829

 被折叠的 条评论
为什么被折叠?
被折叠的 条评论
为什么被折叠?
 到【灌水乐园】发言


