相信大家对MVC模式都很了解,没错,android框架给出来的开发模式就是MVC,xml文件控制View视图的显示,代码中实现Model和Controler的实现。下面我将给大家介绍一种MVC的演化版本MVP模式。
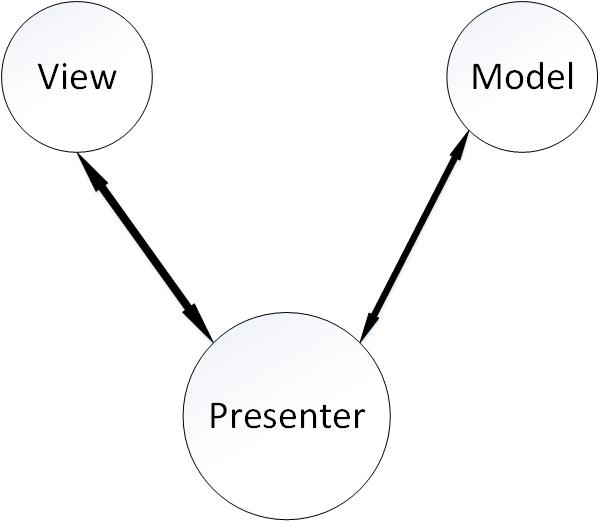
所谓MVP模式,分为三部分:Model(负责数据的存取),View(负责数据内容的显示),Presenter(负责业务逻辑的实现)。三者之间的耦合通过接口来实现。三者之间的关系如下图:
MVP模式图:
从上图可以看出View和Presenter关联,Presenter和Model关联,View与Model没有直接联系,这样做使程序更加模块化,调试和修改程序时更具有针对性,从而降低了整个程序的耦合性。
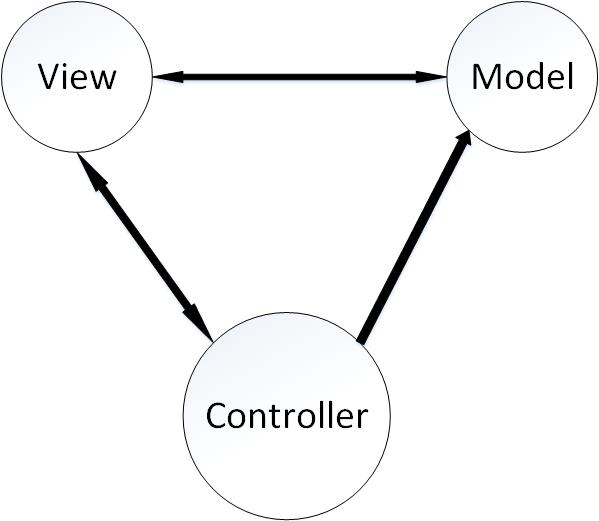
我们再来看看MVC模式:
1、Model(模型)是应用程序中用于处理应用程序数据逻辑的部分,通常模型对象负责在数据库中存取数据。
2、View(视图)是应用程序中处理数据显示的部分,通常视图是依据模型数据创建的。
3、Controller(控制器)是应用程序中处理用户交互的部分,通常控制器负责从视图读取数据,控制用户输入,并向模型发送数据。
三者关系如下图:
很明显MVC模式的耦合性要强于MVP,所以在开发中,强烈建议使用MVP模式。
下面我就给大家介绍一下MVP模式的具体实现。
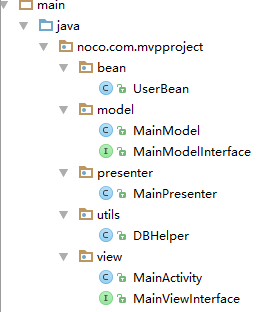
这是我的项目分布图,其中:
1、UserBean负责对用户信息的封装。
2、DBHelper负责创建数据库以及对数据库的操作。
3、MainModeInterface是Model接口,在MainModel中实现它,进行数据的存取。
4、MainViewInterface是View接口,在MainActivity(View模块)中实现它,进行View内容的更新。
5、MainPresenter是Presenter模块,持有MainModeInterface和MainViewInterface两者的引用,关联Model和View模块,进行业务逻辑处理。
下面就给大家献上核心代码:
View模块:
MainActivity类:
public class MainActivity extends Activity implements View.OnClickListener, MainViewInterface{

    private TextView textView;
    private EditText id;
    private TextView textViewPassword;
    private EditText password;
    private Button saveBtn;
    private Button showId;
    private MainPresenter mainPresenter;

    private void assignViews() {
        textView = (TextView) findViewById(R.id.textView);
        id = (EditText) findViewById(R.id.id);
        textViewPassword = (TextView) findViewById(R.id.textViewPassword);
        password = (EditText) findViewById(R.id.password);
        saveBtn = (Button) findViewById(R.id.saveBtn);
        showId = (Button) findViewById(R.id.showId);
        mainPresenter = new MainPresenter(this);
        mainPresenter.setMainViewInterface(this);
        saveBtn.setOnClickListener(this);
        showId.setOnClickListener(this);
    }

    @Override
    protected void onCreate(Bundle savedInstanceState) {
        super.onCreate(savedInstanceState);
        setContentView(R.layout.activity_main);
        assignViews();
    }

    @Override
    public void setId(String id) {//更新UI
        Toast.makeText(this,"用户账号:"+id,Toast.LENGTH_SHORT).show();
    }

    @Override
    public void setPassword(String password) {//更新UI
        Log.i("px password",""+password);
    }

    @Override
    public void onClick(View v) {
        switch (v.getId()){
            case R.id.saveBtn:
               //保存数据
            mainPresenter.saveDatas(this,id.getText().toString().trim(),password.getText().toString().trim());
                Toast.makeText(this,"保存成功",Toast.LENGTH_SHORT).show();
                break;
            case R.id.showId:
                mainPresenter.loadDatas();//显示数据
                break;
        }
    }
}
MainViewInterface类:
public interface MainViewInterface {
    void setId(String id);//更新UI
    void setPassword(String password)//更新UI
}
Presenter模块:
MainPresenter类:
public class MainPresenter {
    private Context context;
    private MainViewInterface mainViewInterface;
    private MainModelInterface mainModelInterface;
    private SQLiteDatabase db;
    private String tableName = "";

    public MainPresenter(Context context){
        this.context = context;
        mainModelInterface  = new MainModel();
        tableName = "user_info";
        db = DBHelper.openOrCreateDatabase(context,"user");
    }

    public void setMainViewInterface(MainViewInterface mainViewInterface) {
        this.mainViewInterface = mainViewInterface;
    }

    public void saveDatas(Context context,String id,String password){//保存数据
        mainModelInterface.createTable(db, tableName);
        mainModelInterface.saveIdAndPassword(db, tableName, id, password);
    }

    public void loadDatas(){//获取数据
        UserBean userBean = mainModelInterface.getUserBean(db,tableName);
        mainViewInterface.setId(userBean.getUserId());
        mainViewInterface.setPassword(userBean.getUserPassword());
    }
}
Model模块:
MainModelInterface类:
public interface MainModelInterface {
    void createTable(SQLiteDatabase db,String tableName);
    void saveIdAndPassword(SQLiteDatabase db,String tableName,String id,String password);
    UserBean getUserBean(SQLiteDatabase db,String tableName);
}
MainModel类:
public class MainModel implements MainModelInterface {

    @Override
    public void createTable(SQLiteDatabase db, String tableName) {
        if(!DBHelper.tableIsExist(db,tableName)){
            List<Map<String,String>>list = new ArrayList<>();
            Map<String,String> map_1 = new HashMap<>();
            map_1.put("DbFieldName","id");
            map_1.put("DbFieldTyple","VARCHAR");
            list.add(map_1);
            Map<String,String> map_2 = new HashMap<>();
            map_2.put("DbFieldName","password");
            map_2.put("DbFieldTyple","VARCHAR");
            list.add(map_2);
            DBHelper.createTable(db, tableName,list);
        }

        DBHelper.executeSQL(db, "DELETE FROM " + tableName);//清空表数据
    }

    @Override
    public void saveIdAndPassword(SQLiteDatabase db,String tableName,String id, String password) {
        List<Map<String,String>> list = new ArrayList<>();
        Map<String,String> map_1 = new HashMap<>();
        map_1.put("DbFieldName","id");
        map_1.put("DbFieldNote", id);
        list.add(map_1);
        Map<String,String> map_2 = new HashMap<>();
        map_2.put("DbFieldName","password");
        map_2.put("DbFieldNote",password);
        list.add(map_2);
        DBHelper.insertDatas(db, tableName, list);
    }

    @Override
    public UserBean getUserBean(SQLiteDatabase db, String tableName) {
        UserBean userBean = new UserBean();
        Cursor cursor = DBHelper.getCursorByQuery(db,tableName);
        while (cursor.moveToNext()){
            String id = cursor.getString(cursor.getColumnIndex("id"));
            String password = cursor.getString(cursor.getColumnIndex("password"));
            Log.i("px Id:", id + "");
            Log.i("px password:", password + "");
            userBean.setUserId(id);
            userBean.setUserPassword(password);
        }
        return userBean;
    }
}
数据库相关的代码我就不写了,大家自己下载代码查看,有错误的话希望大家指出,感激不尽。


 6188
6188

 被折叠的 条评论
为什么被折叠?


