


前几天去看了锤子的发布会,没想到这次还是诚意满满。作为程序员,就关注了在本次发布会出现的两大创意(其实只能算得上微创新)。第一个就是本次要说的big-bang,另一个是One Step。
先简要介绍一下One Step,毕竟本次的主题不是他。在Android中其实已经有了相关的介绍,不知道各位基友注意到没有。早在API11的时候官方推出一个新的API—Drag and Drop。官方链接。
无法科学上网的童鞋们只能通过下图(截取了整个界面)来看这个功能的实现。
图片下载,图片太大了
详情请看—链接大神的解析
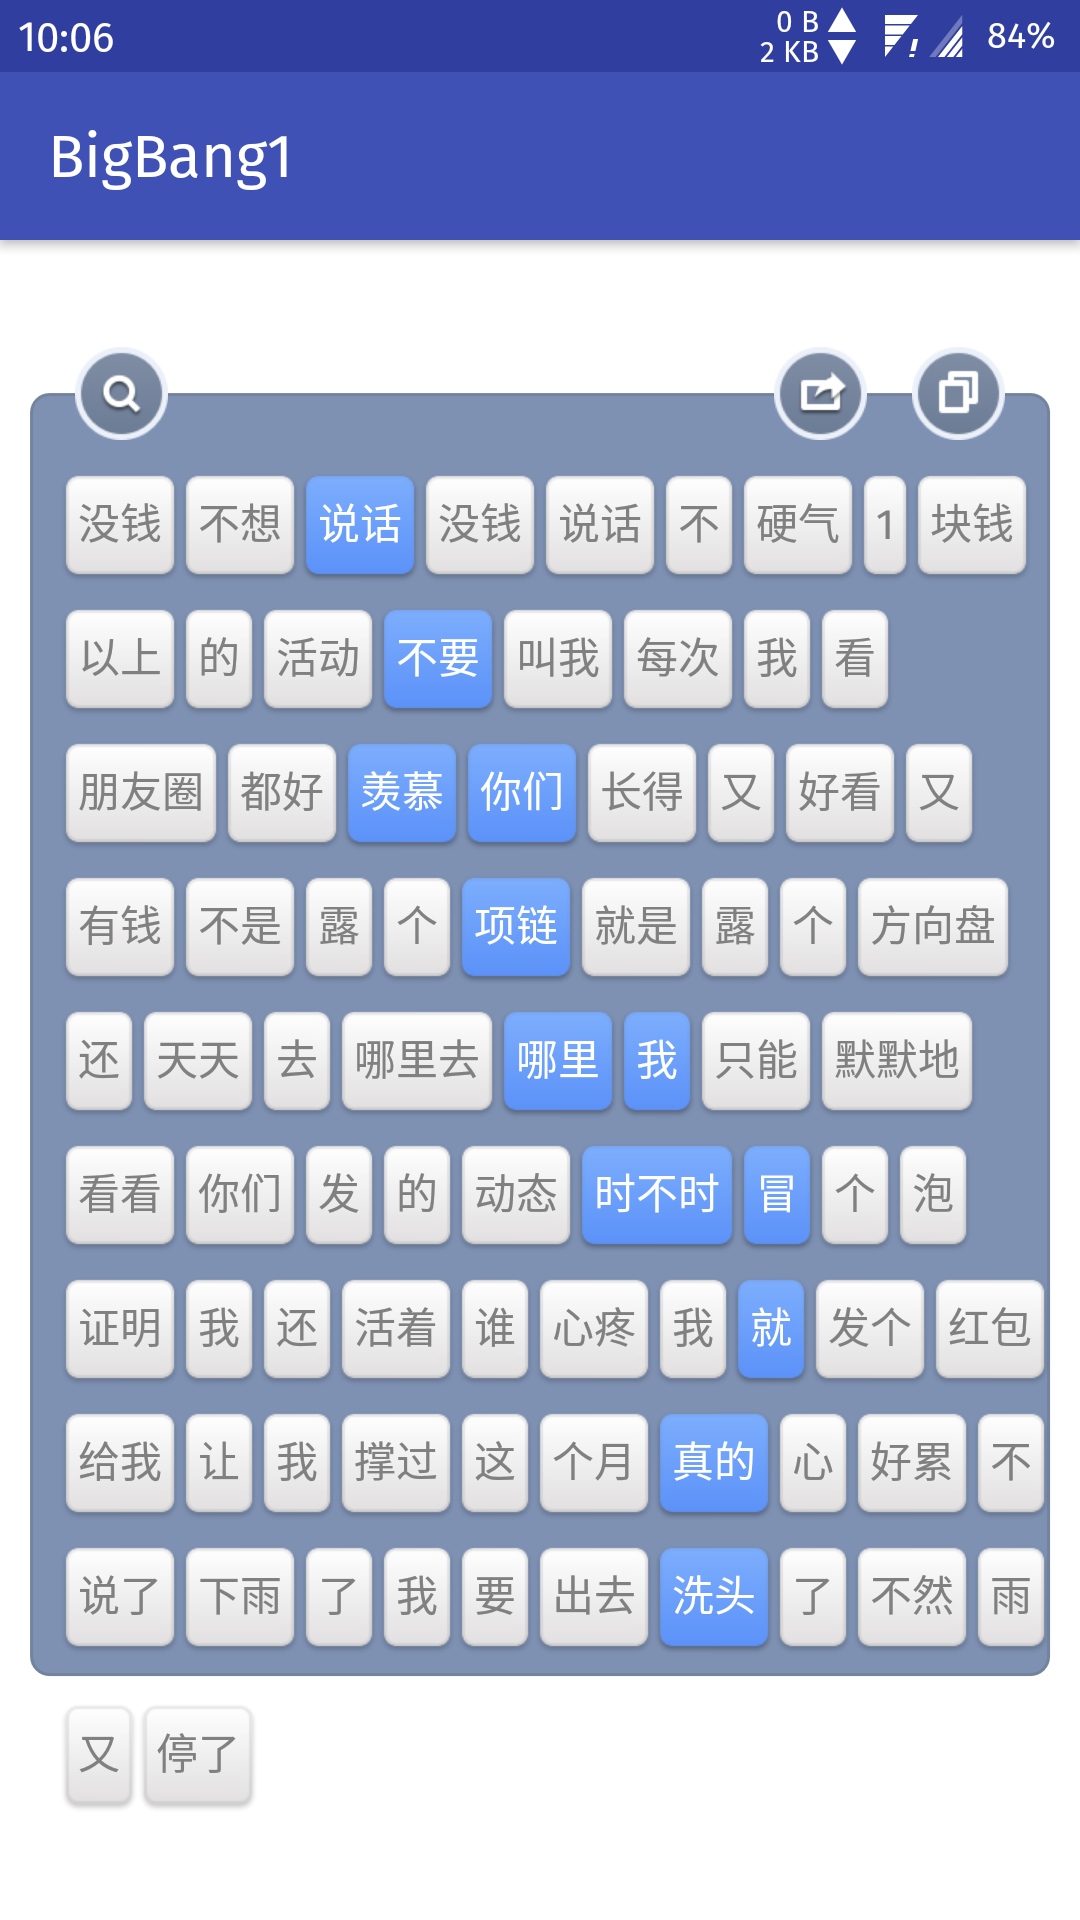
下面来进入BigBang的学习过程,通过发布会上简简单单的演示,我们可以看到一共有三步,系统级拦截长触摸事件+系统剪切板+分词技术。这三个技术现在都比较成熟,不要担心。如果想实现系统级的拦截可以使用Xposed技术,用来拦截,在这里不做赘述。
现在主要分为两部分讲实现BigBang技术的实现。
1. 实现基本功能
本部分主要介绍系统剪切板,中文/英文分词的实现和问题的解决
1,使用系统剪切板
首先启动一个服务,在其他软件上使用剪切板时可以监控通知软件有新的内容出现,并在通知栏上进行提示用户操作。
ClipServer.java(其他方法暂不赘述)
     @Override
    public int onStartCommand(Intent intent, int flags, int startId) {
        final ClipboardManager clipboardManager = (ClipboardManager) getSystemService
                (CLIPBOARD_SERVICE);
        clipboardManager.addPrimaryClipChangedListener(() -> {
            if (clipboardManager.hasPrimaryClip()) {
                if (clipboardManager.getPrimaryClipDescription().hasMimeType(
                        ClipDescription.MIMETYPE_TEXT_PLAIN)) {
                    ClipData primaryClip = clipboardManager.getPrimaryClip();
                    if (primaryClip != null) {
                        ClipData.Item item = primaryClip.getItemAt(0);
                        if (item != null && !TextUtils.isEmpty(item.getText().toString())) {
                            startNofi(item.getText().toString());
                        }
                    }
                }
            }
        });
        return super.onStartCommand(intent, flags, startId);
    }
     private void startNofi(String s) {
        manager = (NotificationManager) getSystemService(NOTIFICATION_SERVICE);
        Intent resultIntent = new Intent(this, ReceiverClip.class);
        resultIntent.setFlags(Intent.FLAG_ACTIVITY_SINGLE_TOP);
        resultIntent.putExtra(ReceiverClip.EXTRA_TEXT, s);
        PendingIntent pendingIntent = PendingIntent.getActivity(this, 0, resultIntent,
                PendingIntent.FLAG_UPDATE_CURRENT);
        Bitmap bitmap = BitmapFactory.decodeResource(getResources(), R.mipmap.ic_launcher);
        notifyBuilder = new NotificationCompat.Builder(this)
                .setLargeIcon(bitmap)
                .setSmallIcon(R.mipmap.ic_launcher)
                .setContentTitle(getResources().getText(R.string.nofi_tongzhi))
                .setContentText(getResources().getText(R.string.nofi_context))
                .setWhen(System.currentTimeMillis())
                .setTicker("Big bang")
                .setOngoing(true)
                .setAutoCancel(true)
                .setContentIntent(pendingIntent);
        manager.notify(121, notifyBuilder.build());
    }
在MainActivity上进行启动服务,在这里童鞋们可以添加一些(XX)的技术,尽量使这个服务线程保活。比如双进程守护(像NDK双进程守护),系统的辅助服务,相互唤醒(全家桶),悬浮窗1px等等(这样的技术在此不做描述,毕竟国内的环境,,,,)。
MainActivity.java

 private void initData() {
        Intent intent = new Intent(MainActivity.this, ClipServer.class);
        startService(intent);
    }
系统剪切板就是这点内容,下面是是分词技术。
2.中文/英文分词技术
通过百度/谷歌查询可知分词是比较成熟的,像Word分词器,IKAnalyzer分词器等等,使用Java实现的分词器(知名的)十多个。
在本文中主要使用的是IKAnalyzer+Lucene(本地)。做过功课的童鞋们大概也看出来分词器需要web端实现或添加大字典。本人猜测锤子的分词是在服务端实现的,毕竟本地实现分词不仅需要大字典还有运算时的高耗,在本地实现运算一段100字左右的段落,会占用大约2s-3s的时间(我的渣渣手机),同时还有IKAnalyzer.cfg.xml,ext_stopword.dic两个文件,作为字典,配置文件。
言归正传,我用的是IKAnalyzer-2012_u3(好像不更新了),和Lucene的三个包,lucene-analyzers-3.1.0.jar,lucene-core-3.6.0.jar,lucene-highlighter-3.6.0-sources.jar。在Maven仓库里面没有Lucene的三个包(有点老),大家在官网上下,或者在本文最后提供的地址中去爬。
使用jdk1.8的童鞋们在build.gradle中添加
 compileOptions {
        sourceCompatibility JavaVersion.VERSION_1_8
        targetCompatibility JavaVersion.VERSION_1_8
    }
在解析界面,使用代码:
String text = getIntent().getStringExtra(EXTRA_TEXT);
        if (!TextUtils.isEmpty(text)) {
            List<String> keywordList = new ArrayList<>();
            try {
                byte[] bt = text.getBytes();
                InputStream ip = new ByteArrayInputStream(bt);
                Reader read = new InputStreamReader(ip);
                IKSegmenter iks = new IKSegmenter(read, true);//true开启只能分词模式,如果不设置默认为false,也就是细粒度分割
                Lexeme t;
                while ((t = iks.next()) != null) {
                    keywordList.add(t.getLexemeText());
                    mLayout.addTextItem(t.getLexemeText());
                }
            } catch (IOException e) {
                e.printStackTrace();
            }
        }
就是这么短的代码量,是不是很惊喜,如此简单的实现。
好了,现在实现界面。
3,分词界面
主要就是一个流式布局,TouchEvent事件。在触摸一个词时加入StringBuilder中。下面放出一个大神写的仿锤子布局(本人实力不够,,,,)。
BigBangLayout.java
     @Override
    protected void onMeasure(int widthMeasureSpec, int heightMeasureSpec) {

        int widthSize = MeasureSpec.getSize(widthMeasureSpec) - getPaddingLeft() - getPaddingRight();
        int contentWidthSize = widthSize - mActionBar.getContentPadding();
        int heightSize = 0;

        int childCount = getChildCount();

        int measureSpec = MeasureSpec.makeMeasureSpec(0, MeasureSpec.UNSPECIFIED);

        mLines = new ArrayList<>();
        Line currentLine = null;
        int currentLineWidth = contentWidthSize;
        for (int i = 0; i < childCount; i++) {

            View child = getChildAt(i);

            if (mActionBar == child) {
                continue;
            }

            child.measure(measureSpec, measureSpec);

            if (currentLineWidth > 0) {
                currentLineWidth += mItemSpace;
            }
            currentLineWidth += child.getMeasuredWidth();
            if (mLines.size() == 0 || currentLineWidth > contentWidthSize) {
                heightSize += child.getMeasuredHeight();
                currentLineWidth = child.getMeasuredWidth();
                currentLine = new Line(mLines.size());
                mLines.add(currentLine);
            }
            Item item = new Item(currentLine);
            item.view = child;
            item.index = i;
            item.width = child.getMeasuredWidth();
            item.height = child.getMeasuredHeight();
            currentLine.addItem(item);
        }

        Line firstSelectedLine = findFirstSelectedLine();
        Line lastSelectedLine = findLastSelectedLine();
        if (firstSelectedLine != null && lastSelectedLine != null) {
            int selectedLineHeight = (lastSelectedLine.index - firstSelectedLine.index + 1) * (firstSelectedLine.getHeight() + mLineSpace);
            mActionBar.measure(MeasureSpec.makeMeasureSpec(widthSize, MeasureSpec.EXACTLY), MeasureSpec.makeMeasureSpec(selectedLineHeight, MeasureSpec.UNSPECIFIED));
        }

        int size = heightSize + getPaddingTop() + getPaddingBottom() + (mLines.size() - 1) * mLineSpace + mActionBarTopHeight + mActionBarBottomHeight;
        super.onMeasure(widthMeasureSpec, MeasureSpec.makeMeasureSpec(size, MeasureSpec.EXACTLY));
    }

    @Override
    protected void onLayout(boolean changed, int l, int t, int r, int b) {
        int top;
        int left;
        int offsetTop;

        Line lastSelectedLine = findLastSelectedLine();
        Line firstSelectedLine = findFirstSelectedLine();

        for (int i = 0; i < mLines.size(); i++) {
            Line line = mLines.get(i);
            List<Item> items = line.getItems();
            left = getPaddingLeft() + mActionBar.getContentPadding();

            if (firstSelectedLine != null && firstSelectedLine.index > line.index) {
                offsetTop = -mActionBarTopHeight;
            } else if (lastSelectedLine != null && lastSelectedLine.index < line.index) {
                offsetTop = mActionBarBottomHeight;
            } else {
                offsetTop = 0;
            }

            for (int j = 0; j < items.size(); j++) {
                Item item = items.get(j);
                top = getPaddingTop() + i * (item.height + mLineSpace) + offsetTop + mActionBarTopHeight;
                View child = item.view;
                int oldTop = child.getTop();
                child.layout(left, top, left + child.getMeasuredWidth(), top + child.getMeasuredHeight());
                if (oldTop != top) {
                    int translationY = oldTop - top;
                    child.setTranslationY(translationY);
                    child.animate().translationYBy(-translationY).setDuration(200).start();
                }
                left += child.getMeasuredWidth() + mItemSpace;
            }
        }

        if (firstSelectedLine != null && lastSelectedLine != null) {
            mActionBar.setVisibility(View.VISIBLE);
            mActionBar.setAlpha(1);
            int oldTop = mActionBar.getTop();
            int actionBarTop = firstSelectedLine.index * (firstSelectedLine.getHeight() + mLineSpace) + getPaddingTop();
            mActionBar.layout(getPaddingLeft(), actionBarTop, getPaddingLeft() + mActionBar.getMeasuredWidth(), actionBarTop + mActionBar.getMeasuredHeight());
            if (oldTop != actionBarTop) {
                int translationY = oldTop - actionBarTop;
                mActionBar.setTranslationY(translationY);
                mActionBar.animate().translationYBy(-translationY).setDuration(200).start();
            }
        } else {
            if (mActionBar.getVisibility() == View.VISIBLE){
                mActionBar.animate().alpha(0).setDuration(200).setListener(mActionBarAnimationListener).start();
            }
        }
    }
还有上面的几个按钮在BigBangActionBar.java
 private void initSubViews() {
        Context context = getContext();

        mBorder = ContextCompat.getDrawable(context, R.drawable.bigbang_action_bar_bg);
        mBorder.setCallback(this);

        mSearch = new ImageView(context);
        mSearch.setImageResource(R.mipmap.bigbang_action_search);
        mSearch.setOnClickListener(this);
        mShare = new ImageView(context);
        mShare.setImageResource(R.mipmap.bigbang_action_share);
        mShare.setOnClickListener(this);
        mCopy = new ImageView(context);
        mCopy.setImageResource(R.mipmap.bigbang_action_copy);
        mCopy.setOnClickListener(this);

        addView(mSearch, createLayoutParams());
        addView(mShare, createLayoutParams());
        addView(mCopy, createLayoutParams());

        setWillNotDraw(false);

        mActionGap = (int) TypedValue.applyDimension(TypedValue.COMPLEX_UNIT_DIP, 15, getResources().getDisplayMetrics());
        mContentPadding = (int) TypedValue.applyDimension(TypedValue.COMPLEX_UNIT_DIP, 10, getResources().getDisplayMetrics());
    }
 @Override
    protected void onMeasure(int widthMeasureSpec, int heightMeasureSpec) {
        int childCount = getChildCount();
        int measureSpec = MeasureSpec.makeMeasureSpec(0, MeasureSpec.UNSPECIFIED);
        for (int i = 0; i < childCount; i++) {
            View child = getChildAt(i);
            child.measure(measureSpec, measureSpec);
        }

        int width = MeasureSpec.getSize(widthMeasureSpec);
        int height = MeasureSpec.getSize(heightMeasureSpec);

        setMeasuredDimension(width, height + mContentPadding + mSearch.getMeasuredHeight());
    }

    @Override
    protected void onLayout(boolean changed, int l, int t, int r, int b) {
        int width = getMeasuredWidth();
        int height = getMeasuredHeight();

        layoutSubView(mSearch, mActionGap, 0);
        layoutSubView(mShare, width - mActionGap * 2 - mShare.getMeasuredWidth() - mCopy.getMeasuredWidth(), 0);
        layoutSubView(mCopy, width - mActionGap - mCopy.getMeasuredWidth(), 0);

        Rect oldBounds = mBorder.getBounds();
        Rect newBounds = new Rect(0, mSearch.getMeasuredHeight() / 2, width, height);

        if (!oldBounds.equals(newBounds)) {
            ObjectAnimator.ofObject(mBorder, "bounds", new RectEvaluator(), oldBounds, newBounds).setDuration(200).start();
        }
    }
至此大家可以看看实现。一般来说剪切板需要保存历史记录,下面开始实现数据库。喜欢使用原生数据库的实现,下节可以不用看了,在本文中数据库使用GreenDao实现数据库操作。
相信大家肯定接触过,下面只是简单的介绍一下。
3. 添加数据库等使用技术
在main下面建立java-gen(大家都这样写,其实无所谓),在build.gradle中设置
 sourceSets{
        main{
            java.srcDirs=['src/main/java','src/main/java-gen']
        }
    }
还有一个 compile ‘de.greenrobot:greendao:1.3.7’,将greendao的包导进去。
接下来开始建立依赖库,在依赖库的build.gradle写:
apply plugin: 'java'

dependencies {
    compile fileTree(dir: 'libs', include: ['*.jar'])
    compile 'de.greenrobot:greendao-generator:1.3.1'
}

sourceCompatibility = "1.8"
targetCompatibility = "1.8"
在java文件中写
 public static void main(String[] args) throws Exception {
        // 正如你所见的,你创建了一个用于添加实体(Entity)的模式(Schema)对象。
        // 两个参数分别代表:数据库版本号与自动生成代码的包路径。
        Schema schema = new Schema(1, "com.longshihan.sqlite");
        //      当然,如果你愿意,你也可以分别指定生成的 Bean 与 DAO 类所在的目录,只要如下所示:
        //      Schema schema = new Schema(1, "me.itangqi.bean");
        //      schema.setDefaultJavaPackageDao("me.itangqi.dao");

        // 模式(Schema)同时也拥有两个默认的 flags,分别用来标示 entity 是否是 activie 以及是否使用 keep sections。
        // schema2.enableActiveEntitiesByDefault();
        // schema2.enableKeepSectionsByDefault();

        // 一旦你拥有了一个 Schema 对象后,你便可以使用它添加实体(Entities)了。
        addNote(schema);

        // 最后我们将使用 DAOGenerator 类的 generateAll() 方法自动生成代码,此处你需要根据自己的情况更改输出目录(既之前创建的 java-gen)。
        // 其实,输出目录的路径可以在 build.gradle 中设置,有兴趣的朋友可以自行搜索,这里就不再详解。
        new DaoGenerator().generateAll(schema, "D:\\1\\BigBang1\\app\\src\\main\\java-gen");
    }

    /**
     * @param schema
     */
    private static void addNote(Schema schema) {
        // 一个实体(类)就关联到数据库中的一张表,此处表名为「Note」(既类名)
        Entity note = schema.addEntity("Clip");
        // 你也可以重新给表命名
        // note.setTableName("NODE");

        // greenDAO 会自动根据实体类的属性值来创建表字段,并赋予默认值
        // 接下来你便可以设置表中的字段:
        note.addIdProperty();
        note.addStringProperty("text").notNull();
        // 与在 Java 中使用驼峰命名法不同,默认数据库中的命名是使用大写和下划线来分割单词的。
        // For example, a property called “creationDate” will become a database column “CREATION_DATE”.
        note.addStringProperty("comment");
        note.addDateProperty("date");
    }
这个全凭自己的需求。建立表等,这种方法比较简单,但适合扩展,或者使用注解的方式生成。
运行或在java-gen中生成表名的类Clip,ClipDao,DaoMaster和DaoSession这三个。
新建一个DaoManager,来管理ClipDao。或者在Application 中实现也可。
所以在服务中就可以添加信息。
 String comment = primaryClip.getDescription().toString();
                            Clip note = new Clip(null, item.getText().toString(), comment, new Date());
                            App.getInstance().App_session().getClipDao().insert(note);
在MainActivity 可以使用RecyclerView 列表。将数据库中所有数据取出,显示在界面中。
效果图:
以上这些就是全部内容,附上我的github地址:链接


 167
167

 被折叠的 条评论
为什么被折叠?
被折叠的 条评论
为什么被折叠?
 到【灌水乐园】发言


