


高效显示Bitmap(一) 高效加载大图
问题的出现
- 为何需要高效显示Bitmap,或者说为何显示Bitmap容易导致OOM异常
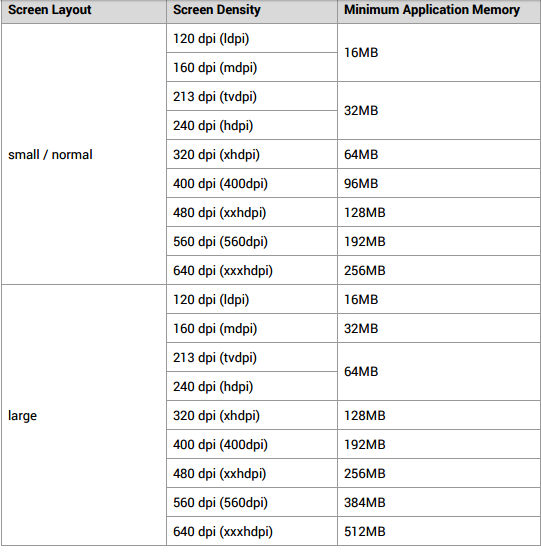
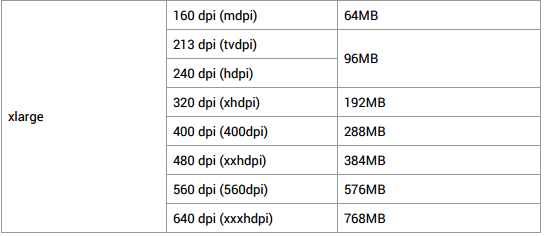
- 移动设备的内存资源有限,android设备对单个程序至少要求16MB的内存空间, Android Compatibility Definition Document(ACDD)对不同屏幕分辨率和屏幕密度的设备所需要的最小内存作出了阐述,请看下图,应该在这个最低内存限制内优化程序
2. 加载Bitmap是非常占用内存的一件事,例如,Galaxy Nexus的照相机能够拍摄2592x1936 pixels (5 MB)的图片。 如果bitmap的图像配置是使用ARGB_8888 (从Android 2.3开始的默认配置,从00000000到FFFFFFFF) ,那么加载这张照片到内存大约需要19MB(2592*1936*4 bytes) 的空间,从而迅速消耗掉该应用的剩余内存空间。
3. ListView GridView和ViewPager等组件会加载大量Bitmap,需要提前加载一些屏幕上还未显示的图片
解决方案
从Bitmap的分辨率着手
实际上我们没有必要一张分辨率完全不变的Bitmap到设备上,很多情况下,尤其是通过手机拍摄的图片分辨率更是吓人(我的华为P7手机分辨为720*1080,而我随便用手机拍摄一张照片的分辨率为2336*4160),所以当屏幕分辨率远远小于图片分辨率时,我们应该加载一个低分辨率的图片到手机上,这样,不尽减少了系统资源的占用,又增加了屏幕滑动的流畅,并且没有减少用户的体验,那么如何判断是否需要降低分辨率,以及如何降低分辨率呢,请往下看:
读取位图的尺寸与类型
判断是否需要降低分辨率,首先我们要检测 Bitmap 的尺寸和类型,这时候我们就需要用到 BitmapFactory.Opitions 这个内部类了,我们常用 的域有:
public Bitmap inBitmap //此Bitmap的内存空间可被复用
//该值为true时,BitmapFactory的decode方法将返回一个值为null,但有
//宽高的Bitmap
public boolean inJustDecodeBounds
//该值代表对Bitmap的缩放比例,1代表不缩放,2代表缩放为原来的1/2
//如720*1280的图片,inSampleSize=2,缩放后为360*640
public int inSampleSize
public int outHeight //bitmap的高度
public String outMimeType //bitmap的MIME类型
public int outWidth //bitmap的宽度
inJustDecodeBounds的使用可以在为Bitmap分配内存前,获取宽高
加载一个按比例缩减的Bitmap到内存中
这一节我们需要用到 inSampleSize ,先看看官方文档的描述:
If set to a value > 1, requests the decoder to subsample the original image, returning a smaller image to save memory. The sample size is the number of pixels in either dimension that correspond to a single pixel in the decoded bitmap. For example, inSampleSize == 4 returns an image that is 1/4 the width/height of the original, and 1/16 the number of pixels. Any value <= 1 is treated the same as 1. Note: the decoder uses a final value based on powers of 2, any other value will be rounded down to the nearest power of 2.
大意就是,当inSampleSize=4时,返回一个宽和高为原来的1/4,像素个数为原来1/16的Bitmap,需要谨记的是解析器最终使用的是一个基于2的幂的值,任何其他值都会被向下处理至接近2的幂
那么新问题又来了,如何确定inSampleSize的值呢
public static int calculateInSampleSize(
BitmapFactory.Options options, int reqWidth, int reqHeight) {
//原始的Bitmap的宽和高
final int height = options.outHeight;
final int width = options.outWidth;
int inSampleSize = 1;
if (height > reqHeight || width > reqWidth) {
final int halfHeight = height / 2;
final int halfWidth = width / 2;
//计算inSampleSize并且保持宽和高大于所要求的宽和高
while ((halfHeight / inSampleSize) > reqHeight
&& (halfWidth / inSampleSize) > reqWidth){ inSampleSize *= 2;
}
}
return inSampleSize;`
然后我们就可以调用该方法来解码bitmap了
public static Bitmap decodeSampledBitmapFromResource(Resources res, int resId,
int reqWidth, int reqHeight) {
//令inJustDecodeBounds=true 来获取宽高
final BitmapFactory.Options options = new BitmapFactory.Options();
options.inJustDecodeBounds = true;
BitmapFactory.decodeResource(res, resId, options);
// 计算inSampleSize
options.inSampleSize = calculateInSampleSize(options,reqWidth, reqHeight);
//解码Bitmap
options.inJustDecodeBounds = false;
return BitmapFactory.decodeResource(res, resId, options);
}
总结
本节课我们主要掌握如何在不加载bitmap的情况下,提前获取bitmap宽高,以及如何缩减一个分辨率过大的bitmap,重点是inSampleSize和inJustDecodeBounds的使用


 154
154


 被折叠的 条评论
为什么被折叠?
被折叠的 条评论
为什么被折叠?
 到【灌水乐园】发言


