


麒麟V10安装MySQL
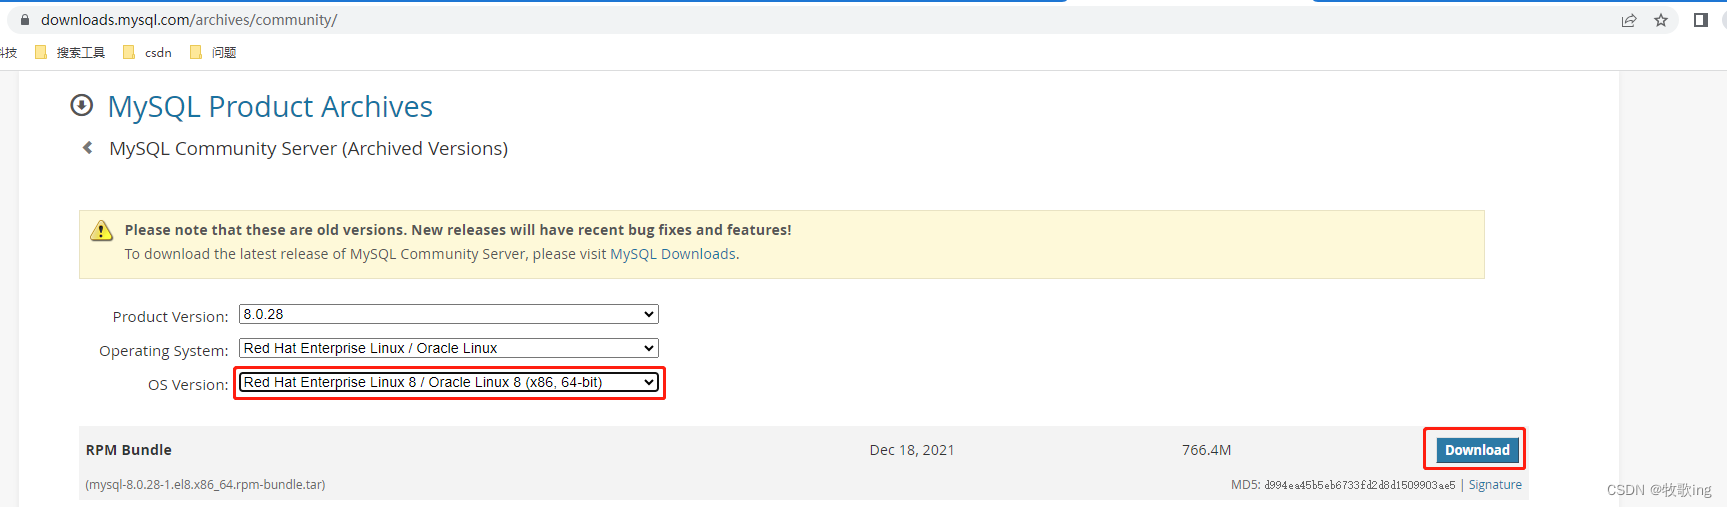
1、下载MySQL并上传到服务器上
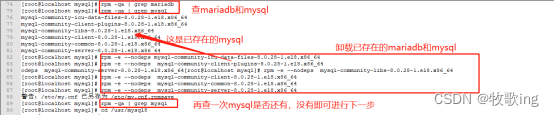
2、查看系统是否已安装Mariadb和MySQL,如果已存在那就卸载
# 查系统是否已经安装mariadb和mysql
[root@localhost mysql]# rpm -qa | grep mariadb
[root@localhost mysql]# rpm -qa | grep mysql
mysql-community-icu-data-files-8.0.28-1.el8.x86_64
mysql-community-client-plugins-8.0.28-1.el8.x86_64
mysql-community-libs-8.0.28-1.el8.x86_64
mysql-community-client-8.0.28-1.el8.x86_64
mysql-community-common-8.0.28-1.el8.x86_64
mysql-community-server-8.0.28-1.el8.x86_64
# 如果安装了就执行卸载操作
[root@localhost mysql]# rpm -e --nodeps mysql-community-icu-data-files-8.0.28-1.el8.x86_64
[root@localhost mysql]# rpm -e --nodeps  mysql-community-client-plugins-8.0.28-1.el8.x86_64
odeps  mysql-community-server-8.0.28-1.el8.x86_64[root@localhost mysql]# rpm -e --nodeps  mysql-community-libs-8.0.28-1.el8.x86_64
[root@localhost mysql]# rpm -e --nodeps  mysql-community-client-8.0.28-1.el8.x86_64
[root@localhost mysql]# rpm -e --nodeps  mysql-community-common-8.0.28-1.el8.x86_64
[root@localhost mysql]# rpm -e --nodeps  mysql-community-server-8.0.28-1.el8.x86_64
警告:/etc/my.cnf 已另存为 /etc/my.cnf.rpmsave
[root@localhost mysql]# rpm -qa | grep mysql
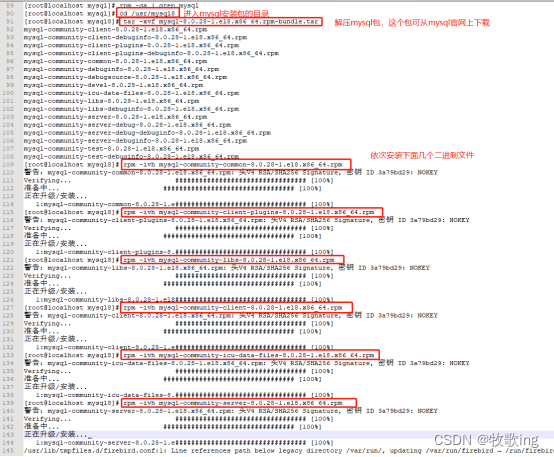
3、解压MySQL安装包并安装MySQL
# 进入存放mysql安装包的目录
[root@localhost mysql]# cd /usr/mysql8
# 解压MySQL压缩包
[root@localhost mysql8]# tar -xvf mysql-8.0.28-1.el8.x86_64.rpm-bundle.tar
mysql-community-client-8.0.28-1.el8.x86_64.rpm
mysql-community-client-debuginfo-8.0.28-1.el8.x86_64.rpm
mysql-community-client-plugins-8.0.28-1.el8.x86_64.rpm
mysql-community-client-plugins-debuginfo-8.0.28-1.el8.x86_64.rpm
mysql-community-common-8.0.28-1.el8.x86_64.rpm
mysql-community-debuginfo-8.0.28-1.el8.x86_64.rpm
mysql-community-debugsource-8.0.28-1.el8.x86_64.rpm
mysql-community-devel-8.0.28-1.el8.x86_64.rpm
mysql-community-icu-data-files-8.0.28-1.el8.x86_64.rpm
mysql-community-libs-8.0.28-1.el8.x86_64.rpm
mysql-community-libs-debuginfo-8.0.28-1.el8.x86_64.rpm
mysql-community-server-8.0.28-1.el8.x86_64.rpm
mysql-community-server-debug-8.0.28-1.el8.x86_64.rpm
mysql-community-server-debug-debuginfo-8.0.28-1.el8.x86_64.rpm
mysql-community-server-debuginfo-8.0.28-1.el8.x86_64.rpm
mysql-community-test-8.0.28-1.el8.x86_64.rpm
mysql-community-test-debuginfo-8.0.28-1.el8.x86_64.rpm
# 安装mysql
[root@localhost mysql8]# rpm -ivh mysql-community-common-8.0.28-1.el8.x86_64.rpm
警告:mysql-community-common-8.0.28-1.el8.x86_64.rpm: 头V4 RSA/SHA256 Signature, 密钥 ID 3a79bd29: NOKEY
Verifying...                          ################################# [100%]
准备中...                          ################################# [100%]
正在升级/安装...
   1:mysql-community-common-8.0.28-1.e################################# [100%]
[root@localhost mysql8]# rpm -ivh mysql-community-client-plugins-8.0.28-1.el8.x86_64.rpm
警告:mysql-community-client-plugins-8.0.28-1.el8.x86_64.rpm: 头V4 RSA/SHA256 Signature, 密钥 ID 3a79bd29: NOKEY
Verifying...                          ################################# [100%]
准备中...                          ################################# [100%]
正在升级/安装...
   1:mysql-community-client-plugins-8.################################# [100%]
[root@localhost mysql8]# rpm -ivh mysql-community-libs-8.0.28-1.el8.x86_64.rpm
警告:mysql-community-libs-8.0.28-1.el8.x86_64.rpm: 头V4 RSA/SHA256 Signature, 密钥 ID 3a79bd29: NOKEY
Verifying...                          ################################# [100%]
准备中...                          ################################# [100%]
正在升级/安装...
   1:mysql-community-libs-8.0.28-1.el8################################# [100%]
[root@localhost mysql8]# rpm -ivh mysql-community-client-8.0.28-1.el8.x86_64.rpm
警告:mysql-community-client-8.0.28-1.el8.x86_64.rpm: 头V4 RSA/SHA256 Signature, 密钥 ID 3a79bd29: NOKEY
Verifying...                          ################################# [100%]
准备中...                          ################################# [100%]
正在升级/安装...
   1:mysql-community-client-8.0.28-1.e################################# [100%]
[root@localhost mysql8]# rpm -ivh mysql-community-icu-data-files-8.0.28-1.el8.x86_64.rpm
警告:mysql-community-icu-data-files-8.0.28-1.el8.x86_64.rpm: 头V4 RSA/SHA256 Signature, 密钥 ID 3a79bd29: NOKEY
Verifying...                          ################################# [100%]
准备中...                          ################################# [100%]
正在升级/安装...
   1:mysql-community-icu-data-files-8.################################# [100%]
[root@localhost mysql8]# rpm -ivh mysql-community-server-8.0.28-1.el8.x86_64.rpm
警告:mysql-community-server-8.0.28-1.el8.x86_64.rpm: 头V4 RSA/SHA256 Signature, 密钥 ID 3a79bd29: NOKEY
Verifying...                          ################################# [100%]
准备中...                          ################################# [100%]
正在升级/安装...
   1:mysql-community-server-8.0.28-1.e################################# [100%]
/usr/lib/tmpfiles.d/firebird.conf:1: Line references path below legacy directory /var/run/, updating /var/run/firebird → /run/firebird; please update the tmpfiles.d/ drop-in file accordingly.
/usr/lib/tmpfiles.d/net-snmp.conf:1: Line references path below legacy directory /var/run/, updating /var/run/net-snmp → /run/net-snmp; please update the tmpfiles.d/ drop-in file accordingly.
/usr/lib/tmpfiles.d/slapd.conf:2: Line references path below legacy directory /var/run/, updating /var/run/openldap → /run/openldap; please update the tmpfiles.d/ drop-in file accordingly.
fchmod() of /run/wine failed: Read-only file system
4、编辑MySQL配置文件
在配置文件中加上lower_case_table_names=1,这句的意义是不让MySQL区分大小写
[root@localhost etc]# vi /etc/my.cnf

# For advice on how to change settings please see
# http://dev.mysql.com/doc/refman/8.0/en/server-configuration-defaults.html

[mysqld]
#
# Remove leading # and set to the amount of RAM for the most important data
# cache in MySQL. Start at 70% of total RAM for dedicated server, else 10%.
# innodb_buffer_pool_size = 128M
#
# Remove the leading "# " to disable binary logging
# Binary logging captures changes between backups and is enabled by
# default. It's default setting is log_bin=binlog
# disable_log_bin
#
# Remove leading # to set options mainly useful for reporting servers.
# The server defaults are faster for transactions and fast SELECTs.
# Adjust sizes as needed, experiment to find the optimal values.
# join_buffer_size = 128M
# sort_buffer_size = 2M
# read_rnd_buffer_size = 2M
#
# Remove leading # to revert to previous value for default_authentication_plugin,
# this will increase compatibility with older clients. For background, see:
# https://dev.mysql.com/doc/refman/8.0/en/server-system-variables.html#sysvar_default_authentication_plugin
# default-authentication-plugin=mysql_native_password

datadir=/var/lib/mysql
socket=/var/lib/mysql/mysql.sock

log-error=/var/log/mysqld.log
pid-file=/var/run/mysqld/mysqld.pid
lower_case_table_names=1
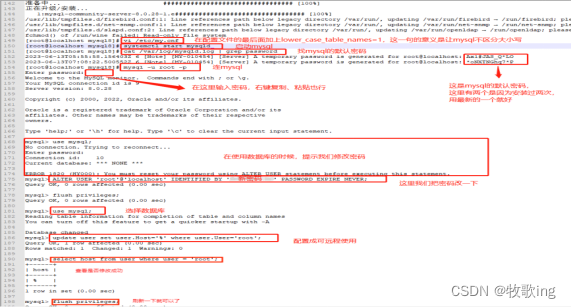
5、启动MySQL服务
首先启动MySQL服务,然后修改MySQL的密码,并配置MySQL可远程访问
[root@localhost mysql8]# systemctl start mysqld
[root@localhost mysql8]# cat /var/log/mysqld.log | grep password
2023-06-13T05:55:58.156403Z 6 [Note] [MY-010454] [Server] A temporary password is generated for root@localhost: Ax1#JAS_Q*LO
2023-06-13T07:08:22.500552Z 6 [Note] [MY-010454] [Server] A temporary password is generated for root@localhost: *oNXTNGhq7*P
[root@localhost mysql8]# mysql -u root -p
Enter password:
Welcome to the MySQL monitor.  Commands end with ; or \g.
Your MySQL connection id is 9
Server version: 8.0.28

Copyright (c) 2000, 2022, Oracle and/or its affiliates.

Oracle is a registered trademark of Oracle Corporation and/or its
affiliates. Other names may be trademarks of their respective
owners.

Type 'help;' or '\h' for help. Type '\c' to clear the current input statement.

mysql> use mysql;
No connection. Trying to reconnect...
Enter password:
Connection id:    10
Current database: *** NONE ***

ERROR 1820 (HY000): You must reset your password using ALTER USER statement before executing this statement.
mysql> ALTER USER 'root'@'localhost' IDENTIFIED BY '新密码' PASSWORD EXPIRE NEVER;
Query OK, 0 rows affected (0.00 sec)

mysql> flush privileges;
Query OK, 0 rows affected (0.00 sec)

mysql> use mysql;
Reading table information for completion of table and column names
You can turn off this feature to get a quicker startup with -A

Database changed
mysql> update user set user.Host='%' where user.User='root';
Query OK, 1 row affected (0.00 sec)
Rows matched: 1  Changed: 1  Warnings: 0

mysql> select host from user where user = 'root';
+------+
| host |
+------+
| %    |
+------+
1 row in set (0.00 sec)

mysql> flush privileges;
Query OK, 0 rows affected (0.00 sec)

mysql>


 1万+
1万+


 被折叠的 条评论
为什么被折叠?
被折叠的 条评论
为什么被折叠?
 到【灌水乐园】发言


