在上一篇博客中,对CAS进行了整体的介绍,我们知道,CAS可分为Server和Client。本篇博客开始介绍对CAS
Sever进行的一些自定义配置。
【版本说明】:CAS Server 4.0
【下载地址】:https://github.com/apereo/cas/releases/tag/v4.0.0
【构建方法】:
1. 将下载好的cas-server-4.0.0-release.zip解压
2. 将cas-server-4.0.0\modules\cas-server-webapp-4.0.0.war放到tomcat的webapps目录下
3. 将默认的cas-server-webapp-4.0.0.war重命名为cas.war
4. CAS默认认证方式使用的是HTTPS协议,这里修改成HTTP方式。开启的话会经常提示证书过期、需要客户确
认等。
5. 取消HTTPS协议
webapps\cas\WEB-INF\spring-configuration\warnCookieGenerator.xml ,找到如下配置
	<bean id="warnCookieGenerator" class="org.jasig.cas.web.support.CookieRetrievingCookieGenerator"
        p:cookieSecure="true"
        p:cookieMaxAge="-1"
        p:cookieName="CASPRIVACY"
        p:cookiePath="/cas"/>
	修改  p:cookieSecure="true" 为 p:cookieSecure="false"
webapps\cas\WEB-INF\spring-configuration\ticketGrantingTicketCookieGenerator.xml ,找到如下配置
	<bean id="ticketGrantingTicketCookieGenerator" class="org.jasig.cas.web.support.CookieRetrievingCookieGenerator"
	        p:cookieSecure="true"
	        p:cookieMaxAge="-1"
	        p:cookieName="CASTGC"
	        p:cookiePath="/cas"/>

	修改  p:cookieSecure="true" 为 p:cookieSecure="false"
webapps\cas\WEB-INF\deployerConfigContext.xml 文件 ,找到如下配置:
	<bean id="proxyAuthenticationHandler"
	class="org.jasig.cas.authentication.handler.support.HttpBasedServiceCredentialsAuthenticationHandler"
	          p:httpClient-ref="httpClient"/>

	增加p:requireSecure="false"即HTTPS为不采用。
	修改后为:

	  <bean id="proxyAuthenticationHandler"
	class="org.jasig.cas.authentication.handler.support.HttpBasedServiceCredentialsAuthenticationHandler"
	          p:httpClient-ref="httpClient" p:requireSecure="false"/>
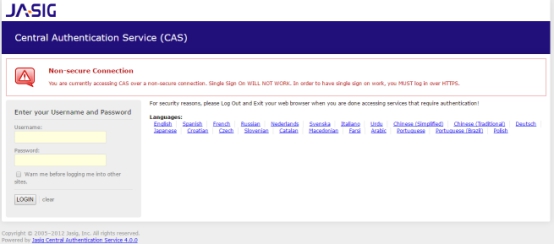
6. 启动tomcat,访问http://localhost:8080/cas,则可以看到登录界面,4.0 之后默认配置是在 deployer
ConfigContext.xml 配置文件中,可以看到用户名密码为casuser/Mellon
【配置方法】:
1. 修改deployerConfigContext.xml文件:
<?xml version="1.0" encoding="UTF-8"?>
<beans xmlns="http://www.springframework.org/schema/beans"
       xmlns:xsi="http://www.w3.org/2001/XMLSchema-instance"
       xmlns:p="http://www.springframework.org/schema/p"
       xmlns:c="http://www.springframework.org/schema/c"
       xmlns:tx="http://www.springframework.org/schema/tx"
       xmlns:util="http://www.springframework.org/schema/util"
       xmlns:sec="http://www.springframework.org/schema/security"
       xsi:schemaLocation="http://www.springframework.org/schema/beans http://www.springframework.org/schema/beans/spring-beans-3.2.xsd
       http://www.springframework.org/schema/tx http://www.springframework.org/schema/tx/spring-tx-3.2.xsd
       http://www.springframework.org/schema/security http://www.springframework.org/schema/security/spring-security-3.2.xsd
       http://www.springframework.org/schema/util http://www.springframework.org/schema/util/spring-util.xsd">

    <bean id="authenticationManager" class="org.jasig.cas.authentication.PolicyBasedAuthenticationManager">
        <constructor-arg>
            <map>
                <entry key-ref="proxyAuthenticationHandler" value-ref="proxyPrincipalResolver" />
                <!-- <entry key-ref="primaryAuthenticationHandler" value-ref="primaryPrincipalResolver" /> -->
		<entry key-ref="dbAuthHandler" value-ref="primaryPrincipalResolver"/>
            </map>
        </constructor-arg>

        <property name="authenticationPolicy">
            <bean class="org.jasig.cas.authentication.AnyAuthenticationPolicy" />
        </property>
    </bean>

       <bean id="proxyAuthenticationHandler"
          class="org.jasig.cas.authentication.handler.support.HttpBasedServiceCredentialsAuthenticationHandler"
          p:httpClient-ref="httpClient" p:requireSecure="false" />

  <!—将默认的用户名和密码注释-->
    <!-- <bean id="primaryAuthenticationHandler"
          class="org.jasig.cas.authentication.AcceptUsersAuthenticationHandler">
        <property name="users">
            <map>
                <entry key="casuser" value="Mellon"/>
            </map>
        </property>
    </bean> -->

	<!-- 配置数据源-->
    <bean id="dataSource"
      class="com.mchange.v2.c3p0.ComboPooledDataSource"
     p:driverClass="com.mysql.jdbc.Driver"
     p:jdbcUrl="jdbc:mysql://localhost:3306/itoo_cloudroot?useUnicode=true&characterEncoding=UTF-8&zeroDateTimeBehavior=convertToNull"
      p:user="root"
      p:password="rootitoo"
      />

    <!-- 密码加密方式-->
    <bean id="passwordEncoder"
      class="org.jasig.cas.authentication.handler.DefaultPasswordEncoder"
      c:encodingAlgorithm="MD5"
      p:characterEncoding="UTF-8" />
      <!--查询匹配的字段-->
      <bean id="dbAuthHandler"
      class="org.jasig.cas.adaptors.jdbc.QueryDatabaseAuthenticationHandler"
      p:dataSource-ref="dataSource"
      p:sql="select password from ta_allusers where userCode=? and isDelete=0 "
	  p:passwordEncoder-ref="passwordEncoder" />
      <!-- 使用密码加密 -->

    <!-- Required for proxy ticket mechanism -->
    <bean id="proxyPrincipalResolver"
          class="org.jasig.cas.authentication.principal.BasicPrincipalResolver" />

    <!--
       | Resolves a principal from a credential using an attribute repository that is configured to resolve
       | against a deployer-specific store (e.g. LDAP).
       -->
    <bean id="primaryPrincipalResolver"
          class="org.jasig.cas.authentication.principal.PersonDirectoryPrincipalResolver" >
        <property name="attributeRepository" ref="attributeRepository" />
    </bean>

    <!--
    Bean that defines the attributes that a service may return.  This example uses the Stub/Mock version.  A real implementation
    may go against a database or LDAP server.  The id should remain "attributeRepository" though.
    +-->
    <!-- <bean id="attributeRepository" class="org.jasig.services.persondir.support.StubPersonAttributeDao"
            p:backingMap-ref="attrRepoBackingMap" />

    <util:map id="attrRepoBackingMap">
        <entry key="uid" value="uid" />
        <entry key="eduPersonAffiliation" value="eduPersonAffiliation" />
        <entry key="groupMembership" value="groupMembership" />
    </util:map> -->

	<bean id="attributeRepository" class="org.jasig.services.persondir.support.jdbc.SingleRowJdbcPersonAttributeDao">
	 <!--  <property name="contextSource" ref="contextSource" />
	  <property name="baseDN" value="ou=people,o=company,c=fr" />
	  <property name="requireAllQueryAttributes" value="true" /> -->
	  <constructor-arg index="0" ref="dataSource"/>
	  <constructor-arg index="1" value="select r.databaseName FROM itoo_cloudroot.ta_allusers a INNER JOIN itoo_cloudroot.ta_registuser r ON a.regist
UserId=r.id where a.isDelete = 0 and {0} "/>
<!--
Attribute mapping between principal (key) and LDAP (value) names
used to perform the LDAP search. By default, multiple search criteria
are ANDed together. Set the queryType property to change to OR.
-->
<property name="queryAttributeMapping">
<map>
<entry key="username" value="a.userCode" />
</map>
</property>
<property name="resultAttributeMapping">
<map>
<!-- Mapping beetween LDAP entry attributes (key) and Principal's (value) -->
<entry value="databaseName" key="databaseName" />
</map>
</property>
</bean>
<!--
Sample, in-memory data store for the ServiceRegistry. A real implementation
would probably want to replace this with the JPA-backed ServiceRegistry DAO
The name of this bean should remain "serviceRegistryDao".
+-->
<bean id="serviceRegistryDao" class="org.jasig.cas.services.InMemoryServiceRegistryDaoImpl"
p:registeredServices-ref="registeredServicesList" />
<util:list id="registeredServicesList">
<bean class="org.jasig.cas.services.RegexRegisteredService"
p:id="0" p:name="HTTP and IMAP" p:description="Allows HTTP(S) and IMAP(S) protocols"
p:serviceId="^(https?|imaps?)://.*" p:evaluationOrder="10000001" />
<!--
Use the following definition instead of the above to further restrict access
to services within your domain (including sub domains).
Note that example.com must be replaced with the domain you wish to permit.
This example also demonstrates the configuration of an attribute filter
that only allows for attributes whose length is 3.
-->
<!--
<bean class="org.jasig.cas.services.RegexRegisteredService">
<property name="id" value="1" />
<property name="name" value="HTTP and IMAP on example.com" />
<property name="description" value="Allows HTTP(S) and IMAP(S) protocols on example.com" />
<property name="serviceId" value="^(https?|imaps?)://([A-Za-z0-9_-]+\.)*example\.com/.*" />
<property name="evaluationOrder" value="0" />
<property name="attributeFilter">
<bean class="org.jasig.cas.services.support.RegisteredServiceRegexAttributeFilter" c:regex="^\w{3}$" />
</property>
</bean>
-->
</util:list>
<bean id="auditTrailManager" class="com.github.inspektr.audit.support.Slf4jLoggingAuditTrailManager" />
<bean id="healthCheckMonitor" class="org.jasig.cas.monitor.HealthCheckMonitor" p:monitors-ref="monitorsList" />
<util:list id="monitorsList">
<bean class="org.jasig.cas.monitor.MemoryMonitor" p:freeMemoryWarnThreshold="10" />
<!--
NOTE
The following ticket registries support SessionMonitor:
* DefaultTicketRegistry
* JpaTicketRegistry
Remove this monitor if you use an unsupported registry.
-->
<bean class="org.jasig.cas.monitor.SessionMonitor"
p:ticketRegistry-ref="ticketRegistry"
p:serviceTicketCountWarnThreshold="5000"
p:sessionCountWarnThreshold="100000" />
</util:list>
</beans> 2. 将几个需要的jar包放入到cas的lib目录下:
• c3p0-0.9.5.1.jar
• cas-server-support-jdbc-4.0.3.jar
• mchange-commons-java-0.2.10.jar
• mysql-connector-java-5.1.40.jar
【连接测试】
1. 链接地址:http://localhost:8080/cas
登录界面如下:
2. 输入正确的用户名密码,登录成功:
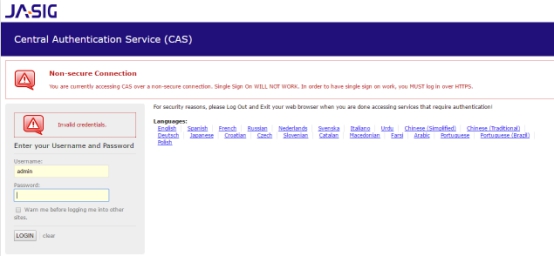
3. 输入错误的密码,登录失败:
【总结】
本篇自定义数据库连接配置属于CAS Server中最基本也是最首要的配置,很简单,只需要修改一个核心的
配置文件即可,除此之外,想要定制一款CAS加入到自己的项目中,还有很多需要自定义配置的地方。下篇博客继续分
享。


 238
238

 被折叠的 条评论
为什么被折叠?


