


最近做开发需要用到一个自定义的dialog,在网上浏览了很多这方面的问题,基本都写的比较复杂难懂(对菜鸟来说),需要extends Dialog或者修改style之类的,最后自己写了一个dialog(不算是真正意义上的dialog),很好的解决了我所遇到的问题。下面,将我的做法分享给大家。
我是使用Android Studio 1.4,基于android5.1写的一个demo。
MainActivity布局文件activity_main.xml :
<?xml version="1.0" encoding="utf-8"?>
<RelativeLayout
    xmlns:android="http://schemas.android.com/apk/res/android"
    xmlns:tools="http://schemas.android.com/tools"
    android:layout_width="match_parent"
    android:layout_height="match_parent"
    tools:context=".MainActivity">

    <Button
        android:layout_centerInParent="true"
        android:id="@+id/btn"
        android:layout_width="200dp"
        android:layout_height="80dp"
        android:background="@drawable/bg_btn"
        android:text="点击显示自定义dialog"
        android:textColor="#ffffffff"
        android:textSize="23sp"/>

</RelativeLayout>
自定义dialog的布局文件layout_customdialog.xml :
<?xml version="1.0" encoding="utf-8"?>
<RelativeLayout
    xmlns:android="http://schemas.android.com/apk/res/android"
    android:layout_width="fill_parent"
    android:layout_height="wrap_content"
    android:background="@android:color/transparent"
    android:layout_marginLeft="50dp"
    android:layout_marginRight="50dp"
    android:layout_marginTop="200dp"
    >

    <RelativeLayout
        android:id="@+id/rl_dialog_content"
        android:layout_width="fill_parent"
        android:layout_height="200dp"
        android:background="@drawable/bg_dialog">

        <View
            android:paddingTop="20dp"
            android:layout_marginTop="30dp"
            android:layout_width="fill_parent"
            android:layout_height="2dp"
            android:background="#1586f6"/>

        <TextView
            android:id="@+id/dialog_text"
            android:layout_width="fill_parent"
            android:layout_height="wrap_content"
            android:layout_marginTop="50dp"
            android:layout_marginLeft="30dp"
            android:layout_marginRight="30dp"
            android:maxLines="5"
            android:gravity="center"
            />

        <LinearLayout
            android:layout_width="fill_parent"
            android:layout_height="wrap_content"
            android:orientation="horizontal"
            android:layout_alignParentBottom="true"
            android:layout_margin="30dp">

            <Button
                android:id="@+id/dialog_cancel"
                android:text="取消"
                android:background="@drawable/bg_btn"
                android:layout_height="30dp"
                android:layout_width="5dp"
                android:layout_weight="1"
                android:textColor="#FFFFFFFF"
                />

            <Button
                android:id="@+id/dialog_ok"
                android:text="确定"
                android:textColor="#FFFFFFFF"
                android:layout_height="30dp"
                android:layout_width="5dp"
                android:background="@drawable/bg_btn"
                android:layout_weight="1"
                android:layout_marginLeft="40dp"/>

        </LinearLayout>

    </RelativeLayout>

</RelativeLayout>
主界面Java代码MainActivity.java :
package com.weizhi.mycustomdialog;
import android.app.AlertDialog;
import android.app.Dialog;
import android.content.Context;
import android.support.v7.app.AppCompatActivity;
import android.os.Bundle;
import android.view.LayoutInflater;
import android.view.View;
import android.widget.Button;
import android.widget.RelativeLayout;
import android.widget.TextView;
public class MainActivity extends AppCompatActivity {
public Context context ;
@Override
protected void onCreate(Bundle savedInstanceState) {
super.onCreate(savedInstanceState);
setContentView(R.layout.activity_main);
context = this ;
Button button = (Button) findViewById(R.id.btn);
button.setOnClickListener(new View.OnClickListener() {
@Override
public void onClick(View view) {
btnDoSomething();
}
});
}
public void btnDoSomething(){
LayoutInflater inflater = LayoutInflater.from(context);
RelativeLayout relativeLayout = (RelativeLayout)inflater.inflate(R.layout.layout_customdialog, null );
//对话框
final Dialog dialog = new AlertDialog.Builder(context).create();
dialog.show();
dialog.getWindow().setContentView(relativeLayout);
TextView dialogText = (TextView) relativeLayout.findViewById(R.id.dialog_text);
dialogText.setText("是否返回主界面?");
//取消按钮
Button btnCancel = (Button) relativeLayout.findViewById(R.id.dialog_cancel);
btnCancel.setOnClickListener(new View.OnClickListener() {
@Override
public void onClick(View v) {
//添加点击事件
dialog.dismiss();
}
});
//确定按钮
Button btnOK = (Button) relativeLayout.findViewById(R.id.dialog_ok);
btnOK.setOnClickListener(new View.OnClickListener() {
@Override
public void onClick(View v) {
//添加点击事件
dialog.dismiss();
}
});
}
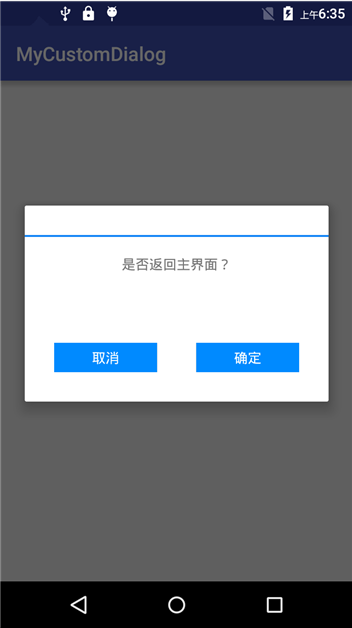
}效果图如下所示:

就这样,很简单的。谢谢阅读。


 2143
2143

 被折叠的 条评论
为什么被折叠?
被折叠的 条评论
为什么被折叠?
 到【灌水乐园】发言


