# example.conf: A single-node Flume configuration# Name the components on this agenta1.sources=r1a1.sinks=k1a1.channels=c1# Describe/configure the sourcea1.sources.r1.type=netcata1.sources.r1.bind=nodea1.sources.r1.port=44444# Describe the sinka1.sinks.k1.type=logger# Use a channel which buffers events in memorya1.channels.c1.type=memorya1.channels.c1.capacity=1000a1.channels.c1.transactionCapacity=100# Bind the source and sink to the channela1.sources.r1.channels=c1a1.sinks.k1.channel=c1


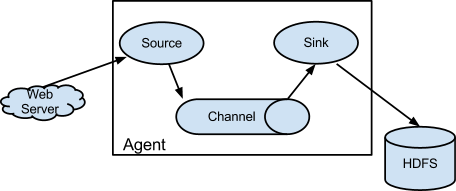
 本文介绍了如何配置和使用Apache Flume的netcat被动source,通过telnet发送消息到Flume Agent,实现数据收集。Flume任务由source、channel和sink组成,重点讨论了被动source的设置,以及如何通过HDFS或Kafka sink处理数据。


 798
798


 被折叠的 条评论
为什么被折叠?
被折叠的 条评论
为什么被折叠?
 到【灌水乐园】发言


