


一、VNC介绍
1.1 VNC简介
VNC (Virtual Network Console)是虚拟网络控制台的缩写。它 是一款优秀的远程控制工具软件,可以实现远程控制计算机的功能。
1.2 VNC组成
VNC基本上是由两部分组成,在任何安装了客户端的应用程序(vncviewer)的计算机都能十分方便地与安装了服务器端的应用程序(vncserver)的计算机相互连接。
-
客户端的应用程序vncviewer
-
服务器端的应用程序vncserver
1.3 常见的VNC工具
-
RealVNC:是一款功能强大的VNC工具,支持多种操作系统,包括Windows、Linux、Mac OS X等,具有高安全性和可靠性。
-
UltraVNC:是一款免费的VNC客户端和服务器软件,支持Windows操作系统,提供了远程桌面、文件传输、文本聊天等功能。
-
TightVNC:是一个小巧而强大的VNC工具,支持Windows、Linux以及Unix等多种操作系统,具有较高的安全性和性能。
-
TigerVNC:是一个开源的VNC工具,支持Windows、Linux以及Mac OS X等多种操作系统,具有稳定性和高性能。
-
TeamViewer:是一款针对远程支持、远程控制和在线协作的应用软件,可以实现桌面共享、远程协助、文件传输等功能。
二、本地环境介绍
本次实践为个人测试环境,服务器操作系统版本为Rocky Linux 8.9,客户端主机使用Windows10操作系统
| 角色 | 主机名 | 主机IP | 操作系统版本 | 内核版本 |
| vncserver | localhost | 192.168.3.168 | Rocky Linux 8.9 (Green Obsidian) | 4.18.0-513.5.1.el8_9.x86_64 |
| vncviewer | N/A | 192.168.3.35 | Windows 10 Pro | N/A |
三、安装vncserver
3.1 使用yum源安装tigervnc-server包
dnf -y install tigervnc-server3.2 检查vncserver安装状态
[root@localhost ~]# rpm -qa | grep tigervnc
tigervnc-license-1.13.1-2.el8.noarch
tigervnc-server-1.13.1-2.el8.x86_64
tigervnc-server-minimal-1.13.1-2.el8.x86_64
tigervnc-selinux-1.13.1-2.el8.noarch
四、创建VNC用户
4.1 分别创建vncuser01、vncuser02用户,并设置密码
[root@localhost ~]# useradd vncuser01
[root@localhost ~]# useradd vncuser02
[root@localhost ~]# echo 123 | passwd --stdin vncuser01      # 设置密码为123
Changing password for user vncuser01.
passwd: all authentication tokens updated successfully.
[root@localhost ~]# echo 123 | passwd --stdin vncuser02      # 设置密码为123
Changing password for user vncuser02.
passwd: all authentication tokens updated successfully.
五、配置vncserver服务
5.1 切换到vncuser01用户,启动vncserver服务,设置vnc连接密码
[root@localhost ~]# su - vncuser01
[vncuser01@localhost ~]$ vncserver

WARNING: vncserver has been replaced by a systemd unit and is now considered deprecated and removed in upstream.
Please read /usr/share/doc/tigervnc/HOWTO.md for more information.

You will require a password to access your desktops.

Password:
Password must be at least 6 characters - try again      # 密码长度至少6位
Password:                                                # 设置密码为123456
Verify:                                                  # 再次输入密码
Would you like to enter a view-only password (y/n)? n    # 询问你是否要再输入一个只有观看权限而被禁止操作的远程桌面的密码
A view-only password is not used
xauth:  file /home/vncuser01/.Xauthority does not exist

New 'localhost.localdomain:1 (vncuser01)' desktop is localhost.localdomain:1

Creating default startup script /home/vncuser01/.vnc/xstartup
Creating default config /home/vncuser01/.vnc/config
Starting applications specified in /home/vncuser01/.vnc/xstartup
Log file is /home/vncuser01/.vnc/localhost.localdomain:1.log
5.2 切换到vncuser02用户,启动vncserver服务,设置vnc连接密码
[vncuser01@localhost ~]$ exit
logout
[root@localhost ~]# su - vncuser02
[vncuser02@localhost ~]$ vncserver

WARNING: vncserver has been replaced by a systemd unit and is now considered deprecated and removed in upstream.
Please read /usr/share/doc/tigervnc/HOWTO.md for more information.

You will require a password to access your desktops.

Password:
Verify:
Would you like to enter a view-only password (y/n)? n
A view-only password is not used
xauth:  file /home/vncuser02/.Xauthority does not exist

New 'localhost.localdomain:2 (vncuser02)' desktop is localhost.localdomain:2

Creating default startup script /home/vncuser02/.vnc/xstartup
Creating default config /home/vncuser02/.vnc/config
Starting applications specified in /home/vncuser02/.vnc/xstartup
Log file is /home/vncuser02/.vnc/localhost.localdomain:2.log
后面如果需要修改vnc连接密码,可以切换到对应用户执行vncpasswd进行修改
5.3 查看服务端口
[root@localhost ~]# netstat -tulnp
Active Internet connections (only servers)
Proto Recv-Q Send-Q Local Address           Foreign Address         State       PID/Program name
tcp        0      0 0.0.0.0:5901            0.0.0.0:*               LISTEN      33743/Xvnc
tcp        0      0 0.0.0.0:5902            0.0.0.0:*               LISTEN      34664/Xvnc
tcp        0      0 0.0.0.0:111             0.0.0.0:*               LISTEN      1/systemd
tcp        0      0 192.168.122.1:53        0.0.0.0:*               LISTEN      1709/dnsmasq
tcp        0      0 0.0.0.0:22              0.0.0.0:*               LISTEN      1145/sshd
tcp        0      0 127.0.0.1:631           0.0.0.0:*               LISTEN      1148/cupsd
tcp6       0      0 :::5901                 :::*                    LISTEN      33743/Xvnc
tcp6       0      0 :::5902                 :::*                    LISTEN      34664/Xvnc
tcp6       0      0 :::111                  :::*                    LISTEN      1/systemd
tcp6       0      0 :::22                   :::*                    LISTEN      1145/sshd
tcp6       0      0 ::1:631                 :::*                    LISTEN      1148/cupsd
udp        0      0 0.0.0.0:5353            0.0.0.0:*                           938/avahi-daemon: r
udp        0      0 0.0.0.0:50923           0.0.0.0:*                           938/avahi-daemon: r
udp        0      0 192.168.122.1:53        0.0.0.0:*                           1709/dnsmasq
udp        0      0 0.0.0.0:67              0.0.0.0:*                           1709/dnsmasq
udp        0      0 0.0.0.0:111             0.0.0.0:*                           1/systemd
udp        0      0 127.0.0.1:323           0.0.0.0:*                           957/chronyd
udp6       0      0 :::5353                 :::*                                938/avahi-daemon: r
udp6       0      0 :::34264                :::*                                938/avahi-daemon: r
udp6       0      0 :::111                  :::*                                1/systemd
udp6       0      0 ::1:323                 :::*                                957/chronyd
可以看到vnc服务端口已经处于监听状态了。
5.3 设置vncserver开机自启动.
第一个桌面环境
[root@localhost ~]# systemctl enable vncserver@:1.service   # 注意:此处服务名称不能tab键补全,需手动敲完整,对应5901端口
Created symlink /etc/systemd/system/multi-user.target.wants/vncserver@:1.service → /usr/lib/systemd/system/vncserver@.service.
第二个桌面环境
[root@localhost ~]# systemctl enable vncserver@:2.service
Created symlink /etc/systemd/system/multi-user.target.wants/vncserver@:2.service → /usr/lib/systemd/system/vncserver@.service.
5.4 增加会话窗口与用户的映射关系,第一个桌面与vncuser01账号关联,第二个桌面环境与vncuser02账号关联
编辑/etc/tigervnc/vncserver.users文件
[root@localhost ~]# vim /etc/tigervnc/vncserver.users
# TigerVNC User assignment
#
# This file assigns users to specific VNC display numbers.
# The syntax is <display>=<username>. E.g.:
#
# :2=andrew
# :3=lisa
:1=vncuser01      # 增加这两行
:2=vncuser02
5.5 防火墙规则放行
在firewalld防火墙上放行端口
[root@localhost ~]# firewall-cmd --add-port=5901/tcp --permanent
success

[root@localhost ~]# firewall-cmd --add-port=5902/tcp --permanent
success

[root@localhost ~]# firewall-cmd --reload

success
5.6 重启验证服务状态
[root@localhost ~]# systemctl status vncserver@\:1.service
[root@localhost ~]# systemctl status vncserver@\:1.service
● vncserver@:1.service - Remote desktop service (VNC)
   Loaded: loaded (/usr/lib/systemd/system/vncserver@.service; enabled; vendor preset: disabled)
   Active: active (running) since Thu 2023-12-14 18:00:57 CST; 40s ago
  Process: 1471 ExecStart=/usr/libexec/vncsession-start :1 (code=exited, status=0/SUCCESS)
  Process: 1422 ExecStartPre=/usr/libexec/vncsession-restore :1 (code=exited, status=0/SUCCESS)
 Main PID: 1489 (vncsession)
    Tasks: 0 (limit: 24436)
   Memory: 1.4M
   CGroup: /system.slice/system-vncserver.slice/vncserver@:1.service
           ‣ 1489 /usr/sbin/vncsession vncuser01 :1

Dec 14 18:00:57 localhost.localdomain systemd[1]: Starting Remote desktop service (VNC)...
Dec 14 18:00:57 localhost.localdomain systemd[1]: Started Remote desktop service (VNC).
[root@localhost ~]#
[root@localhost ~]# systemctl status vncserver@\:2.service
● vncserver@:2.service - Remote desktop service (VNC)
   Loaded: loaded (/usr/lib/systemd/system/vncserver@.service; enabled; vendor preset: disabled)
   Active: active (running) since Thu 2023-12-14 18:00:57 CST; 44s ago
  Process: 1470 ExecStart=/usr/libexec/vncsession-start :2 (code=exited, status=0/SUCCESS)
  Process: 1421 ExecStartPre=/usr/libexec/vncsession-restore :2 (code=exited, status=0/SUCCESS)
 Main PID: 1492 (vncsession)
    Tasks: 0 (limit: 24436)
   Memory: 2.1M
   CGroup: /system.slice/system-vncserver.slice/vncserver@:2.service
           ‣ 1492 /usr/sbin/vncsession vncuser02 :2

Dec 14 18:00:57 localhost.localdomain systemd[1]: Starting Remote desktop service (VNC)...
Dec 14 18:00:57 localhost.localdomain systemd[1]: Started Remote desktop service (VNC).
重启系统后,服务成功自启动,均为active状态
5.7 查看端口状态
[root@localhost ~]# netstat -tulnp
Active Internet connections (only servers)
Proto Recv-Q Send-Q Local Address           Foreign Address         State       PID/Program name
tcp        0      0 192.168.122.1:53        0.0.0.0:*               LISTEN      1858/dnsmasq
tcp        0      0 0.0.0.0:22              0.0.0.0:*               LISTEN      1101/sshd
tcp        0      0 127.0.0.1:631           0.0.0.0:*               LISTEN      1098/cupsd
tcp        0      0 0.0.0.0:5901            0.0.0.0:*               LISTEN      1624/Xvnc
tcp        0      0 0.0.0.0:5902            0.0.0.0:*               LISTEN      1625/Xvnc
tcp        0      0 0.0.0.0:111             0.0.0.0:*               LISTEN      1/systemd
tcp6       0      0 :::22                   :::*                    LISTEN      1101/sshd
tcp6       0      0 ::1:631                 :::*                    LISTEN      1098/cupsd
tcp6       0      0 :::5901                 :::*                    LISTEN      1624/Xvnc
tcp6       0      0 :::5902                 :::*                    LISTEN      1625/Xvnc
tcp6       0      0 :::111                  :::*                    LISTEN      1/systemd
udp        0      0 0.0.0.0:5353            0.0.0.0:*                           973/avahi-daemon: r
udp        0      0 192.168.122.1:53        0.0.0.0:*                           1858/dnsmasq
udp        0      0 0.0.0.0:67              0.0.0.0:*                           1858/dnsmasq
udp        0      0 0.0.0.0:111             0.0.0.0:*                           1/systemd
udp        0      0 127.0.0.1:323           0.0.0.0:*                           983/chronyd
udp        0      0 0.0.0.0:44138           0.0.0.0:*                           973/avahi-daemon: r
udp6       0      0 :::5353                 :::*                                973/avahi-daemon: r
udp6       0      0 :::36338                :::*                                973/avahi-daemon: r
udp6       0      0 :::111                  :::*                                1/systemd
udp6       0      0 ::1:323                 :::*                                983/chronyd
vnc服务端口处于监听状态中
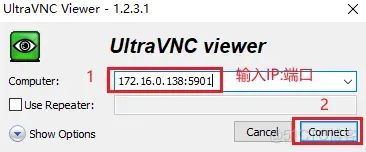
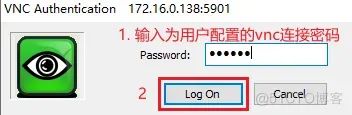
六、客户端连接验证
这里我的客户端主机使用的是Windows10操作系统,使用UltraVNC Viewer工具连接

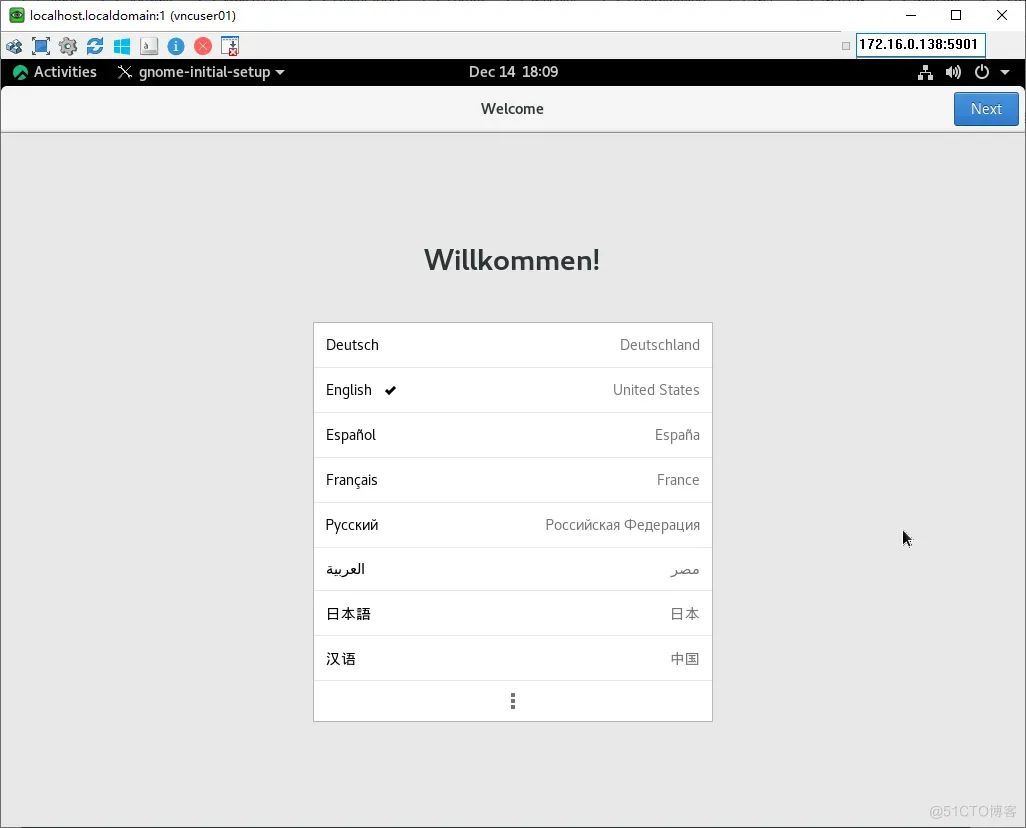
登录成功,vncuser02同理


 7672
7672

 被折叠的 条评论
为什么被折叠?
被折叠的 条评论
为什么被折叠?
 到【灌水乐园】发言


