


 本文介绍了如何在WPF中自定义窗口标题栏,通过设置ResizeMode和WindowStyle属性去除默认标题栏,并通过添加允许透明和背景透明属性实现异型窗口。在客户区定义StackPanel创建标题栏,并应用样式实现阴影和按钮。示例代码展示了具体的实现方法,包括圆角边框和自定义窗口按钮的样式,但未涉及按钮功能逻辑。文章强调了自定义标题栏的便利性以及注意边框和阴影的必要性,以避免窗口融入桌面背景。
wpf自定义标题栏系列
第一章 自定义标题栏(本章)
第二章 添加窗口阴影
第三章 style中定义标题栏
第四章 style使用参数及模板定义标题栏
前言
我们日常开发的时候,经常会遇到需要自定义标题栏的UI设计,采用特定颜色的标题栏或者特定样式的按钮,这个时候就需要自定义标题栏了,wpf中自定义标题栏还是相对容易的。
一、步骤
1.设置窗口属性
我们要把窗口本身的标题栏去除,因为标题栏不属于我们能控制的部分,我们能控制的只有窗口的客户区域。
ResizeMode="NoResize"
WindowStyle="None"
AllowsTransparency="True"
Background="Transparent"
2.客户区定义标题栏
我们可以在客户区的顶部添加一个容器作为标题栏。
 <StackPanel>
     <!--标题栏-->
     <Grid Background="Gray" Height="50" >
     </Grid>
     <!--客户区-->
</StackPanel>
二、示例
界面代码
<Window x:Class="WpfApp1.MainWindow"
        xmlns="http://schemas.microsoft.com/winfx/2006/xaml/presentation"
        xmlns:x="http://schemas.microsoft.com/winfx/2006/xaml"
        xmlns:d="http://schemas.microsoft.com/expression/blend/2008"
        xmlns:mc="http://schemas.openxmlformats.org/markup-compatibility/2006"
        xmlns:sys="clr-namespace:System;assembly=mscorlib"
        xmlns:local="clr-namespace:WpfApp1"
        mc:Ignorable="d"
        Title="MainWindow" Height="370" Width="650"
        AllowsTransparency="True"
        Background="Transparent"
        ResizeMode="NoResize"
        WindowStyle="None"
        >
    <StackPanel Margin="10" Background="White">
        <StackPanel.Effect>
            <DropShadowEffect ShadowDepth="0" BlurRadius="10" Opacity="0.8"/>
        </StackPanel.Effect>
        <!--标题栏-->
        <Grid Background="Gray" Height="50" >
            <StackPanel Margin="0,0,10,0" HorizontalAlignment="Right" Orientation="Horizontal">
                <Button Width="40" Height=" 40" VerticalAlignment="Center" Cursor="Hand">
                    <Button.Template>
                        <ControlTemplate>
                            <Grid Background="Transparent">
                                <Rectangle Width="30" Height="3" Fill="White" ></Rectangle>
                            </Grid>
                        </ControlTemplate>
                    </Button.Template>
                </Button>
                <Button Width="40" Height=" 40" VerticalAlignment="Center" Cursor="Hand">
                    <Button.Template>
                        <ControlTemplate>
                            <Grid Background="Transparent">
                                <Rectangle Width="30" Height="30" Stroke="White"  StrokeThickness="3"></Rectangle>
                            </Grid>
                        </ControlTemplate>
                    </Button.Template>
                </Button>
                <Button Width="40" Height=" 40" VerticalAlignment="Center" Cursor="Hand">
                    <Button.Template>
                        <ControlTemplate>
                            <Grid Background="Transparent">
                                <Line Width="30" Height="30" X1="0" Y1="0" X2="30" Y2="30" StrokeThickness="3" Stroke="White" ></Line>
                                <Line Width="30" Height="30" X1="30" Y1="0" X2="0" Y2="30" StrokeThickness="3" Stroke="White" ></Line>
                            </Grid>
                        </ControlTemplate>
                    </Button.Template>
                </Button>
            </StackPanel>
        </Grid>
  <!--客户区-->

    </StackPanel>
</Window>
效果预览
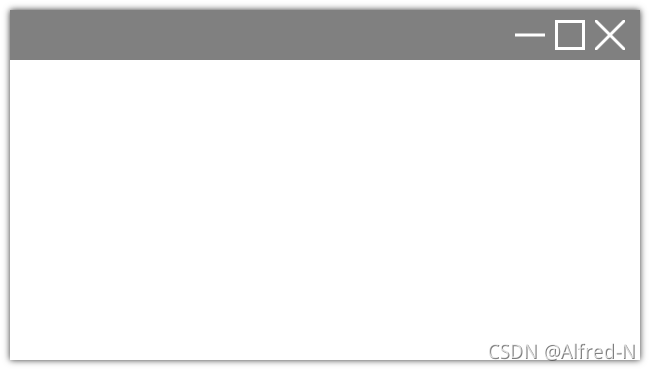
总结
wpf中自定义标题栏是比较方便,上述示例中没有提供3个窗口按钮的操作逻辑,其实也是很容易实现的。其他要注意的是需要在边框出加边线或者阴影,否则很容易出现融入桌面背景,尤其是窗口背景色是白色时。


 2232
2232

 被折叠的 条评论
为什么被折叠?
被折叠的 条评论
为什么被折叠?
 到【灌水乐园】发言


