


为了有个展示自己文章和作品的地,所以搭了一个静态博客。
找了一下静态博客,发现用jekyll的人比较多,本来想用又发现基于Node的Hexo,不用再装个Ruby环境,另外Hexo支持本地预览,这一点还是比较方便的,两者主题都很丰富。
第一次用静态博客生成器,所以写一份说明书,也希望能帮到想要自己动手折腾,却没什么经验的人。
下面包含了准备工作的环境安装和必要的帐号申请,虽然我已经搞过了,不过觉得还是提一下,方便从0开始的朋友。(凭记忆写的,但应该误差不大)
先上一下自己的博客,大家可以预览一下效果。
地址: https://zeashon.github.io/
- 准备工作:下载和安装 git 和 node.js
下载地址: git.//点击前面文字下载Windows版本Git
下载地址:Node.js //点击前面文字下载NodeJS
安装
申请Github帐号(如果没有,申请流程相对简单,不会请问搜索引擎哈)
配置本地 Git (注意替换以下的test字段)
- $ git config --global user.name "test" //用户名,随意起
- $ git config --global user.emailtest@test.com //用户邮箱,可以用刚才申请github的邮箱
连接远程仓库(github)
- $ ssh-keygen -t rsa -C "youremail@example.com" //这个邮箱必须是申请github的邮箱
- **回车以后会让你确认和输入密码,这时候你不要输入任何字段,直接回车,它会使用默认设置
- 成功以后,进入.ssh文件夹,用记事本打开id_rsa.pub,全选并复制里面的key
- 在浏览器中打开你的github,点击头像进入设置页
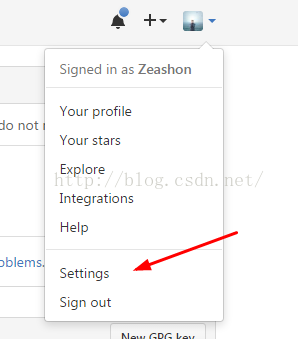
- 按照步骤添加新的 SHH Key
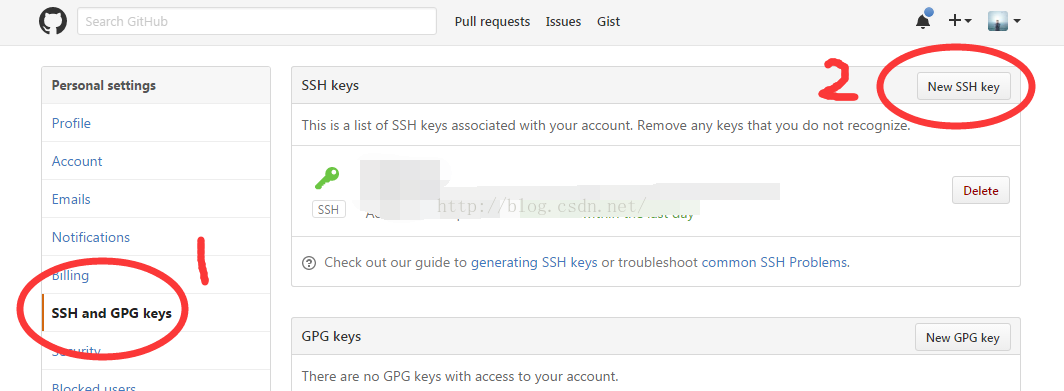
- Title随便填,下面填你刚才复制的Key,然后点击添加就完成了。

- 添加完毕后,打开GitBash,输入下面的命令,验证是否成功。
$ ssh -Tgit@github.com
- 出现这句就是OK了:Hiyour_name! You've successfully authenticated, but GitHub does not provide shell access.
**然后你可以在Github上面建立你的仓库,(因为等下也要建,建个Test什么的,或者要把主页挂在Github上的,要建个“your_name.github.io”,把your_name换成你的github用户名。)所以接下来我们来看看怎么把Hexo博客挂到Github上。
- 安装hexo:打开 git (刚才安装的gitbash)运行
$ npm install-g hexo-cli
$npm install hexo --save
- Hexo初始化:打开git顺序运行下面指令
<folder>=> 你要初始化的本地路径
$ hexo init<folder>
$ cd <folder>
$ npm install
- 安装插件
先进入你刚才的<folder>中(已经在就跳过这步)
$ cd <folder>
- 自动生成sitemap,Rss,部署到git等,建议安装
npm installhexo-generator-index --save
npm installhexo-generator-archive --save
npm installhexo-generator-category --save
npm installhexo-generator-tag --save
npm installhexo-server --save
npm installhexo-deployer-git --save
npm installhexo-deployer-heroku --save
npm installhexo-deployer-rsync --save
npm installhexo-deployer-openshift --save
npm installhexo-renderer-marked@0.2 --save
npm installhexo-renderer-stylus@0.2 --save
npm installhexo-generator-feed@1 --save
npm installhexo-generator-sitemap@1 --save
- 各种配置(站点和主题)
配置文件考虑去参考下别人的,但其实也可以在原本默认的文件上做些自己要的参数的修改就OK了。
_config.yml 文件
# HexoConfiguration
## Docs: https://hexo.io/docs/configuration.html
## Source: https://github.com/hexojs/hexo/
# Site
title: Welcome //标题
subtitle: //副标题
description: //描述
author: Zeashon //作者
language: //语言
timezone: //时区
# URL
## If yoursite is put in a subdirectory, set url as 'http://yoursite.com/child' and root as '/child/'
url:https://zeashon.github.io //这里面放域名,比如我把他放到Github上,域名直接用Github的个人主页
root: /
permalink::year/:month/:day/:title/
permalink_defaults:
# Directory
source_dir:source
public_dir:public
tag_dir: tags
archive_dir:archives
category_dir:categories
code_dir:downloads/code
i18n_dir::lang
skip_render:
# Writing
new_post_name::title.md # File name of new posts
default_layout:post
titlecase:false # Transform title into titlecase
external_link:true # Open external links in new tab
filename_case:0
render_drafts:false
post_asset_folder:false
relative_link:false
future: true
highlight:
enable: true
line_number: true
auto_detect: false
tab_replace:
# Category& Tag
default_category:uncategorized
category_map:
tag_map:
# Date / Timeformat
## Hexo usesMoment.js to parse and display date
## You cancustomize the date format as defined in
## http://momentjs.com/docs/#/displaying/format/
date_format:YYYY-MM-DD
time_format:HH:mm:ss
# Pagination
## Setper_page to 0 to disable pagination
per_page: 10
pagination_dir:page
# Extensions
## Plugins: https://hexo.io/plugins/
## Themes: https://hexo.io/themes/
theme: next //在这里设置博客的主题,主题在themes文件夹中,默认为landscape,要应用其他主题需要先下载到本地
# Deployment
## Docs: https://hexo.io/docs/deployment.html
deploy:
type: git //配置到远程仓库的方式
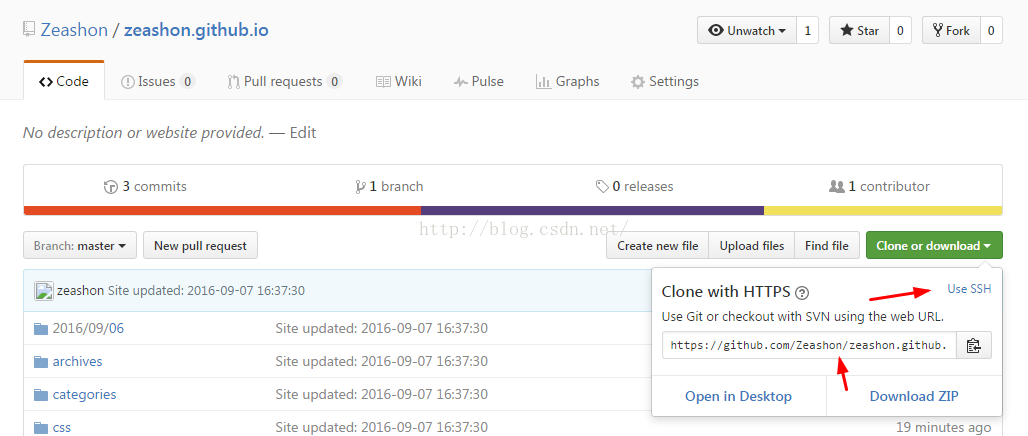
repository: git@github.com:Zeashon/zeashon.github.io.git //远程仓库的SSH地址(这个的由来等下在下面详细说明)
branch: master
**远程仓库的SSH地址:登录你的github以后,进入你要同步的仓库,如下图操作,点击 Use SSH,然后把框里的地址复制下来。
- 连接远程仓库
- 首先进入到你的博客根目录,就是上面第2步的那个folder
$ cd <folder>
- 然后运行下面的命令连接Github仓库
$git remote add origin git@github.com:Zeashon/zeashon.github.io.git //上面的SSH地址,已经介绍过了
- 部署你的博客到Github
- 一样还是首先进入到你的博客根目录,就是上面第2步的那个folder(如果已经在就不用执行这步了)
$ cd<folder>
- 本地运行你的博客,这一步的作用就是预览你的博客,你可以在本地看看你博客是什么样子的
$hexo server
- 成功运行会像下面一样提示,比如我在本地运行后的博客地址是http://localhost:4000/,那么打开浏览器,输入http://localhost:4000/进行浏览就能看到你的博客了。

- Hexo博客是静态的,而他的静态文件需要依靠执行下面的指令来生成
$hexo generate
- 上一步让本地生成静态的HTML文件,我们要做的就是把这些文件同步到我们的Github上。
$hexo deploy
这句指令将博客部署到你的Github上。这时候,你可以通过在浏览器中输入你的Github主页地址进行博客浏览了
比如:Zeashon.github.io
参考文章:
- Jekyll迁移到Hexo搭建个人博客:http://ezlippi.com/blog/2016/02/jekyll-to-hexo.html
- next主题指南:http://theme-next.iissnan.com/getting-started.html
- Git安装教程:http://www.runoob.com/git/git-install-setup.html
- Git远程仓库:http://www.runoob.com/git/git-remote-repo.html


 292
292

 被折叠的 条评论
为什么被折叠?
被折叠的 条评论
为什么被折叠?
 到【灌水乐园】发言


