


基本示例
组件是可复用的 Vue 实例,且带有一个名字:在这个例子中是 。我们可以在一个通过 new Vue 创建的 Vue 根实例中,把这个组件作为自定义元素来使用
 <div id="components-demo">
        <button-counter></button-counter>
    </div>

    <script>

        Vue.component('button-counter', {
            data: function () {
                return {
                    count: 0
                }
            },
            template: '<button v-on:click="count++">You clicked me {{ count }} times.</button>'
        })

        new Vue({
            el: "#components-demo"
        })
    </script>
效果如下,点击按钮,会显示点击的总次数
You clicked me 5 times.
组件的复用
你可以将组件进行任意次数的复用:
<div id="components-demo">
        <button-counter></button-counter>
        <button-counter></button-counter>
        <button-counter></button-counter>
    </div>
注意当点击按钮时,每个组件都会各自独立维护它的 count。因为你每用一次组件,就会有一个它的新实例被创建。
一个组件的 data 选项必须是一个函数,因此每个实例可以维护一份被返回对象的独立的拷贝:
如果 Vue 没有这条规则,点击一个按钮就可能会影响到其它所有实例:
通过 Prop 向子组件传递数据
Prop 是你可以在组件上注册的一些自定义特性。当一个值传递给一个 prop 特性的时候,它就变成了那个组件实例的一个属性。为了给博文组件传递一个标题,我们可以用一个 props 选项将其包含在该组件可接受的 prop 列表中:
    <div id="div11">
        <blog-post title="My journey with Vue"></blog-post>
        <blog-post title="Blogging with Vue"></blog-post>
        <blog-post title="Why Vue is so fun"></blog-post>
    </div>
    <script>
        Vue.component('blog-post', {
            props: ['title'],
            template: '<h3>{{ title }}</h3>'
        })
        new Vue({
            el: "#div11"
        })
    </script>
输出如下:
My journey with Vue
Blogging with Vue
Why Vue is so fun
v-bind 来动态传递 prop
你会发现我们可以使用 v-bind 来动态传递 prop
    <div id="div12">
        <blog-post v-for="post in posts" v-bind:key="post.id" v-bind:title="post.title"></blog-post>
    </div>
    <script>
        Vue.component('blog-post', {
            props: ['title'],
            template: '<h3>{{ title }}</h3>'
        })
        new Vue({
            el: "#div12",
            data: {
                posts: [
                    { id: 1, title: 'My journey with Vue' },
                    { id: 2, title: 'Blogging with Vue' },
                    { id: 3, title: 'Why Vue is so fun' }
                ]
            }
        })
    </script>
渲染效果如下:
My journey with Vue
Blogging with Vue
Why Vue is so fun
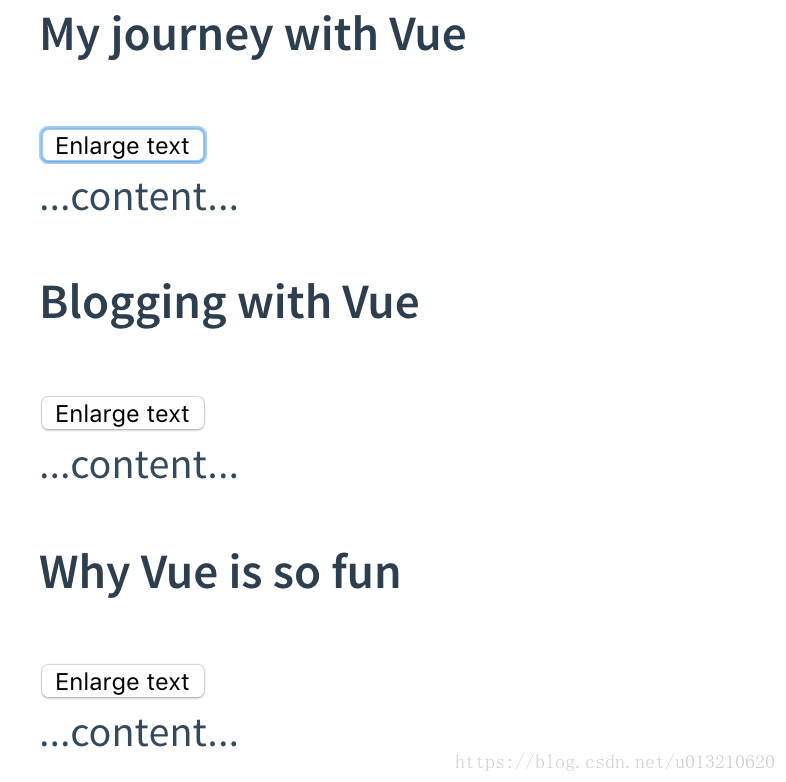
通过 $emit 事件向父级组件发送消息
我们可以调用内建的 $emit 方法并传入事件的名字,来向父级组件触发一个事件:
  <div id="blog-posts-events-demo">
        <div :style="{ fontSize: postFontSize + 'em' }">
            <blog-post v-for="post in posts" v-bind:key="post.id"
            v-bind:post="post" v-on:enlarge-text="postFontSize += 0.1"></blog-post>
        </div>
    </div>


    <script>
        Vue.component('blog-post', {
            props: ['post'],
            template: `
    <div class="blog-post">
      <h3>{{ post.title }}</h3>
      <button v-on:click="$emit('enlarge-text')">
  Enlarge text
</button>
      <div v-html="post.content"></div>
    </div>`
        })

        new Vue({
            el: '#blog-posts-events-demo',
            data: {
                posts: [
                    { id: 1, title: 'My journey with Vue' },
                    { id: 2, title: 'Blogging with Vue' },
                    { id: 3, title: 'Why Vue is so fun' }
                ],
                postFontSize: 1
            }
        })

    </script>
效果图如下:
使用事件抛出一个值
有的时候用一个事件来抛出一个特定的值是非常有用的。例如我们可能想让 组件决定它的文本要放大多少。这时可以使用 $emit 的第二个参数来提供这个值:
<button v-on:click="$emit('enlarge-text', 0.1)">
  Enlarge text
</button>
然后当在父级组件监听这个事件的时候,我们可以通过 $event 访问到被抛出的这个值
<blog-post
  ...
  v-on:enlarge-text="postFontSize += $event"
></blog-post>
如果这个事件处理函数是一个方法
<blog-post
  ...
  v-on:enlarge-text="onEnlargeText"
></blog-post>
那么这个值将会作为第一个参数传入这个方法:
new Vue({
            el: '#blog-posts-events-demo',
            data: {
                posts: [
                    { id: 1, title: 'My journey with Vue' },
                    { id: 2, title: 'Blogging with Vue' },
                    { id: 3, title: 'Why Vue is so fun' }
                ],
                postFontSize: 1
            },
            methods: {
                onEnlargeText: function (enlargeAmount) {
                    this.postFontSize += enlargeAmount
                }
            }
        })
在组件上使用 v-model
<input v-model="searchText">
等价于
<input
  v-bind:value="searchText"
  v-on:input="searchText = $event.target.value"
>
当用在组件上时,v-model 则会这样:
<custom-input
  v-bind:value="searchText"
  v-on:input="searchText = $event"
></custom-input>
为了让它正常工作,这个组件内的 必须:
将其 value 特性绑定到一个名叫 value 的 prop 上
在其 input 事件被触发时,将新的值通过自定义的 input 事件抛出
<div id="lll">
        <custom-input v-model="searchText"></custom-input>
        <span>{{searchText}}</span>
    </div>


    <script>


        Vue.component('custom-input', {
            props: ['value'],
            template: `
    <input
      v-bind:value="value"
      v-on:input="$emit('input', $event.target.value)"
    >
  `
        })
        new Vue({
            el: "#lll",
            data: { searchText: "" }
        })

    </script>
效果如下:


 1123
1123


 被折叠的 条评论
为什么被折叠?
被折叠的 条评论
为什么被折叠?
 到【灌水乐园】发言


