


在学习了鸿洋老师的自定义View之后接着也自己温习了一遍,主要是熟悉自定义View的步骤和使用,下面是例子,大家可以看看,相互学习和讨论:
<?xml version="1.0" encoding="utf-8"?>
<resources>
    <attr name="textColor" format="color" />
    <attr name="textSize" format="dimension" />
    <attr name="textContent" format="string" />
    <attr name="imageContent" format="reference" />
    <attr name="imageType" >
        <enum name="fillXY" value="0" />
        <enum name="center" value="1" />
    </attr>

    <declare-styleable name="CustomView">
        <attr name="textColor" />
        <attr name="textSize" />
        <attr name="textContent" />
        <attr name="imageContent" />
        <attr name="imageType" />
    </declare-styleable>
</resources>
这里是自定的集中属性,包括文字,颜色,大小,图片,和图片显示格式
这个大家应该都清楚
接下来就是利用自定义的View来实现一些功能,代码如下
public class CustomView extends View {

    private String textContent;

    private int textSize;

    private int textColor;

    private Bitmap imageContent;

    private int imageType;

    private TypedArray typedArray;

    private Rect rect;

    private Rect textRect;

    private Paint paint;
    public CustomView(Context context) {
        this(context, null);
    }

    public CustomView(Context context, AttributeSet attrs) {
        this(context, attrs, 0);
    }

    public CustomView(Context context, AttributeSet attrs, int defStyleAttr) {
        super(context, attrs, defStyleAttr);
        typedArray = context.getTheme().obtainStyledAttributes(attrs, R.styleable.CustomView, defStyleAttr, 0);
        initData();
    }

    private void initData() {
        int count = typedArray.getIndexCount();
        for (int i = 0; i < count; i++) {
            int content = typedArray.getIndex(i);
            switch (content) {
                case R.styleable.CustomView_textColor:
                    textColor = typedArray.getColor(content, Color.BLUE);
                    break;
                case R.styleable.CustomView_textContent:
                    textContent = typedArray.getString(content);
                    break;
                case R.styleable.CustomView_textSize:
                    textSize = typedArray.getDimensionPixelSize(content, (int) TypedValue.applyDimension(TypedValue.COMPLEX_UNIT_SP,
                            16, getResources().getDisplayMetrics()));
                    break;
                case R.styleable.CustomView_imageContent:
                    imageContent = BitmapFactory.decodeResource(getResources(),typedArray.getResourceId(typedArray.getIndex(content),0));
                    break;
                case R.styleable.CustomView_imageType:
                    imageType = typedArray.getInt(content,0);
                    break;
            }
        }
        typedArray.recycle();

        rect = new Rect();
        paint = new Paint();
        textRect = new Rect();
        paint.setTextSize(textSize);
        // 计算了描绘字体需要的范围
        paint.getTextBounds(textContent, 0, textContent.length(), textRect);
    }

    /**
     * EXACTLY:一般是设置了明确的值或者是MATCH_PARENT
     * AT_MOST:表示子布局限制在一个最大值内,一般为WARP_CONTENT
     * UNSPECIFIED:表示子布局想要多大就多大,很少使用
     *
     * @param widthMeasureSpec
     * @param heightMeasureSpec
     */
    @Override
    protected void onMeasure(int widthMeasureSpec, int heightMeasureSpec) {
        super.onMeasure(widthMeasureSpec, heightMeasureSpec);
        int widthMode = MeasureSpec.getMode(widthMeasureSpec);
        int widthSize = MeasureSpec.getSize(widthMeasureSpec);
        int heightMode = MeasureSpec.getMode(heightMeasureSpec);
        int heightSize = MeasureSpec.getSize(heightMeasureSpec);

        if (widthMode != MeasureSpec.EXACTLY) {
            //宽度为图片和文字较宽的
            int textWidthSize = (int) (getPaddingLeft() + textRect.width() + getPaddingRight());
            int imageWidthSize = (int) (getPaddingLeft() + imageContent.getWidth() + getPaddingRight());
            widthSize = Math.max(textWidthSize,imageWidthSize);
        }

        if (heightMode != MeasureSpec.EXACTLY) {
            //高度是文字和图片的高度之和
            int textHeigetSize = (int) (getPaddingTop() + textRect.height() + getPaddingBottom());
            int imageHeightSize = (int) (getPaddingLeft() + imageContent.getHeight() + getPaddingRight());
            heightSize = Math.min(textHeigetSize,imageHeightSize);
        }

        setMeasuredDimension(widthSize, heightSize);
    }

    @Override
    protected void onDraw(Canvas canvas) {
        /**
         * 边框
         */
        paint.setStrokeWidth(4);
        paint.setStyle(Paint.Style.STROKE);
        paint.setColor(Color.CYAN);
        canvas.drawRect(0, 0, getMeasuredWidth(), getMeasuredHeight(), paint);

        rect.left = getPaddingLeft();  //设置绘图左边的坐标
        rect.right = getMeasuredWidth() - getPaddingRight();  //设置绘图右边的坐标
        rect.top = getPaddingTop();  //设置绘图上边的坐标
        rect.bottom = getMeasuredHeight() - getPaddingBottom();   //设置绘图下面的坐标

        paint.setColor(textColor);//设置画笔颜色,开始绘制文字
        paint.setStyle(Paint.Style.FILL);  //设置撑满全布局

        if(textRect.width() > getMeasuredWidth()){
            //重新设置文字的宽度为布局的宽度
            TextPaint textPaint = new TextPaint(paint);
            String msg = TextUtils.ellipsize(textContent, textPaint, (float) getMeasuredWidth() - getPaddingLeft() - getPaddingRight(),
                    TextUtils.TruncateAt.END).toString();
            canvas.drawText(msg, getPaddingLeft(), getMeasuredHeight() - getPaddingBottom(), paint);

        }else {
            //绘制在底部剧中
            canvas.drawText(textContent,getMeasuredWidth()/2 - textRect.width()/2,getMeasuredHeight() - getPaddingBottom(),paint);
        }

        if (imageType == 0)
        {
            //画布剪掉已经绘制的布局
            rect.bottom -= textRect.height();
            canvas.drawBitmap(imageContent, null, rect, paint);
        } else
        {
            //计算居中的矩形范围
            rect.left = getMeasuredWidth() / 2 - imageContent.getWidth() / 2;
            rect.right = getMeasuredWidth() / 2 + imageContent.getWidth() / 2;
            rect.top = (getMeasuredHeight() - textRect.height()) / 2 - imageContent.getHeight() / 2;
            rect.bottom = (getMeasuredHeight() - textRect.height()) / 2 + imageContent.getHeight() / 2;

            canvas.drawBitmap(imageContent, null, rect, paint);
        }
    }
}
这个是核心代码,也很简单,基本都有注释,主要就是一个便利,取出自定义的属性,获取它的值
然后计算画布的宽高,最后就是根据宽高和图片的样式来绘制自定义的布局,基本是对第一次的复习,代码很简单,与鸿洋老师的也很类似,大家有什么不明白的也可以留言
最后附上我的布局文件和最后的效果图
<LinearLayout xmlns:android="http://schemas.android.com/apk/res/android"
    xmlns:zxf="http://schemas.android.com/apk/res-auto"
    android:id="@+id/activity_main"
    android:layout_width="match_parent"
    android:layout_height="match_parent"
    android:orientation="vertical">

    <com.example.myapplication.view.CustomView
        android:layout_width="wrap_content"
        android:layout_height="wrap_content"
        android:layout_marginLeft="10dp"
        zxf:textSize="10dp"
        zxf:textContent="111111111111"
        zxf:textColor="@color/colorAccent"
        zxf:imageContent="@drawable/ic_launcher"
        zxf:imageType="center"/>

    <com.example.myapplication.view.CustomView
        android:layout_width="100dp"
        android:layout_height="wrap_content"
        android:layout_marginLeft="10dp"
        android:layout_marginRight="20dp"
        zxf:textSize="10dp"
        zxf:textContent="5555555"
        zxf:textColor="@android:color/black"
        zxf:imageContent="@drawable/ic_launcher"
        zxf:imageType="fillXY" />

    <com.example.myapplication.view.CustomView
        android:layout_width="match_parent"
        android:layout_height="200dp"
        android:layout_marginLeft="10dp"
        android:layout_marginRight="20dp"
        zxf:textSize="20dp"
        zxf:textContent="睡觉啦啦啦啦啦啦啦啦"
        zxf:textColor="@android:color/holo_green_light"
        zxf:imageContent="@drawable/a"
        zxf:imageType="fillXY" />

</LinearLayout>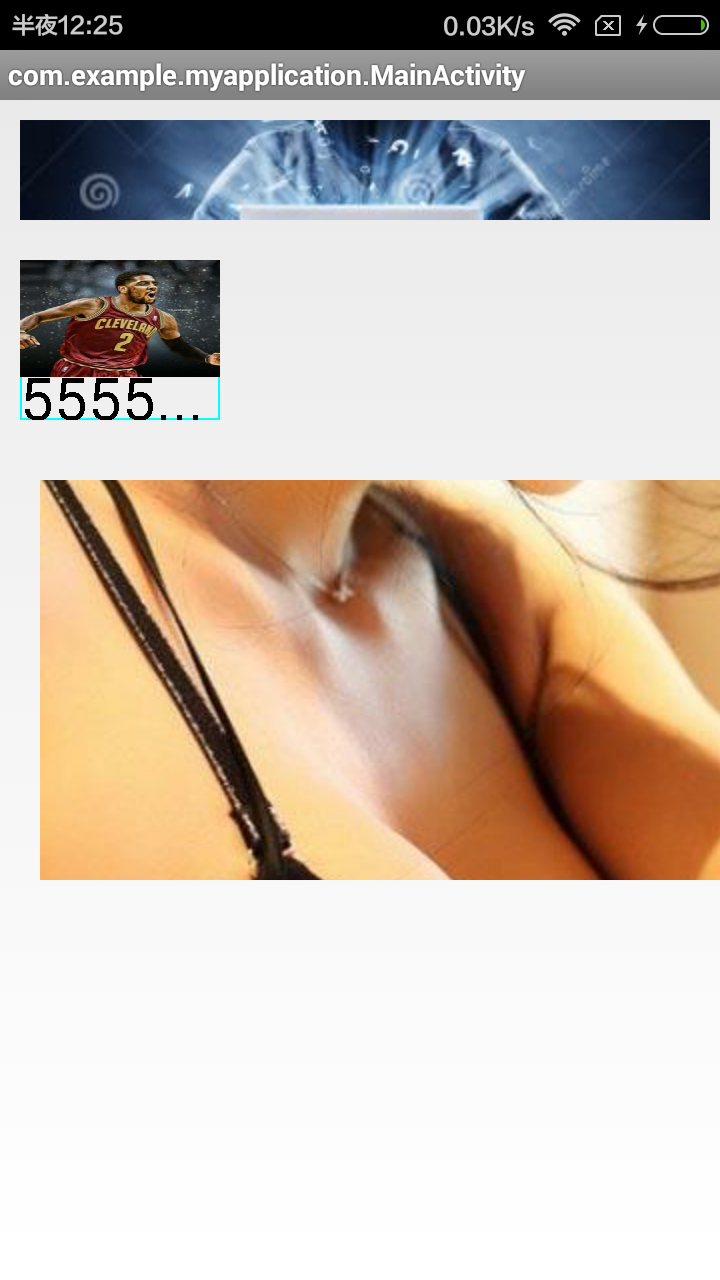
好了,就这些了,如果对你有帮助,请留下宝贵的意见。


 2864
2864

 被折叠的 条评论
为什么被折叠?
被折叠的 条评论
为什么被折叠?
 到【灌水乐园】发言


