


目录
- ElementUI
- 1. 添加Iconfont的svg图形
- 2. 三级/四级路由嵌套
- 3. `el-divider` 组件无法使用
- 4. 多个上传组件`el-upload`无法确定操作的是哪一个
- 5. elementUI table组件表头未对齐
- 6. Tree 水平和垂直滚动条及样式
- 7. el-dialog组建中使用el-tree组件,显示影藏el-dialog组件的时候,tree中节点的checked属性的设置
- 8. 自定义面包屑组件 CustomBreadcrumbItem ,主要解决当前页Table钻取时的同一表格路径的问题
- 9. 表格排序,挺简单的 反正改了一下就做个笔记了
- 10. el-chebox 绑定选中和非选中状态下对应点的值时,需要动态的绑定相关的属性
- 11. 修复el-table中最后一列fixed时,表格的边框不显示
- 12. 密码RSA加解密
- 13. el-checkbox-group绑定的值有刷新,但是页面效果没刷新
- 14. el-tree组件的事件,check-change、check
- 15. el-table组件中,v-if结合el-table-column时有时候会导致表头列显示错位
- 16. 登录时获取用户信息接口的分装
- 17. 后台将验证token放在请求的头部时,自己还需要注意下(在utils/request.js文件)
- 18. 每次进入新页面时刷新数据(作者设计的是缓存,不刷新所以组件中调用created钩子函数)
- 19. el-image组件导入图片
- 20. `background url()`如何处理
- 21. 每次注销时,重新进入系统时,清除已经访问的记录,并在首页展示
- 22. 前端动态路由基本实现
- 23. element-ui里el-progress:Invalid prop: custom validator check failed for prop "percentage"
- 24. 密码验证
- 25. history 模式下打包发布到Tomcat
- 26. 有些奇怪的显示在编辑器报错误,执行下面的去清空下缓存就好了
- 27. ESlint 自动保存时格式化
- 28. 下载doc文件
- 29. 路由跳转同一页面 但是里面tab根据不同的query 去设置
- 30. 表单中存在上传文件组件
- 31. 输入框`Enter` 被转译成 `\n\r`
- 32. `出现不同的请求复用同一个组件的时候一定绑定动态的key值`
- 33. 绑定函数传参又想访问事件相关的信息`$event`
- 34. 出现表格钻取(点击表单某一列展示新的表,但是前后有复用的列)排序问题
- 35. 发送请求为fomedate时,上传文件常用
- 36. 下载的Excel中插入Echart的图标信息
- 37. Select两个联动时,第二个数据发生变化时,未显示选中结果
- 38. Dialog弹窗取消点击窗口外关闭
- 39. 弹窗确认操作,多次点击触发多次
- 40. 压缩打包文件
- 41. 多页应用
- 42. 动画GPU加速
- 43. 自定义鼠标指针样式
- 44. 防抖
- 45. Docker打包
- 46. Sass Variable in CSS calc() function
- 47. 处理跨域
- 48. ElementUI Tree 组件懒加载,更新数据后局部树的刷新及存在 checkbox 时选中问题
- 49. 树节点半选
- 50. el-autocomplete 远程搜索,点击clearable清空后,再输入下拉框不显示
- 51. 文件上传报错:413 Request Entity Too Large
- 52. 通过面包屑来表示不用层级信息时 el-table 中列展示位置不正常
- 53. mouseenter 事件导致 target 改变触发闪烁
ElementUI
1. 添加Iconfont的svg图形
在阿里巴巴矢量图标库中将选中的图标添加进库,如下图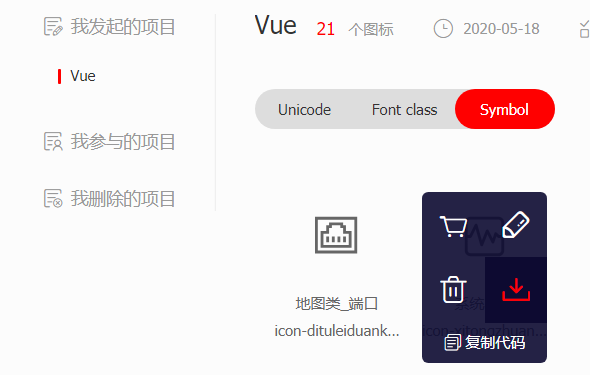
需要选中是Symbol类型,然后去下载需要的svg代码。拷贝进项目的时候需要在svg代码中需要去除 fill/stroke给矢量图像添加颜色相关的代码
2. 三级/四级路由嵌套
<!-- sub-parent/index -->
<template>
  <router-view />
</template>
...
{
	path: 'parent',
	...
	children: [
		{
			path: 'sub-parent',
			component: () => import('@/sub-parent/index') // 嵌套路由
			...
			children: [
				{
					path: 'sub-sub-parent',
					component: () => import('@/sub-sub-parent/index'),
					...
				}
			]
		}
	]
}
3. el-divider 组件无法使用
解决:修改package.json element-ui 的版本号大于`2.8.0`
## 查看可以版本
npm view element-ui version

## 修改package.json 中element-ui版本为最新

## 更新element-ui
npm update element-ui
4. 多个上传组件el-upload无法确定操作的是哪一个
修改源码
在element-ui/lib目录下修改element-ui.common.js和upload.js两个文件实际上前者包含了后者
element-ui 版本2.12.0
// element-ui.common.js 在29461行 给props添加一个属性 temp
temp: Object;
// methods 方法里面和this.onChange相关的函数末尾都添加 this.temp参数 如下
this.onChange(file, this.uploadFiles, this.temp);

//upload.js还是和上面的一样 在1043行开始

//这样的话父组件中只要绑定 temp,然后就可以在on-change时间的参数中添加 标识的参数了
<div v-for="items in addProblems" :key="items.key" class="show-pic">
   <el-upload
      :ref="items.ref"
      :action="uploadURL"
      :temp="items"
      list-type="picture-card"
      accept=".jpg, .png, .gif"
      :auto-upload="false"
      :on-preview="handlePictureCardPreview"
      :on-change="handleChange"
   >
     <i class="el-icon-plus" />
  </el-upload>
  <el-dialog :visible.sync="items.dialogVisible">
  	<img width="100%" :src="items.dialogImageUrl" alt="">
  </el-dialog>
</div>

//js
handleChange(file, fileList, temp) {
      const isLt10M = file.size / 1024 / 1024 < 10
      const isExcel = /\.(png|jpg|gif)$/.test(file.name)

      if (!isExcel) {
        this.$message.error('上传文件只能是图片!')
      }
      if (!isLt10M) {
        this.$message.error('上传图片大小不能超过 10MB!')
      }

      if (!isExcel || !isLt10M) {
        fileList.splice(fileList.length - 1, 1)
      }
	//就可以区别是在哪一个上操作了
      temp.images = fileList
    }

	// 多个上传组件的上传
	this.addProblems.forEach(item => {
        this.$refs[item.ref][0].submit()
      })

	// 相关的一些代码
	handleAddProblem() {
      ++this.addProblemsId //默认 0
      var val = this.addProblemsId
      this.addProblems.push({
        id: val,
        ref: 'upload' + val,
        description: '',
        severity: '',
        images: [],
        violate: '',
        dialogImageUrl: '',
        dialogVisible: false
      })
    },
5. elementUI table组件表头未对齐
/* fix table Misaligned */
.el-table th.gutter{
  display: table-cell!important;
}
6. Tree 水平和垂直滚动条及样式
<el-card class="tree">
  <el-tree
    :data="dataTree"
    node-key="id"
    :default-expanded-keys="[0]"
    :props="defaultProps"
    @node-click="handleNodeClick"
  />
</el-card>
.tree {
  width: 100%;
  max-height: 600px;
  overflow: auto;
}

.el-tree>.el-tree-node {
  min-width: 100%;
  display: inline-block !important;
}
 /*滚动条样式*/
.tree::-webkit-scrollbar {
  /* 宽度和高度 */
  width: 4px;
  height: 4px;
}
.tree::-webkit-scrollbar-thumb {
  border-radius: 10px;
  box-shadow: inset 0 0 5px rgba(0,0,0,0.2);
  background: rgba(0,0,0,0.2);
}
.tree::-webkit-scrollbar-track {
  box-shadow: inset 0 0 5px rgba(0,0,0,0.2);
  border-radius: 0;
  background: rgba(0,0,0,0.1);
}
或者借助<el-scrollbar>
<el-scrollbar class="tree-scroll">
  <el-tree
    ref="tree"
    ...
  />
</el-scrollbar>
.tree-scroll.el-scrollbar {
  .el-scrollbar__wrap{
    height: 600px;
  }
}
7. el-dialog组建中使用el-tree组件,显示影藏el-dialog组件的时候,tree中节点的checked属性的设置
// 树种必须设置node-key属性
 this.dialogFormVisible = true
 // DOM还没更新
 this.$nextTick(() => {
   // DOM 更新了。this自动绑定到调用他的实例上
   this.$refs.dataTree.setCheckedKeys([.....id])
   this.$refs['dataForm'].clearValidate()
 })
8. 自定义面包屑组件 CustomBreadcrumbItem ,主要解决当前页Table钻取时的同一表格路径的问题
当前页面Table钻取时,显示Table钻取的路径
<!-- 查看elementUI面包屑,组件的实现方式 然后二次开发 CustomBreadcrumbItem.vue -->
<!-- CustomBreadcrumbItem  用来替换 BreadcrumbItem  我需要里面的样式和部分逻辑 -->
<template>
  <span class="el-breadcrumb__item">
    <span
      ref="link"
      :class="['el-breadcrumb__inner', 'is-link']"
      role="link"
    >
      <slot />
    </span>
    <i v-if="separatorClass" class="el-breadcrumb__separator" :class="separatorClass" />
    <span v-else class="el-breadcrumb__separator" role="presentation">{{ separator }}</span>
  </span>
</template>
<script>
export default {
  name: 'CustomBreadcrumbItem',
  props: {
    to: {
      type: Object,
      default: function() {}
    }
  },
  data() {
    return {
      separator: '',
      separatorClass: ''
    }
  },

  inject: ['elBreadcrumb'],

  mounted() {
    this.separator = this.elBreadcrumb.separator
    this.separatorClass = this.elBreadcrumb.separatorClass
    const link = this.$refs.link
    link.setAttribute('role', 'link')
    link.addEventListener('click', _ => {
      const { to } = this
      this.$emit('handle', to)
    })
  }
}
</script>
页面的部分关键代码
<template>
	...
	<el-breadcrumb separator-class="el-icon-arrow-right" class="filter-item" style="margin-right: 20px">
        <transition-group name="breadcrumb">
          <custom-breadcrumb-item v-for="item in breadArray" :key="item.tree_id" :to="item" @handle="breadClick">
            <svg-icon :icon-class="item.type | deviceTypeImg" />
            {{ item.label }}
          </custom-breadcrumb-item>
        </transition-group>
      </el-breadcrumb>
	...
</template>
<script>
export default {
	...
	methods: {
		...
		cellClick(row) {
		  // 动态修改路由
	      this.breadArray.push({
	        tree_id: row.tree_id,
	        label: row.label,
	        type: row.type
	      })
	      this.listQuery.tree_id = row.tree_id
	      this.getList()
	    },
	    breadClick(to) {
	      const len = this.breadArray.length
	      for (let i = 0; i < len; i++) {
	        if (to['tree_id'] === this.breadArray[i].tree_id) {
	          this.breadArray = this.breadArray.splice(0, i + 1)
	        } else {
	          continue
	        }
	      }
	      this.listQuery.tree_id = to['tree_id']
	      this.getList()
	    }
	}
 </script>
9. 表格排序,挺简单的 反正改了一下就做个笔记了
<template>
	...
	<el-table
      :key="tableKey"
      v-loading="listLoading"
      :data="list"
      border
      fit
      highlight-current-row
      style="width: 100%;"
      :default-sort="{prop: 'alarm_level', order: 'descending'}"
      @sort-change="sortChange"
    >
    <el-table-column label="对象" prop="label" sortable="custom" min-width="110" align="left" :class-name="getSortClass('label')">...</el-table-column>
    <el-table-column label="更新时间" prop="update_time" sortable="custom" width="180" align="center" :class-name="getSortClass('update_time')"></el-table-column>
	...
</template>
<script>
...
	methods: {
		sortChange(data) {
	      const { prop, order } = data
	      this.sortBy(prop, order)
	    },
	    sortBy(prop, order) {
	      if (order === 'ascending') {
	        this.listQuery.orderBy = '+' + prop
	      } else {
	        this.listQuery.orderBy = '-' + prop
	      }
	      this.handleFilter()
	    },
	    getSortClass: function(key) {
	      const sort = this.listQuery.orderBy
	      return sort === `+${key}` ? 'ascending' : sort === `-${key}` ? 'descending' : ''
	    },
	}
...
</script>
10. el-chebox 绑定选中和非选中状态下对应点的值时,需要动态的绑定相关的属性
当一个组件没有声明任何 prop 时,这里会包含所有父作用域的绑定 (class 和 style 除外),并且可以通过 v-bind="$attrs" 传入内部组件
在Vue2.4.0,可以在组件定义中添加inheritAttrs:false,组件将不会把未被注册的props呈现为普通的HTML属性。但是在组件里我们可以通过其$attrs可以获取到没有使用的注册属性,如果需要,我们在这也可以往下继续传递。
<!-- elementUI 中 el-checkbox子组件声明了父组件可以传入的prop属性 -->
<el-checkbox v-model="row.isAlarm" :true-label="1" :false-label="0" />
11. 修复el-table中最后一列fixed时,表格的边框不显示
// scss
.el-table__row {
 td{
   &:last-child {
     border-left: 1px solid #dfe6ec;
   }
 }
}
.el-table__fixed-header-wrapper {
 z-index: 4;

 th {
   &:last-child{
     border-left: 1px solid #dfe6ec;
   }
 }
}
12. 密码RSA加解密
npm install jsencrypt --save
// RSA 加密
// main.js 直接导入就好了,源码中实现的部分代码是这样写的
/** window.JSEncrypt = JSEncrypt
  * exports.JSEncrypt = JSEncrypt
  * exports.default= JSEncrypt
  */
import 'jsencrypt/bin/jsencrypt'

// 某个需要的文件调用
import { publicKey, privateKey } from '......'
let encryptor = new JSEncrypt()
encryptor.setPublicKey(publicKey)
let rsaPassword = encryptor.encrypt('加密的内容') // 加密后的内容

// 解密
let decryptor = new JSEncrypt()
decryptor .setPublicKey(privateKey)
let rsaPassword = decryptor .decrypt('被加密的内容') // 解密后的内容
13. el-checkbox-group绑定的值有刷新,但是页面效果没刷新
页面大致的结构是这样的,弹窗dialog,内部是一个tabs,根据不同条件显示不同的el-tab-pane。
但当在某一个条件下显示的el-tab-pane,需要在el-form中去验证el-checkbox-group时,点击时绑定的值发生了修改,但是el-checkbox-group没显示出来,进行多选的时候,会在最原始绑定的值上只添加最后一次点击的值。只能点击一次切换一下el-tab-pane才会显示 勾选的结果。所以在el-chexkbox-group 的change事件上做了下面的事。每次在B上点击一下,切换一下,来刷新当前选中的结果。

我在codepen去尝试了是没任何问题的代码示例
changeRole(val) {
  this.activeName = 'A'
  this.activeName = 'B'
},
14. el-tree组件的事件,check-change、check
当去选择某一个子树的时候,在不使用严格模式的时候,从你选择的当前节点的最上层父节点和子层的节点总共有几个节点选中,就触发几次事件
check事件 每次选择时,第一个参数是当前节点对象
15. el-table组件中,v-if结合el-table-column时有时候会导致表头列显示错位
可能错位的两列所用的数据格式差不多导致列渲染复用导致的,可以在el-table-column 结合key 关键字来区分,使表按你要额顺序展示。(好像这个问题在官方文档就有说明,组件复用的问题)
16. 登录时获取用户信息接口的分装
// 在permission.js中看到当登录设置了token的时候,会根据roles去判断是否去获取当前用户的信息,如果没存在当前用户的信息则取获取用的信息。但是在返回的用户信息的结果中是有一个roles的对象,设置当前的用户角色
// note: roles must be a object array! such as: ['admin'] or ,['developer','editor']
const { roles } = await store.dispatch('user/getInfo')

// 在store/modules/user.js 中需要根据后台的返回去自己封装一下,必须将roles返回。其他的根据自己的需要去封装,或者也可以自己直接去修改permission.js中的代码
resolve({
  roles,
  name,
  path,
  note
})
17. 后台将验证token放在请求的头部时,自己还需要注意下(在utils/request.js文件)
// 在response的拦截器中添加如下代码
if (response.headers && response.headers['authorization']) {
  return response
}
注意:当请求报401或者其他错误状态码时,会跳转到error。error中封装了response响应的所有属性。所以可以这样去自己封装一下
error => {
  const { data, msg } = error.response.data
  Message({
    message: data || msg || error.message,
    type: 'error',
    duration: 5 * 1000
  })
  return Promise.reject(error)
}
18. 每次进入新页面时刷新数据(作者设计的是缓存,不刷新所以组件中调用created钩子函数)
在AppMain.vue组件中调用keep-alive组件。当组件在 内被切换,它的 activated 和 deactivated 这两个生命周期钩子函数将会被对应执行。所以可以将created钩子函数用activated替换,同时修改一下table上绑定的key值
19. el-image组件导入图片
根据官方文档,图片都是在某个具体路径下。但是可以在自己项目中加入本地的图片进行展示。
<el-image:src="logo">
// 创建文件夹并添加图片 src/img/logo.png
// const logo = require('../../imgs/login-bg.png') 或者require('@/imgs/login-bg.png')
import logo from '@/imgs/logo.png'
...
data() {
	return {
		logo: logo
	}
}
基于 Node require()实现原理 可以添加css中背景图片的样式
20. background url()如何处理
现有vue-element-admin框架基本都是路径不匹配导致的,最大问题就是vue.config.js中设置的assetsDir: ‘static’,将资源都打包到static文件夹下,如直接将该属性置空,设置如下的路径就不会发生错误。
.logo {
	background: url('../../imgs/boy.jpg') center/80% 80% no-repeat;
}
21. 每次注销时,重新进入系统时,清除已经访问的记录,并在首页展示
// src/layout/component/Navbar.vue
async logout() {
	// 添加让路由到首页,
	this.$router.push({path: '/'})
	...
}

// src/store/modules/tagsView.js 直接将state.visitedViews = [] 就行。
// 默认会保留访问过的路由的meta属性中affix为true
DEL_ALL_VISITED_VIEWS: state => {
  // keep affix tags
  const affixTags = state.visitedViews.filter(tag => tag.meta.affix)
  state.visitedViews = affixTags
},
22. 前端动态路由基本实现
// 每个前后端实现的逻辑肯定不一样
// 暂时只是实现页面根据不同的分配权限显示不同的页面,更细的话涉及到页面上不同操作按钮之类的(这种根据请求返回相应的再去处理具体的页面)。
// 在页面权限设置中可以设置不同页面不同的标识,然后去分配。这种基本都是写死的路由,不可能再去动态的添加,应为三级路由以上的实现的方式不一样
// 在src/store/getters.js
const getters = {
	...
	// 还可以一次性的加载完所有页面中更细的控制操作的标识
	menuSet: state => state.user.menuSet
}

// src/store/modules/user.js
const state = {
	...
	menuSet: []
}
const mutations = {
	...
	SET_MENUSET: (state, menuSet) => {
	    state.menuSet = menuSet
	  }
}
getInfo({ commit }) {
	...
	// 后台封装数据 menuSet是展示页面的标识
	const { type, name, note, menuSet } = data

    switch (type) {
      case 0:
        roles = ['editor']
        break
      case 1:
      case 2:
        roles = ['admin']
        break
    }

	// 需要二次处理菜单路由中父级路由展示,后台返回的展示的叶子路由节点
	if (menuSet.includes('p1') || menuSet.includes('p2')) {
      menuSet.push('pt1')
    }
    ...
    commit('SET_MENUSET', menuSet)
    resolve({
      roles,
      name,
      path,
      note,
      menuSet
    })
}

// src/permission.js
 const { roles, menuSet } = await store.dispatch('user/getInfo')
 // generate accessible routes map based on roles
 const accessRoutes = await store.dispatch('permission/generateRoutes', { roles: roles, menuSet: menuSet })

// src/store/modules/permission.js 只需要重新去生成一下路由中roles对象
/**
 * add editor to meta.roles
 * @param routes asyncRoutes
 * @param menuSet menuSet
 * @param roles
 */
export function addEditor(routes, menuSet, roles) {
  routes.forEach(route => {
    const tmp = { ...route }
    if (tmp.meta && tmp.meta.mark && menuSet.includes(tmp.meta.mark)) {
      if (tmp.meta && tmp.meta.roles) {
        tmp.meta.roles.push(...roles)
      }
      if (tmp.children && tmp.children.length > 0) {
        addEditor(tmp.children, menuSet, roles)
      }
    }
  })

  return routes
}

const actions = {
  generateRoutes({ commit }, obj) {
    const { roles, menuSet } = obj
    return new Promise(resolve => {
      let accessedRoutes
      if (roles.includes('admin')) {
        accessedRoutes = []
        accessedRoutes = asyncRoutes || []
      } else {
        const newRouters = addEditor(asyncRoutes, menuSet, roles)
        accessedRoutes = filterAsyncRoutes(newRouters, roles)
      }
      commit('SET_ROUTES', accessedRoutes)
      resolve(accessedRoutes)
    })
  }
}
23. element-ui里el-progress:Invalid prop: custom validator check failed for prop “percentage”
// 给el-progress 添加一个v-if 去判断percentage 是否存在即可
<el-progress v-if="calculate(items.value, item.Total)" :text-inside="true" :stroke-width="18" :percentage="calculate(items.value, item.Total)" />
24. 密码验证

原本打算用正则的,结果发现有点复杂,先用别的方式来处理一下
/**
 * @param {string} str
 * @returns {Boolean}
 */
export function validPassword(str) {
  let i = 0
  if (/[^\w~!#\$%\^&*\(\)<>]/.test(str)) {
    return false
  }
  if (/\d/.test(str)) {
    ++i
  }
  if (/[a-zA-Z]/.test(str)) {
    ++i
  }
  if (/[_!@#]/.test(str)) {
    ++i
  }
  return i >= 2
}
25. history 模式下打包发布到Tomcat
// src/router/index 中修改
const createRouter = () => new Router({
  mode: 'history', // require service support
  base: '/webProj',
  scrollBehavior: () => ({ y: 0 }),
  routes: constantRoutes
})

// vue.config.js中设置
  publicPath: '/webProj',
  outputDir: 'webProj',

// public目录下 创建WEB-INF/web.xml -----方法1
<?xml version="1.0" encoding="UTF-8"?>
<web-app xmlns:xsi="http://www.w3.org/2001/XMLSchema-instance"
    xmlns="http://xmlns.jcp.org/xml/ns/javaee" xsi:schemaLocation="http://xmlns.jcp.org/xml/ns/javaee http://xmlns.jcp.org/xml/ns/javaee/web-app_3_1.xsd" id="WebApp_ID" version="3.1">
    <display-name>historyMode</display-name>
    <error-page>
        <error-code>404</error-code>
        <location>/index.html</location>
    </error-page>
</web-app>

// tomcat/conf/server.xml
<Context path="" docBase="/webProj" reloadable="true" />
# 方法2
# /etc/httpd/conf/httpd.conf
#打开 LoadModule rewrite_module libexec/apache2/mod_rewrite.so 我去看是默认打开的
# vim /xxx 快捷搜索xxx
# AllowOverride None的那行,把它改成AllowOverride All 使.htaccess文件生效
# public 目录下创建 .htaccss文件
<IfModule mod_rewrite.c>
  RewriteEngine On
  RewriteBase /
  RewriteRule ^index\.html$ - [L]
  RewriteCond %{REQUEST_FILENAME} !-f
  RewriteCond %{REQUEST_FILENAME} !-d
  RewriteRule . /webProj/index.html [L]
</IfModule>
26. 有些奇怪的显示在编辑器报错误,执行下面的去清空下缓存就好了
npm cache clean --force
27. ESlint 自动保存时格式化
	"editor.formatOnSave": false,
	"eslint.validate": [
        "javascript",
        "javascriptreact",
        "html",
        "vue"
    ],
    "editor.codeActionsOnSave": {
        "source.fixAll.eslint": true
    },
    "eslint.run": "onSave",
28. 下载doc文件
// axions response 拦截器
// blob--size
// arrayBuffer--byteLength

// 下载文件的信息(需要后端设置)
// headers: {
//   'content-disposition': 'attachment;filename=%E7%BB%84%E7%BB%87%E6%9E%B6%E6%9E%84%E5%AF%BC%E5%85%A5%E6%A8%A1%E6%9D%BF.xls'
// }
if (response.config.responseType === 'blob') {
  if (response.status === 200 && response.data.size > 0) return Promise.resolve(response.data)
  return Promise.reject(response.data)
}

// Express 模拟请求
app.post('/download', function(req, res){
  let file = fs.readFileSync('name.doc', 'utf8')
  res.end(file)
})

// 请求
export function reqDownload() {
  return request({
    url: 'http://127.0.0.1:2020/download',
    method: 'post',
    responseType: 'blob'  // 设置返回的响应很很重要
  })
}

// 处理:(文件名可能存在空格需要处理)
export function downloadFile(fileName, data) {
  if (window.navigator.msSaveOrOpenBlob) {
    window.navigator.msSaveOrOpenBlob(data, fileName)
  } else {
    const url = window.URL.createObjectURL(new Blob([data], { type: 'blob' }))
    const a = document.createElement('a')
    a.setAttribute('href', url)
    a.setAttribute('download', fileName)
    a.click()
    window.URL.revokeObjectURL(url)
  }
}

download() {
  reqDownload().then(res => {
    this.$prompt('请输入保存文件名', '提示', {
      confirmButtonText: '确定',
      cancelButtonText: '取消',
      inputPattern: /\S*/,
      inputErrorMessage: ''
    }).then(({ value }) => {
      const name = value || Math.random().toString(16).slice(2, 8)
      downloadFile(`${name}.doc`, res.data)
    })
  })
}
29. 路由跳转同一页面 但是里面tab根据不同的query 去设置
因为跳转的是同一个页面导致该组件的声明周期函数都不可用,但是又想去改变某些东西。只有路由是变化的,在项目开始的时候路由就挂载到组件上了,类似一个全局的mixin,那就可以通过watch$route去改变数据
const componentList = {
  scan: [
    {
      id: 1,
      name: 'list',
      zhName: '浏览',
      componentName: 'Scan'
    },
    {
      id: 2,
      name: 'scan',
      zhName: '未知',
      componentName: 'FutureText'
    }
  ],
  manual: [
    {
      id: 1,
      name: 'list',
      zhName: '浏览',
      componentName: 'Scan'
    }
  ]
 }
...
watch: {
    $route: function(val) {
      const { query } = val
      this.tabList = componentList[query.tip]
    }
  },
...

30. 表单中存在上传文件组件
<el-form
   ref="ruleForm"
   :model="ruleForm"
   :rules="rules"
   :label-width="'80px'"
   class="rule-form"
 >
   <el-form-item  label="任务" prop="task">
     <el-input v-model="ruleForm.task" placeholder="任务名称" class="add-list-input" />
   </el-form-item>
   <el-form-item  label="附件">
     <el-upload
       ref="upload-attach"
       class="upload-attach"
       action="https://jsonplaceholder.typicode.com/posts/"
       :on-change="handleChange"
       :auto-upload="false"
     >
       <el-button slot="trigger" size="small" type="primary">选取文件</el-button>
       <div slot="tip" class="el-upload__tip">上传文件不超过500kb</div>
     </el-upload>
   </el-form-item>
 </el-form>
this.$refs['ruleForm'].validate(valid => {
  if (valid) {
    if (this.handleMark == 'addTask') {
      let formData = new FormData(form)
      // 遍历文件列表
      for (const item of this.fileList) {
		formData.append('file', item.raw, item.name)
	  }
      addDepartment(formData).then(res => {
        console.log(res)
      })
    }
  }
})
如此发请求,文件属性会被自动封装进请求体中(请求头肯定是multipart/form-data)

31. 输入框Enter 被转译成 \n\r
这种通过加密 base64传输
32. 出现不同的请求复用同一个组件的时候一定绑定动态的key值
防止组件总是在复用之前渲染的结果,也可以根据watch 监听全部路由的变化在执行一操作
33. 绑定函数传参又想访问事件相关的信息$event
dragChangeCell($event, arg1, arg2) // $event 传入事件相关的信息
34. 出现表格钻取(点击表单某一列展示新的表,但是前后有复用的列)排序问题
需要在点击列钻取前,修改el-table中default-sort的prop属性,两次是不同的排序方式,只在请求中修改排序方式时,视图的排序样式会有问题
35. 发送请求为fomedate时,上传文件常用
但有时候都是一个项目很多人写,你懂的。。。。
formdata是无法发送数组的,他会数组转成字符串
Content-Type: multipart/form-data
 		let formData = new FormData()
        formData.append('typeId', 'belongedMajor')
        formData.append('code', '')
        commonOptionsFilter(formData).then(res => {})
 	  let loadingInstance = Loading.service({ fullscreen: true, background: 'rgba(0, 0, 0, 0.2)' })
      let form = this.$refs.uploadExcelForm.$el
      let formData = new FormData(form)
      formData.delete('file')
      // 添加空文件
      formData.append('file', new Blob([]))
      virusImport(formData)
        .then(res => {
          this.$message({
            showClose: true,
            message: '上传成功',
            type: 'success'
          })
          this.canUpload1 = true
          this.$refs['uploadExcel'].clearFiles()
          this.dialogVisible = false
        })
        .finally(_ => {
          loadingInstance.close()
        })
36. 下载的Excel中插入Echart的图标信息
// Echart chart实例 echartInstance.getDataURL()  获取图片base64

// exceljs
const ExcelJS = require('exceljs')

export function DownImgExcel() {
  const workbook = new ExcelJS.Workbook()

  workbook.creator = 'Me'
  workbook.lastModifiedBy = 'Her'
  workbook.created = new Date(1985, 8, 30)
  workbook.modified = new Date()
  workbook.lastPrinted = new Date(2016, 9, 27)

  workbook.views = [
    {
      x: 0, y: 0, width: 1000, height: 1000,
      firstSheet: 0, activeTab: 0, visibility: 'visible'
    }
  ]

  const sheet1 = workbook.addWorksheet('My Sheet1')
  sheet1.columns = [
    { header: 'Id', key: 'id', width: 10 },
    { header: 'Name', key: 'name', width: 32 },
    { header: 'D.O.B.', key: 'dob', width: 10 }
  ]
  sheet1.addRow({ id: 1, name: 'John Doe', dob: new Date(1970, 1, 1) })
  sheet1.addRow({ id: 2, name: 'Jane Doe', dob: new Date(1965, 1, 7) })
  sheet1.getRow(2).font = { name: 'Comic Sans MS', family: 4, size: 16, underline: 'double', bold: true }

  sheet1.addRow({ id: 21, name: 'New Life', dob: new Date(2020, 1, 7) })

  const myBase64Image = 'data:image/png;base64,iVBORw0KGgoAAA...'
  const imageId2 = workbook.addImage({
    base64: myBase64Image,
    extension: 'png'
  })
  sheet1.addImage(imageId2, 'A5:F20')

  const sheet2 = workbook.addWorksheet('My Sheet2', {
    properties: {
      tabColor: {
        argb: '22FFFF'
      }
    },
    pageSetup: {
      fitToPage: true,
      fitToHeight: 5, fitToWidth: 7
    }
  })

  const rowValues = []
  rowValues[1] = 4
  rowValues[5] = 'Kyle'
  rowValues[9] = new Date()
  sheet2.addRow(rowValues)

  // 将表格数据转为二进制
  workbook.xlsx.writeBuffer().then((buffer) => {
    writeFile(`demo.xlsx`, buffer)
  })

  // 将二进制转为Excel并下载
  const writeFile = (fileName, content) => {
    const a = document.createElement('a')
    const blob = new Blob([content], { type: 'text/plain' })

    a.download = fileName
    a.href = URL.createObjectURL(blob)

    a.click()
  }
}
37. Select两个联动时,第二个数据发生变化时,未显示选中结果
 // 第二个change事件中触发强制更新
updateFun() {
   this.$forceUpdate();
}
38. Dialog弹窗取消点击窗口外关闭
// 全局设置
 ElementUI.Dialog.props.closeOnClickModal.default = false
39. 弹窗确认操作,多次点击触发多次
最上层添加一个遮罩(感觉还是有点呆, 应该将button disabled了,防抖节流)
let loadingInstance = Loading.service({ fullscreen: true, background: 'rgba(0, 0, 0, 0.2)' })
...
handleData(formData)
   .then(res => {
     this.$message({
       showClose: true,
       message: '上传成功',
       type: 'success'
     })
   })
   .finally(_ => {
     loadingInstance.close()
   })
40. 压缩打包文件
const FileManagerWebpackPlugin = require('filemanager-webpack-plugin')
new FileManagerWebpackPlugin ({  // 需要在 plugins 数组里添加
  onEnd: {
     delete: [
          './dist/web.zip', // 删除之前已经存在的压缩包
      ],
     archive: [
          {source: './dist', destination: './dist/web.zip'},
      ]
  }
})

// webpack-chain
const zipName = 'web'
config
     .plugin('FileManagerPlugin')
     .use('filemanager-webpack-plugin', [
       {
         events: {
           //初始化 filemanager-webpack-plugin 插件实例
           onEnd: {
             archive: [
               //然后我们选择dist文件夹将之打包成dist.zip并放在根目录
               { source: './home', destination: './home.' + zipName + '.zip' }
             ]
           }
         }
       }
     ])
     .end()
41. 多页应用
vue-cli脚手架生成的项目中只需要参考Vue Cli的vue.config.js中的配置参数 pages即可(查看webpack版本 cat node_modules/webpack/package.json )
// vue.config.js
const pages = {
    'index': {
      entry: 'src/main.js',
      template: 'public/index.html',
      filename: 'index.html',
      // template 中的 title 标签需要是 <title><%= htmlWebpackPlugin.options.title %></title>
      title: 'Index Page',
      // 前三个是优化通过分块
      chunks: ['chunk-libs', 'chunk-elementUI', 'chunk-commons', 'runtime', 'index']
    },
    'editor': {
      entry: 'src/editor.js',
      template: 'public/editor.html',
      filename: 'editor.html',
      title: 'Editor Page',
      chunks: ['chunk-libs', 'chunk-elementUI', 'chunk-commons', 'runtime', 'total']
    }
module.exports = {
  pages,
  chainWebpack(config) {
  	// 注释 ScriptExtHtmlWebpackPlugin 插件相关代码
  	// 增加
  	Object.keys(pages).forEach(page => {
     config.plugins.delete(`preload-${page}`)
     config.plugins.delete(`prefetch-${page}`)
   })
  }
},
 // 在 editor 页面入口文件配置 router 时设置base
 const createRouter = () => new VueRouter({
  mode: 'history',
  base: '/web/editor.html',
  scrollBehavior: () => ({ y: 0 }),
  routes:  [...yourRoutes]
})
// 页面直接切换,去editor 页面
location.pathname = '/web/editor.html'
如此打包就可以访问到页面,而不是一个空白页面或者提示无法找到runtime.xx.js 相关文件的信息
42. 动画GPU加速
CSS Triggers 动画的属性将会触发重绘
.shake{
	perspective: 1000px;
	backface-visibility: hidden;
	transform: translateZ(0);
}
43. 自定义鼠标指针样式
/** auto 防止url的图片不支持导致异常问题 */
.marker {
	cursor: url(...xx.png), auto;
}
44. 防抖
import {
  debounce
} from '@/utils'
export default {
	data() {
		click: null
	}
	mounted() {
		this.click = debounce(() => {
			// do something
		}, 1000)
	}
}
45. Docker打包
// vue.config.js
publicPath: '/web'

// router/index.js
const createRouter = () => new Router({
  // mode: 'history', // require service support
  base: '/web',
  scrollBehavior: () => ({ y: 0 }),
  routes: constantRoutes
})
# Dockerfile
FROM node:12
COPY ./ /app
WORKDIR /app
RUN npm install && npm run build

FROM nginx
RUN mkdir -p /app/web
COPY --from=0 /app/web /app/web
COPY nginx.conf /etc/nginx/nginx.conf
# nginx.cong
user  nginx;
worker_processes  1;
error_log  /var/log/nginx/error.log warn;
pid        /var/run/nginx.pid;
events {
  worker_connections  1024;
}
http {
  include       /etc/nginx/mime.types;
  default_type  application/octet-stream;
  log_format  main  '$remote_addr - $remote_user [$time_local] "$request" '
                    '$status $body_bytes_sent "$http_referer" '
                    '"$http_user_agent" "$http_x_forwarded_for"';
  access_log  /var/log/nginx/access.log  main;
  sendfile        on;
  keepalive_timeout  65;
  server {
    listen       80;
    server_name  localhost;
    location /web {
      root   /app;
      index  index.html;
      try_files $uri $uri/ /index.html;
    }
    error_page   500 502 503 504  /50x.html;
    location = /50x.html {
      root   /usr/share/nginx/html;
    }
  }
}
46. Sass Variable in CSS calc() function
直接 使用$Variable linux 上编译会报错
ERROR Error: CSS minification error: Lexical error on line 1: Unrecognized text.
body {
	height: calc(100% - #{$body_padding})
}
47. 处理跨域
// vue.config.js
// VUE_APP_BASE_API = '/'
devServer: {
	...
    proxy: {
      '/': {
        target: 'http://ip:port',
        ws: false,
        changeOrigin: true
      }
    }
  },
48. ElementUI Tree 组件懒加载,更新数据后局部树的刷新及存在 checkbox 时选中问题
ElementUI Tree 组件每个节点 node 都有内部已定义的属性包括 id(内部自身维护), 我们定义的数据全部在 data 属性上
懒加载初始化的时候相当于点击了一个内部 id 为 0 的隐藏 node 节点
假如节点数据很多 展开的多这样展示感觉也有问题,还是根据自身情况去做适当的处理吧
...
	data() {
		lazyLoadRecords: new Map() // 记录已经懒加载的节点数据
	}
	methods() {
		loadNode(node, resolve) {
			// 组件自身有一个自己的id (组建中 node-key 属性设置的值) , data 是根据自己需要的数据封装的数据
			// node.indeterminate = true 半选中状态
			const { data: { id, leaf }, id: buildInId, level } = node
			// 下次显示更新选中的节点,自己处理好现在已经懒加载完的结构的所以的节点就行
			this.$nextTick(() => {
	          this.$refs.tree.setCheckedKeys([2,....])
	          console.log( this.$refs.tree.getCheckedKeys())
	        })

			if (level === 0) {
		        this.lazyLoadRecords.set(buildInId, { node, resolve })
		        this.getTreeNodeLazy(0, resolve)
		      } else if (!leaf) {
		        this.lazyLoadRecords.set(id, { node, resolve })
		        this.getTreeNodeLazy(id, resolve)
		      }
		},
		nodeSave(node, data) {
			const { data: { id, parentId }} = node
			fetch(xx).then((res) => {
				const { node, resolve } = this.lazyLoadRecords.get(parentId)
        		this.loadNode({ node, resolve })
			})
		},
		nodeDelete(node) {
			const { data: { parentId }} = node
			if (this.lazyLoadRecords.has(id)) {
	          this.lazyLoadRecords.delete(id)
	        }
	        fetch(xx).then((res) => {
				const { node, resolve } = this.lazyLoadRecords.get(parentId)
          		this.loadNode({ node, resolve })
			})
		}
	}
49. 树节点半选
const node = this.$refs.tree.getNode(id)
if (node && node.checked === false) {
  node.indeterminate = true
}
50. el-autocomplete 远程搜索,点击clearable清空后,再输入下拉框不显示
// ckear 事件中
this.$refs.remoteSearch.activated = true
51. 文件上传报错:413 Request Entity Too Large
需要后端修改 Nginx 配置文件中的属性
# 默认 1m
client_max_body_size 50m
52. 通过面包屑来表示不用层级信息时 el-table 中列展示位置不正常
根据不同层级下对表中的列 添加 不用的 key 值 就会让表的列顺序显示正常
53. mouseenter 事件导致 target 改变触发闪烁
<el-card>
	<div v-if="hoverId === item.id" class="active-item">
       <el-button type="primary" icon="el-icon-edit" circle @click="editMap(item)" />
       <el-button type="primary" icon="el-icon-link" circle @click="bindRobot(item)" />
     </div>
     <el-image
       class="map-item"
       :src="`${origin}${item.mapImgUrl}`"
       :fit="'contain'"
       lazy
       @mouseenter.native="mouseEnter(item)"
       @mouseleave.native="mouseLeave"
     />
</el-card>
...
<style lang="scss" scoped>
.active-item {
	pointer-events: none;
}
</style>


 1011
1011

 被折叠的 条评论
为什么被折叠?
被折叠的 条评论
为什么被折叠?
 到【灌水乐园】发言


