


1.Oracle11gR2数据库安装
https://edu.csdn.net/course/detail/27750
2.Oracle 12c 数据库安装
https://edu.csdn.net/course/detail/35882
3.Oracle 19c 数据库一键安装
https://edu.csdn.net/course/detail/39198
4.Oracle 19c RAC For Linux安装部署 (视频讲解)
https://edu.csdn.net/course/detail/35792
5.oracle 19c 数据库基础和日常管理
https://edu.csdn.net/course/detail/36112
6.Oracle 11g DataGuard RAC集群到单节点部署
https://edu.csdn.net/course/detail/35959
7.Oracle数据库 底层原理解析_解析oracle数据库内部实现(视频讲解)
https://edu.csdn.net/course/detail/35647
8.MySQL数据库基础实战教程
https://edu.csdn.net/course/detail/26743
部署环境
系统:CentOS Linux release 7.9.2009 (Core)
数据库:Oracle 21.3
1.修改hosts文件
1.1查询主机名和IP地址
[root@host01 ~]# hostname host01
1.2修改/etc/hosts文件如下
root@host01 ~]# cat /etc/hosts
127.0.0.1   localhost
IP地址   host01
2.将软件包上传到系统上,目录位置自定义
2.1 上传的软件
[root@host01 sw]# ls
oracle-database-ee-21c-1.0-1.ol7.x86_64.rpm  oracle-database-preinstall-21c-1.0-1.el7.x86_64.rpm
[root@host01 sw]#
2.2 软件下载地址
软件下载地址
1.软件oracle-database-preinstall-21c-1.0-1.el7.x86_64.rpm
https://yum.oracle.com/repo/OracleLinux/OL7/latest/x86_64/index.html

2.软件oracle-database-ee-21c-1.0-1.ol7.x86_64.rpm下载地址
https://www.oracle.com/database/technologies/oracle21c-linux-downloads.html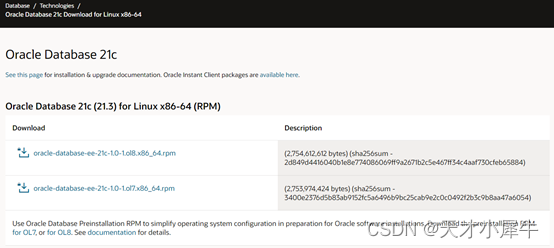
3.安装预安装包
3.1 安装预安装包
[root@host01 sw]# rpm -ivh oracle-database-preinstall-21c-1.0-1.el7.x86_64.rpm
warning: oracle-database-preinstall-21c-1.0-1.el7.x86_64.rpm: Header V3 RSA/SHA256 Signature, key ID ec551f03: NOKEY
error: Failed dependencies:
        ksh is needed by oracle-database-preinstall-21c-1.0-1.el7.x86_64
        policycoreutils-python is needed by oracle-database-preinstall-21c-1.0-1.el7.x86_64
        smartmontools is needed by oracle-database-preinstall-21c-1.0-1.el7.x86_64
        sysstat is needed by oracle-database-preinstall-21c-1.0-1.el7.x86_64
        xorg-x11-utils is needed by oracle-database-preinstall-21c-1.0-1.el7.x86_64
        xorg-x11-xauth is needed by oracle-database-preinstall-21c-1.0-1.el7.x86_64
[root@host01 sw]#
3.2.安装依赖包
根据以上提示安装缺少的依赖包
[root@host01 sw]# yum install ksh policycoreutils-python smartmontools sysstat xorg-x11-utils xorg-x11-xauth
Loaded plugins: fastestmirror, langpacks
Repository epel is listed more than once in the configuration
Loading mirror speeds from cached hostfile
epel                                                                                                                  | 4.7 kB  00:00:00
extras                                                                                                                | 2.9 kB  00:00:00
os                                                                                                                    | 3.6 kB  00:00:00
updates                                                                                                               | 2.9 kB  00:00:00
Resolving Dependencies
--> Running transaction check
---> Package ksh.x86_64 0:20120801-144.el7_9 will be installed
---> Package policycoreutils-python.x86_64 0:2.5-34.el7 will be installed
--> Processing Dependency: setools-libs >= 3.3.8-4 for package: policycoreutils-python-2.5-34.el7.x86_64
--> Processing Dependency: libsemanage-python >= 2.5-14 for package: policycoreutils-python-2.5-34.el7.x86_64
--> Processing Dependency: audit-libs-python >= 2.1.3-4 for package: policycoreutils-python-2.5-34.el7.x86_64
--> Processing Dependency: libapol.so.4()(64bit) for package: policycoreutils-python-2.5-34.el7.x86_64
---> Package smartmontools.x86_64 1:7.0-2.el7 will be installed
---> Package sysstat.x86_64 0:10.1.5-20.el7_9 will be installed
--> Processing Dependency: libsensors.so.4()(64bit) for package: sysstat-10.1.5-20.el7_9.x86_64
---> Package xorg-x11-utils.x86_64 0:7.5-23.el7 will be installed
--> Processing Dependency: libxcb.so.1()(64bit) for package: xorg-x11-utils-7.5-23.el7.x86_64
--> Processing Dependency: libXext.so.6()(64bit) for package: xorg-x11-utils-7.5-23.el7.x86_64
--> Processing Dependency: libX11.so.6()(64bit) for package: xorg-x11-utils-7.5-23.el7.x86_64
--> Processing Dependency: libX11-xcb.so.1()(64bit) for package: xorg-x11-utils-7.5-23.el7.x86_64
---> Package xorg-x11-xauth.x86_64 1:1.0.9-1.el7 will be installed
--> Processing Dependency: libXmuu.so.1()(64bit) for package: 1:xorg-x11-xauth-1.0.9-1.el7.x86_64
--> Processing Dependency: libXau.so.6()(64bit) for package: 1:xorg-x11-xauth-1.0.9-1.el7.x86_64
--> Running transaction check
---> Package audit-libs-python.x86_64 0:2.8.5-4.el7 will be installed
---> Package libSM.x86_64 0:1.2.2-2.el7 will be installed
--> Finished Dependency Resolution

Dependencies Resolved

=============================================================================================================================================
 Package                                Arch                   Version                                         Repository               Size
=============================================================================================================================================
Installing:
 ksh                                    x86_64                 20120801-144.el7_9                              updates                 885 k
 policycoreutils-python                 x86_64                 2.5-34.el7                                      os                      457 k
 smartmontools                          x86_64                 1:7.0-2.el7                                     os                      546 k
 sysstat                                x86_64                 10.1.5-20.el7_9                                 updates                 315 k
 xorg-x11-utils                         x86_64                 7.5-23.el7                                      os                      114 k
 xorg-x11-xauth                         x86_64                 1:1.0.9-1.el7                                   os                       30 k
Installing for dependencies:
 audit-libs-python                      x86_64                 2.8.5-4.el7
 libXext                                x86_64                 1.3.3-3.el7                                     os                       39 k
 lm_sensors-libs                        x86_64                 3.4.0-8.20160601gitf9185e5.el7                  os                       42 k
 python-IPy                             noarch                 0.75-6.el7                                      os                       32 k
 setools-libs                           x86_64                 3.3.8-4.el7                                     os                      620 k

Transaction Summary
=============================================================================================================================================
Install  6 Packages (+26 Dependent packages)

Total download size: 5.1 M
Installed size: 17 M
Is this ok [y/d/N]: y
Downloading packages:
(1/32): audit-libs-python-2.8.5-4.el7.x86_64.rpm                                                                      |  76 kB  00:00:00
(2/32): libICE-1.0.9-9.el7.x86_64.rpm                                                                                 |  66 kB  00:00:00

部分省略......


Installed:
  ksh.x86_64 0:20120801-144.el7_9           policycoreutils-python.x86_64 0:2.5-34.el7          smartmontools.x86_64 1:7.0-2.el7
  sysstat.x86_64 0:10.1.5-20.el7_9          xorg-x11-utils.x86_64 0:7.5-23.el7                  xorg-x11-xauth.x86_64 1:1.0.9-1.el7

Dependency Installed:
  audit-libs-python.x86_64 0:2.8.5-4.el7    checkpolicy.x86_64 0:2.5-8.el7        libICE.x86_64 0:1.0.9-9.el7
  libSM.x86_64 0:1.2.2-2.el7                libX11.x86_64 0:1.6.7-4.el7_9         libX11-common.noarch 0:1.6.7-4.el7_9
  libXau.x86_64 0:1.0.8-2.1.el7             libXext.x86_64 0:1.3.3-3.el7          libXi.x86_64 0:1.7.9-1.el7
  libXinerama.x86_64 0:1.1.3-2.1.el7        libXmu.x86_64 0:1.1.2-2.el7           libXrandr.x86_64 0:1.5.1-2.el7
  libXrender.x86_64 0:0.9.10-1.el7          libXt.x86_64 0:1.1.5-3.el7            libXtst.x86_64 0:1.2.3-1.el7
  libXv.x86_64 0:1.0.11-1.el7               libXxf86dga.x86_64 0:1.1.4-2.1.el7    libXxf86misc.x86_64 0:1.0.3-7.1.el7
  libXxf86vm.x86_64 0:1.1.4-1.el7           libcgroup.x86_64 0:0.41-21.el7        libdmx.x86_64 0:1.1.3-3.el7
  libsemanage-python.x86_64 0:2.5-14.el7    libxcb.x86_64 0:1.13-1.el7            lm_sensors-libs.x86_64 0:3.4.0-8.20160601gitf9185e5.el7
  python-IPy.noarch 0:0.75-6.el7            setools-libs.x86_64 0:3.3.8-4.el7

Complete!
3.3.再次安装依赖包
没有提示报错,说明环境满足安装oracle21c

[root@host01 sw]# rpm -ivh oracle-database-preinstall-21c-1.0-1.el7.x86_64.rpm
warning: oracle-database-preinstall-21c-1.0-1.el7.x86_64.rpm: Header V3 RSA/SHA256 Signature, key ID ec551f03: NOKEY
Preparing...                          ################################# [100%]
Updating / installing...
   1:oracle-database-preinstall-21c-1.################################# [100%]
[root@host01 sw]#
4.安装oracle软件

[root@host01 sw]# rpm -ivh  oracle-database-ee-21c-1.0-1.ol7.x86_64.rpm
warning: oracle-database-ee-21c-1.0-1.ol7.x86_64.rpm: Header V3 RSA/SHA256 Signature, key ID ec551f03: NOKEY
Preparing...                          ################################# [100%]
Updating / installing...
   1:oracle-database-ee-21c-1.0-1     ################################# [100%]
[INFO] Executing post installation scripts...
[INFO] Oracle home installed successfully and ready to be configured.
To configure a sample Oracle Database you can execute the following service configuration script as root: /etc/init.d/oracledb_ORCLCDB-21c configure
[root@host01 sw]#
To configure a sample Oracle Database you can execute the following service configuration script as root: /etc/init.d/oracledb_ORCLCDB-21c configure
根据日志输出接下来需要使用root用户执行 /etc/init.d/oracledb_ORCLCDB-21c
5.创建数据库
[root@host01 sw]# /etc/init.d/oracledb_ORCLCDB-21c configure
Configuring Oracle Database ORCLCDB.
Prepare for db operation
8% complete
Copying database files
31% complete
Creating and starting Oracle instance
32% complete
36% complete
40% complete
43% complete
46% complete
Completing Database Creation
51% complete
54% complete
Creating Pluggable Databases
58% complete
77% complete
Executing Post Configuration Actions
100% complete
Database creation complete. For details check the logfiles at:
 /opt/oracle/cfgtoollogs/dbca/ORCLCDB.
Database Information:
Global Database Name:ORCLCDB
System Identifier(SID):ORCLCDB
Look at the log file "/opt/oracle/cfgtoollogs/dbca/ORCLCDB/ORCLCDB.log" for further details.

Database configuration completed successfully. The passwords were auto generated, you must change them by connecting to the database using 'sqlplus / as sysdba' as the oracle user.
[root@host01 sw]#
6.设置oracle用户环境变量
通过rpm包安装oracle
数据目录是:/opt/oracle/oradata/ORCLCDB
home目录是:/opt/oracle/product/21c/dbhome_1
su - oracle

vim .bashrc
export ORACLE_HOME=/opt/oracle/product/21c/dbhome_1
export ORACLE_SID=ORCLCDB
export CHARSET=AL32UTF8
export PATH=$PATH:$ORACLE_HOME/bin

source .bashrc
7.连接数据库
[oracle@host01 ~]$ sqlplus / as sysdba

SQL*Plus: Release 21.0.0.0.0 - Production on Mon Apr 3 17:08:45 2023
Version 21.3.0.0.0

Copyright (c) 1982, 2021, Oracle.  All rights reserved.


Connected to:
Oracle Database 21c Enterprise Edition Release 21.0.0.0.0 - Production
Version 21.3.0.0.0

SQL>
8.查询数据库信息
查询当前可插拔数据库以及状态
SQL> col name for a30
SQL> select con_id,name,open_mode from v$pdbs;
    CON_ID NAME                           OPEN_MODE
---------- ------------------------------ ----------
         2 PDB$SEED                       READ ONLY
         3 ORCLPDB1                       READ WRITE


切换到可插拔数据库
SQL> alter session set container=ORCLPDB1;
Session altered.


查询可插拔数据库状态
SQL> col name for a30
SQL> select con_id,name,open_mode from v$pdbs;
    CON_ID NAME                           OPEN_MODE
---------- ------------------------------ ----------
         3 ORCLPDB1                       READ WRITE

关闭pdb数据库
SQL> alter pluggable database close;
Pluggable database altered.


SQL> select con_id,name,open_mode from v$pdbs;

    CON_ID NAME                           OPEN_MODE
---------- ------------------------------ ----------
         3 ORCLPDB1                       MOUNTED

启动pdb数据库
SQL> alter pluggable database open;
Pluggable database altered.

SQL> select con_id,name,open_mode from v$pdbs;
    CON_ID NAME                           OPEN_MODE
---------- ------------------------------ ----------
         3 ORCLPDB1                       READ WRITE
总结
以上是oracle21c数据库通过rpm包在linux系统上的安装。

Oracle数据库 底层原理解析 (解析oracle数据库内部实现)
https://edu.csdn.net/course/detail/35647
Oracle 19c RAC For Linux安装部署
https://edu.csdn.net/course/detail/35792
Oracle11gR2数据库Linux系统上安装
https://edu.csdn.net/course/detail/27750
Oracle19c数据库Linux系统上安装
https://edu.csdn.net/course/detail/35881


 3604
3604


 被折叠的 条评论
为什么被折叠?
被折叠的 条评论
为什么被折叠?
 到【灌水乐园】发言


