


安装单机版redis
下载网址:https://redis.io/download
写文章时最新版本为:redis-4.0.1.tar.gz

可以先下载到windows操作系统,然后拷贝到centos。
下载成功后,在centos上创建一个目录,存放我们的软件,我比较喜欢放在/soft目录下。
[root@localhost /]# mkdir /soft
然后利用WinScp工具拷贝到centos系统,放在/soft/目录下。
可以在 这儿下载http://download.csdn.net/download/u013308504/10250657 解压后可以直接使用 可以省略步骤3和4
1、安装gcc
[root@localhost ~]# yum install gcc
中间有2次提示,要求输入:yes 或 y,我们按照提示来就可以。
2、安装pstree
[root@localhost ~]# yum install psmisc
中间有1次提示,要求输入:y。按照提示来就可以。
3、解压tar包
[root@localhost /]# cd /soft
[root@localhost soft]# tar zxvf redis-4.0.1.tar.gz
[root@localhost soft]# mv redis-4.0.1 /usr/local/redis
4、编译安装
[root@localhost soft]# cd /usr/local/redis
[root@localhost redis]# make MALLOC=libc
[root@localhost redis]# make & make install
说明:如果在make的时候不指定内存管理方式,会报错的:
zmalloc.h:50:31: 致命错误:jemalloc/jemalloc.h:没有那个文件或目录。
malloc是管理内存碎片的。
5、启动reids 看是否安装成功
[root@localhost redis]# ./src/redis-server redis.conf
如果报没得权限 在当前目录下 执行命令 chmod 777 ./src/redis-server
如果成功,如下图:

然后新开终端,打开redis客户端
[root@localhost ~]# cd /usr/local/redis/
[root@localhost redis]# src/redis-cli

表示已经启动成功。
我相信单机安装有点linux基础的同学都能安装成功。
集群redis
1、安装ruby
清理已安装过的 ruby
yum erase ruby ruby-libs ruby-mode ruby-rdoc ruby-irb ruby-ri ruby-docs
手动下载
https://cache.ruby-lang.org/pub/ruby/2.2/ruby-2.2.7.tar.gz
上传到linux环境 并解压
tar xf ruby-2.2.7.tar.gz
刚开始用命令yum install ruby安装,但是是2.0以下的版本。我把它卸载了,重新下的2.0以上的包安装
把安装包上传到指定目录,并解压
命令:tar zxvf ruby-2.2.7.tar.gz;解压后,进入ruby-2.2.7目录下,依次执行下面命令
命令:./configure
命令:make & make install
添加环境变量 export PATH=/usr/local/ruby-2.2.7/bin:$PATH
2、查看ruby信息
命令:ruby -v
3、要支持redis的通信,需要下载redis相关包
命令:gem install redis
新建6个文件夹 cp -RF redis 7001 cp -RF redis 7002....
redis.conf
配置文件 全部替换即可redis.conf 并修改相应的IP 与端口
#自己的ip
bind 192.168.33.159
port 7001
timeout 0
tcp-keepalive 0
loglevel notice
databases 16
save 900 1
save 300 10
save 60 10000
stop-writes-on-bgsave-error yes
rdbcompression yes
rdbchecksum yes
dbfilename dump.rdb
dir ./
################################# REPLICATION #################################
slave-serve-stale-data yes
slave-read-only yes
repl-diskless-sync no
repl-diskless-sync-delay 5
repl-disable-tcp-nodelay no
slave-priority 100
############################## APPEND ONLY MODE ###############################
appendonly yes
appendfilename "appendonly.7001.aof"
appendfsync everysec
no-appendfsync-on-rewrite no
auto-aof-rewrite-percentage 100
auto-aof-rewrite-min-size 64mb
aof-load-truncated yes
lua-time-limit 5000
cluster-enabled yes
cluster-config-file nodes-7001.conf
cluster-node-timeout 15000
cluster-slave-validity-factor 10
cluster-migration-barrier 1
cluster-require-full-coverage yes
################################# SLOW LOG ###################################
slowlog-log-slower-than 10000
slowlog-max-len 128
latency-monitor-threshold 0
notify-keyspace-events ""
hash-max-ziplist-entries 512
hash-max-ziplist-value 64
list-max-ziplist-size -2
list-compress-depth 0
set-max-intset-entries 512
zset-max-ziplist-entries 128
zset-max-ziplist-value 64
hll-sparse-max-bytes 3000
activerehashing yes
client-output-buffer-limit normal 0 0 0
client-output-buffer-limit slave 256mb 64mb 60
client-output-buffer-limit pubsub 32mb 8mb 60
hz 10
aof-rewrite-incremental-fsync yes
启动集群 前 先启动所有的单个redis
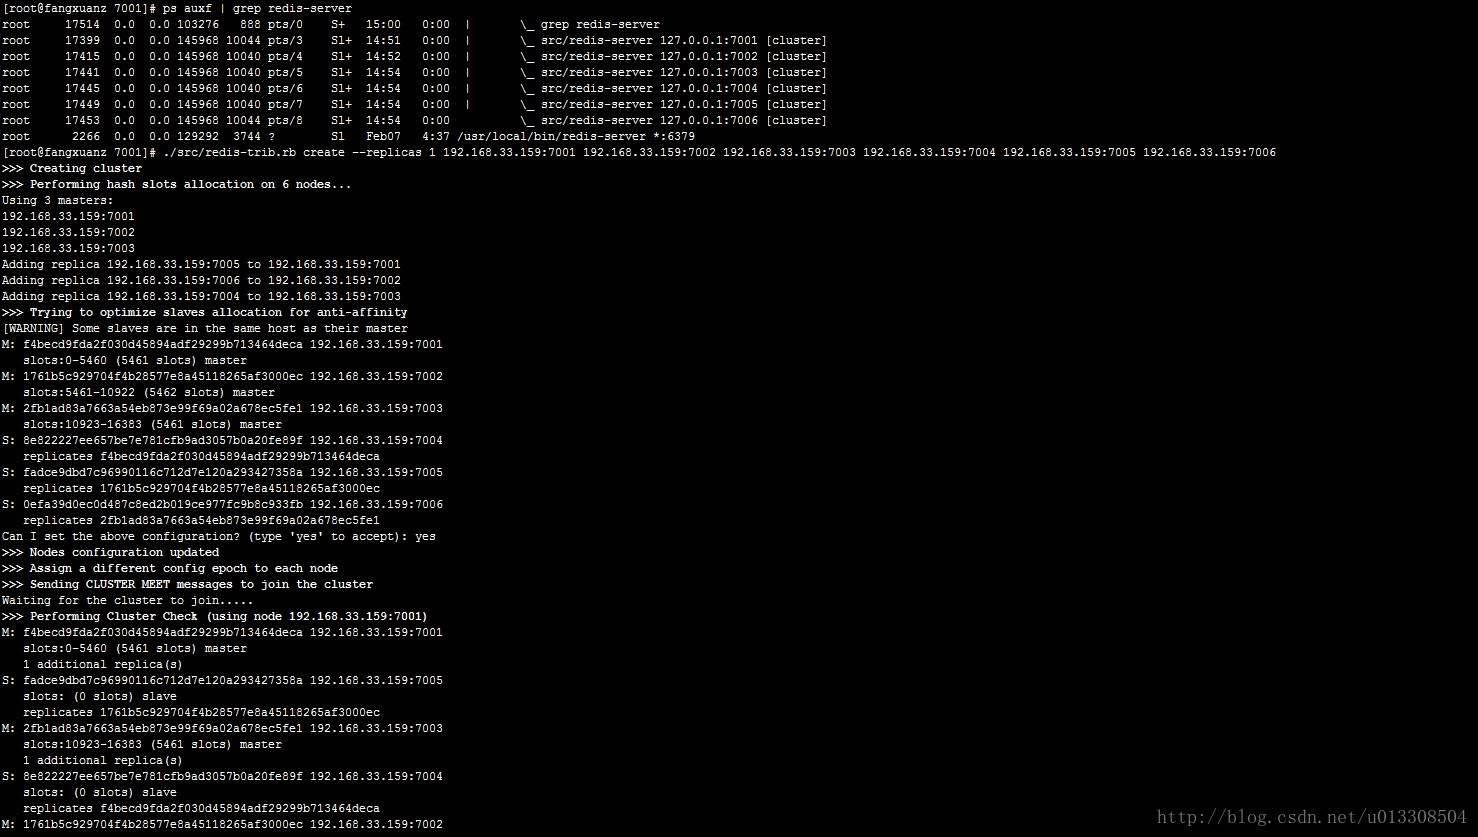
[root@fangxuanz 7001]# ./src/redis-trib.rb create --replicas 1 192.168.33.159:7001 192.168.33.159:7002 192.168.33.159:7003 192.168.33.159:7004 192.168.33.159:7005 192.168.33.159:7006
>>> Creating cluster
[ERR] Sorry, can't connect to node 192.168.33.159:7001
出现这个错误 是由于redis.conf 配置文件是127.0.0.1 修改成对应的内网IP即可
[root@fangxuanz src]# ./redis-trib.rb create --replicas 1 192.168.33.159:7001 192.168.33.159:7002 192.168.33.159:7003 192.168.33.159:7004 192.168.33.159:7005 192.168.33.159:7006
-bash: ./redis-trib.rb: 权限不够
[root@fangxuanz src]# chmod 777 ./redis-trib.r
使用redis-trib.rb 启动 集群
[root@fangxuanz 7001]# ./src/redis-trib.rb create --replicas 1 192.168.33.159:7001 192.168.33.159:7002 192.168.33.159:7003 192.168.33.159:7004 192.168.33.159:7005 192.168.33.159:7006
-------------启动日志
>>> Creating cluster>>> Performing hash slots allocation on 6 nodes...
Using 3 masters:
192.168.33.159:7001
192.168.33.159:7002
192.168.33.159:7003
Adding replica 192.168.33.159:7005 to 192.168.33.159:7001
Adding replica 192.168.33.159:7006 to 192.168.33.159:7002
Adding replica 192.168.33.159:7004 to 192.168.33.159:7003
>>> Trying to optimize slaves allocation for anti-affinity
[WARNING] Some slaves are in the same host as their master
M: f4becd9fda2f030d45894adf29299b713464deca 192.168.33.159:7001
slots:0-5460 (5461 slots) master
M: 1761b5c929704f4b28577e8a45118265af3000ec 192.168.33.159:7002
slots:5461-10922 (5462 slots) master
M: 2fb1ad83a7663a54eb873e99f69a02a678ec5fe1 192.168.33.159:7003
slots:10923-16383 (5461 slots) master
S: 8e822227ee657be7e781cfb9ad3057b0a20fe89f 192.168.33.159:7004
replicates f4becd9fda2f030d45894adf29299b713464deca
S: fadce9dbd7c96990116c712d7e120a293427358a 192.168.33.159:7005
replicates 1761b5c929704f4b28577e8a45118265af3000ec
S: 0efa39d0ec0d487c8ed2b019ce977fc9b8c933fb 192.168.33.159:7006
replicates 2fb1ad83a7663a54eb873e99f69a02a678ec5fe1
Can I set the above configuration? (type 'yes' to accept): yes ---输入yes
>>> Nodes configuration updated
>>> Assign a different config epoch to each node
>>> Sending CLUSTER MEET messages to join the cluster
Waiting for the cluster to join.....
>>> Performing Cluster Check (using node 192.168.33.159:7001)
M: f4becd9fda2f030d45894adf29299b713464deca 192.168.33.159:7001
slots:0-5460 (5461 slots) master
1 additional replica(s)
S: fadce9dbd7c96990116c712d7e120a293427358a 192.168.33.159:7005
slots: (0 slots) slave
replicates 1761b5c929704f4b28577e8a45118265af3000ec
M: 2fb1ad83a7663a54eb873e99f69a02a678ec5fe1 192.168.33.159:7003
slots:10923-16383 (5461 slots) master
1 additional replica(s)
S: 8e822227ee657be7e781cfb9ad3057b0a20fe89f 192.168.33.159:7004
slots: (0 slots) slave
replicates f4becd9fda2f030d45894adf29299b713464deca
M: 1761b5c929704f4b28577e8a45118265af3000ec 192.168.33.159:7002
slots:5461-10922 (5462 slots) master
1 additional replica(s)
S: 0efa39d0ec0d487c8ed2b019ce977fc9b8c933fb 192.168.33.159:7006
slots: (0 slots) slave
replicates 2fb1ad83a7663a54eb873e99f69a02a678ec5fe1
[OK] All nodes agree about slots configuration.
>>> Check for open slots...
>>> Check slots coverage...
[OK] All 16384 slots covered.
连接redis集群
在192.168.33.159机器上进行连接
7001目录下执行
./src/redis-cli -h 192.168.33.159 -c -p 7001
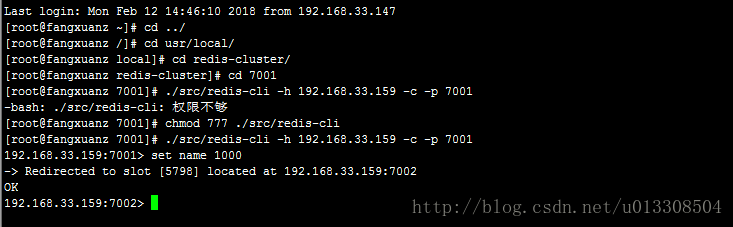
已经自动跳转到了7002服务器了
续
如果重启服务器后,再次执行redis-trib.rb会报错如下错误:
[ERR] Node 192.168.33.159:7001 is not empty. Either the node already knows other nodes (check with CLUSTER NODES) or contains some key in database 0.
解决方法:
删除dump.rdb和nodes-7001.conf这两个文件,然后重启redis服务,最后启动集群。
1次不行搞2次,2次不行搞3次。多删除几次


 6653
6653

 被折叠的 条评论
为什么被折叠?
被折叠的 条评论
为什么被折叠?
 到【灌水乐园】发言


