


- 参考:https://amueller.github.io/word_cloud/auto_examples/colored.html#colored-py
wordcloud.WordCloud(font_path=None, width=400, height=200, margin=2, ranks_only=None, prefer_horizontal=0.9,mask=None, scale=1, color_func=None, max_words=200, min_font_size=4, stopwords=None, random_state=None,background_color=’black’, max_font_size=None, font_step=1,mode=’RGB’, relative_scaling=0.5, regexp=None, collocations=True,colormap=None, normalize_plurals=True)
参数:
font_path : string //字体路径,需要展现什么字体就把该字体路径+后缀名写上,如:font_path = '黑体.ttf'

width : int (default=400) //输出的画布宽度,默认为400像素

height : int (default=200) //输出的画布高度,默认为200像素

prefer_horizontal : float (default=0.90) //词语水平方向排版出现的频率,默认 0.9 (所以词语垂直方向排版出现频率为 0.1 )

mask : nd-array or None (default=None) //如果参数为空,则使用二维遮罩绘制词云。如果 mask 非空,设置的宽高值将被忽略,遮罩形状被 mask 取代。除全白(#FFFFFF)的部分将不会绘制,其余部分会用于绘制词云。如:bg_pic = imread('读取一张图片.png'),背景图片的画布一定要设置为白色(#FFFFFF),然后显示的形状为不是白色的其他颜色。可以用ps工具将自己要显示的形状复制到一个纯白色的画布上再保存,就ok了。

scale : float (default=1) //按照比例进行放大画布,如设置为1.5,则长和宽都是原来画布的1.5倍。

min_font_size : int (default=4) //显示的最小的字体大小

font_step : int (default=1) //字体步长,如果步长大于1,会加快运算但是可能导致结果出现较大的误差。

max_words : number (default=200) //要显示的词的最大个数

stopwords : set of strings or None //设置需要屏蔽的词,如果为空,则使用内置的STOPWORDS

background_color : color value (default=”black”) //背景颜色,如background_color='white',背景颜色为白色。

max_font_size : int or None (default=None) //显示的最大的字体大小

mode : string (default=”RGB”) //当参数为“RGBA”并且background_color不为空时,背景为透明。

relative_scaling : float (default=.5) //词频和字体大小的关联性

color_func : callable, default=None //生成新颜色的函数,如果为空,则使用 self.color_func

regexp : string or None (optional) //使用正则表达式分隔输入的文本

collocations : bool, default=True //是否包括两个词的搭配

colormap : string or matplotlib colormap, default=”viridis” //给每个单词随机分配颜色,若指定color_func,则忽略该方法。
方法:
fit_words(frequencies)  //根据词频生成词云
generate(text)  //根据文本生成词云
generate_from_frequencies(frequencies[, ...])   //根据词频生成词云
generate_from_text(text)    //根据文本生成词云
process_text(text)  //将长文本分词并去除屏蔽词(此处指英语,中文分词还是需要自己用别的库先行实现,使用上面的 fit_words(frequencies) )
recolor([random_state, color_func, colormap])   //对现有输出重新着色。重新上色会比重新生成整个词云快很多。
to_array()  //转化为 numpy array
to_file(filename)   //输出到文件
from os import path
from scipy.misc import imread
import matplotlib.pyplot as plt
from wordcloud import WordCloud, STOPWORDS, ImageColorGenerator
# 获取当前文件路径
# __file__ 为当前文件, 在ide中运行此行会报错,可改为
# d = path.dirname('.')
d = path.dirname(__file__)
# 读取文本 alice.txt 在包文件的example目录下
#内容为
"""
Project Gutenberg's Alice's Adventures in Wonderland, by Lewis Carroll
This eBook is for the use of anyone anywhere at no cost and with
almost no restrictions whatsoever. You may copy it, give it away or
re-use it under the terms of the Project Gutenberg License included
with this eBook or online at www.gutenberg.org
"""
text = open(path.join(d, 'alice.txt')).read()
# read the mask / color image
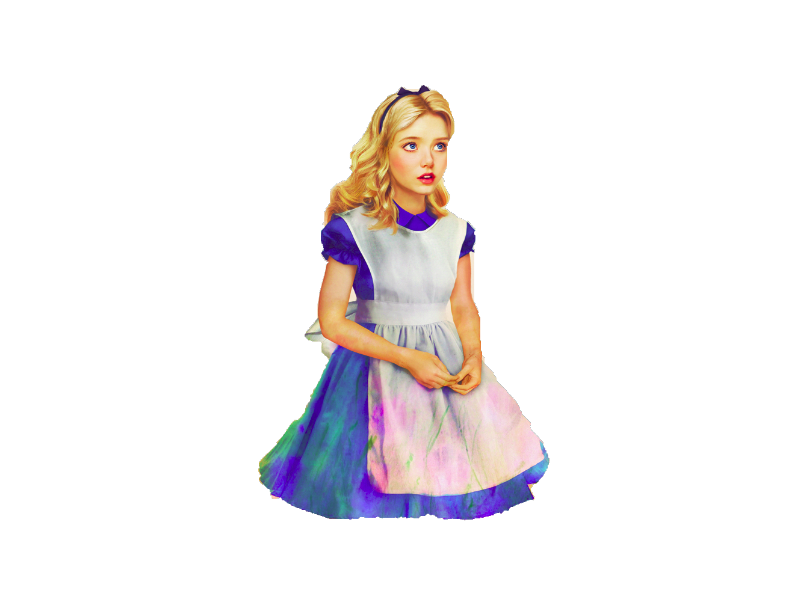
# taken from http://jirkavinse.deviantart.com/art/quot-Real-Life-quot-Alice-282261010
# 设置背景图片
alice_coloring = imread(path.join(d, "alice_color.png"))
wc = WordCloud(background_color="white", #背景颜色
max_words=2000,# 词云显示的最大词数
mask=alice_coloring,#设置背景图片
stopwords=STOPWORDS.add("said"),
max_font_size=40, #字体最大值
random_state=42)
# 生成词云, 可以用generate输入全部文本(中文不好分词),也可以我们计算好词频后使用generate_from_frequencies函数
wc.generate(text)
# wc.generate_from_frequencies(txt_freq)
# txt_freq例子为[('词a', 100),('词b', 90),('词c', 80)]
# 从背景图片生成颜色值
image_colors = ImageColorGenerator(alice_coloring)
# 以下代码显示图片
plt.imshow(wc)
plt.axis("off")
# 绘制词云
plt.figure()
# recolor wordcloud and show
# we could also give color_func=image_colors directly in the constructor
plt.imshow(wc.recolor(color_func=image_colors))
plt.axis("off")
# 绘制背景图片为颜色的图片
plt.figure()
plt.imshow(alice_coloring, cmap=plt.cm.gray)
plt.axis("off")
plt.show()
# 保存图片
wc.to_file(path.join(d, "名称.png"))
#!/usr/bin/env python
"""
Masked wordcloud
================

Using a mask you can generate wordclouds in arbitrary shapes.
"""

from os import path
from PIL import Image
import numpy as np
import matplotlib.pyplot as plt

from wordcloud import WordCloud, STOPWORDS

d = path.dirname(__file__)

# Read the whole text.
text = open(path.join(d, 'alice.txt')).read()

# read the mask image
# taken from
# http://www.stencilry.org/stencils/movies/alice%20in%20wonderland/255fk.jpg
alice_mask = np.array(Image.open(path.join(d, "alice_mask.png")))

stopwords = set(STOPWORDS)
stopwords.add("said")

wc = WordCloud(background_color="white", max_words=2000, mask=alice_mask,
               stopwords=stopwords)
# generate word cloud
wc.generate(text)

# store to file
wc.to_file(path.join(d, "alice.png"))

# show
plt.imshow(wc, interpolation='bilinear')
plt.axis("off")
plt.figure()
plt.imshow(alice_mask, cmap=plt.cm.gray, interpolation='bilinear')
plt.axis("off")
plt.show()
#coding:utf-8
from os import path
from scipy.misc import imread
import matplotlib.pyplot as plt
import jieba
from wordcloud import WordCloud, STOPWORDS, ImageColorGenerator
stopwords = {}
def importStopword(filename=''):
global stopwords
f = open(filename, 'r', encoding='utf-8')
line = f.readline().rstrip()
while line:
stopwords.setdefault(line, 0)
stopwords[line] = 1
line = f.readline().rstrip()
f.close()
def processChinese(text):
seg_generator = jieba.cut(text) # 使用结巴分词,也可以不使用
seg_list = [i for i in seg_generator if i not in stopwords]
seg_list = [i for i in seg_list if i != u' ']
seg_list = r' '.join(seg_list)
return seg_list
importStopword(filename='./stopwords.txt')
# 获取当前文件路径
# __file__ 为当前文件, 在ide中运行此行会报错,可改为
# d = path.dirname('.')
d = path.dirname(__file__)
text = open(path.join(d, 'love.txt'),encoding ='utf-8').read()
#如果是中文
#text = processChinese(text)#中文不好分词,使用Jieba分词进行
# read the mask / color image
# taken from http://jirkavinse.deviantart.com/art/quot-Real-Life-quot-Alice-282261010
# 设置背景图片
back_coloring = imread(path.join(d, "./image/love.jpg"))
wc = WordCloud( font_path='./font/cabin-sketch.bold.ttf',#设置字体
background_color="black", #背景颜色
max_words=2000,# 词云显示的最大词数
mask=back_coloring,#设置背景图片
max_font_size=100, #字体最大值
random_state=42,
)
# 生成词云, 可以用generate输入全部文本(中文不好分词),也可以我们计算好词频后使用generate_from_frequencies函数
wc.generate(text)
# wc.generate_from_frequencies(txt_freq)
# txt_freq例子为[('词a', 100),('词b', 90),('词c', 80)]
# 从背景图片生成颜色值
image_colors = ImageColorGenerator(back_coloring)
plt.figure()
# 以下代码显示图片
plt.imshow(wc)
plt.axis("off")
plt.show()
# 绘制词云
# 保存图片
wc.to_file(path.join(d, "名称.png")) 


 2982
2982

 被折叠的 条评论
为什么被折叠?
被折叠的 条评论
为什么被折叠?
 到【灌水乐园】发言


