


目前接触比较多的就是通过dialer应用来启动/触发暗码。
也有通过Calculator来实现的。
本文以Dialer为例,
1.经过调试定位,发现拨号盘接对应的Activity为DialtactsActivity。

2.DialtactsActivity中有个showDialpadFragment方法,用来加载显示拨号盘,因为有可能此时拨号盘正处于收缩/隐藏状态。
    /**
     * Initiates a fragment transaction to show the dialpad fragment. Animations and other visual
     * updates are handled by a callback which is invoked after the dialpad fragment is shown.
     * @see #onDialpadShown
     */
    private void showDialpadFragment(boolean animate) {
        if (mIsDialpadShown || mStateSaved) {
            return;
        }
        mIsDialpadShown = true;

        mListsFragment.setUserVisibleHint(false);

        final FragmentTransaction ft = getFragmentManager().beginTransaction();
        if (mDialpadFragment == null) {
            mDialpadFragment = new DialpadFragment();
            ft.add(R.id.dialtacts_container, mDialpadFragment, TAG_DIALPAD_FRAGMENT);
        } else {
            ft.show(mDialpadFragment);
        }

        //mDialpadFragment.setAnimate(animate);
        AnalyticsUtil.sendScreenView(mDialpadFragment);
        ft.commit();
        maybeEnterSearchUi();
        if (animate) {
            mFloatingActionButtonController.scaleOut();
        } else {
            mFloatingActionButtonController.setVisible(false);
        }
        mActionBarController.onDialpadUp();

        mListsFragment.getView().animate().alpha(0).withLayer();
    }
3.接下来重点处理实现就在DialpapFragment中,首先来看类的声明/继承。
import com.android.dialer.dialpad.DialpadFragment;
/**
 * Fragment that displays a twelve-key phone dialpad.
 */
public class DialpadFragment extends Fragment
        implements View.OnClickListener,
        View.OnLongClickListener, View.OnKeyListener,
        AdapterView.OnItemClickListener, TextWatcher,
        PopupMenu.OnMenuItemClickListener,
        DialpadKeyButton.OnPressedListener,
        /// M: add for plug-in @{
        DialpadExtensionAction {
从以上类实现/继承中可以发现,其继承了TextWatcher类,也正是这个类使之能够监听实现输入变化。
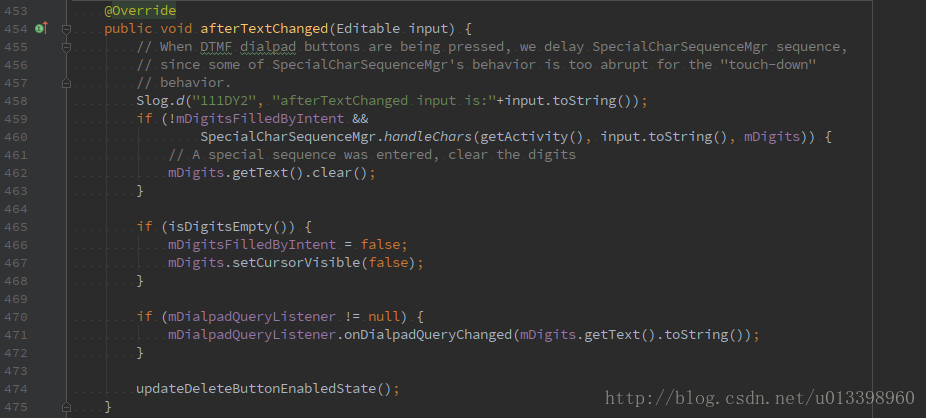
TextWatcher有3个重要方法,分别为:beforeTextChanged,onTextChanged和afterTextChanged。分别看下面那份源码。

onTextChanged
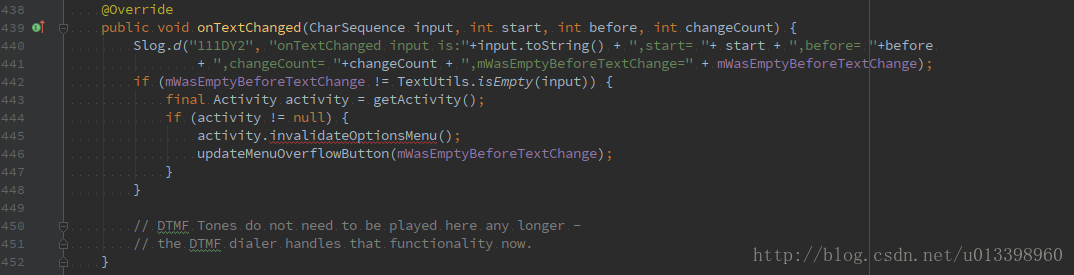
其中最重点的是afterTextChanged方法,其调用了SpecialCharSequenceMgr辅助工具类的handleChars方法。
4.handleChars方法中,会对各种特殊的secret code进行匹配处理。
    public static boolean handleChars(Context context, String input, EditText textField) {
        //get rid of the separators so that the string gets parsed correctly
        String dialString = PhoneNumberUtils.stripSeparators(input);
        if (handleDeviceIdDisplay(context, dialString) //*#06#
                || handleRegulatoryInfoDisplay(context, dialString)
                || handlePinEntry(context, dialString)
                || handleAdnEntry(context, dialString, textField)
                || handleSecretCode(context, dialString) //for the form of *#*#<code>#*#*.
                /// @}
                /// M: for plug-in @{
                || ExtensionManager.getInstance().getDialPadExtension().handleChars(context,
                        dialString)
                /// @}
                ) {
            return true;
        }
        return false;
}5.1 )*#*#<code>#*#*
    /**
     * Handles secret codes to launch arbitrary activities in the form of *#*#<code>#*#*.
     * If a secret code is encountered an Intent is started with the android_secret_code://<code>
     * URI.
     *
     * @param context the context to use
     * @param input the text to check for a secret code in
     * @return true if a secret code was encountered
     */
    static boolean handleSecretCode(Context context, String input) {
        // Secret codes are in the form *#*#<code>#*#*

        /// M: for plug-in @{
        input = ExtensionManager.getInstance().getDialPadExtension().handleSecretCode(input);
        /// @}

        int len = input.length();
        if (len > 8 && input.startsWith("*#*#") && input.endsWith("#*#*")) {
            final Intent intent = new Intent(SECRET_CODE_ACTION,
                    Uri.parse("android_secret_code://" + input.substring(4, len - 4)));///android_secret_code://287
            context.sendBroadcast(intent);
            return true;
        }

        return false;
}Action:
private static final String SECRET_CODE_ACTION = "android.provider.Telephony.SECRET_CODE";接受端的注册方式,Action 和 data必须和发送的broadcast相匹配才行:
/vendor/mediatek/proprietary/packages/apps/EngineerMode/AndroidManifest.xml
        <receiver
            android:name=".EngineerModeReceiver"
            android:exported="true" >
            <intent-filter>
                <action android:name="android.provider.Telephony.SECRET_CODE" />
                <data
                    android:host="3646633"
                    android:scheme="android_secret_code" />
            </intent-filter>
        </receiver>
/vendor/mediatek/proprietary/packages/apps/EngineerMode/src/com/mediatek/engineermode/EngineerModeReceiver.java
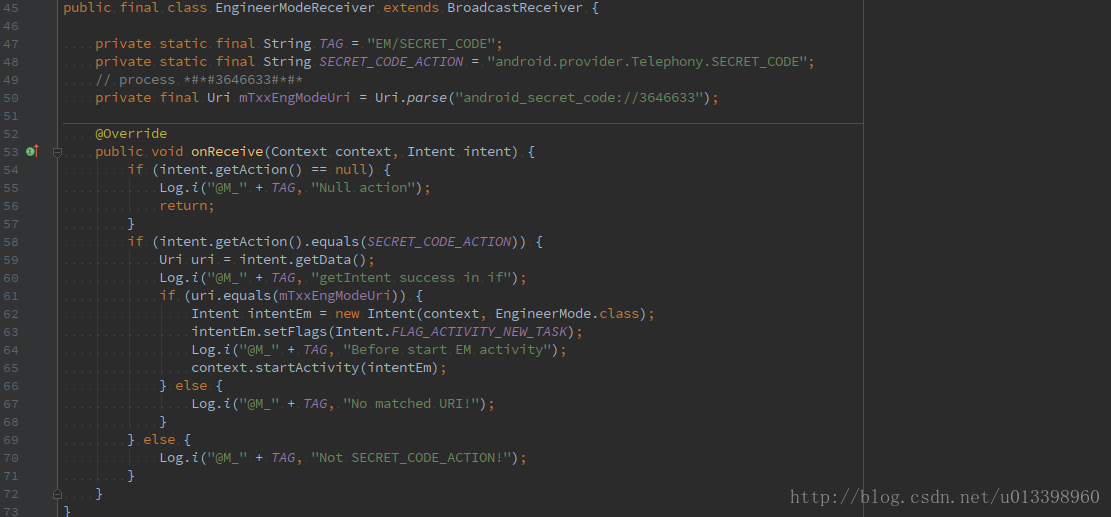
由上面代码可知,这就对应上了,在Receiver接受到广播后,启动对应的应用/Activity来处理接下来的工作。
5.2 )*#06# 直接在Context中弹出对话框,显示IMEI信息
/packages/apps/Dialer/src/com/android/dialer/SpecialCharSequenceMgr.java
    // TODO: Use TelephonyCapabilities.getDeviceIdLabel() to get the device id label instead of a
    // hard-coded string.
    static boolean handleDeviceIdDisplay(Context context, String input) {
        TelephonyManager telephonyManager =
                (TelephonyManager) context.getSystemService(Context.TELEPHONY_SERVICE);

        if (telephonyManager != null && input.equals(MMI_IMEI_DISPLAY)) {
            int labelResId = (telephonyManager.getPhoneType() == TelephonyManager.PHONE_TYPE_GSM) ?
                    R.string.imei : R.string.meid;

            List<String> deviceIds = new ArrayList<String>();
            if (TelephonyManagerCompat.getPhoneCount(telephonyManager) > 1 &&
                    CompatUtils.isMethodAvailable(TelephonyManagerCompat.TELEPHONY_MANAGER_CLASS,
                            "getDeviceId", Integer.TYPE)) {
                for (int slot = 0; slot < telephonyManager.getPhoneCount(); slot++) {
                    String deviceId = telephonyManager.getDeviceId(slot);
                    if (!TextUtils.isEmpty(deviceId)) {
                        deviceIds.add(deviceId);
                    }
                }
            } else {
                deviceIds.add(telephonyManager.getDeviceId());
            }

            AlertDialog alert = new AlertDialog.Builder(context)
                    .setTitle(labelResId)
                    .setItems(deviceIds.toArray(new String[deviceIds.size()]), null)
                    .setPositiveButton(android.R.string.ok, null)
                    .setCancelable(false)
                    .show();///直接在Context中弹出对话框,显示IMEI信息
            return true;
        }
        return false;
    }
*#07# 直接通过隐式intent启动相关应用
    private static boolean handleRegulatoryInfoDisplay(Context context, String input) {
        if (input.equals(MMI_REGULATORY_INFO_DISPLAY)) {
            Log.d(TAG, "handleRegulatoryInfoDisplay() sending intent to settings app");
            Intent showRegInfoIntent = new Intent(Settings.ACTION_SHOW_REGULATORY_INFO);
            try {
                context.startActivity(showRegInfoIntent);
            } catch (ActivityNotFoundException e) {
                Log.e(TAG, "startActivity() failed: " + e);
            }
            return true;
        }
        return false;
    }
以上就是Android通过Dialer方式启动暗码的大致源码流程分析。


 1137
1137

 被折叠的 条评论
为什么被折叠?
被折叠的 条评论
为什么被折叠?
 到【灌水乐园】发言


