


前言:发散按钮也是小编自创的名词,我不知道怎么形容它,希望读者不要介意,接触过ios编程的人看了效果图应该就能够明白了.
(图1)

(图2)
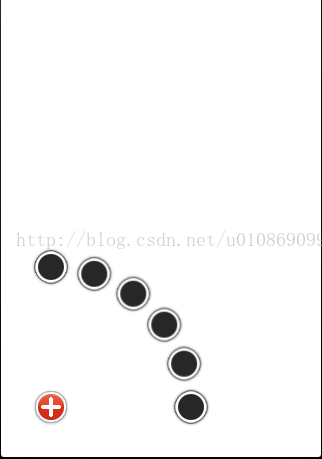
当我们点击图1的时候,图2中的6个小黑圈就会从加号按钮中飞出.现在很多app都是基于这个模型,据说用户体验非常好.今天小编也来讲解一下它的原理,在此基础之上的更多炫的效果,留待读者自行发挥创造.
为了使大家花最少的时间阅读此文章,小编分三步走哦 ,lets go!!!
首先
我们需要创建一个加号按钮和六个黑圈视图,至于加号按钮怎么完成的这里小编不在赘述,接着我们新建一个UIImageView(QuadCurveMenuItem)类和一个UIView(QuadCurveMenu).并将QuadCurveMenuItem作为我们的根视图,把创建好的六个小黑圈imageView存入数组:
NSArray *menus = [NSArray arrayWithObjects:cameraMenuItem, peopleMenuItem, placeMenuItem, musicMenuItem, thoughtMenuItem, sleepMenuItem, nil];
我们为QuadCurveMenu自定义一个初始化方法-(id)initWithFrame:(CGRect)frame menus:(NSArray *)aMenusArray;这也是方便我们在初始化视图的时候导入六个黑圈视图.我们先来分析一下QuadCurveMenu的初始化方法,代码如下.
1. - (id)initWithFrame:(CGRect)frame menus:(NSArray *)aMenusArray
2. {
3. self = [super initWithFrame:frame];
4. if (self) {
5. self.backgroundColor = [UIColor clearColor];
6.
7. _menusArray = [aMenusArray copy];
8.
9. int count = [_menusArray count];
10. for (int i = 0; i < count; i ++)
11. {
12. QuadCurveMenuItem *item = [_menusArray objectAtIndex:i];
13. item.tag = 1000 + i;
14. //这里先计算好每个小图标的初始坐标,ENDRADIUS代表圆的半径,STARTPOINT代表大按钮的坐标
15. item.startPoint = CGPointMake(STARTPOINT.x + ENDRADIUS * sinf(i * M_PI_2 / (count - 1)), STARTPOINT.y - ENDRADIUS * cosf(i * M_PI_2 / (count - 1)));
16. item.endPoint = STARTPOINT;
17. item.nearPoint = CGPointMake(STARTPOINT.x + NEARRADIUS * sinf(i * M_PI_2 / (count - 1)), STARTPOINT.y - NEARRADIUS * cosf(i * M_PI_2 / (count - 1)));
18. item.farPoint = CGPointMake(STARTPOINT.x + FARRADIUS * sinf(i * M_PI_2 / (count - 1)), STARTPOINT.y - FARRADIUS * cosf(i * M_PI_2 / (count - 1)));
19. item.center = item.startPoint;
20.
21. [self addSubview:item];
22. }
23.
24. // 添加"添加"按钮
25. _addButton = [UIButton buttonWithType:UIButtonTypeCustom];
26. _addButton.frame = CGRectMake(0, 0, 40, 40)
27. ;
28. _addButton.center = STARTPOINT;
29. _addButton.layer.cornerRadius = 20;
30. _addButton.layer.borderWidth = 0;
31. [_addButton setBackgroundImage:[UIImage imageNamed:@"bg-addbutton"] forState:UIControlStateNormal];
32. UIImage *image = [UIImage imageNamed:@"icon-plus"];
33. UIImageView *imageView = [[UIImageView alloc] initWithImage:image];
34. imageView.frame = CGRectMake(0, 0, 20, 20);
35. imageView.center = _addButton.center;
36. imageView.tag = 250;
37. [_addButton addTarget:self action:@selector(addBtn) forControlEvents:UIControlEventTouchUpInside];
38. [self addSubview:_addButton];
39. [self addSubview:imageView];
40. }
41. return self;
42. }
乍一看,可能会有点蒙,但是细看你就会发现,哈哈,一点都不难.都是我们基本的东西,带大家读一下, startPoint和endPoint分别代表小黑圈的初始坐标和结束坐标,在QuadCurveMenuItem我们定义,可能有读者会问这里的小黑圈为什么不直接用UIImageView,在这里我解释一下,用QuadCurveMenuItem可以自定义我们需要的属性.因为我们需要的是一个带有动画效果的,而不是一个单纯的UIImageView,好了,不再纠结,接着看.
第14行ENDRADIUS代表圆的半径,STARTPOINT代表大按钮的坐标是什么意思呢,那是因为,我们需要用到圆形布局,所以小编也用到了几个宏定义:
#define ENDRADIUS 140.0f
#define STARTPOINT CGPointMake(50, 430)
#define TIMEOFFSET 0.026f
关于坐标怎么设置我只解释一个,其余大家回忆一下高中知识,只要数学不是英语老师教的相信都能看得懂.大家看到第15行:
item.startPoint = CGPointMake(STARTPOINT.x + ENDRADIUS * sinf(i * M_PI_2 / (count - 1)), STARTPOINT.y - ENDRADIUS * cosf(i * M_PI_2 / (count - 1)));
翻译成我们看得懂的语言item.startPoint = CGPointMake(50 +140 * sin(i*π/2/5),430-140*cos(i*π/2/5)));
接着我们来添加点击按钮:
1. _addButton = [UIButton buttonWithType:UIButtonTypeCustom];
2. _addButton.frame = CGRectMake(0, 0, 40, 40)
3. ;
4. _addButton.center = STARTPOINT;
5. _addButton.layer.cornerRadius = 20;
6. _addButton.layer.borderWidth = 0;
7. [_addButton setBackgroundImage:[UIImage imageNamed:@"bg-addbutton"] forState:UIControlStateNormal];
8. UIImage *image = [UIImage imageNamed:@"icon-plus"];
9. UIImageView *imageView = [[UIImageView alloc] initWithImage:image];
10. imageView.frame = CGRectMake(0, 0, 20, 20);
11. imageView.center = _addButton.center;
12. imageView.tag = 250;
13. [_addButton addTarget:self action:@selector(addBtn) forControlEvents:UIControlEventTouchUpInside];
14. [self addSubview:_addButton];
15. [self addSubview:imageView];
这里我只解释为什么要在button上添加一个ImageView,原因很简单,因为在后面我们点击黑圈收起和发散的时候需要按钮呈现不同的状态.
其次:
我们来看看具体动画怎么实现,动画都放在按钮触发的方法里,请看:
1. -(void)addBtn
2. {
3. //这里我们可以给个静态的bool值就相当于全局的了,方便我们对按钮进行操作.
4. static BOOL a = YES;
5. NSLog(@"heh");
6. if (a) {
7. for (int i = 0; i<6; i++) {
8.
9. [UIView animateWithDuration:0.3 delay:0.1*i options:UIViewAnimationOptionTransitionFlipFromTop animations:^{
10. UIImageView *changeView = (UIImageView *)[self viewWithTag:1000+i];
11. changeView.center = STARTPOINT;
12. } completion:^(BOOL finished) {
13.
14. }];
15. }
16.
17. }if (!a)
18. {
19. for (int i = 0; i<6; i++) {
20.
21. [UIView animateWithDuration:0.3 delay:0.1*i options:UIViewAnimationOptionTransitionFlipFromTop animations:^{
22. UIImageView *changeView = (UIImageView *)[self viewWithTag:1000+i];
23. changeView.center = CGPointMake(STARTPOINT.x + ENDRADIUS * sinf(i * M_PI_2 / 5), STARTPOINT.y - ENDRADIUS * cosf(i * M_PI_2 / 5));
24.
25. } completion:^(BOOL finished) {
26.
27. }];
28. }
29.
30. }
31.
32. [UIView beginAnimations:@"" context:@""] ;
33. [UIView setAnimationDuration:0.5] ;
34.
35. CGAffineTransform aff ;
36.
37. UIImageView *changeView = (UIImageView *)[self viewWithTag:250];
38. //设置动画的变化方式为原地旋转
39. aff = CGAffineTransformRotate(changeView.transform, M_PI / 4) ;
40. [changeView setTransform:aff];
41. [UIView commitAnimations] ;// 提交动画 结束的意思。所有的动画操作都是在个函数之前完成的 。
42.
43. //最后记得改变a的值哦
44. a = !a;
45. }
第9行动画时间我们设0.3秒,延迟0.1*i调用,这里用不用I,全凭个人喜好,接着我们看第37行,我们通过tag值取到上面提到的覆盖在button上的imageView,通过点击旋转来区别两种点击状态.其余需要注意的地方小编都标注好了哦.
最后:
(图1)
(图2)
当我们点击图1的时候,图2中的6个小黑圈就会从加号按钮中飞出.现在很多app都是基于这个模型,据说用户体验非常好.今天小编也来讲解一下它的原理,在此基础之上的更多炫的效果,留待读者自行发挥创造.
为了使大家花最少的时间阅读此文章,小编分三步走哦 ,lets go!!!
首先
我们需要创建一个加号按钮和六个黑圈视图,至于加号按钮怎么完成的这里小编不在赘述,接着我们新建一个UIImageView(QuadCurveMenuItem)类和一个UIView(QuadCurveMenu).并将QuadCurveMenuItem作为我们的根视图,把创建好的六个小黑圈imageView存入数组:
NSArray *menus = [NSArray arrayWithObjects:cameraMenuItem, peopleMenuItem, placeMenuItem, musicMenuItem, thoughtMenuItem, sleepMenuItem, nil];
我们为QuadCurveMenu自定义一个初始化方法-(id)initWithFrame:(CGRect)frame menus:(NSArray *)aMenusArray;这也是方便我们在初始化视图的时候导入六个黑圈视图.我们先来分析一下QuadCurveMenu的初始化方法,代码如下.
1. - (id)initWithFrame:(CGRect)frame menus:(NSArray *)aMenusArray
2. {
3. self = [super initWithFrame:frame];
4. if (self) {
5. self.backgroundColor = [UIColor clearColor];
6.
7. _menusArray = [aMenusArray copy];
8.
9. int count = [_menusArray count];
10. for (int i = 0; i < count; i ++)
11. {
12. QuadCurveMenuItem *item = [_menusArray objectAtIndex:i];
13. item.tag = 1000 + i;
14. //这里先计算好每个小图标的初始坐标,ENDRADIUS代表圆的半径,STARTPOINT代表大按钮的坐标
15. item.startPoint = CGPointMake(STARTPOINT.x + ENDRADIUS * sinf(i * M_PI_2 / (count - 1)), STARTPOINT.y - ENDRADIUS * cosf(i * M_PI_2 / (count - 1)));
16. item.endPoint = STARTPOINT;
17. item.nearPoint = CGPointMake(STARTPOINT.x + NEARRADIUS * sinf(i * M_PI_2 / (count - 1)), STARTPOINT.y - NEARRADIUS * cosf(i * M_PI_2 / (count - 1)));
18. item.farPoint = CGPointMake(STARTPOINT.x + FARRADIUS * sinf(i * M_PI_2 / (count - 1)), STARTPOINT.y - FARRADIUS * cosf(i * M_PI_2 / (count - 1)));
19. item.center = item.startPoint;
20.
21. [self addSubview:item];
22. }
23.
24. // 添加"添加"按钮
25. _addButton = [UIButton buttonWithType:UIButtonTypeCustom];
26. _addButton.frame = CGRectMake(0, 0, 40, 40)
27. ;
28. _addButton.center = STARTPOINT;
29. _addButton.layer.cornerRadius = 20;
30. _addButton.layer.borderWidth = 0;
31. [_addButton setBackgroundImage:[UIImage imageNamed:@"bg-addbutton"] forState:UIControlStateNormal];
32. UIImage *image = [UIImage imageNamed:@"icon-plus"];
33. UIImageView *imageView = [[UIImageView alloc] initWithImage:image];
34. imageView.frame = CGRectMake(0, 0, 20, 20);
35. imageView.center = _addButton.center;
36. imageView.tag = 250;
37. [_addButton addTarget:self action:@selector(addBtn) forControlEvents:UIControlEventTouchUpInside];
38. [self addSubview:_addButton];
39. [self addSubview:imageView];
40. }
41. return self;
42. }
乍一看,可能会有点蒙,但是细看你就会发现,哈哈,一点都不难.都是我们基本的东西,带大家读一下, startPoint和endPoint分别代表小黑圈的初始坐标和结束坐标,在QuadCurveMenuItem我们定义,可能有读者会问这里的小黑圈为什么不直接用UIImageView,在这里我解释一下,用QuadCurveMenuItem可以自定义我们需要的属性.因为我们需要的是一个带有动画效果的,而不是一个单纯的UIImageView,好了,不再纠结,接着看.
第14行ENDRADIUS代表圆的半径,STARTPOINT代表大按钮的坐标是什么意思呢,那是因为,我们需要用到圆形布局,所以小编也用到了几个宏定义:
#define ENDRADIUS 140.0f
#define STARTPOINT CGPointMake(50, 430)
#define TIMEOFFSET 0.026f
关于坐标怎么设置我只解释一个,其余大家回忆一下高中知识,只要数学不是英语老师教的相信都能看得懂.大家看到第15行:
item.startPoint = CGPointMake(STARTPOINT.x + ENDRADIUS * sinf(i * M_PI_2 / (count - 1)), STARTPOINT.y - ENDRADIUS * cosf(i * M_PI_2 / (count - 1)));
翻译成我们看得懂的语言item.startPoint = CGPointMake(50 +140 * sin(i*π/2/5),430-140*cos(i*π/2/5)));
接着我们来添加点击按钮:
1. _addButton = [UIButton buttonWithType:UIButtonTypeCustom];
2. _addButton.frame = CGRectMake(0, 0, 40, 40)
3. ;
4. _addButton.center = STARTPOINT;
5. _addButton.layer.cornerRadius = 20;
6. _addButton.layer.borderWidth = 0;
7. [_addButton setBackgroundImage:[UIImage imageNamed:@"bg-addbutton"] forState:UIControlStateNormal];
8. UIImage *image = [UIImage imageNamed:@"icon-plus"];
9. UIImageView *imageView = [[UIImageView alloc] initWithImage:image];
10. imageView.frame = CGRectMake(0, 0, 20, 20);
11. imageView.center = _addButton.center;
12. imageView.tag = 250;
13. [_addButton addTarget:self action:@selector(addBtn) forControlEvents:UIControlEventTouchUpInside];
14. [self addSubview:_addButton];
15. [self addSubview:imageView];
这里我只解释为什么要在button上添加一个ImageView,原因很简单,因为在后面我们点击黑圈收起和发散的时候需要按钮呈现不同的状态.
其次:
我们来看看具体动画怎么实现,动画都放在按钮触发的方法里,请看:
1. -(void)addBtn
2. {
3. //这里我们可以给个静态的bool值就相当于全局的了,方便我们对按钮进行操作.
4. static BOOL a = YES;
5. NSLog(@"heh");
6. if (a) {
7. for (int i = 0; i<6; i++) {
8.
9. [UIView animateWithDuration:0.3 delay:0.1*i options:UIViewAnimationOptionTransitionFlipFromTop animations:^{
10. UIImageView *changeView = (UIImageView *)[self viewWithTag:1000+i];
11. changeView.center = STARTPOINT;
12. } completion:^(BOOL finished) {
13.
14. }];
15. }
16.
17. }if (!a)
18. {
19. for (int i = 0; i<6; i++) {
20.
21. [UIView animateWithDuration:0.3 delay:0.1*i options:UIViewAnimationOptionTransitionFlipFromTop animations:^{
22. UIImageView *changeView = (UIImageView *)[self viewWithTag:1000+i];
23. changeView.center = CGPointMake(STARTPOINT.x + ENDRADIUS * sinf(i * M_PI_2 / 5), STARTPOINT.y - ENDRADIUS * cosf(i * M_PI_2 / 5));
24.
25. } completion:^(BOOL finished) {
26.
27. }];
28. }
29.
30. }
31.
32. [UIView beginAnimations:@"" context:@""] ;
33. [UIView setAnimationDuration:0.5] ;
34.
35. CGAffineTransform aff ;
36.
37. UIImageView *changeView = (UIImageView *)[self viewWithTag:250];
38. //设置动画的变化方式为原地旋转
39. aff = CGAffineTransformRotate(changeView.transform, M_PI / 4) ;
40. [changeView setTransform:aff];
41. [UIView commitAnimations] ;// 提交动画 结束的意思。所有的动画操作都是在个函数之前完成的 。
42.
43. //最后记得改变a的值哦
44. a = !a;
45. }
第9行动画时间我们设0.3秒,延迟0.1*i调用,这里用不用I,全凭个人喜好,接着我们看第37行,我们通过tag值取到上面提到的覆盖在button上的imageView,通过点击旋转来区别两种点击状态.其余需要注意的地方小编都标注好了哦.
最后:
限于本人水平,文中可能存在不严谨之处,小编也尽最大努力分享所知道的.祝大家工作顺利,身体健康!
代码下载处:http://code4app.com/ios/QuadCurve-Menu/4f67ef546803fa6d45000000
原文地址:http://blog.csdn.net/u010869099/article/details/39377377


 1205
1205

 被折叠的 条评论
为什么被折叠?
被折叠的 条评论
为什么被折叠?
 到【灌水乐园】发言


