


C# Winform编程(6)高级控件
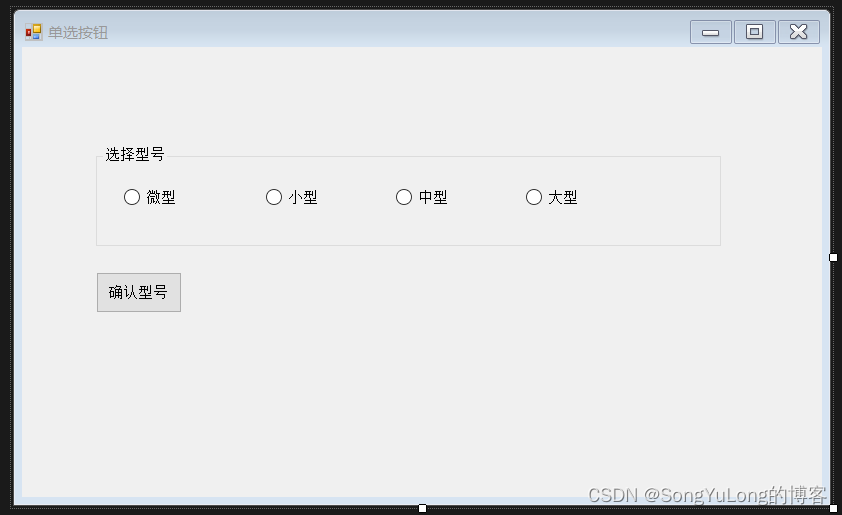
RadioButton(单选框)
- 在一个容器(如Panel控件、GroupBox控件或窗体)内绘制的单选按钮即可将他们分组。
- 若要添加不同的组,必须将它们放到面板或分组框中。
using System;
using System.Collections.Generic;
using System.ComponentModel;
using System.Data;
using System.Drawing;
using System.Linq;
using System.Text;
using System.Threading.Tasks;
using System.Windows.Forms;

namespace 高级控件
{
    public partial class FormRadioButton : Form
    {
        public FormRadioButton()
        {
            InitializeComponent();
        }

        private void FormRadioButton_Load(object sender, EventArgs e)
        {
            radioButton2.Checked = true;
        }

        private void button1_Click(object sender, EventArgs e)
        {
            if (radioButton1.Checked)
            {
                MessageBox.Show("微型", "型号选择");
            }
            else if (radioButton2.Checked)
            {
                MessageBox.Show("小型", "型号选择");
            }
            else if (radioButton3.Checked)
            {
                MessageBox.Show("中型", "型号选择");
            }
            else if (radioButton4.Checked) {
                MessageBox.Show("大型", "型号选择");
            }
        }


    }
}
PictureBox(图像框)
图片框用于显示图像,常用属性及方法:
- 属性:
- Image:用于指定图片框显示的图像,该图像可以设计或运行时设置
- SizeMode:用于指定图像的显示方式。可以指定各种大小模式,包括AutoSize,CenterImage,Normal和StretchImage,默认值为Normal。
- 方法:
- Show:是否显示控件,设置为true时显示图片,为false时不显示。
- 事件:
- Click:用户点击控件时触发改事件。
using System;
using System.Collections.Generic;
using System.ComponentModel;
using System.Data;
using System.Drawing;
using System.Linq;
using System.Text;
using System.Threading.Tasks;
using System.Windows.Forms;

namespace 高级控件
{
    public partial class FormPictureBox : Form
    {
        public FormPictureBox()
        {
            InitializeComponent();
        }

        public void showpicture()
        {
            //
            pictureBox1.Image = Image.FromFile(System.Environment.GetFolderPath(
                System.Environment.SpecialFolder.Personal) + @"\1.png");

            // 指定图片显示属性为StretchImage类型
            pictureBox1.SizeMode = System.Windows.Forms.PictureBoxSizeMode.StretchImage;
        }
        private void pictureBox1_Click(object sender, EventArgs e)
        {
            if (pictureBox1.Image != null)
            {
                pictureBox1.Image.Dispose();
                pictureBox1.Image = null;
            }
            else {
                showpicture();
            }

        }
    }
}
PictureBox显示Bitmap对象
Bitmap bmp = new Bitmap(@"D:\2.png");
Image img = Image.FromHbitmap(bmp.GetHbitmap());
pictureBox1.Image = img;
pictureBox1.Show();
pictureBox1.Refresh();
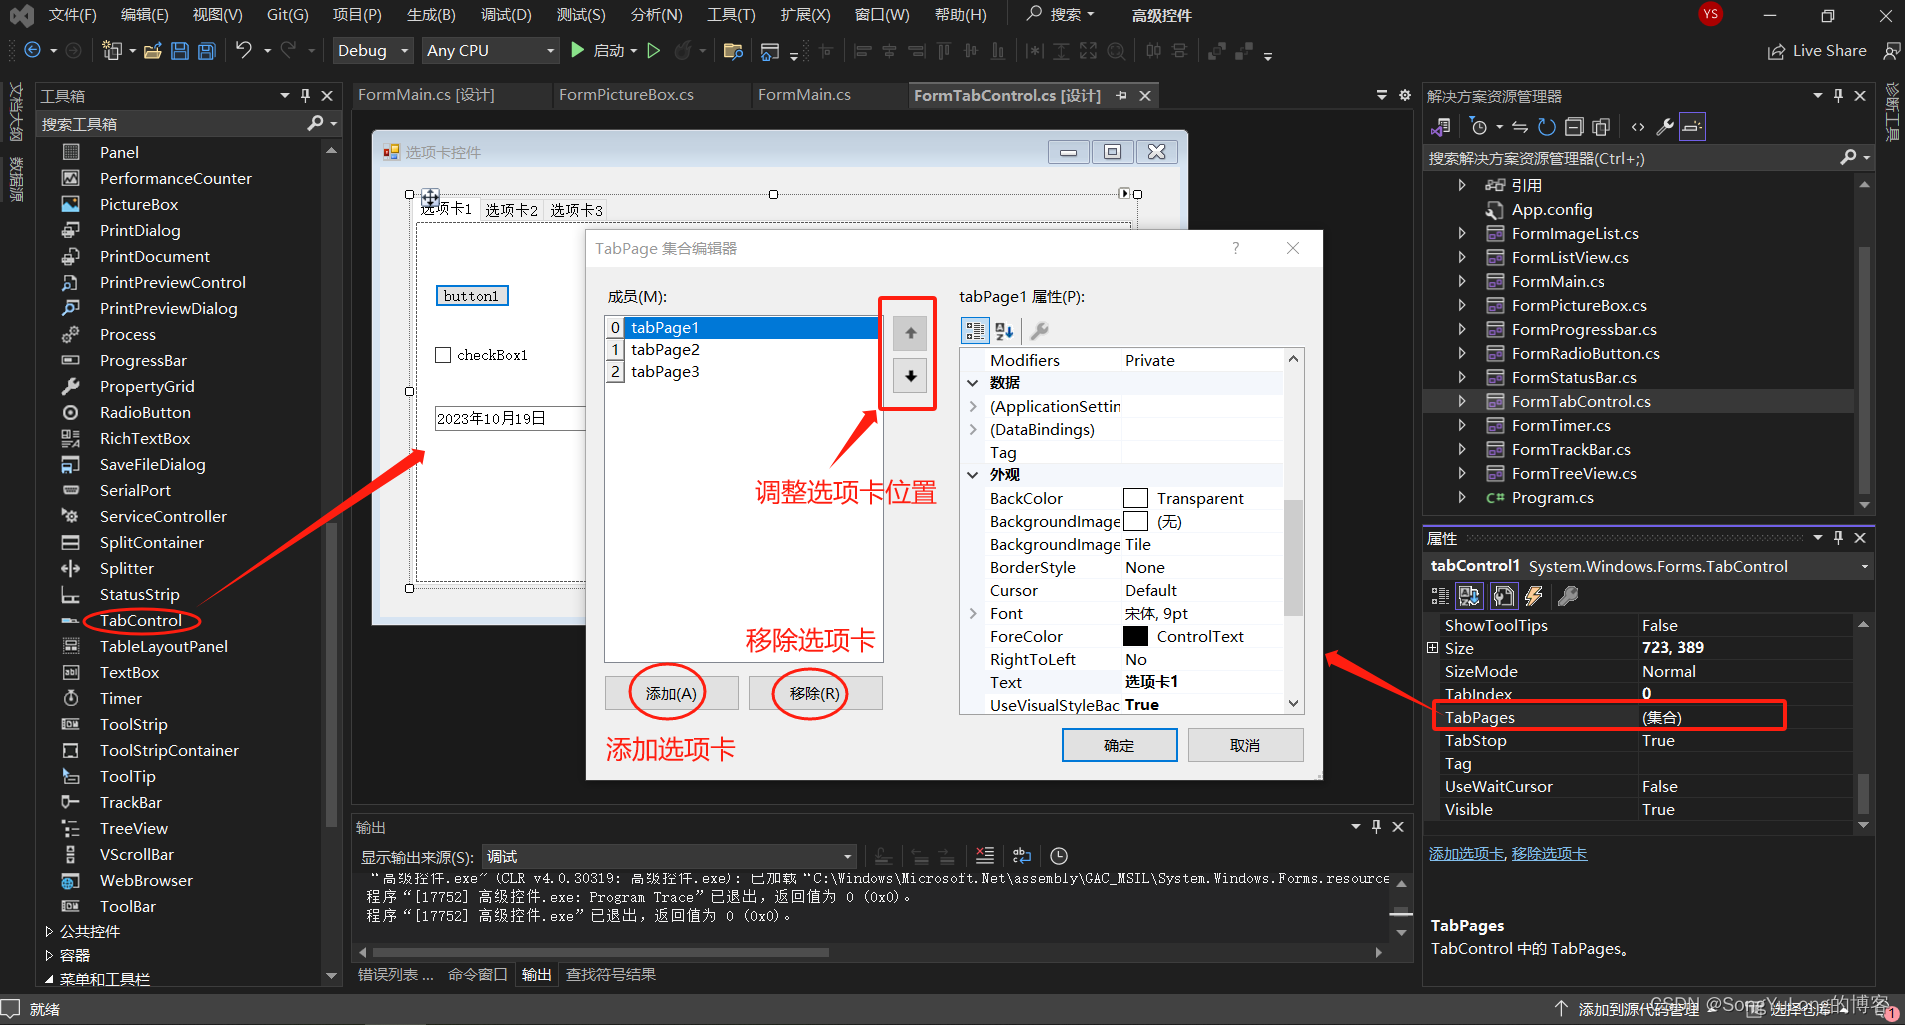
TabControl(选项卡)
- 属性:
- MultiLine:指定是否可以显示多行选项卡。
- SelectedIndex:当前所选择的选项卡索引值。从0开始,默认-1未选定状态。
- SelectedTab:当前选定的选项卡页。未选定未NULL引用。
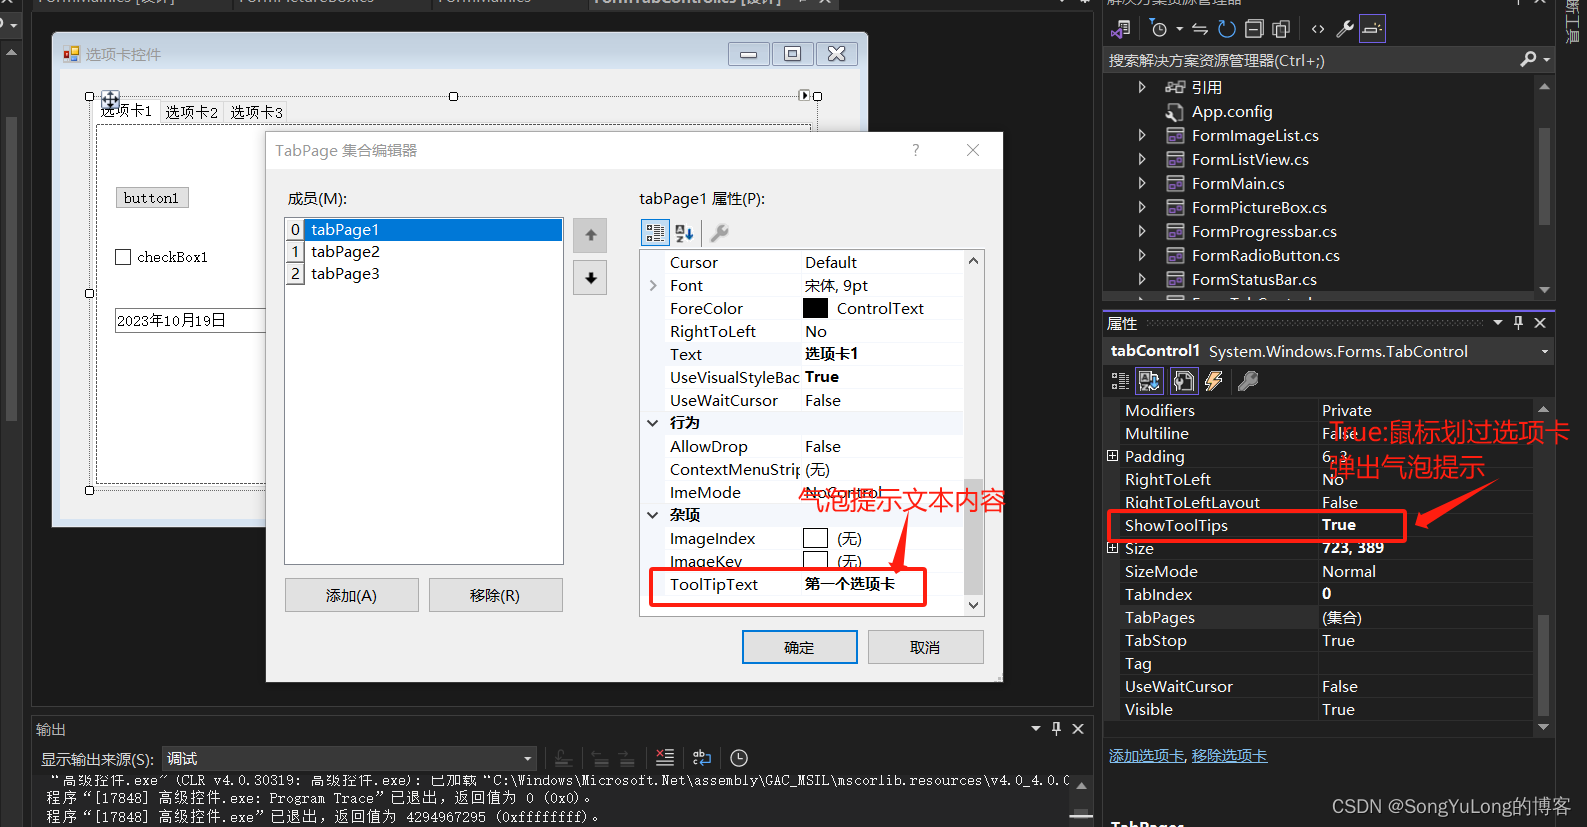
- ShowToolTips:指定鼠标移至选项卡时,是否显示改选项卡的工具提示。
- TabCount:检索选项卡控件中选项卡的数目。
- Alignment:控制选项卡标签在控件中的显示位置。默认位置为控件的顶部。
- Appearance:控制标签的显示方式。标签可以显示为一般的按钮或平面样式。
- HotTrack :如果这个属性设置为True,当鼠标指针经过控件上的标签时,其外观会改变。
- RowCount:返回当前显示的标签行数。
- TabPages:控件中的TabPage对象集合。使用这个集合可以添加和删除TabPage对象。
选项卡编辑:
选项卡添加鼠标划过气泡提示:
using System;
using System.Collections.Generic;
using System.ComponentModel;
using System.Data;
using System.Drawing;
using System.Linq;
using System.Text;
using System.Threading.Tasks;
using System.Windows.Forms;

namespace 高级控件
{
    public partial class FormTabControl : Form
    {
        public FormTabControl()
        {
            InitializeComponent();
        }

        private void dateTimePicker1_ValueChanged(object sender, EventArgs e)
        {

        }

        private void tabPage1_Click(object sender, EventArgs e)
        {

        }

        private void tabControl1_SelectedIndexChanged(object sender, EventArgs e)
        {
            label1.Text = "当前选项卡为:第"+tabControl1.SelectedIndex.ToString() + "页,选项卡页为:"+
                tabControl1.SelectedTab.Text+"选项卡总为:"+tabControl1.TabCount.ToString();

        }
    }
}
ProgressBar(进度条)
进度条控件是显示用户当前进程的控件:
- 属性:
- Maxinum:进度条控件的最大值。默认值为100。
- Minimux: 进度条控件的最小值。默认值为0。
- Step:PerformStep方法根据该属性增加进度条的光标位置的值。默认值10。
- Value:进度条控制光标当前位置。默认值0。
- 方法:
- Increment:按指定的递增值移动进度条光标位置。
- PerformStep:按Step属性的值移动进度条的光标位置。
using System;
using System.Collections.Generic;
using System.ComponentModel;
using System.Data;
using System.Drawing;
using System.Linq;
using System.Text;
using System.Threading.Tasks;
using System.Windows.Forms;

namespace 高级控件
{
    public partial class FormProgressbar : Form
    {
        public FormProgressbar()
        {
            InitializeComponent();
        }

        private void progressBar1_Click(object sender, EventArgs e)
        {
            progressBar1.Value++;
        }

        private void progressBar2_Click(object sender, EventArgs e)
        {
            progressBar1.Value++;
        }
    }
}
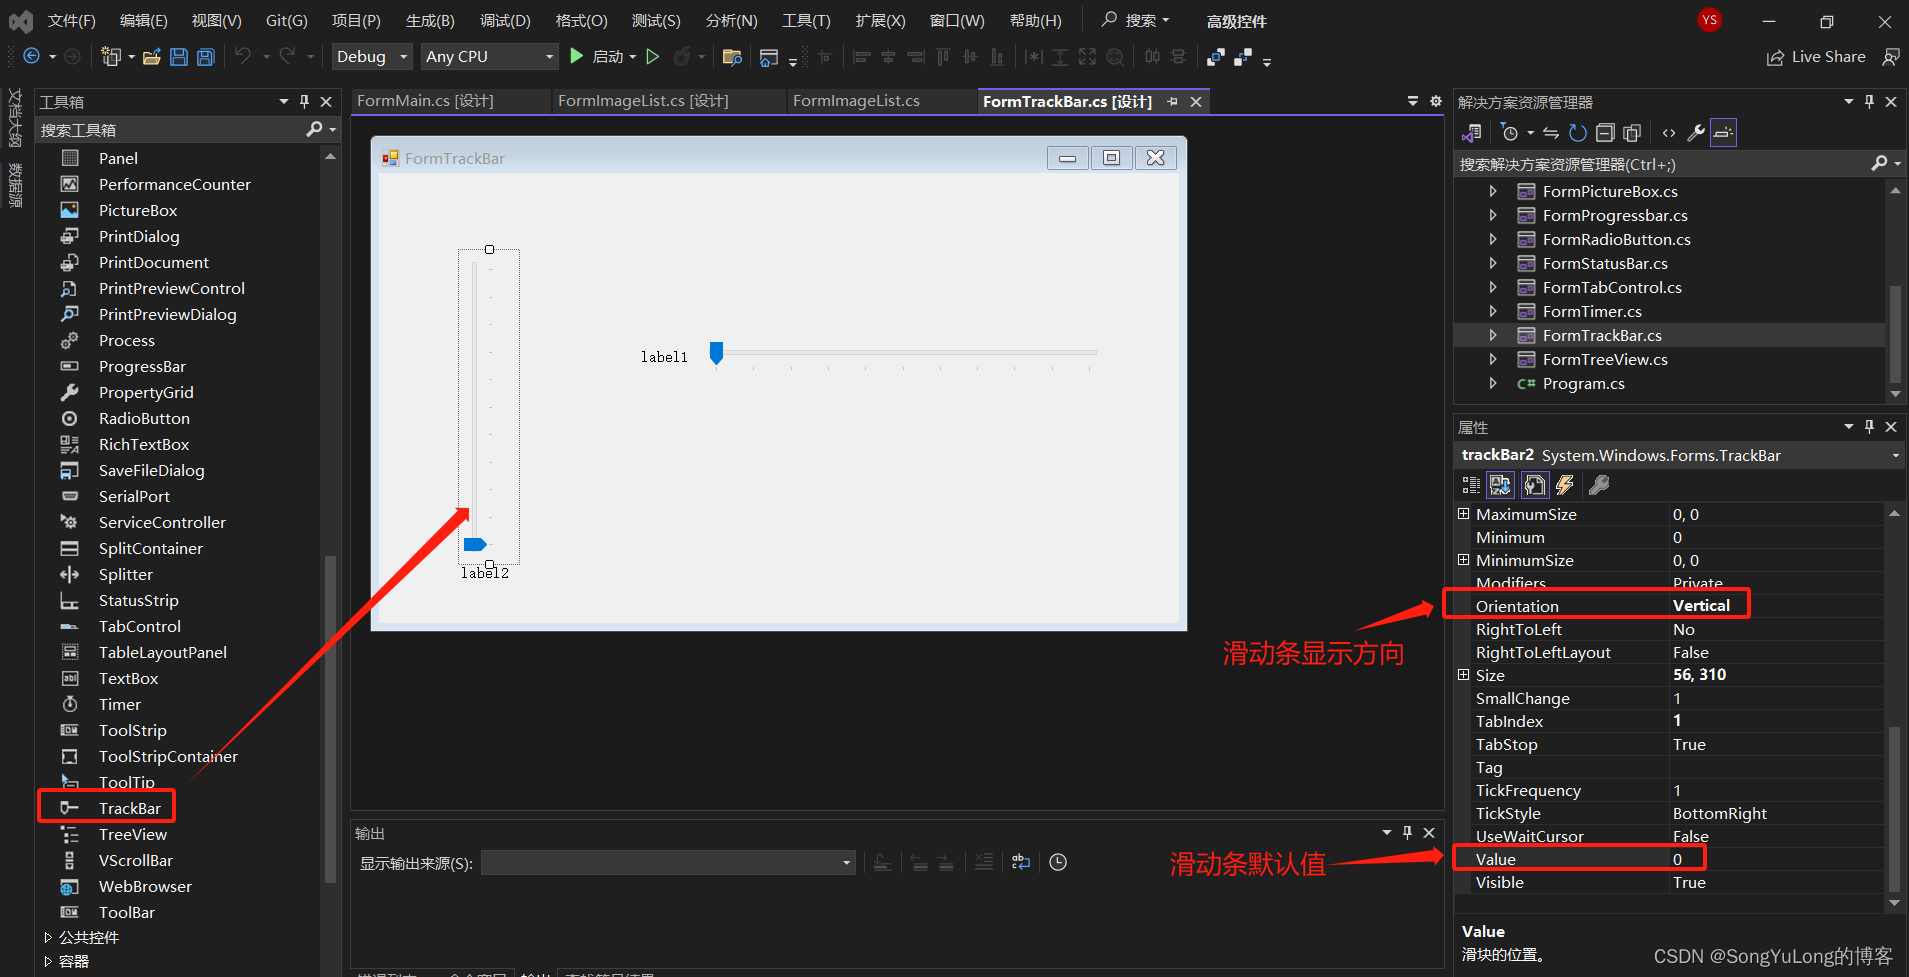
TrackBar(滑动条)
using System;
using System.Collections.Generic;
using System.ComponentModel;
using System.Data;
using System.Drawing;
using System.Linq;
using System.Text;
using System.Threading.Tasks;
using System.Windows.Forms;

namespace 高级控件
{
    public partial class FormTrackBar : Form
    {
        public FormTrackBar()
        {
            InitializeComponent();
        }

        private void trackBar2_Scroll(object sender, EventArgs e)
        {
            label2.Text = trackBar2.Value.ToString();
        }

        private void trackBar1_Scroll(object sender, EventArgs e)
        {

            label1.Text = trackBar1.Value.ToString();
        }


        private void FormTrackBar_Load(object sender, EventArgs e)
        {
            trackBar1.Minimum = 0;
            trackBar1.Maximum = 100;
            trackBar1.SmallChange = 5;
            trackBar1.TickFrequency = 10;

            trackBar2.Minimum = 0;
            trackBar2.Maximum = 100;
            trackBar2.SmallChange = 1;
            trackBar2.TickFrequency = 5;
        }

    }
}
ImageList(图像列表控件)
位于Systems.Windows.Forms命名空间内的ImageList控件,主要用于缓存用户预定义好的图片列表信息,该控件不可以单独使用显示图片内容,必须附着在其他控件联合使用才可以显示图片内容。
- 属性:
- Images:该属性表示图像列表中包含的图像的集合。
- ImageSize:该属性表示图像的大小,默认高度和宽度为16x16,最大大小为256x256
- 方法:
- Draw:该方法用于绘制指定图像。

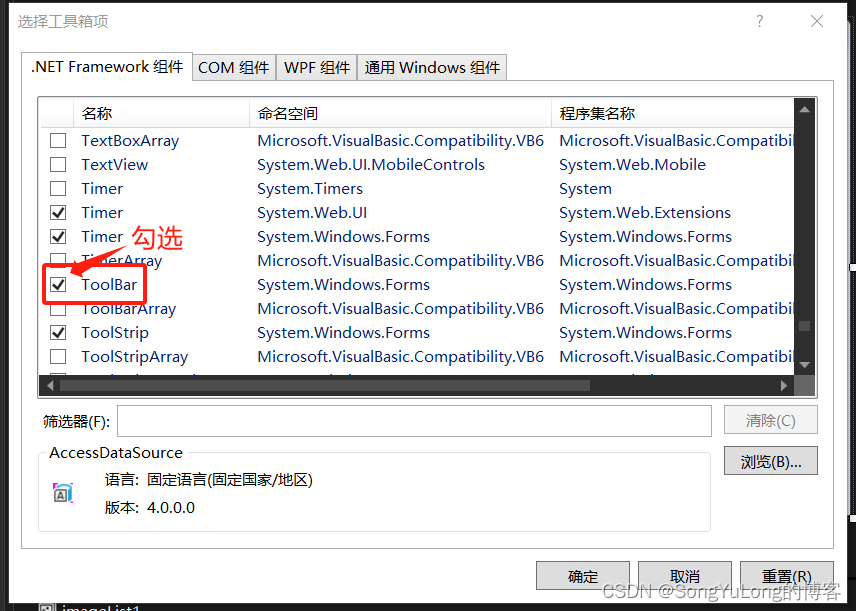
ToolBar(工具栏)
ToolBar控件主要用于窗体的顶部工具栏的实现。
- 属性:
- Buttons : 工具栏按钮控件的集合。
- ShowToolTips:鼠标移动到各个工具栏按钮上时,是否显示相应的工具提示。
- ImageIndex:工具栏按钮指定的图像在图像列表中的索引值。
- Parent:指定工具栏按钮所属的ToolBar控件。
- Style:工具栏按钮的样式,其中包括DropDownButton(下拉按钮),Separator(分隔符)、和ToggleButton(切换按钮)。
- 方法:
- ButtonClick :单击工具栏按钮时,将触发该事件。
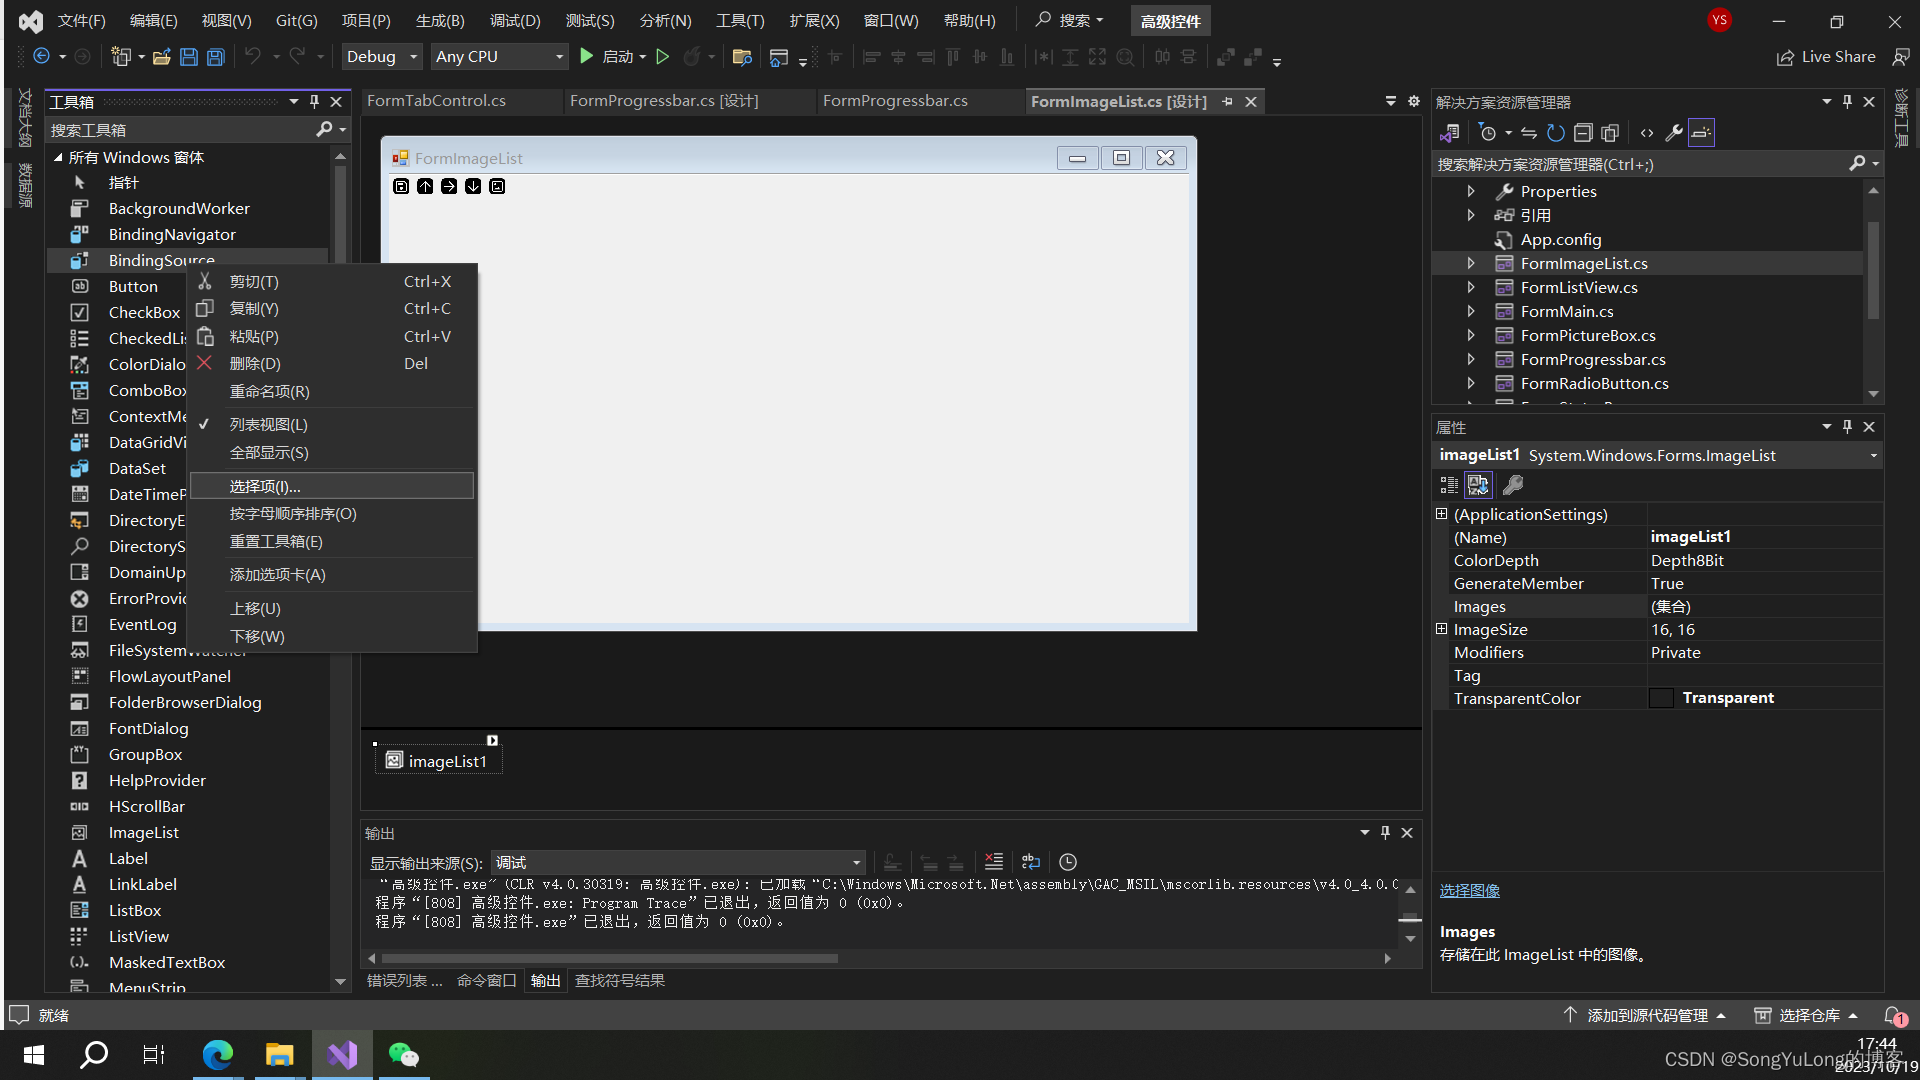
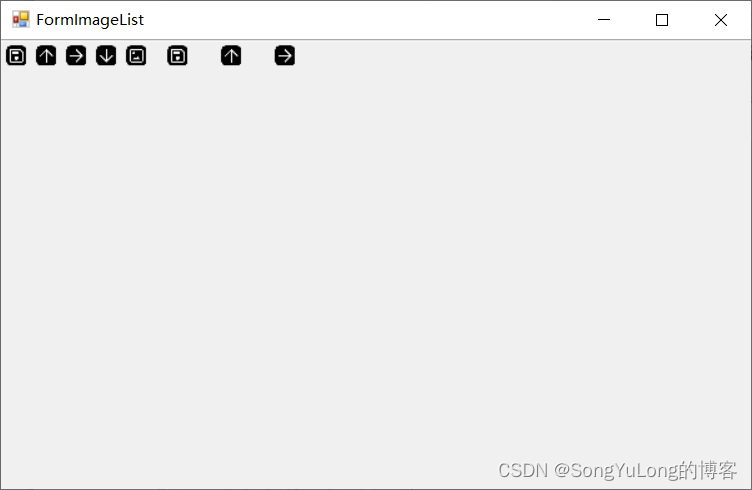
添加ToolBar来联合使用ImageList图像列表:
BindingSource=》选择项

using System;
using System.Collections.Generic;
using System.ComponentModel;
using System.Data;
using System.Drawing;
using System.Linq;
using System.Text;
using System.Threading.Tasks;
using System.Windows.Forms;

namespace 高级控件
{
    public partial class FormImageList : Form
    {
        public FormImageList()
        {
            InitializeComponent();
        }

        private void toolBar1_ButtonClick(object sender, ToolBarButtonClickEventArgs e)
        {

        }

        private void FormImageList_Load(object sender, EventArgs e)
        {
            // 定义ToolBarButton对象
            ToolBarButton btn1 = new ToolBarButton();
            ToolBarButton btn2 = new ToolBarButton();
            ToolBarButton btn3 = new ToolBarButton();

            // 向当前的ToolBar控件添加工具栏按钮
            toolBar1.Buttons.Add(btn1);
            toolBar1.Buttons.Add(btn2);
            toolBar1.Buttons.Add(btn3);

            // 指定ToolBar控件的ImageList控件对象
            toolBar1.ImageList = imageList1;

            // 设置显示工具提示
            toolBar1.ShowToolTips = true;

            // 设置图片索引
            btn1.ImageIndex = 0;
            btn2.ImageIndex = 1;
            btn3.ImageIndex = 2;

            // 设置按钮的标题和提示信息
            btn1.Text = "按钮1";
            btn1.ToolTipText = "按钮提示1";
            btn2.Text = "按钮2";
            btn2.ToolTipText = "按钮提示2";
            btn3.Text = "按钮3";
            btn3.ToolTipText = "按钮提示3";

        }
    }
}
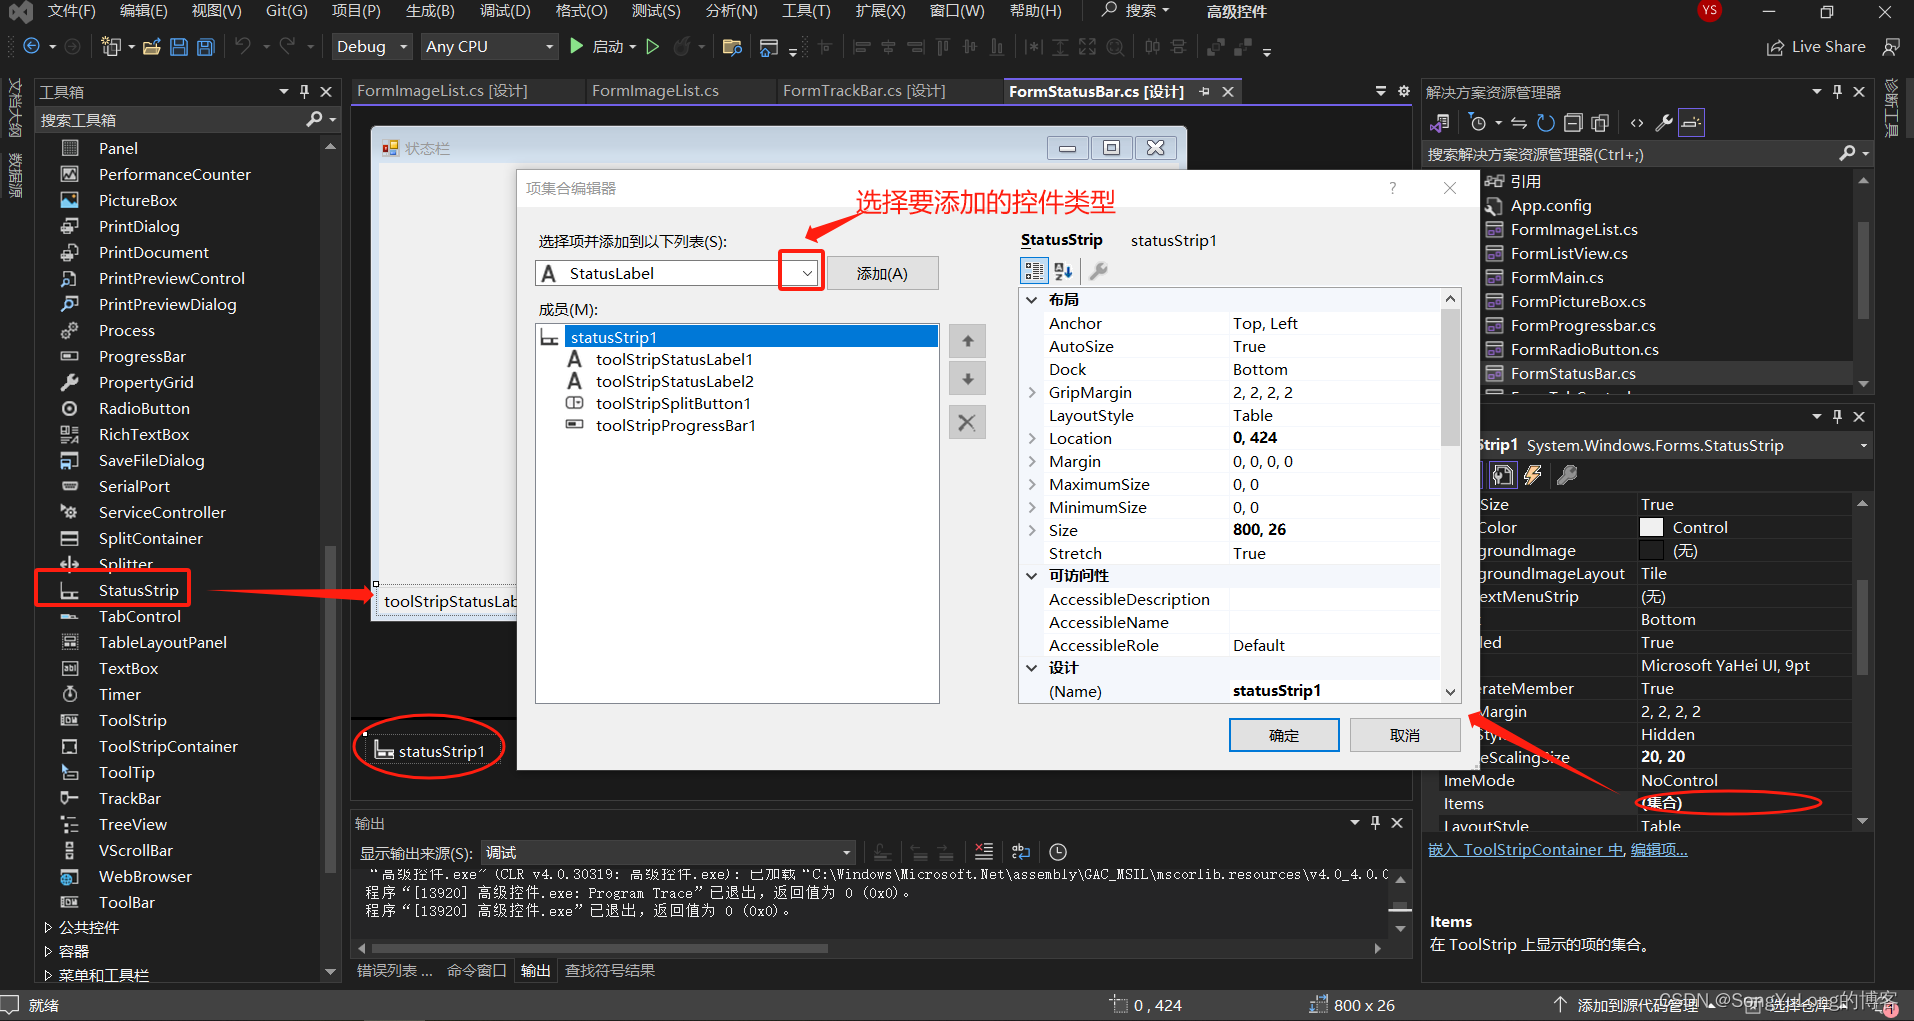
StatusStrip(状态栏)
StatusStrip控件主要出现在窗体的底部,一般用于显示程序的当前状态信息。
StatusStrip控件允许添加包括:StatusLabel(标签控件)、ProgressBar(进度条)、DropDownButton(下拉按钮)和SplitButton(分割控件)等。
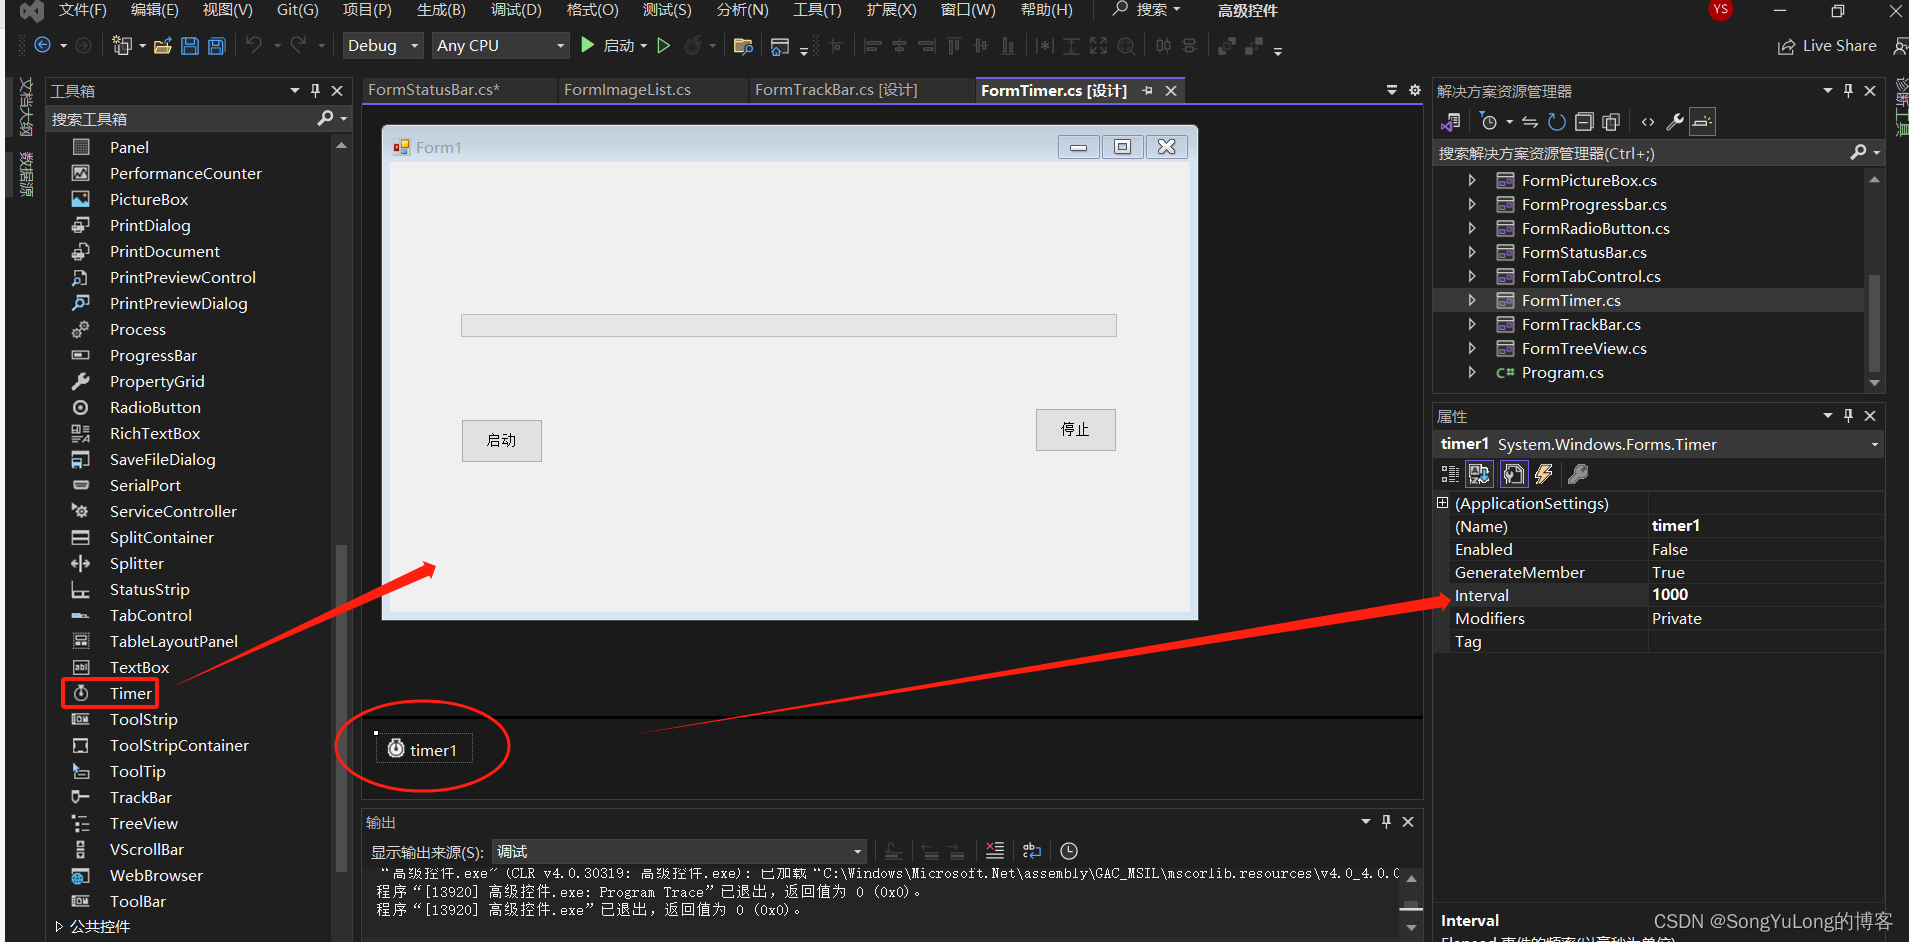
Timer(定时器)
定时执行设定方法。
- 属性:
- Enabled:定时器是否可用
- Interval:定时器每个多长时间触发一次tick事件,时间单位是毫秒。
- 方法:
- Start():启动定时器。
- Stop():停止定时器。
- 事件:
- Tick : 没每隔Interval设定时间触发一次 。
using System;
using System.Collections.Generic;
using System.ComponentModel;
using System.Data;
using System.Drawing;
using System.Linq;
using System.Text;
using System.Threading.Tasks;
using System.Windows.Forms;

namespace 高级控件
{
    public partial class FormTimer : Form
    {
        public FormTimer()
        {
            InitializeComponent();
        }

        private void button1_Click(object sender, EventArgs e)
        {
            progressBar1.Value = 0;
            timer1.Start();
        }

        private void button2_Click(object sender, EventArgs e)
        {
            timer1.Stop();
        }

        private void timer1_Tick(object sender, EventArgs e)
        {
            progressBar1.Value += 1;
            if (progressBar1.Value > 100) {
                progressBar1.Value = 100;
            }
        }
    }
}
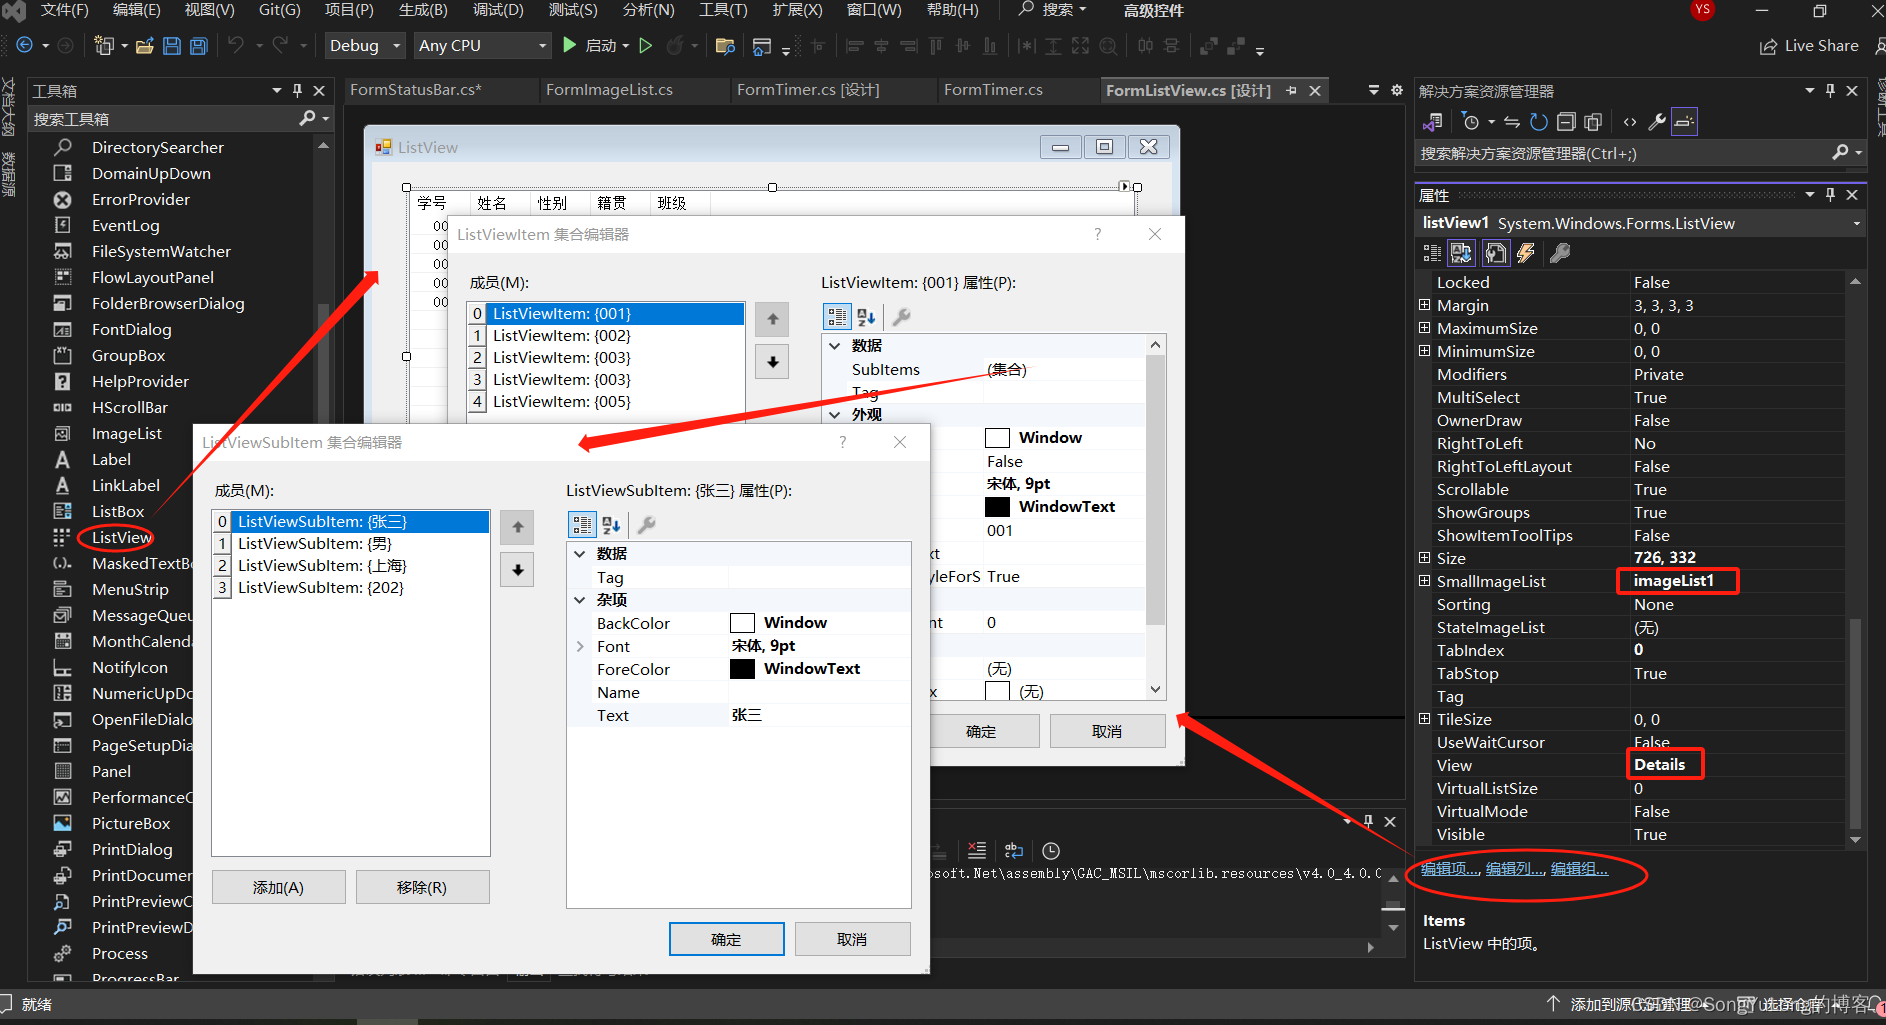
ListView(列表视图)
ListView是以列表的方式显示数据内容,可以通过编辑列、组和项,添加行列数据信息。
- 属性:
- Items:ListView中的具体内容。
- MultiSelect:是否允许选择多个项。
- SelectedItems:用户选择的ListView行。
- Sorting:指定进行的排序方式。
- Columns:详细视图中显示的列信息。
- 方法:
- Clear():彻底清除视图,删除所有的选项和列。
- GetIteAt():返回列表视图中位于x,y的选项。
- Sort():进行排序,仅限于字母数字类型。
- 事件:
- BeginUpdate:开始更新,直到调用EndUpdate为止。当一次插入多个选项时可以避免视图闪送,并可以大大提高速度。
- EndUpdate:结束更新。
ListView控件的编辑列、组和项的一般流程:
- 拖拽ImageList图片列表控件和ListView控件,在ImageList加载图片信息。
- 选中ListView控件,配置其LargeImageList和SallImageList的属性为ImageList控件对象。
- 选中ListView控件,通过Columns属性或者编辑列,打开Columnheader集合编辑器,设置图片列表内容和表头名称。
- 选中ListView控件,设置其View属性为Details。
using System;
using System.Collections.Generic;
using System.ComponentModel;
using System.Data;
using System.Drawing;
using System.Linq;
using System.Text;
using System.Threading.Tasks;
using System.Windows.Forms;


namespace 高级控件
{
    public partial class FormListView : Form
    {
        public FormListView()
        {
            InitializeComponent();

            listView1.View = View.Details;
            // 设置ListView对象的View属性值为Details
        }

        private void listView1_SelectedIndexChanged(object sender, EventArgs e)
        {
            foreach (ListViewItem lst in listView1.SelectedItems)
            {
                MessageBox.Show(lst.Text);
            }
        }

        private void FormListView_Load(object sender, EventArgs e)
        {
            ColumnHeader header1 = new ColumnHeader();
            header1.Text = "职业";
            header1.TextAlign = HorizontalAlignment.Center;
            header1.Width = 50;
            listView1.Columns.Add(header1);

            ColumnHeader header2 = new ColumnHeader();
            header2.Text = "兴趣";
            header2.TextAlign = HorizontalAlignment.Center;
            header2.Width = 50;
            listView1.Columns.Add(header2);

            listView1.Columns.Add("身高", 100, HorizontalAlignment.Center);
        }

        private void button1_Click(object sender, EventArgs e)
        {
            listView1.Columns.Add("年龄", 100, HorizontalAlignment.Center);
            listView1.Columns.Add("班级", 40, HorizontalAlignment.Center);
        }

        private void button2_Click(object sender, EventArgs e)
        {
            listView1.Columns.Remove(listView1.Columns[0]);
        }

        private void button3_Click(object sender, EventArgs e)
        {
            listView1.Clear();
        }

        private void button4_Click(object sender, EventArgs e)
        {
            listView1.Items.Clear();
        }

        private void button5_Click(object sender, EventArgs e)
        {
            listView1.BeginUpdate();
            listView1.Items.Add("row1", "小李", 0);
            listView1.Items["row1"].SubItems.Add("21");
            listView1.Items["row1"].SubItems.Add("98524");
            listView1.Items["row1"].SubItems.Add("男");
            listView1.EndUpdate();

            for (int i = 0; i < listView1.Items.Count; i++) {
                if (i % 2 == 0) {
                    listView1.Items[i].BackColor = Color.Gray;
                }
            }
        }
    }
}
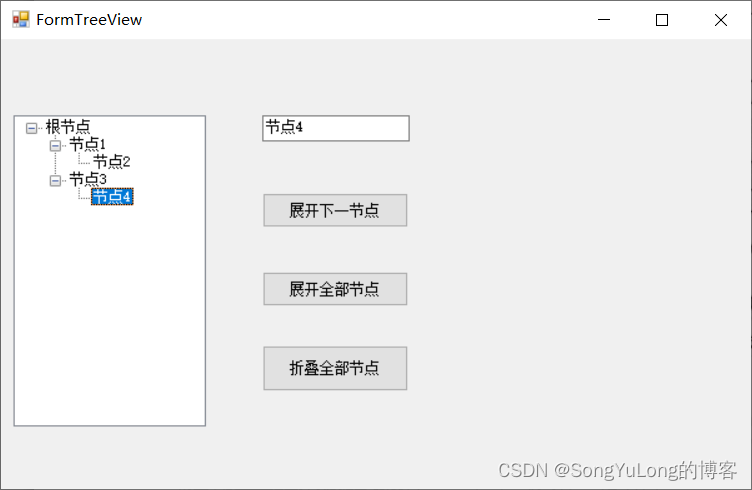
TreeView(树型视图)
TreeView是以树型视图样式排列的对象。有两个重要的知识概念节点集和节点对象。TreeView控件的Nodes属性表示为TreeView控件指定的树节点集,而树节点集中的每个树节点对象可以包括它本身的树节点集,在树节点集中Add(),Remove()和RemoveAt()方法使开发人员可以添加和移动集中的单个树节点。
- 属性:
- Nodes:TreeView中的根节点具体内容集合。
- ShowLines:是否显示父子节点之间的连接线,默认为True。
- StateImageList:树型视图 用以表示自定义状态的ImageList控件。
- Scrollable:是否出现滚动条。
- 事件:
- AfterCheck:选中或取消属性节点时触发。
- AfterCollapse:折叠节点后触发。
- AfterExpand:展开节点后触发。
- AfterSelect:更改选定内容后触发。
- BeforeCheck: 选中或取消树节点复选框时触发。
- BeforeCollapse:折叠节点之前触发。
- BeforeExpand:展开节点之前触发。
- BeforeSelect:更改选定内容前触发。
using System;
using System.CodeDom.Compiler;
using System.Collections.Generic;
using System.ComponentModel;
using System.Data;
using System.Drawing;
using System.Linq;
using System.Text;
using System.Threading.Tasks;
using System.Windows.Forms;

namespace 高级控件
{
    public partial class FormTreeView : Form
    {
        public FormTreeView()
        {
            InitializeComponent();
        }

        private void FormTreeView_Load(object sender, EventArgs e)
        {
            treeView1.Nodes.Clear();
            TreeNode tem = new TreeNode("根节点");
            treeView1.Nodes.Add(tem);
        }

        /// <summary>
        /// 添加子节点方法
        /// </summary>
        private void AddChildNode()
        {
            // 首先判断是否选定组件中的位置
            if (treeView1.SelectedNode == null)
            {
                MessageBox.Show("请选择一个节点", "提示信息", MessageBoxButtons.OK, MessageBoxIcon.Information);
            }
            else
            {
                if (textBox1.Text != "")
                {
                    // 创建一个节点对象并初始化
                    TreeNode tmp;
                    tmp = new TreeNode(textBox1.Text);
                    // 在TreeView组件中加入子节点
                    treeView1.SelectedNode.Nodes.Add(tmp);
                    treeView1.SelectedNode = tmp;
                    treeView1.ExpandAll();
                }
                else
                {
                    MessageBox.Show("请填写节点名称!", "信息提示",
                        MessageBoxButtons.OK, MessageBoxIcon.Information);
                    return;
                }

            }
        }

        /// <summary>
        /// 添加兄弟节点方法
        /// </summary>
        private void AddParent()
        {
            try
            {
                if (treeView1.SelectedNode == null)
                {
                    MessageBox.Show("请选择一个节点", "提示信息", MessageBoxButtons.OK, MessageBoxIcon.Information);
                }
                else
                {
                    if (textBox1.Text != "")
                    {
                        // 创建一个节点对象并初始化
                        TreeNode tmp;
                        tmp = new TreeNode(textBox1.Text);

                        treeView1.SelectedNode.Parent.Nodes.Add(tmp);
                        treeView1.ExpandAll();
                    }
                    else
                    {
                        MessageBox.Show("请选择一个节点!", "提示信息",
                            MessageBoxButtons.OK, MessageBoxIcon.Information);
                    }
                }
            }
            catch
            {
                TreeNode tem = new TreeNode("根节点");
                treeView1.Nodes.Add(tem);

            }
        }

        private void treeView1_AfterSelect(object sender, TreeViewEventArgs e)
        {

        }

        private void treeView1_MouseDown(object sender, MouseEventArgs e)
        {
            if (e.Button == MouseButtons.Right)
            {
                contextMenuStrip1.Show(this, new Point(e.X, e.Y));
            }
        }

        private void button1_Click(object sender, EventArgs e)
        {
            treeView1.SelectedNode.Expand();
        }

        private void button2_Click(object sender, EventArgs e)
        {
            treeView1.SelectedNode = treeView1.Nodes[0];
            treeView1.SelectedNode.ExpandAll();
        }

        private void button3_Click(object sender, EventArgs e)
        {
            treeView1.SelectedNode = treeView1.Nodes[0];
            treeView1.SelectedNode.Collapse();
        }

        private void toolStripMenuItem1_Click(object sender, EventArgs e)
        {
            AddChildNode();
        }

        private void toolStripMenuItem2_Click(object sender, EventArgs e)
        {
            AddParent();
        }

        private void toolStripMenuItem3_Click(object sender, EventArgs e)
        {
            if (treeView1.SelectedNode.Nodes.Count == 0)
            {
                treeView1.SelectedNode.Remove();
            }
            else
            {
                MessageBox.Show("请先删除此节点的所有子节点!", "提示信息",
                    MessageBoxButtons.OK, MessageBoxIcon.Information);
            }
        }
    }
}
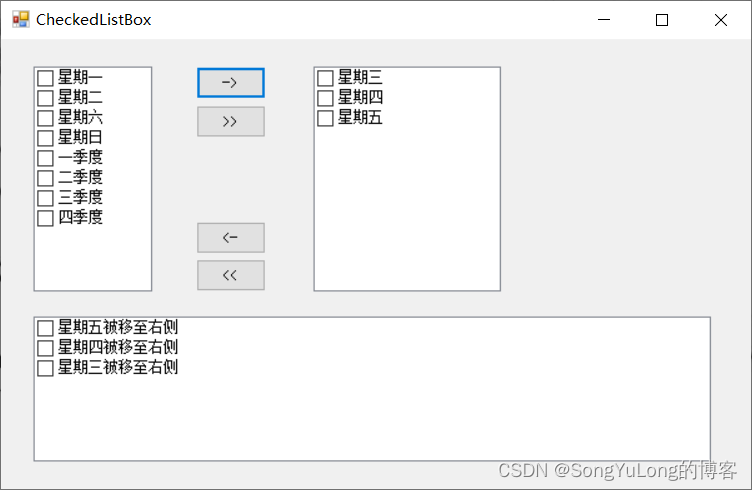
CheckedListBox(列表复选框)
CheckedListBox类似于ListBox和CheckBox控件的综合体,允许用户在ListBox内有多个选择框控件。
- 属性:
- Items:控件对象中的所有项。
- MultiColumn:决定是否可以以多列的形式显示各项。在控件对象的指定高度内无法完全显示所有项时可以分为多列显示。
- ColumnWidth:当控件对象支持多列时,指定各列所占宽度。
- CheckOnClick:决定是否在第一次单击某复选框时即改变其状态。
- SelectionMode:指示复现框列表控件的可选择性。该属性只有两个值None和One。
- Sorted:表示控件对象中的各项是否按字母的顺序排序显示。
- CheckedItems:表示控件对象中选中项的集合,该属性是只读的。
- CheckedIndices:表示控件对象中选中索引的集合。
- 事件:
- SetItemChecked:设置列表中的某个复选框的选中状态。
- SetSelected:设置列表中的某个复选框的待选状态。
using System;
using System.Collections.Generic;
using System.ComponentModel;
using System.Data;
using System.Drawing;
using System.Linq;
using System.Text;
using System.Threading.Tasks;
using System.Windows.Forms;

namespace 高级控件
{
    public partial class FormCheckedListBox : Form
    {
        public FormCheckedListBox()
        {
            InitializeComponent();
        }

        private void FormCheckedListBox_Load(object sender, EventArgs e)
        {
            checkedListBox1.Items.Add("一季度");
            checkedListBox1.Items.Add("二季度");
            checkedListBox1.Items.Add("三季度");
            checkedListBox1.Items.Add("四季度");


            // 设置单选一次既可勾选一行信息
            checkedListBox1.CheckOnClick = true;
            checkedListBox2.CheckOnClick = true;
            checkedListBox3.CheckOnClick = true;
        }

        private void button1_Click(object sender, EventArgs e)
        {
            foreach (object o in checkedListBox1.CheckedItems)
            {
                checkedListBox2.Items.Add(o);
            }

            for (int i =  checkedListBox1.Items.Count-1; i>=0; i--)
            {
                if (checkedListBox1.CheckedItems.Contains(checkedListBox1.Items[i]))
                {
                    checkedListBox3.Items.Add(checkedListBox1.Items[i].ToString()+"被移至右侧");
                    checkedListBox1.Items.Remove(checkedListBox1.Items[i]);
                }
            }
        }

        private void button2_Click(object sender, EventArgs e)
        {
            foreach (object o in checkedListBox1.Items)
            {
                checkedListBox2.Items.Add(o);
            }
            checkedListBox1.Items.Clear();
            checkedListBox3.Items.Add("左侧全部移到右侧");
        }

        private void button3_Click(object sender, EventArgs e)
        {
            foreach (object o in checkedListBox2.CheckedItems)
            {
                checkedListBox1.Items.Add(o);
            }

            for (int i = 0; i < checkedListBox2.Items.Count; i++)
            {
                checkedListBox3.Items.Add(checkedListBox1.Items[i].ToString() + "被移至左侧");
                checkedListBox2.Items.Remove(checkedListBox2.Items[i]);
            }
        }

        private void button4_Click(object sender, EventArgs e)
        {
            foreach (object o in checkedListBox2.Items)
            {
                checkedListBox1.Items.Add(o);
            }
            checkedListBox2.Items.Clear();
            checkedListBox3.Items.Add("右侧全部移动到左侧");
        }
    }
}
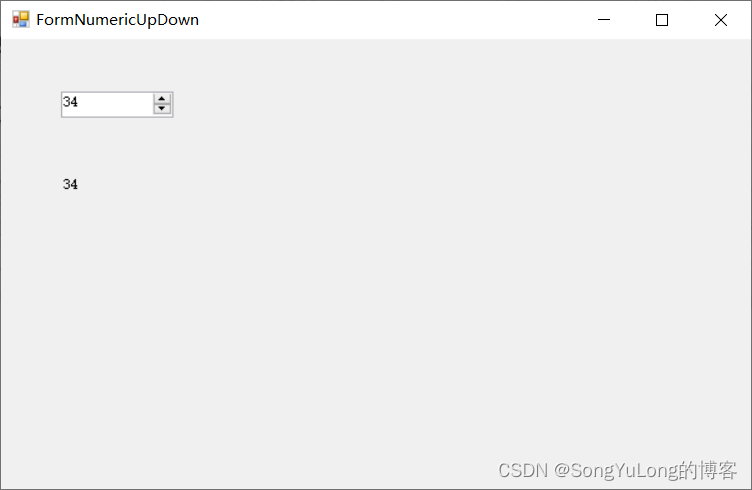
NumericUpDown(微调按钮)
NumericUpDown微调按钮控件看起来像是文本框和一组箭头的组合,用户可以通过点击上下箭头增大或减小参数值。
- 属性:
- Increent : 递增量,默认值为1。
- Maximum:最大值,默认值为100 。
- Minmum:最小值,默认为0。
- Updownalign:设置微调按钮的位置,值为Left或Right。
- InterceptArrowKeys:设置是否接受上下箭头的控制。
using System;
using System.Collections.Generic;
using System.ComponentModel;
using System.Data;
using System.Drawing;
using System.Linq;
using System.Text;
using System.Threading.Tasks;
using System.Windows.Forms;

namespace 高级控件
{
    public partial class FormNumericUpDown : Form
    {
        public FormNumericUpDown()
        {
            InitializeComponent();
        }

        private void numericUpDown1_ValueChanged(object sender, EventArgs e)
        {
            label1.Text = numericUpDown1.Value.ToString();
        }
    }
}
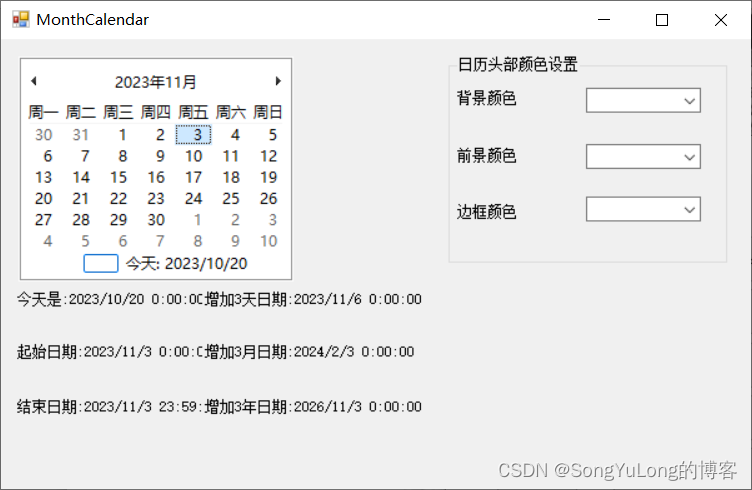
MonthCalendar(日历控件)
用户可以通过MonthClendar控件插卡和设置日期信息。
- 属性:
- Backcolor :月份中显示背景颜色。
- SelectionRange:在月历中显示的起始时间范围,Start为开始,End为截止。
- Minmum:最小值,默认值为0。
- Showtody:是否显示今天日期。
- Showtodaycircle:是否在今天日期上加红圈。
- Showweeknumbers:是否在左侧显示周数(1~52周)。
- TitleBackcolor:日历标题背景色。
- TitleForecolor:日历标题前景色。
- Trailingcolor:上下月颜色。
注:颜色先关设置可能需要注释掉//Program.cs中Application.EnableVisualStyles();这行代码才生效。
using System;
using System.Collections.Generic;
using System.ComponentModel;
using System.Data;
using System.Drawing;
using System.Linq;
using System.Text;
using System.Threading.Tasks;
using System.Windows.Forms;

namespace 高级控件
{
    public partial class FormMonthCalendar : Form
    {
        public FormMonthCalendar()
        {
            InitializeComponent();
        }

        private void monthCalendar1_DateChanged(object sender, DateRangeEventArgs e)
        {
            label1.Text = "今天是:" + monthCalendar1.TodayDate.ToString();
            label2.Text = "起始日期:" + monthCalendar1.SelectionStart.ToString();
            label3.Text = "结束日期:" + monthCalendar1.SelectionEnd.ToString();

            label4.Text = "增加3天日期:" + monthCalendar1.SelectionStart.AddDays(3);
            label5.Text = "增加3月日期:" + monthCalendar1.SelectionStart.AddMonths(3);
            label6.Text = "增加3年日期:" + monthCalendar1.SelectionStart.AddYears(3);


        }

        private void FormMonthCalendar_Load(object sender, EventArgs e)
        {
            label1.Text = "今天是:" + monthCalendar1.TodayDate.ToString();
            label2.Text = "";
            label3.Text = "";
            label4.Text = "";
            label5.Text = "";
            label6.Text = "";

            comboBox1.Items.Add("红色");
            comboBox1.Items.Add("绿色");
            comboBox1.Items.Add("蓝色");
            comboBox1.Items.Add("黄色");

            comboBox2.Items.Add("红色");
            comboBox2.Items.Add("绿色");
            comboBox2.Items.Add("蓝色");
            comboBox2.Items.Add("黄色");

            comboBox3.Items.Add("红色");
            comboBox3.Items.Add("绿色");
            comboBox3.Items.Add("蓝色");
            comboBox3.Items.Add("黄色");
        }

        private void comboBox1_SelectedIndexChanged(object sender, EventArgs e)
        {
            if (comboBox1.SelectedIndex >= 0)
            {
                int i = comboBox1.SelectedIndex;
                switch (i)
                {
                    case 0:
                        monthCalendar1.TitleBackColor = System.Drawing.Color.Red;
                        break;
                    case 1:
                        monthCalendar1.TitleBackColor = System.Drawing.Color.Green;
                        break;
                    case 2:
                        monthCalendar1.TitleBackColor = System.Drawing.Color.Blue;
                        break;
                    case 3:
                        monthCalendar1.TitleBackColor = System.Drawing.Color.Yellow;
                        break;
                    default:
                        break;
                }

            }
        }

        private void comboBox2_SelectedIndexChanged(object sender, EventArgs e)
        {
            if (comboBox2.SelectedIndex >= 0)
            {
                int i = comboBox2.SelectedIndex;
                switch (i)
                {
                    case 0:
                        monthCalendar1.TrailingForeColor = System.Drawing.Color.Red;
                        break;
                    case 1:
                        monthCalendar1.TrailingForeColor = System.Drawing.Color.Green;
                        break;
                    case 2:
                        monthCalendar1.TrailingForeColor = System.Drawing.Color.Blue;
                        break;
                    case 3:
                        monthCalendar1.TrailingForeColor = System.Drawing.Color.Yellow;
                        break;
                }
            }
        }

        private void comboBox3_SelectedIndexChanged(object sender, EventArgs e)
        {
            if (comboBox3.SelectedIndex >= 0)
            {
                int i = comboBox3.SelectedIndex;
                switch (i)
                {
                    case 0:
                        monthCalendar1.TitleForeColor = System.Drawing.Color.Red;
                        break;
                    case 1:
                        monthCalendar1.TitleForeColor = System.Drawing.Color.Green;
                        break;
                    case 2:
                        monthCalendar1.TitleForeColor = System.Drawing.Color.Blue;
                        break;
                    case 3:
                        monthCalendar1.TitleForeColor = System.Drawing.Color.Yellow;
                        break;
                }
            }
        }
    }
}
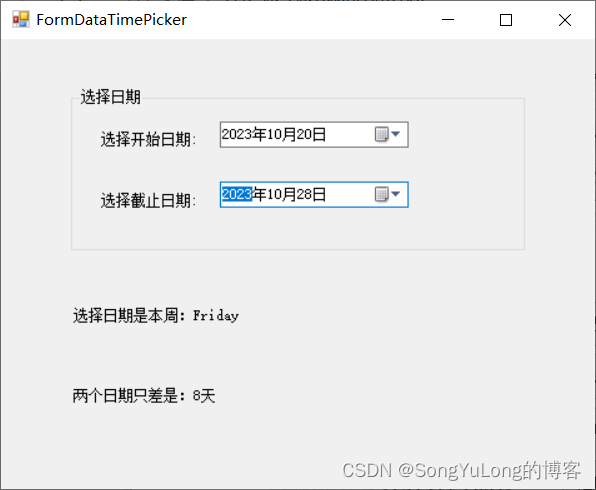
DataTimePicker(日期时间选择)
- 属性:
- showcheckbox : 是否在控件中显示复选框,当复选框未被先选中时,表示未被选中任何值。
- checked:当showcheckbox为True时,确定是否选择复选框。
- showupdown:改为数字显示框,不再显示日历表。
- value:当前的日期(年月日时分秒)。
using System;
using System.Collections.Generic;
using System.ComponentModel;
using System.Data;
using System.Drawing;
using System.Linq;
using System.Text;
using System.Threading.Tasks;
using System.Windows.Forms;

namespace 高级控件
{
    public partial class FormDataTimePicker : Form
    {
        public FormDataTimePicker()
        {
            InitializeComponent();
        }

        private void FormDataTimePicker_Load(object sender, EventArgs e)
        {
            label3.Text = "选择日期是本周:"+dateTimePicker1.Value.DayOfWeek.ToString();

            label4.Text = "两个日期只差是:" + Convert.ToString(dateTimePicker2.Value.DayOfYear -
                dateTimePicker1.Value.DayOfYear+"天");
        }

        private void dateTimePicker1_ValueChanged(object sender, EventArgs e)
        {
            label4.Text = "两个日期只差是:" + Convert.ToString(dateTimePicker2.Value.DayOfYear -
                dateTimePicker1.Value.DayOfYear + "天");
        }

        private void dateTimePicker2_ValueChanged(object sender, EventArgs e)
        {
            label4.Text = "两个日期只差是:" + Convert.ToString(dateTimePicker2.Value.DayOfYear -
                dateTimePicker1.Value.DayOfYear + "天");
        }


    }
}
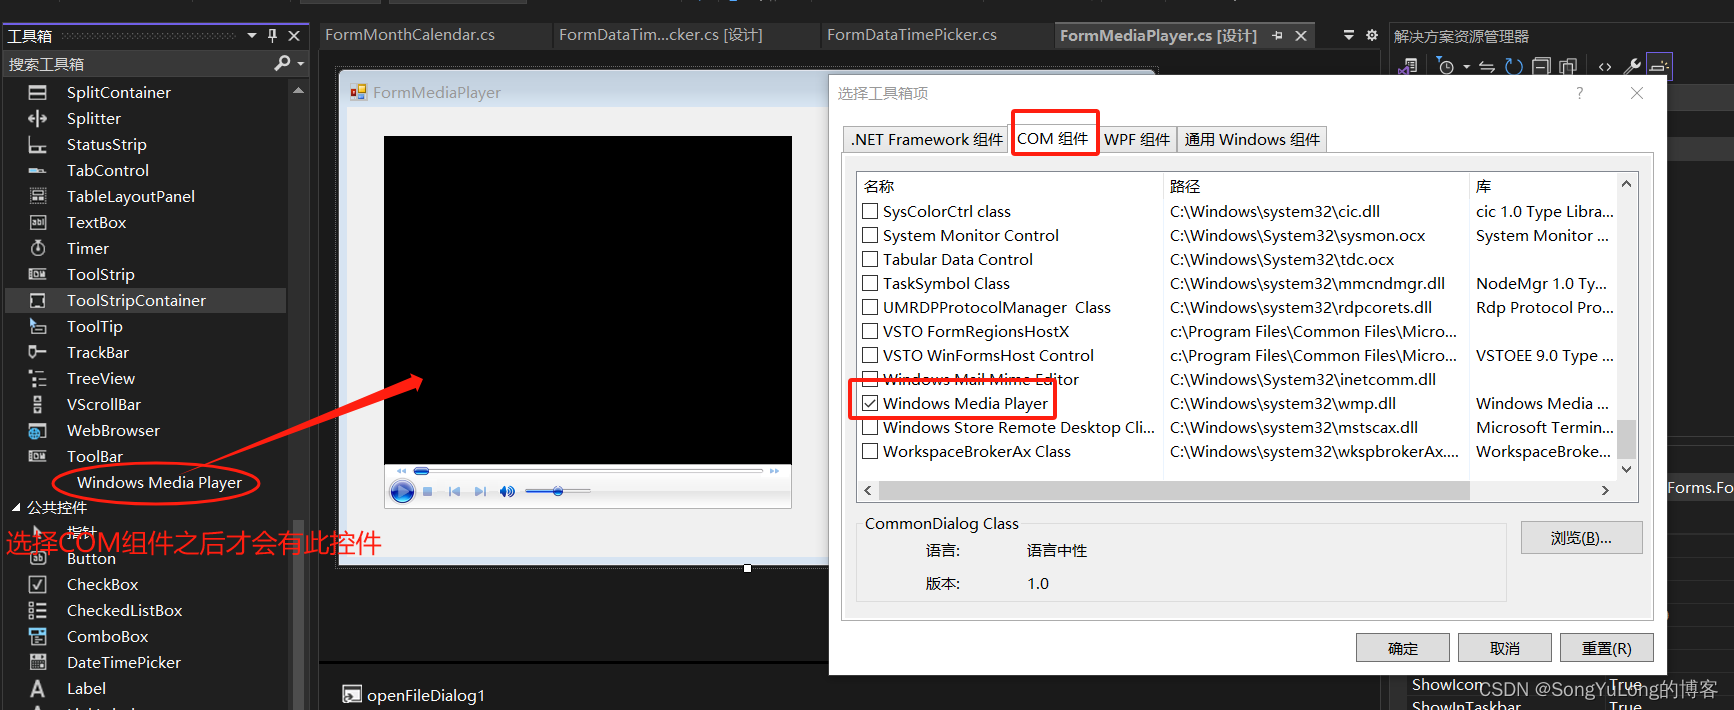
Windows Media Player(媒体播放器)
用于播放多媒体文件。
using System;
using System.Collections.Generic;
using System.ComponentModel;
using System.Data;
using System.Drawing;
using System.Linq;
using System.Text;
using System.Threading.Tasks;
using System.Windows.Forms;

namespace 高级控件
{
    public partial class FormMediaPlayer : Form
    {
        public FormMediaPlayer()
        {
            InitializeComponent();
        }
        private void FormMediaPlayer_Load(object sender, EventArgs e)
        {
            // 通过OpenFileDialog对象打开文件对话框,选择一个文件。
            openFileDialog1.ShowDialog();

            // 播放选择的文件
            axWindowsMediaPlayer1.URL = openFileDialog1.FileName;
        }
        private void axWindowsMediaPlayer1_Enter(object sender, EventArgs e)
        {

        }


    }
}
用户自定义控件
C#允许用户进行控件的自定义。通常用户可自行编写的控件分为3类:
- 复合控件:组合现有的控件实现功能。
- 扩展控件:扩展基本控件的功能。
- 自定义控件:从头开始创建一个全新的控件。
如何创建用户自定义控件:
右击“解决方案资源管理器”,选择“添加”->“用户控件”
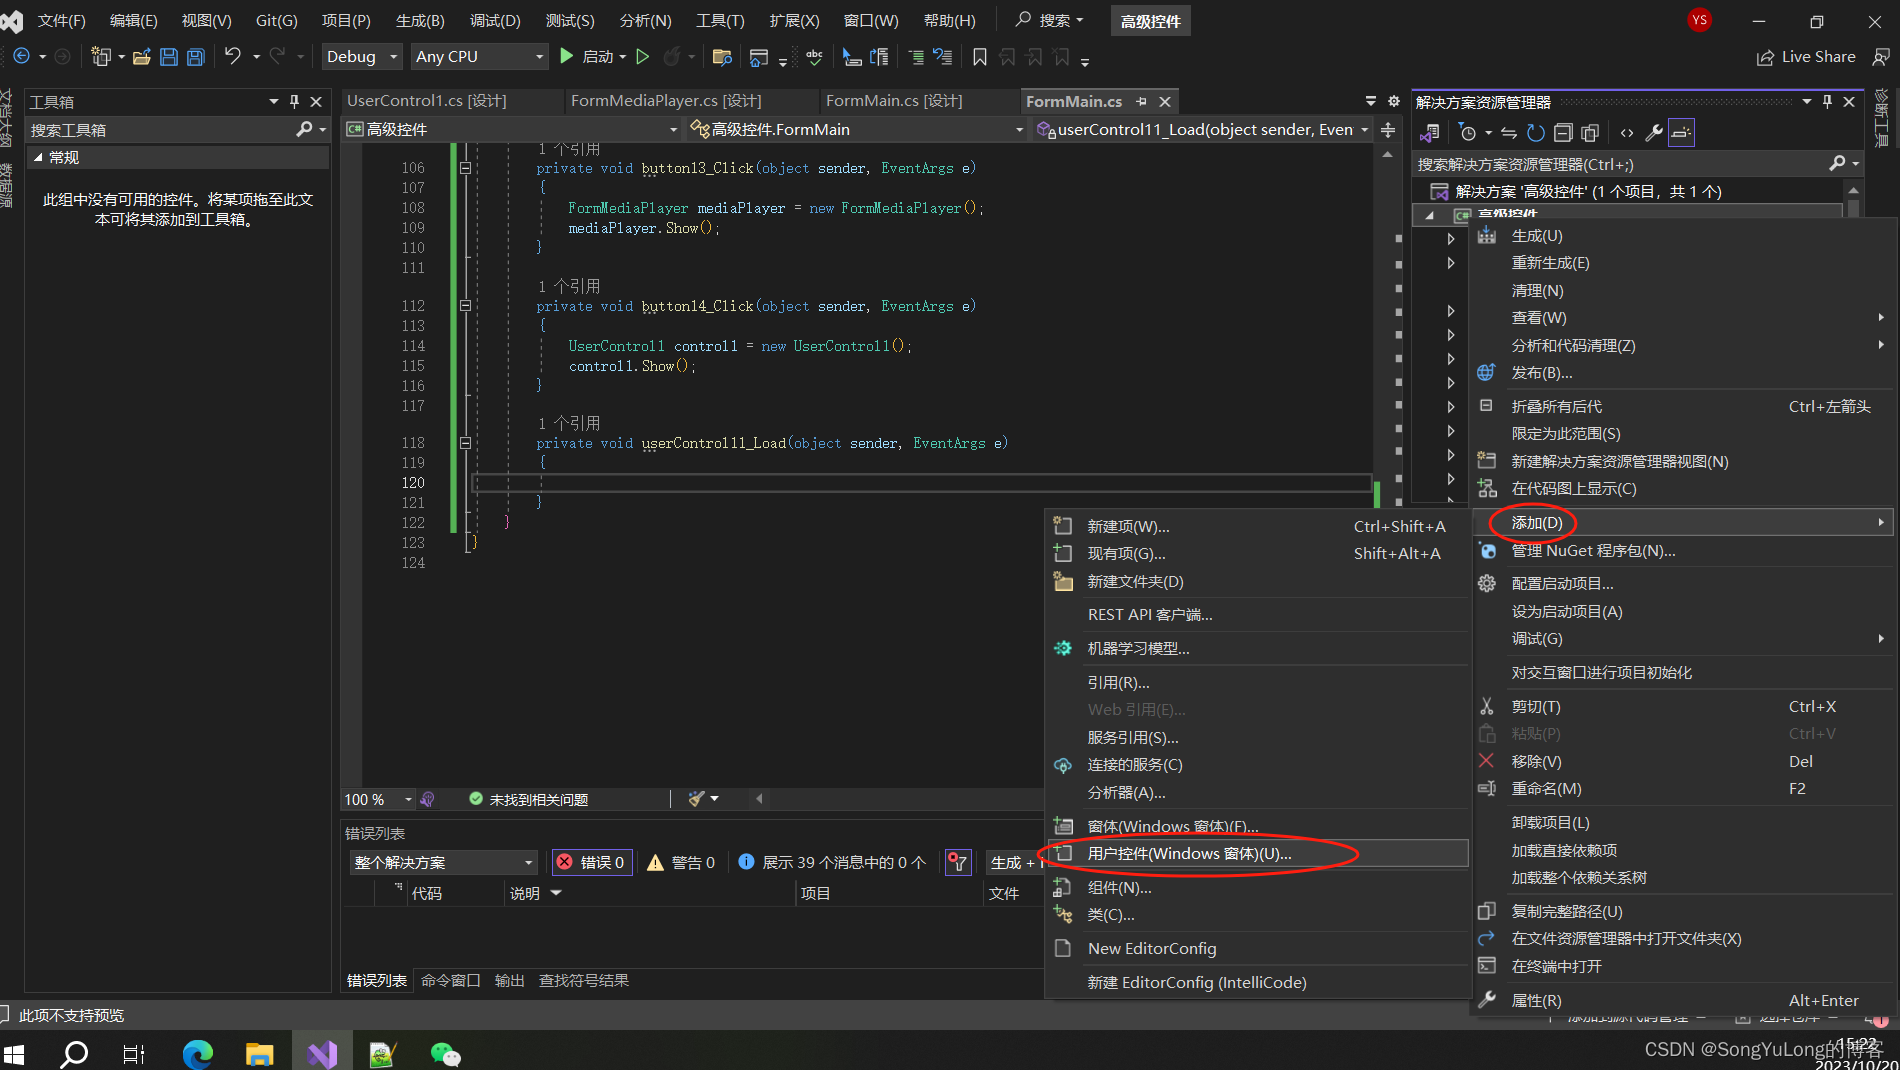
自定义控件添加一个Label和一个Button
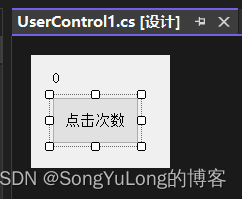
using System;
using System.Collections.Generic;
using System.ComponentModel;
using System.Data;
using System.Drawing;
using System.Linq;
using System.Text;
using System.Threading.Tasks;
using System.Windows.Forms;

namespace 高级控件
{
    public partial class UserControl1 : UserControl
    {
        public UserControl1()
        {
            InitializeComponent();
        }

        int i = 0;
        private void button1_Click(object sender, EventArgs e)
        {
            i++;
            label1.Text = i.ToString();
        }
    }
}
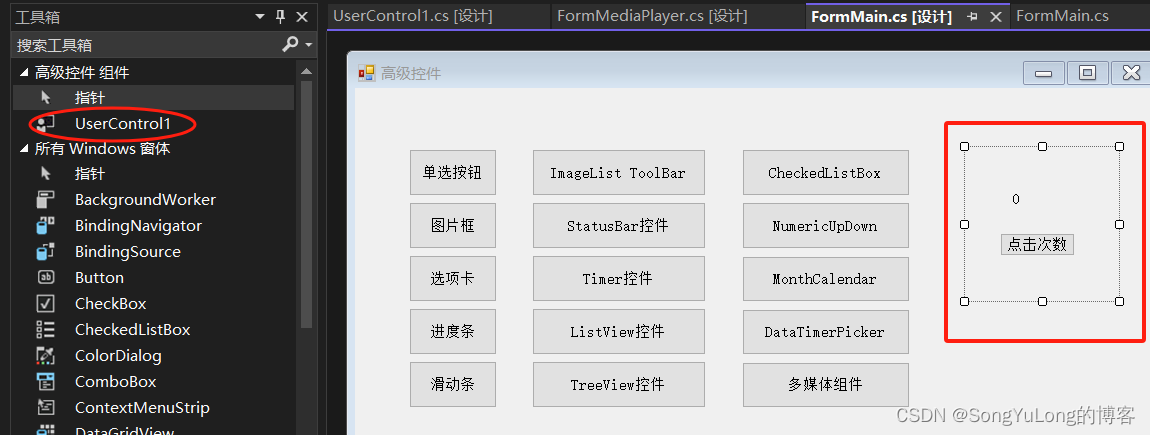
运行一下这个用户定义控件,则该控件将自动添加到工具箱组件中。然后就可以在其他窗体中以拖拽的方式使用自定义控件了。


 540
540


 被折叠的 条评论
为什么被折叠?
被折叠的 条评论
为什么被折叠?
 到【灌水乐园】发言


