


基于VS Code搭建通用ARM微控制器开发平台
| Data | Author | Version | Note |
|---|---|---|---|
| 2022.04.12 | Dog Tao | V1.0 | Release as V1.0 - 使用基于STM32CubeIDE构建的Makefile工程(STM32F103)完成了环境搭建与编译测试。 |
| 2022.04.13 | Dog Tao | V1.1 | Release as V1.1 - 在windows平台实际测试发现存在平台兼容性与GCC工具链版本问题,找到了有效的解决方法。 - 对应的更新了示例Makefile文件、示例task.json文件。 |
| 2022.06.21 | Dog Tao | V1.2 | 在windows平台上完整测试了开发环境搭建、项目工程建立、编译下载调试等流程,根据测试过程与结果对文档的内容与结构进行大幅的优化调整。 |
| 2022.06.28 | Dog Tao | V1.3 | 增加了“设置Include Path”的说明。 |
| 2022.07.04 | Dog Tao | V1.4 | 1. 增加了“选择默认终端”的说明。2. 增加了几篇优秀的技术文章以供拓展与参考。 |
| 2022.07.11 | Dog Tao | V1.5 | 1. 在tasks.json中增加了clean output任务的示例。 |
| 2022.07.12 | Dog Tao | V1.6 | 1. 增加了在macOS系统下设置Cortex-Debug的说明。 |
| 2022.08.12 | Dog Tao | V1.7 | 1. 增加了“切换MCU型号”的章节。 |
| 2022.08.28 | Dog Tao | V1.8 | 1. 修改了“跨平台的注意事项”小节,增加了从安装包安装VS code插件的内容。2. 增加了选择Cortex-Debug的版本说明,并提供了各种调试器的资料链接。 |
| 2022.09.09 | Dog Tao | V1.9 | 1. 在配置调试功能章节中增加了SVD文件的添加说明。 |
| 2023.03.27 | Dog Tao | V1.10 | 1. 增加了使用ST-Link/OpenOCD调试的设置说明并微调了配置调试功能章节的内容。 |
| 2023.06.27 | Dog Tao | V1.11 | 1. 修改了文章部分标题与正文结构,明确指出VS Code需要安装的插件类型与版本号。 |
| 2023.08.23 | Dog Tao | V1.12 | 1. 增加了c_cpp_properties.json文件的详细配置说明。 |
概述
现在流行的开发平台有很多,很多芯片厂商也会提供自己的IDE,一般这些IDE都是基于通用IDE框架(例如Eclipse与VS Code)通过设计相应的插件实现的。例如目前用的比较多的STM32CubeIDE就是基于Eclipse开发的。同时,ARM提供的官方开发工具Keil MDK虽然比较原始简陋,但使用者也很多。不同的操作系统、不同的单片机平台就会对应衍生出很多个开发环境,带来管理和开发上的困难。
单片机开发的核心过程是交叉编译,即在PC端编译生成能够在单片机平台运行的可执行文件。因此,通过设置正确的交叉编译工具链,并使用与平台无关的Makefile文件可以将不同单片机的工程统一的组织起来。当然,这样做的缺点是对新手极其不友好,如果没有gcc、linux与交叉编译相关项目经验的很难直接理解与掌握。同时,很多工程师只是用一两款平台的甚至是一两种型号的单片机开发,如此就没有必要考虑通用的微控制器开发方法。
但是,从进一步提高嵌入式开发水平、全面理解交叉编译过程以及多单片机平台开发的角度来看,搭建通用ARM微控制器开发平台又是十分必要的,具备很强的工程意义与研究价值。
需要说明的是,本文档是基于现成Makefile工程进行的。而不同的单片机平台的Makefile文件是不一样的,尤其是与内核相关的编译命令。与此同时,不同单片机平台还有不同的启动文件(.S*)与链接脚本(.ls*),这些都是需要提前整理好,并用Makefile文件组织起来的。
VS Code与Eclipse之争
VS Code与Eclipse都是主流的、开源的、通用的IDE,都能通过预留的接口与插件实现对各种编程语言、各种运行平台的支持。笔者综合考虑了各个MCU芯片厂商的推荐工具、软件维护与使用体验、代码编写与功能支持、交叉编译环境设置难以程度的角度出发,最终认为VS Code更加适合我们设计通用ARM微控制器开发的需要。因此,以下介绍使用VS Code搭建MCU开发平台的一般过程。
其实,从它们的官网首页风格中就能看出彼此的差异。
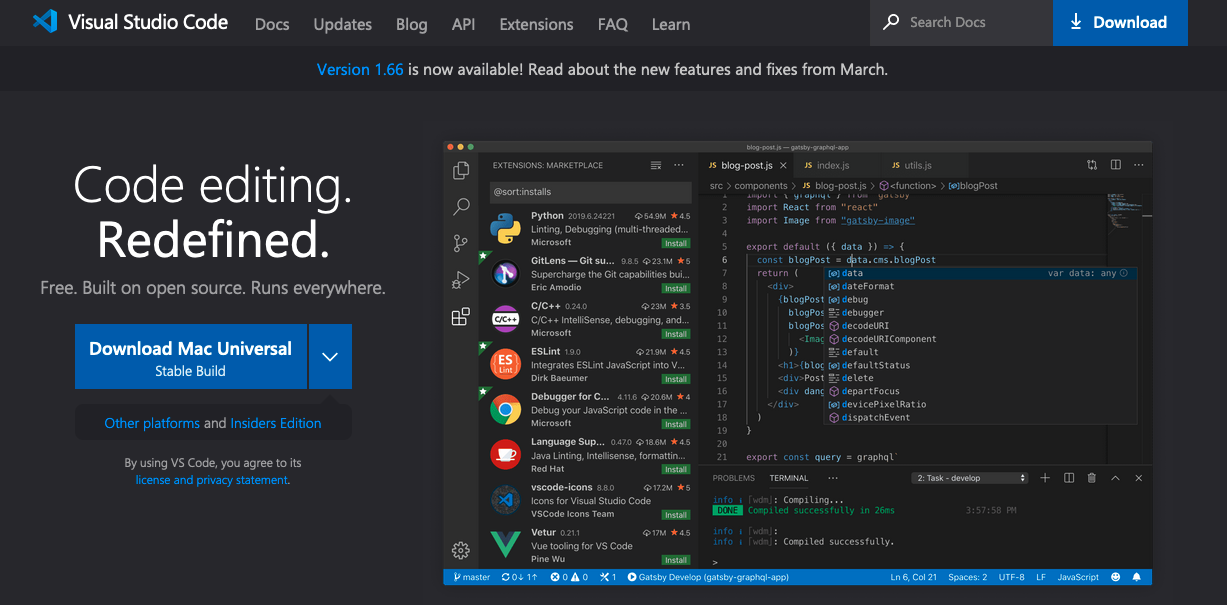
VS Code的官网下载页面:

参考文章
Cortex-Debug for Visual Studio Code
安装VS Code插件
- VS Code 官方下载地址:https://code.visualstudio.com/
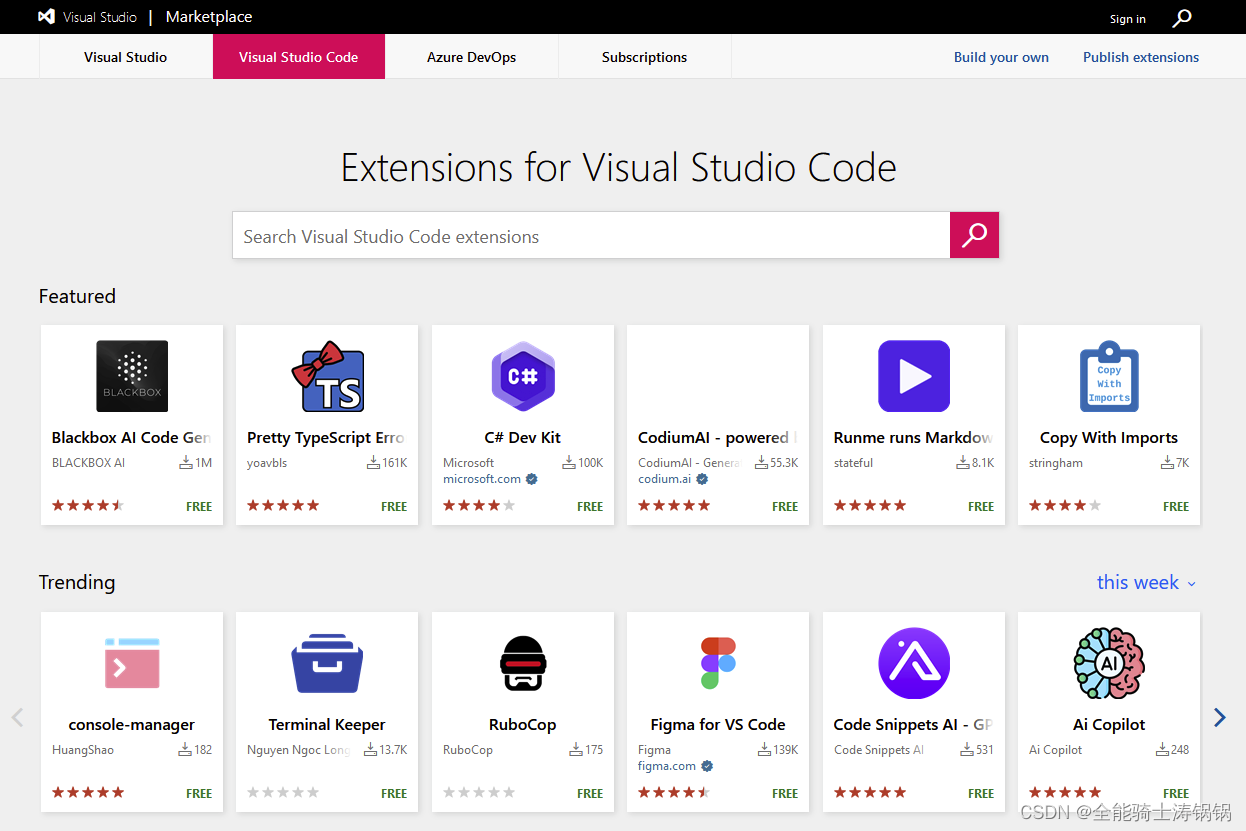
- VS Code插件 手动下载地址:https://marketplace.visualstudio.com/
- 安装VS Code插件一定要注意安装指定的版本,更新或更老的版本可能会出现未知错误
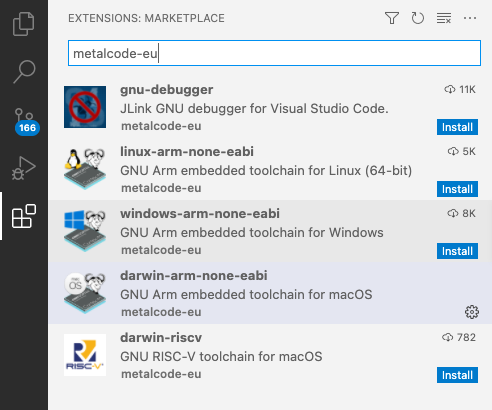
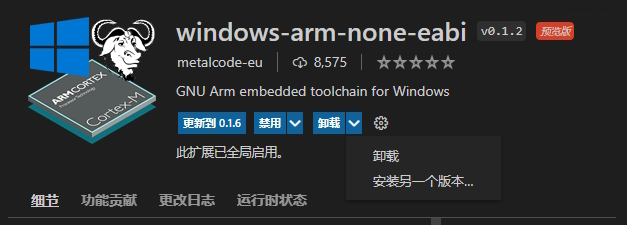
插件1 - ARM-GCC工具(交叉编译工具链)
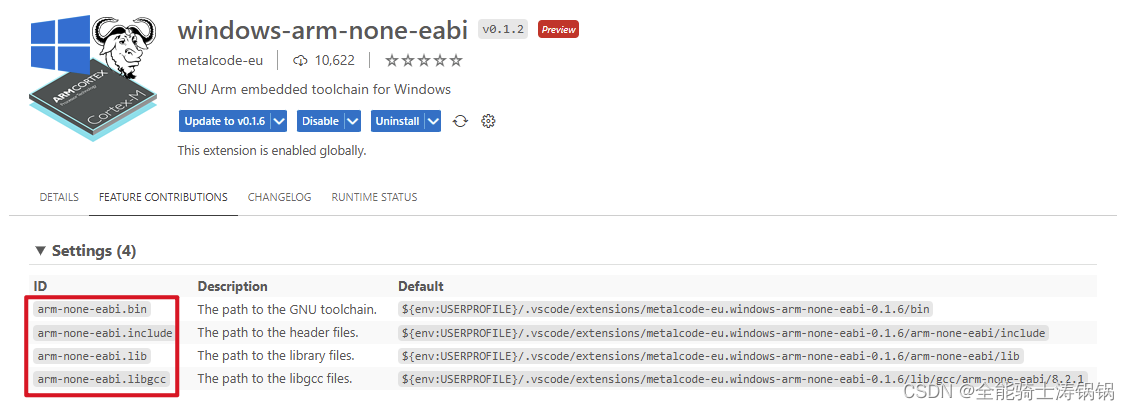
根据不同的系统平台选择安装不同的交叉编译工具链。作者推荐使用metalcode-eu出品的原生工具链。例如,如果是windows系统,就选择安装windows-arm-none-eabi工具链;如果是darwin(macOS)系统,就选择安装darwin-arm-none-eabi工具链。
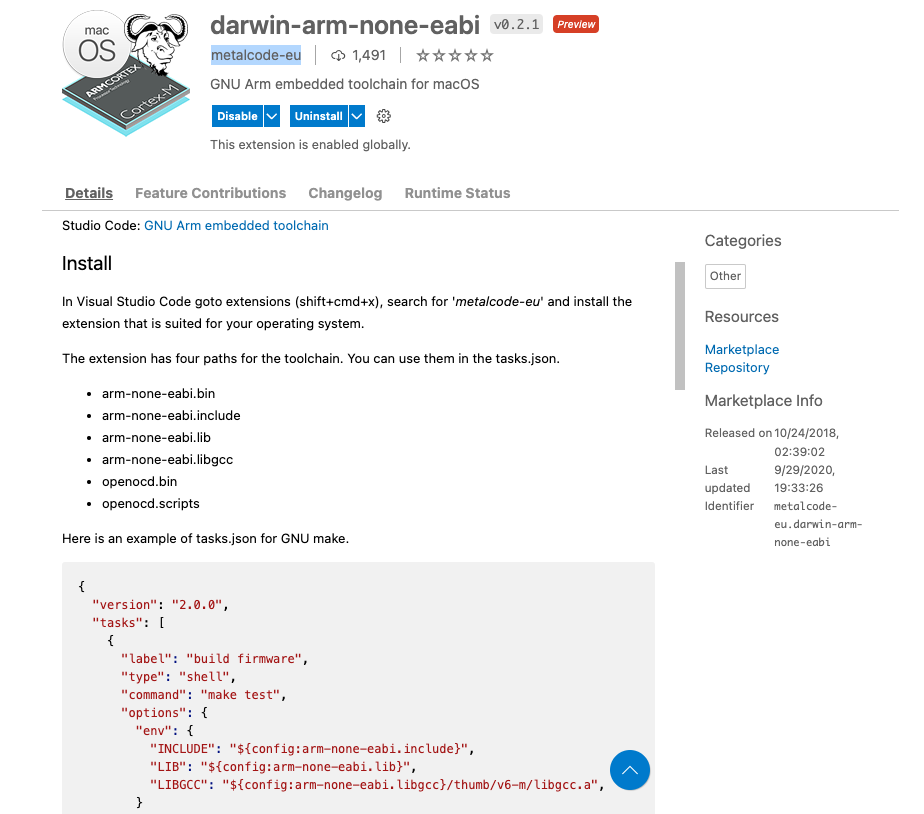
ARM-GCC工具链的路径
安装完成之后,打开扩展,会显示相应的教程。使用交叉编译工具链,最重要的就是正确设置环境变量,使得Makefile文件中指定的命令可以被正确识别。因此,这个插件中所介绍的使用方法就是在tasks.json中指定任务名、任务的环境变量。此工具链主要提供了以下四个环境变量可供使用:${config:arm-none-eabi.bin}、${config:arm-none-eabi.include}、${config:arm-none-eabi.lib}、${config:arm-none-eabi.libgcc}。
跨平台的注意事项
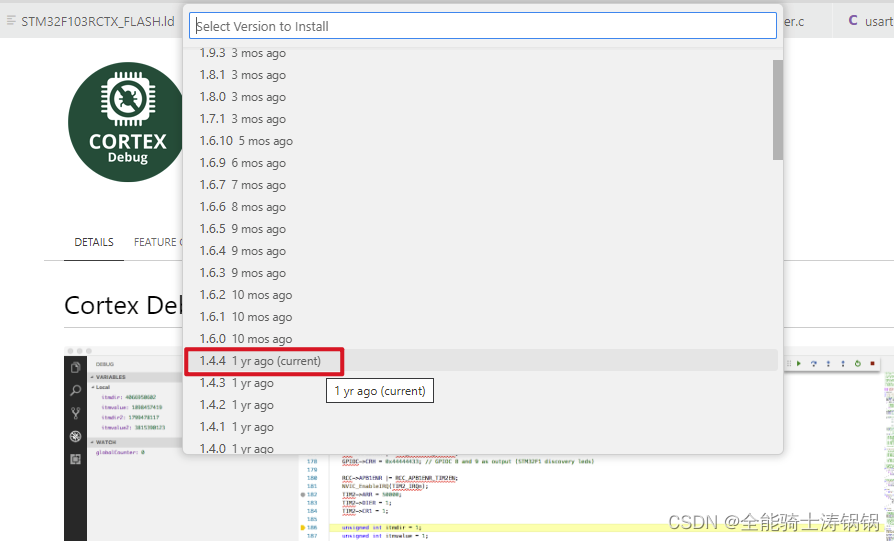
选择插件版本
windows平台工具链的版本问题:经过在Windows平台的实际测试发现如果安装了最新版本的GCC工具链,从elf生成hex文件时会报错:“objcopy.exe: 64-bit address 0x4b4fa308000000 out of range for Intel Hex file”,其他功能不受影响。经过排查发现是GCC工具链的版本问题,可以自行选择安装其他插件提供的工具链或者简单的将此扩展插件降低版本即可使用。笔者实测V0.1.2版本是可用的。
可以直接在VS Code的“扩展”功能中选择“安装另一个版本”
可以在应用市场中下载对应版本的插件安装包,然后在VS code中选择手动安装


使用了V0.1.2版本的插件后,项目编译成功

选择插件平台
如果同时安装了不同平台的交叉编译工具链,请禁用非当前操作系统的工具链,否则会出现报错。

插件2 - 文件类型支持
可以在VS Code中下载相关插件支持**.map文件与**.ld文件的语法高亮。
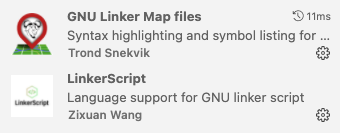
支持语法高亮后,比较适合阅读、检查以及修改这些文件。

插件3 - Debug功能支持
对于ARM单片机开发,首先需要安装Cortex-debug插件。
注意选择安装的版本为V1.4.4(经过笔者测试,最新版本V1.6.0使用J-Link、ST-Link调试器会有问题)。

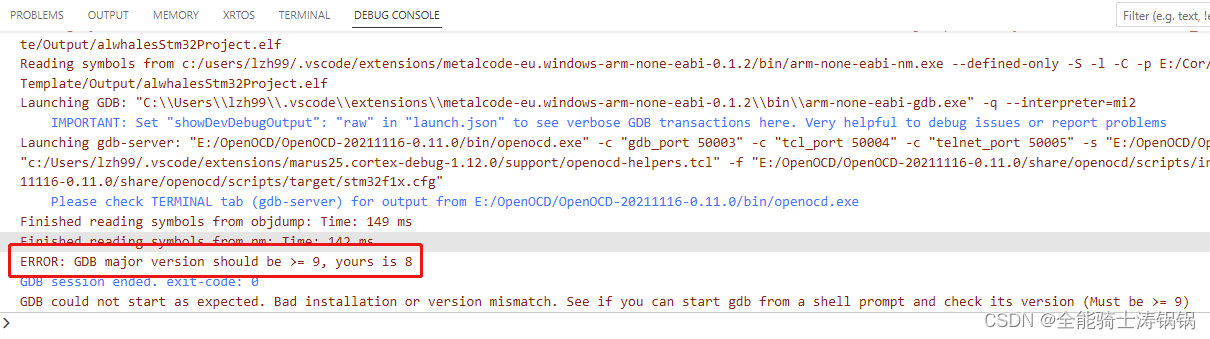
 如果安装的版本过新,可能会出现如下报错:
ERROR: GDB major version should be >= 9, yours is 8

创建项目工程
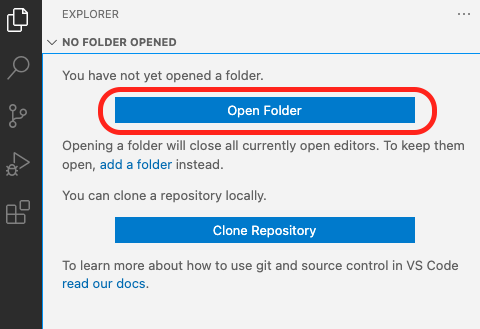
如果是初次在VS Code上使用一个Makefile工程,那么需要打开这个工程所在的文件夹(可以是任意位置)。当然,也可以指定git的远端仓位地址直接clone代码到本地。
创建tasks.json
对于新打开的工程文件夹,需要手动创建tasks.json文件与launch.json文件。
VS Code是通过运行tasks.json中配置的任务来执行脚本命令的。配置文件中以JSON格式保存各个参数,例如任务名字label,类型type,命令command,参数args等等。其中run build/test task是软件提供的最常用的两种任务,所以一般就把编译,链接等生成目标程序的任务名设置为build,把测试运行的任务名设置为run。其中run build task的快捷键是ctrl/cmd + shift + B。
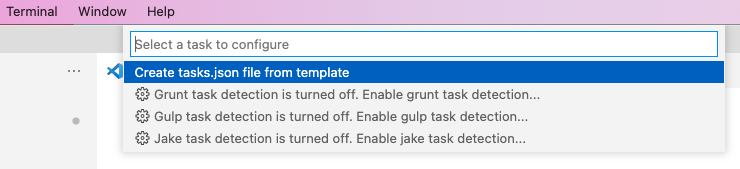
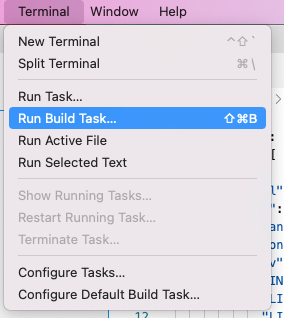
依次选择【Terminal】【Configure Tasks…】【Create tasks.json file from template】即可创建默认的tasks.json文件。

可以根据GCC工具链扩展中提示的参考配置修改此文件。示例实现了build firmware, clean output, test environment等三个任务,代码如下:
{
    "version": "2.0.0",
    "tasks": [
        {
            "label": "build firmware",
            "type": "shell",
            "command": "make all",
            "options": {
                "env": {
                    "INCLUDE": "${config:arm-none-eabi.include}",
                    "LIB": "${config:arm-none-eabi.lib}",
                    "LIBGCC": "${config:arm-none-eabi.libgcc}/thumb/v6-m/libgcc.a",
                }
            },
            "osx": {
                "options": {
                    "env": {
                        "PATH": "${config:arm-none-eabi.bin}:${env:PATH}",
                        "PLATFORM": "osx"
                    }
                },
            },
            "linux": {
                "options": {
                    "env": {
                        "PATH": "${config:arm-none-eabi.bin}:${env:PATH}",
                        "PLATFORM": "linux"
                    }
                },
            },
            "windows": {
                "options": {
                    "env": {
                        "PATH": "${config:arm-none-eabi.bin};${env:PATH}",
                        "PLATFORM": "windows"
                    }
                },
            },
            "group": {
                "kind": "build",
                "isDefault": true,
            },
            "problemMatcher": "$gcc"
        },
        {
            "label": "clean output",
            "type": "shell",
            "command": "make clean",
            "options": {
                "env": {
                    "INCLUDE": "${config:arm-none-eabi.include}",
                    "LIB": "${config:arm-none-eabi.lib}",
                    "LIBGCC": "${config:arm-none-eabi.libgcc}/thumb/v6-m/libgcc.a",
                }
            },
            "osx": {
                "options": {
                    "env": {
                        "PATH": "${config:arm-none-eabi.bin}:${env:PATH}",
                        "PLATFORM": "osx"
                    }
                },
            },
            "linux": {
                "options": {
                    "env": {
                        "PATH": "${config:arm-none-eabi.bin}:${env:PATH}",
                        "PLATFORM": "linux"
                    }
                },
            },
            "windows": {
                "options": {
                    "env": {
                        "PATH": "${config:arm-none-eabi.bin};${env:PATH}",
                        "PLATFORM": "windows"
                    }
                },
            },
            "group": {
                "kind": "build",
                "isDefault": true,
            },
            "problemMatcher": "$gcc"
        },
        {
            "label": "test environment",
            "type": "shell",
            "command": "make test",
            "options": {
                "env": {
                    "INCLUDE": "${config:arm-none-eabi.include}",
                    "LIB": "${config:arm-none-eabi.lib}",
                    "LIBGCC": "${config:arm-none-eabi.libgcc}/thumb/v6-m/libgcc.a",
                }
            },
            "osx": {
                "options": {
                    "env": {
                        "PATH": "${config:arm-none-eabi.bin}:${env:PATH}",
                        "PLATFORM": "osx"
                    }
                },
            },
            "linux": {
                "options": {
                    "env": {
                        "PATH": "${config:arm-none-eabi.bin}:${env:PATH}",
                        "PLATFORM": "linux"
                    }
                },
            },
            "windows": {
                "options": {
                    "env": {
                        "PATH": "${config:arm-none-eabi.bin};${env:PATH}",
                        "PLATFORM": "windows"
                    }
                },
            },
            "group": {
                "kind": "test",
                "isDefault": true,
            },
            "problemMatcher": "$gcc"
        }
    ]
}
设置完tasks.json文件后,可以执行【Terminal】【Run Build Task…】,即可按照"command"字段中指定的命令完成工程编译。

关键设置说明
tasks.json文件中除了要指定各个平台的工具链路径之外,还需要提供两个任务,一个为默认的build任务,一个为测试任务。通过测试任务可以输出环境变量以判断是否设置正确。同时,考虑到跨平台支持,需要额外设置一个PLATFORM环境变量,在不同的操作系统下,它的值不同。对应的Makefile文件中应该提供支持,示例如下:
- 测试任务与构建任务
all: buildelf

buildelf: $(OBJS)
	$(CC) -o "$(BIN_DIR)/$(OBJECT_NAME).elf" $(OBJS) $(LINKER_FLAGS)
	$(CC_OBJCOPY) -O ihex "$(BIN_DIR)/$(OBJECT_NAME).elf" "$(BIN_DIR)/$(OBJECT_NAME).hex"
	$(CC_OBJCOPY) -O binary "$(BIN_DIR)/$(OBJECT_NAME).elf" "$(BIN_DIR)/$(OBJECT_NAME).bin"

clean:
	$(RM) $(OBJS) $(DEPS) $(BIN_DIR)/$(OBJECT_NAME).*


test:
	@echo "Platform is:" $(PLATFORM)
	@echo "PATH is:" $(PATH)
	@echo "INCLUDE is:" $(INCLUDE)
	@echo "LIB is:" $(LIB)
	@echo "BIN is:" $(BIN)
	@echo "GCCLIB is:" $(GCCLIB)
- 平台判断与处理。例如在windows系统中的
mkdir指令用法与在unix系统中是有区别的。
ifeq ("$(PLATFORM)", "windows")

$(OBJECT_DIR)/%.o: %.c
	mkdir $(subst /,\,$(dir $@)) 2> NUL || echo off
	$(CC) $(COMPILER_FLAGS) $< -o $@

$(OBJECT_DIR)/%.o: %.s
	mkdir $(subst /,\,$(dir $@)) 2> NUL || echo off
	$(CC) $(ASSEMBLER_FLAGS) $< -o $@

$(OBJECT_DIR)/%.o: %.S
	mkdir $(subst /,\,$(dir $@)) 2> NUL || echo off
	$(CC) $(ASSEMBLER_FLAGS) $< -o $@

else

$(OBJECT_DIR)/%.o: %.c
	mkdir -p $(dir $@)
	$(CC) $(COMPILER_FLAGS) $< -o $@

$(OBJECT_DIR)/%.o: %.s
	mkdir -p $(dir $@)
	$(CC) $(ASSEMBLER_FLAGS) $< -o $@

$(OBJECT_DIR)/%.o: %.S
	mkdir -p $(dir $@)
	$(CC) $(ASSEMBLER_FLAGS) $< -o $@

endif
配置调试功能
配置调试工具
调试器的驱动安装、配置文件设置等可以参考此文档。
进入Cortex-debug插件的配置页面,选择不同项目对应不同操作系统的配置设定,会在settings.json文件中自动创建对应的项。


配置ARM-GNU-Toolchain
可以利用已经安装的windows-arm-none-eabi插件提供的工具链套件(环境变量)实现快速配置。
 配置代码示例如下:
    "cortex-debug.armToolchainPath": "${config:arm-none-eabi.bin}",
    "cortex-debug.armToolchainPath.windows": "${config:arm-none-eabi.bin}",
    "cortex-debug.armToolchainPath.linux": "${config:arm-none-eabi.bin}",
    "cortex-debug.armToolchainPath.osx": "${config:arm-none-eabi.bin}",
    "cortex-debug.JLinkGDBServerPath.windows": "C:\\Program Files (x86)\\SEGGER\\JLink\\JLinkGDBServerCL.exe",
    "cortex-debug.openocdPath.windows": "E:\\Working\\STM32CubeIDE_workspace\\OpenOCD-20211116-0.11.0\\bin\\openocd.exe",
配置J-Link GDBServer
如果使用JLink调试,则需要配置JLink GDBServer的路径。例如在windows系统下,可以通过everything软件快速定位目标文件的路径,并填入配置文件中。
"cortex-debug.JLinkGDBServerPath.windows": "C:\\Program Files (x86)\\SEGGER\\JLink\\JLinkGDBServerCL.exe",

配置ST-Link/Open OCD
同理,如果使用ST-Link/Open OCD进行调试,需要在配置文件中指定Open OCD的应用程序路径。
"cortex-debug.openocdPath.windows": "E:/Working/STM32CubeIDE_workspace/OpenOCD-20211116-0.11.0/bin/openocd.exe",

在macOS系统下,如果已经正确安装了JLink软件,则命令行中可以直接识别JLinkGDBServer命令,因此不需要特别指定JLink GDBServer的路径即可正常进行调试。

调试器资料
-
J-Link Software Tools - provides the J-Link GDB Server for J-Link based debuggers (https://www.segger.com/downloads/jlink)
-
OpenOCD - provides a GDB Server that can be used with a number of debuggers (http://openocd.org)
NOTE: On macOS do not use the default version of OpenOCD provided by homebrew, this is not compatible with releases V0.2.4 and newer. You can either install from source using homebrew (brew install open-ocd --HEAD) or the packages from https://github.com/gnu-mcu-eclipse/openocd/releases will also work. Some linux versions and Windows may also need a more up-to-date version of OpenOCD from the gnu-mcu-eclipse releases. -
Texane’s st-util GDB server - Only supports ST-Link Debug Probes (https://github.com/texane/stlink)
-
ST-LINK GDB server - This server is packaged with the STM32CubeIDE which must be installed. The location of the STM32CubeIDE and related tools is automatically resolved but also can be overridden using configuration settings (armToolchainPath, stm32cubeprogrammer and serverpath).
-
pyOCD GDB Server - GDB server that supports the CMSIS-DAP debugger on a number of mbed boards (https://github.com/mbedmicro/pyOCD)
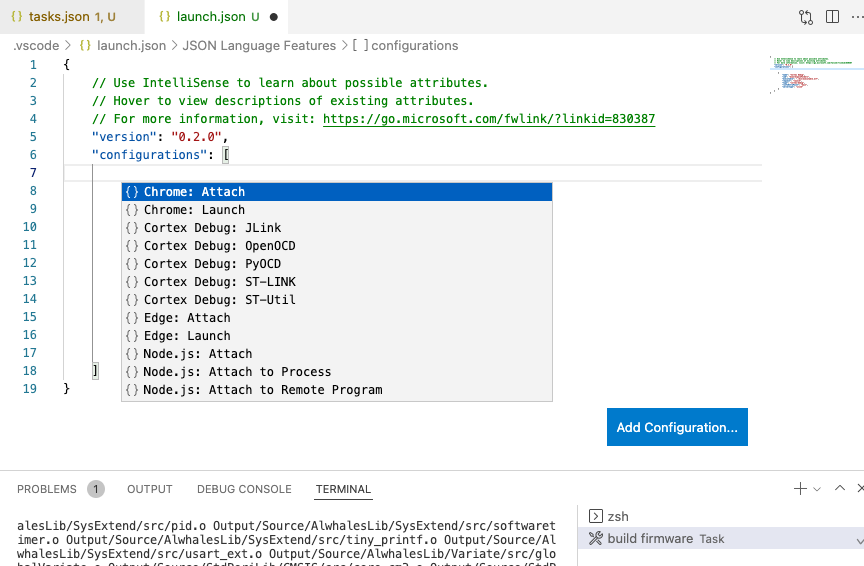
创建launch.json
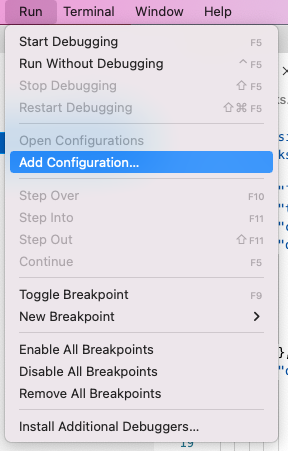
VS Code是通过运行launch.json中配置的任务来执行程序下载与调试的。
依次选择【Run】【Add Configuration…】【Cortex Debug】,即可自动生成launch.json文件。
其中,executable字段的值需要改为实际可执行文件的位置。servertype需要改为实际使用的调试器的类型。也可以使用【Add Configuration…】进行快捷设置。配置文件中的不同字段的值需要根据实际项目进行修改,例如OpenOCD调试时需要指定2个配置文件。
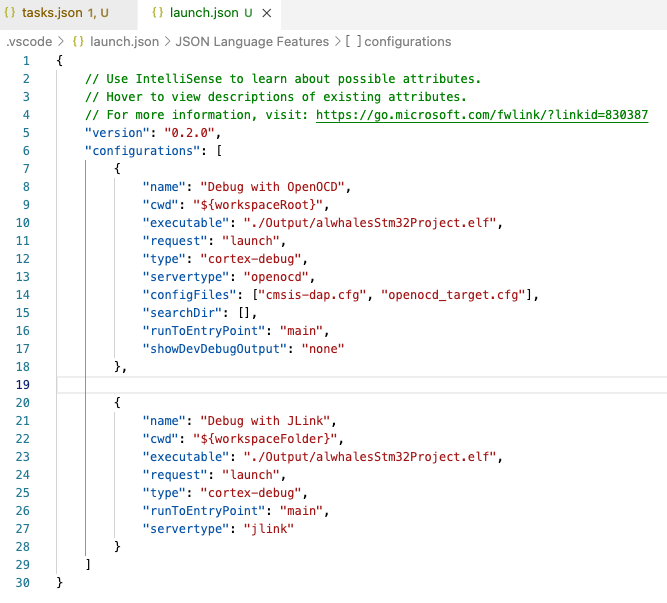
launch.json示例代码:
{
    // Use IntelliSense to learn about possible attributes.
    // Hover to view descriptions of existing attributes.
    // For more information, visit: https://go.microsoft.com/fwlink/?linkid=830387
    "version": "0.2.0",
    "configurations": [
        {
            "cwd": "${workspaceFolder}",
            "executable": "./Output/alwhalesStm32Project.elf",
            "name": "Debug with JLink",
            "request": "launch",
            "type": "cortex-debug",
            "device": "STM32L432KB",
            "runToEntryPoint": "main",
            "showDevDebugOutput": "none",
            "servertype": "jlink"
        },
        {
            "cwd": "${workspaceRoot}",
            "executable": "./Output/alwhalesStm32Project.elf",
            "name": "Debug with OpenOCD",
            "request": "launch",
            "type": "cortex-debug",
            "servertype": "openocd",
            "device": "STM32F103C8",
            "svdFile": "./Source/stdperiph/stm32f103.svd",
            "configFiles": [
                "E:/Working/STM32CubeIDE_workspace/OpenOCD-20211116-0.11.0/share/openocd/scripts/interface/stlink-v2.cfg", // 使用ST-LINK
                "E:/Working/STM32CubeIDE_workspace/OpenOCD-20211116-0.11.0/share/openocd/scripts/target/stm32f1x.cfg",     // 根据芯片型号更改stm32f1x.cfg
            ],
            "searchDir": ["E:/Working/STM32CubeIDE_workspace/OpenOCD-20211116-0.11.0/share/openocd/scripts"],
            "runToEntryPoint": "main",
            "showDevDebugOutput": "none",
        },
        // {
        //     "cwd": "${workspaceFolder}",
        //     "executable": "./Output/alwhalesStm32Project.elf",
        //     "name": "Debug with ST-Link",
        //     "request": "launch",
        //     "type": "cortex-debug",
        //     "runToEntryPoint": "main",
        //     "showDevDebugOutput": "none",
        //     "servertype": "stlink"
        // },
    ]
}
指定MCU型号
以JLink调试为例,在launch.json中指定MCU的型号。

在J-Link GDB Server软件中可以查找支持的MCU的型号。


指定SVD文件
CMSIS SVD(System View Description)文件将传统的芯片手册数字化,通过采用XML文档结构化的方式,定义了某个芯片的详细的信息,例如包含了哪些片内外设,每一个外设的硬件寄存器,每一个寄存器中每一个数据位的值,以及详细的说明信息等。
如果安装了STM32CubeIDE、TrueSTUDIO等软件,则它所支持的单片机都有配套的SVD文件,我们可以直接复制使用。此外,网络上也有各种主流型号单片机的配套SVD文件,可以根据需要下载。
从本地软件中查找配套的SVD文件

SVD文件内容示例

在launch.json中使用svdFile属性描述芯片外设的XXX.svd文件路径,如果此选项有效,那么可以在调试时查看外设寄存器的值。

调试效果

配置示例
插件配置文件(settings.json)
下面是一份关于Cortex-Debug插件的配置示例,注意在不同的操作系统中可能需要分别指定不同的路径(settings.json文件)。
{
    "workbench.colorTheme": "Default Light+",
    "workbench.editorAssociations": {
        "*.map": "default"
    },
    "explorer.autoReveal": false,
    "security.workspace.trust.untrustedFiles": "open",
    "terminal.integrated.defaultProfile.windows": "Git Bash",
    "explorer.confirmDelete": false,

    "cortex-debug.armToolchainPath": "${config:arm-none-eabi.bin}",
    "cortex-debug.armToolchainPath.windows": "${config:arm-none-eabi.bin}",
    "cortex-debug.armToolchainPath.linux": "${config:arm-none-eabi.bin}",
    "cortex-debug.armToolchainPath.osx": "${config:arm-none-eabi.bin}",

    "cortex-debug.JLinkGDBServerPath.windows": "C:\\Program Files (x86)\\SEGGER\\JLink\\JLinkGDBServerCL.exe",
    "cortex-debug.openocdPath.windows": "E:/Working/STM32CubeIDE_workspace/OpenOCD-20211116-0.11.0/bin/openocd.exe",
}
调试启动文件(launch.json)
下面是launch.json的配置示例,包含了J-Link与ST-Link/OpenOCD两种调试器配置。
{
    // Use IntelliSense to learn about possible attributes.
    // Hover to view descriptions of existing attributes.
    // For more information, visit: https://go.microsoft.com/fwlink/?linkid=830387
    "version": "0.2.0",
    "configurations": [

        {
            "cwd": "${workspaceFolder}",
            "executable": "./Output/alwhalesStm32Project.elf",
            "name": "Debug with JLink",
            "request": "launch",
            "type": "cortex-debug",
            "servertype": "jlink",
            "device": "STM32F103C8",
            "svdFile": "./Source/stdperiph/stm32f103.svd",
            "runToEntryPoint": "main",
            "showDevDebugOutput": "none",
        },
        {
            "cwd": "${workspaceRoot}",
            "executable": "./Output/alwhalesStm32Project.elf",
            "name": "Debug with OpenOCD",
            "request": "launch",
            "type": "cortex-debug",
            "servertype": "openocd",
            "device": "STM32F103C8",
            "svdFile": "./Source/stdperiph/stm32f103.svd",
            "configFiles": [
                "E:/Working/STM32CubeIDE_workspace/OpenOCD-20211116-0.11.0/share/openocd/scripts/interface/stlink-v2.cfg", // 使用ST-LINK
                "E:/Working/STM32CubeIDE_workspace/OpenOCD-20211116-0.11.0/share/openocd/scripts/target/stm32f1x.cfg",     // 根据芯片型号更改/stm32f1x.cfg
            ],
            "searchDir": ["E:/Working/STM32CubeIDE_workspace/OpenOCD-20211116-0.11.0/share/openocd/scripts"],
            "runToEntryPoint": "main",
            "showDevDebugOutput": "none",
        },
    ]
}
调试程序
点击【Run and Debug】,可以看到出现了launch.json文件指定的两个配置的名称,可以根据实际调试器的类型选择一种配置运行。


切换MCU型号
如果单片机的型号(内核与封装)发生变化,需要对开发环境进行配置调整。如果代码本身有涉及到平台选择的功能,需要自行注意替换或者兼容处理。例如,STM32系列的单片机配套的标准库函数会有关于单片机型号/封装的宏定义,且不同内核的单片机使用的标准库函数也是不一样的。以下仅作一个示例说明。
启动文件与链接文件
根据不同的MCU型号,应当选择不同的启动文件与链接文件。一般情况下,这种选择是在Makefile文件中指定的。
LINK_SCRIPT := Source/stdperiph/stm32f103_flash_x8.ld
STARTUP_FILE := Source/stdperiph/startup_stm32f103x8.s
STM32F103单片机的链接文件

STM32F103单片机的启动文件

库函数配置文件与宏定义
对于不同内核的单片机(例如STM32F103与STM32F407)需要替换全部的标准库函数。对于相同内核的单片机的不同封装(例如STM32F103C8与STM32F103RC的外设数量、Flash容量、RAM容量不同)可能支持在库函数中使用宏定义进行选择。例如,在stm32f10x.h文件中选择不同的封装:
/* Uncomment the line below according to the target STM32 device used in your
   application
  */
#if !defined (STM32F10X_LD) && !defined (STM32F10X_LD_VL) && !defined (STM32F10X_MD) && !defined (STM32F10X_MD_VL) && !defined (STM32F10X_HD) && !defined (STM32F10X_HD_VL) && !defined (STM32F10X_XL) && !defined (STM32F10X_CL)
  /* #define STM32F10X_LD */     /*!< STM32F10X_LD: STM32 Low density devices */
  /* #define STM32F10X_LD_VL */  /*!< STM32F10X_LD_VL: STM32 Low density Value Line devices */
   #define STM32F10X_MD     /*!< STM32F10X_MD: STM32 Medium density devices */
  /* #define STM32F10X_MD_VL */  /*!< STM32F10X_MD_VL: STM32 Medium density Value Line devices */
//  #define STM32F10X_HD     /*!< STM32F10X_HD: STM32 High density devices */
  /* #define STM32F10X_HD_VL */  /*!< STM32F10X_HD_VL: STM32 High density value line devices */
  /* #define STM32F10X_XL */     /*!< STM32F10X_XL: STM32 XL-density devices */
  /* #define STM32F10X_CL */     /*!< STM32F10X_CL: STM32 Connectivity line devices */
#endif

/*  Tip: To avoid modifying this file each time you need to switch between these
        devices, you can define the device in your toolchain compiler preprocessor.
 - Low-density devices are STM32F101xx, STM32F102xx and STM32F103xx microcontrollers
   where the Flash memory density ranges between 16 and 32 Kbytes.
 - Low-density value line devices are STM32F100xx microcontrollers where the Flash
   memory density ranges between 16 and 32 Kbytes.
 - Medium-density devices are STM32F101xx, STM32F102xx and STM32F103xx microcontrollers
   where the Flash memory density ranges between 64 and 128 Kbytes.
 - Medium-density value line devices are STM32F100xx microcontrollers where the
   Flash memory density ranges between 64 and 128 Kbytes.
 - High-density devices are STM32F101xx and STM32F103xx microcontrollers where
   the Flash memory density ranges between 256 and 512 Kbytes.
 - High-density value line devices are STM32F100xx microcontrollers where the
   Flash memory density ranges between 256 and 512 Kbytes.
 - XL-density devices are STM32F101xx and STM32F103xx microcontrollers where
   the Flash memory density ranges between 512 and 1024 Kbytes.
 - Connectivity line devices are STM32F105xx and STM32F107xx microcontrollers.
  */

#if !defined (STM32F10X_LD) && !defined (STM32F10X_LD_VL) && !defined (STM32F10X_MD) && !defined (STM32F10X_MD_VL) && !defined (STM32F10X_HD) && !defined (STM32F10X_HD_VL) && !defined (STM32F10X_XL) && !defined (STM32F10X_CL)
 #error "Please select first the target STM32F10x device used in your application (in stm32f10x.h file)"
#endif

#if !defined  USE_STDPERIPH_DRIVER
/**
 * @brief Comment the line below if you will not use the peripherals drivers.
   In this case, these drivers will not be included and the application code will
   be based on direct access to peripherals registers
   */
  #define USE_STDPERIPH_DRIVER
#endif
这些相关的宏定义也可以在Makefile文件设置的编译选项中指定,例如:-D"STM32F10X_MD" -D"USE_STDPERIPH_DRIVER"。
ASSEMBLER_FLAGS =-c -g -O1 -mcpu=cortex-m3  -mthumb  \
    -D"STM32F10X_MD" -D"USE_STDPERIPH_DRIVER"  -x assembler-with-cpp $(INCLUDE_DIR)

COMPILER_FLAGS =-c -g -MMD -mcpu=cortex-m3  -O1 -Wall \
    -ffunction-sections -fdata-sections -mthumb  \
    -D"STM32F10X_MD" -D"USE_STDPERIPH_DRIVER" $(INCLUDE_DIR)
GCC的编译选项
GCC的编译选项主要是指选择不同的内核、功能以及宏定义。例如:-mcpu=cortex-m3与-mcpu=cortex-m4选项指定不同的内核;-mfloat-abi=hard选项指定要使用FPU硬件来做浮点运算,并且函数的参数直接传递到FPU的寄存器(s0、d0)中。 -mfpu=fpv4-sp-d16选项指定硬件浮点运算单元的名称,具体的值可在《Cortex M3与M4权威指南》的17章节可找到。
- STM32F103C8
LINKER_FLAGS = -lm -mthumb -mcpu=cortex-m3  -Wl,--gc-sections -T$(LINK_SCRIPT) \
    -static  -Wl,--start-group -lc -lrdimon -u _printf_float -lm -Wl,--end-group  \
    -specs=nano.specs  -Wl,-cref "-Wl,-Map=$(BIN_DIR)/$(OBJECT_NAME).map" \
    -Wl,--defsym=malloc_getpagesize_P=0x1000 $(LDLIBPATH) $(LDLIBS)

ASSEMBLER_FLAGS =-c -g -O1 -mcpu=cortex-m3  -mthumb  \
    -D"STM32F10X_MD" -D"USE_STDPERIPH_DRIVER"  -x assembler-with-cpp $(INCLUDE_DIR)

COMPILER_FLAGS =-c -g -MMD -mcpu=cortex-m3  -O1 -Wall \
    -ffunction-sections -fdata-sections -mthumb  \
    -D"STM32F10X_MD" -D"USE_STDPERIPH_DRIVER" $(INCLUDE_DIR)
- STM32F407VE
LINKER_FLAGS = -lm -mthumb -mcpu=cortex-m4  -mfloat-abi=hard -mfpu=fpv4-sp-d16 -std=gnu11 -Wl,--gc-sections -T$(LINK_SCRIPT) \
    -static  -Wl,-cref,-u,Reset_Handler -Wl,--start-group -lc -lrdimon -u _printf_float -lm -Wl,--end-group  \
    -specs=nano.specs  -Wl,-cref "-Wl,-Map=$(BIN_DIR)/$(OBJECT_NAME).map" \
    -Wl,--defsym=malloc_getpagesize_P=0x80 -Wl,--start-group -lc -lm -Wl,--end-group $(LDLIBPATH) $(LDLIBS)

ASSEMBLER_FLAGS =-c -g -O0 -mcpu=cortex-m4  -mthumb  \
    -mfloat-abi=hard -mfpu=fpv4-sp-d16  \
    -D"STM32F10X_HD" -D"USE_STDPERIPH_DRIVER"  -x assembler-with-cpp $(INCLUDE_DIR)

COMPILER_FLAGS =-c -g -MMD -mcpu=cortex-m4  -O0 -Wall \
    -mfloat-abi=hard -mfpu=fpv4-sp-d16  \
    -ffunction-sections -fdata-sections -mthumb  \
    -D"STM32F10X_HD" -D"USE_STDPERIPH_DRIVER" $(INCLUDE_DIR)
调试器配置文件
请参考“配置调试功能/指定MCU型号”小节的内容。
其他说明
选择默认终端
windows下选用不同的命令行工具(例如cmd、powershell、git bash等)有不同的配置make命令的方法。由于代码开发都是要用git进行版本管理,而git命令行又是与linux终端非常相近,因此推荐采用git bash作为VS Code的终端。注意,在编译工程之前,需要选择正确的默认终端。


也可以直接使用ctrl+shift+P快捷键调出Command Palette,输入"select default …"命令并选择设置默认终端的功能。

make命令
windows平台的中,在git bash中增加makefile文件需要用到的make命令,可以参考以下教程进行配置。
解决windows git bash无法识别make指令的问题
Ports of Unix and GNU software to MS-Windows
标准项目目录结构
推荐的目录结构如下图所示。整个工程的全部文件包含了vs code的工程文件夹(.vscode)、源码文件夹(Source)、编译输出文件夹(Output)、Makefile文件等四个部分。

配置c_cpp_properties.json
虽然我们的项目在Makefile中指定了头文件的包含路径,当时如果要使用编译器的自动补全、语法建议等高级功能,则需要让VS Code的代码编辑器知道我们的项目中头文件的包含路径。由于使用的是C/C++语言,需要使用如下扩展:

打开Command Palette (ctrl+shift+P) ,打开C/C++的JSON配置文件。VS Code会自动在项目的.vscode文件夹中创建c_cpp_properties.json文件。

VS Code官方提供了这个配置文件的详细说明:c_cpp_properties.json reference。
Top-level properties:
envAn array of user-defined variables that will be available for substitution in the configurations via the standard environment variable syntax:${<var>}or${env:<var>}. Strings and arrays of strings are accepted.configurationsAn array of configuration objects that provide the IntelliSense engine with information about your project and your preferences. By default, the extension creates a configuration for you based on your operating system. You may also add additional configurations.versionWe recommend you don’t edit this field. It tracks the current version of thec_cpp_properties.jsonfile so that the extension knows what properties and settings should be present and how to upgrade this file to the latest version.
includePathAn include path is a folder that contains header files (such as#include "myHeaderFile.h") that are included in a source file. Specify a list of paths for the IntelliSense engine to use while searching for included header files. Searching on these paths is not recursive. Specify**to indicate recursive search. For example,${workspaceFolder}/**will search through all subdirectories while${workspaceFolder}will not. If on Windows with Visual Studio installed, or if a compiler is specified in thecompilerPathsetting, it is not necessary to list the system include paths in this list.
以下提供了一个项目中的头文件路径配置示例。
{
    "configurations": [
        {
            "name": "Win32-arm-dev",
            "includePath": [    // 设置编辑器中的头文件查找目录
                "${workspaceFolder}/**",
                "../AwStdMcuLibrary/stm32f407/storabledata/include",
                "../AwStdMcuLibrary/stm32f407/awmodbus/include",
                "../AwStdMcuLibrary/stm32f407/stdlibext/include",
                "../AwStdMcuLibrary/stm32f407/freertos/include",
                "../AwStdMcuLibrary/stm32f407/stdperiph/include",
                "../AwStdMcuLibrary/stm32f407/utility/include",
                "../AwStdMcuLibrary/stm32f407/drivers/include"
            ],
            "defines": [
                "_DEBUG",
                "UNICODE",
                "_UNICODE",
                "__CC_ARM"    // 解决编辑器中提示无法识别uint32_t, uint16_t, uint8_t
            ],
            "windowsSdkVersion": "10.0.19041.0",
            // The compilerPath can be obtained from the Extension of windows-arm-none-eabi
            "compilerPath": "${env:USERPROFILE}/.vscode/extensions/metalcode-eu.windows-arm-none-eabi-0.1.2/bin/arm-none-eabi-gcc",  // 设置编译器路径
            "cStandard": "c11",  // 设置使用的C标准
            "cppStandard": "c++11",  // 设置使用的C++标准
            "intelliSenseMode": "windows-gcc-arm"  // 设置编译器类型
        }
    ],
    "version": 4
}
- 设置编辑器头文件查找路径:
在c_cpp_properties.json文件中的"includePath"数组中增加需要使用的头文件路径。 - 解决编辑器中提示无法识别
uint32_t,uint16_t,uint8_t问题:
在c_cpp_properties.json文件中的"defines"数组中增加宏定义"__CC_ARM"。 - 解决编辑器中提示无法识别例如
__attribute__((weak))等gcc编译器功能选项:
在c_cpp_properties.json文件中设置正确的compilerPath、intelliSenseMode等变量的值。


 3万+
3万+


 被折叠的 条评论
为什么被折叠?
被折叠的 条评论
为什么被折叠?
 到【灌水乐园】发言


