


一、前言
在Android开发中,会经常涉及到显示图片的相关操作,在网上查阅资料,ImageLoader得到大家广泛的使用,本篇文章针对初使用者的一个向导,同时也是自己使用该框架的一个总结,主要包含:
   ## 源码浅析 ##
   ## 使用教程 ##
   ## 用法总结及demo下载 ##
二、源码浅析
从用法来看,我们在使用该框架的时候,会先做一个初始化操作(一般在Application中),
ImageLoader imageLoader = ImageLoader.getInstance();
imageLoader.init(ImageLoaderConfiguration imageLoaderConfiguration );
我们在源码进入该方法查看:
private volatile static ImageLoader instance;

    /** Returns singleton class instance */
    public static ImageLoader getInstance() {
        if (instance == null) {
            synchronized (ImageLoader.class) {
                if (instance == null) {
                    instance = new ImageLoader();
                }
            }
        }
        return instance;
    }

    protected ImageLoader() {
    }

    /**
     * Initializes ImageLoader instance with configuration.<br />
     * If configurations was set before ( {@link #isInited()} == true) then this method does nothing.<br />
     * To force initialization with new configuration you should {@linkplain #destroy() destroy ImageLoader} at first.
     *
     * @param configuration {@linkplain ImageLoaderConfiguration ImageLoader configuration}
     * @throws IllegalArgumentException if <b>configuration</b> parameter is null
     */
    public synchronized void init(ImageLoaderConfiguration configuration) {
        if (configuration == null) {
            throw new IllegalArgumentException(ERROR_INIT_CONFIG_WITH_NULL);
        }
        if (this.configuration == null) {
            L.d(LOG_INIT_CONFIG);
            engine = new ImageLoaderEngine(configuration);
            this.configuration = configuration;
        } else {
            L.w(WARNING_RE_INIT_CONFIG);
        }
    }
获取实例对象的方式用了单例模式,这里我们主要看一下init()这个方法:
根据注释的文档可知初始化时的一些注意事项,该方法主要对engine做初始化:
engine = new ImageLoaderEngine(configuration);我们继续进入ImageLoaderEngine中看下这个类的构造方法:
ImageLoaderEngine(ImageLoaderConfiguration configuration) {
        this.configuration = configuration;

        taskExecutor = configuration.taskExecutor;
        taskExecutorForCachedImages = configuration.taskExecutorForCachedImages;

        taskDistributor = DefaultConfigurationFactory.createTaskDistributor();
    }
可知,该库是通过Executor对象将线程放入线程池中运行的,此构造方法里面初始化了taskExecutorForCachedImages、taskExecutor、taskDistributor这三个对象,它们都是Executor接口的实例。关于Executor接口,大家可以上网搜一下相关的知识,这里给个参考链接:
http://blog.csdn.net/minword/article/details/20565867
关于初始化的操作我们先看到这里,主要是明白了它是通过Executor来处理任务的。
接下来看下显示图片的操作,同样,我们看下源码:
/**
     * Adds display image task to execution pool. Image will be set to ImageAware when it's turn.<br />
     * <b>NOTE:</b> {@link #init(ImageLoaderConfiguration)} method must be called before this method call
     *
     * @param uri              Image URI (i.e. "http://site.com/image.png", "file:///mnt/sdcard/image.png")
     * @param imageAware       {@linkplain com.nostra13.universalimageloader.core.imageaware.ImageAware Image aware view}
     *                         which should display image
     * @param options          {@linkplain com.nostra13.universalimageloader.core.DisplayImageOptions Options} for image
     *                         decoding and displaying. If <b>null</b> - default display image options
     *                         {@linkplain ImageLoaderConfiguration.Builder#defaultDisplayImageOptions(DisplayImageOptions)
     *                         from configuration} will be used.
     * @param listener         {@linkplain ImageLoadingListener Listener} for image loading process. Listener fires
     *                         events on UI thread if this method is called on UI thread.
     * @param progressListener {@linkplain com.nostra13.universalimageloader.core.listener.ImageLoadingProgressListener
     *                         Listener} for image loading progress. Listener fires events on UI thread if this method
     *                         is called on UI thread. Caching on disk should be enabled in
     *                         {@linkplain com.nostra13.universalimageloader.core.DisplayImageOptions options} to make
     *                         this listener work.
     * @throws IllegalStateException    if {@link #init(ImageLoaderConfiguration)} method wasn't called before
     * @throws IllegalArgumentException if passed <b>imageAware</b> is null
     */
    public void displayImage(String uri, ImageAware imageAware, DisplayImageOptions options,
            ImageLoadingListener listener, ImageLoadingProgressListener progressListener) {
        checkConfiguration();
        if (imageAware == null) {
            throw new IllegalArgumentException(ERROR_WRONG_ARGUMENTS);
        }
        if (listener == null) {
            listener = emptyListener;
        }
        if (options == null) {
            options = configuration.defaultDisplayImageOptions;
        }

        if (TextUtils.isEmpty(uri)) {
            engine.cancelDisplayTaskFor(imageAware);
            listener.onLoadingStarted(uri, imageAware.getWrappedView());
            if (options.shouldShowImageForEmptyUri()) {
                imageAware.setImageDrawable(options.getImageForEmptyUri(configuration.resources));
            } else {
                imageAware.setImageDrawable(null);
            }
            listener.onLoadingComplete(uri, imageAware.getWrappedView(), null);
            return;
        }

        ImageSize targetSize = ImageSizeUtils.defineTargetSizeForView(imageAware, configuration.getMaxImageSize());
        String memoryCacheKey = MemoryCacheUtils.generateKey(uri, targetSize);
        engine.prepareDisplayTaskFor(imageAware, memoryCacheKey);

        listener.onLoadingStarted(uri, imageAware.getWrappedView());

        Bitmap bmp = configuration.memoryCache.get(memoryCacheKey);
        if (bmp != null && !bmp.isRecycled()) {
            L.d(LOG_LOAD_IMAGE_FROM_MEMORY_CACHE, memoryCacheKey);

            if (options.shouldPostProcess()) {
                ImageLoadingInfo imageLoadingInfo = new ImageLoadingInfo(uri, imageAware, targetSize, memoryCacheKey,
                        options, listener, progressListener, engine.getLockForUri(uri));
                ProcessAndDisplayImageTask displayTask = new ProcessAndDisplayImageTask(engine, bmp, imageLoadingInfo,
                        defineHandler(options));
                if (options.isSyncLoading()) {
                    displayTask.run();
                } else {
                    engine.submit(displayTask);
                }
            } else {
                options.getDisplayer().display(bmp, imageAware, LoadedFrom.MEMORY_CACHE);
                listener.onLoadingComplete(uri, imageAware.getWrappedView(), bmp);
            }
        } else {
            if (options.shouldShowImageOnLoading()) {
                imageAware.setImageDrawable(options.getImageOnLoading(configuration.resources));
            } else if (options.isResetViewBeforeLoading()) {
                imageAware.setImageDrawable(null);
            }

            ImageLoadingInfo imageLoadingInfo = new ImageLoadingInfo(uri, imageAware, targetSize, memoryCacheKey,
                    options, listener, progressListener, engine.getLockForUri(uri));
            LoadAndDisplayImageTask displayTask = new LoadAndDisplayImageTask(engine, imageLoadingInfo,
                    defineHandler(options));
            if (options.isSyncLoading()) {
                displayTask.run();
            } else {
                engine.submit(displayTask);
            }
        }
    }
可知,我们将显示图片的任务加入到线程池中,之后ImageAware进行工作,
这里看下这段代码:
if (options == null) {
            options = configuration.defaultDisplayImageOptions;
}
其实就是我们设置的图片显示失败时显示的图片,这边是我们设置null时,使用了默认的图片。
回到刚才,我们发现该类读取了很多的配置参数信息,其实是我们初始化时,配置的参数,主要是配置缓存相关信息,见第二部分,使用教程。最后我们通过ImageLoaderEngine来执行显示图片的任务。
engine.submit(displayTask);submit内部方法(ImageLoaderEngine类中):
/** Submits task to execution pool */
    void submit(ProcessAndDisplayImageTask task) {
        initExecutorsIfNeed();
        taskExecutorForCachedImages.execute(task);
    }

    private void initExecutorsIfNeed() {
        if (!configuration.customExecutor && ((ExecutorService) taskExecutor).isShutdown()) {
            taskExecutor = createTaskExecutor();
        }
        if (!configuration.customExecutorForCachedImages && ((ExecutorService) taskExecutorForCachedImages)
                .isShutdown()) {
            taskExecutorForCachedImages = createTaskExecutor();
        }
    }
以上是主要的一些源码浅析,想了解更多的可以自行翻阅源码查看。接下来我们介绍一下简单的使用教程。
三、使用教程
首先获取该库:我用的是gradle配置:
在gradle中加入:
compile 'com.nostra13.universalimageloader:universal-image-loader:1.9.3'Maven 配置:
<dependency>
    <groupid>com.nostra13.universalimageloader</groupid>
    <artifactId>universal-image-loader</artifactid>
    <version>1.9.3</version>
</dependency>
在AndroidManifest.xml中加入(涉及到图片缓存读写路径,访问网络操作):
<uses-permission android:name="android.permission.WRITE_EXTERNAL_STORAGE" />
<uses-permission android:name="android.permission.INTERNET" />
之后我们就可以代码编写。
首先在activity_main中设置一个显示图片的控件:
  <ImageView
        android:id="@+id/user_image"
        android:layout_width="64dp"
        android:layout_height="64dp"/>
在MainActivity中使用ImageLoader加载一张网络图片:
imageView = (ImageView) findViewById(R.id.user_image);
ImageLoaderUtil.init(this);
String url_image = "https://ss1.bdstatic.com/70cFvXSh_Q1YnxGkpoWsK1HF6hhy/it/u=3266622398,4228444443&fm=116&gp=0.jpg";
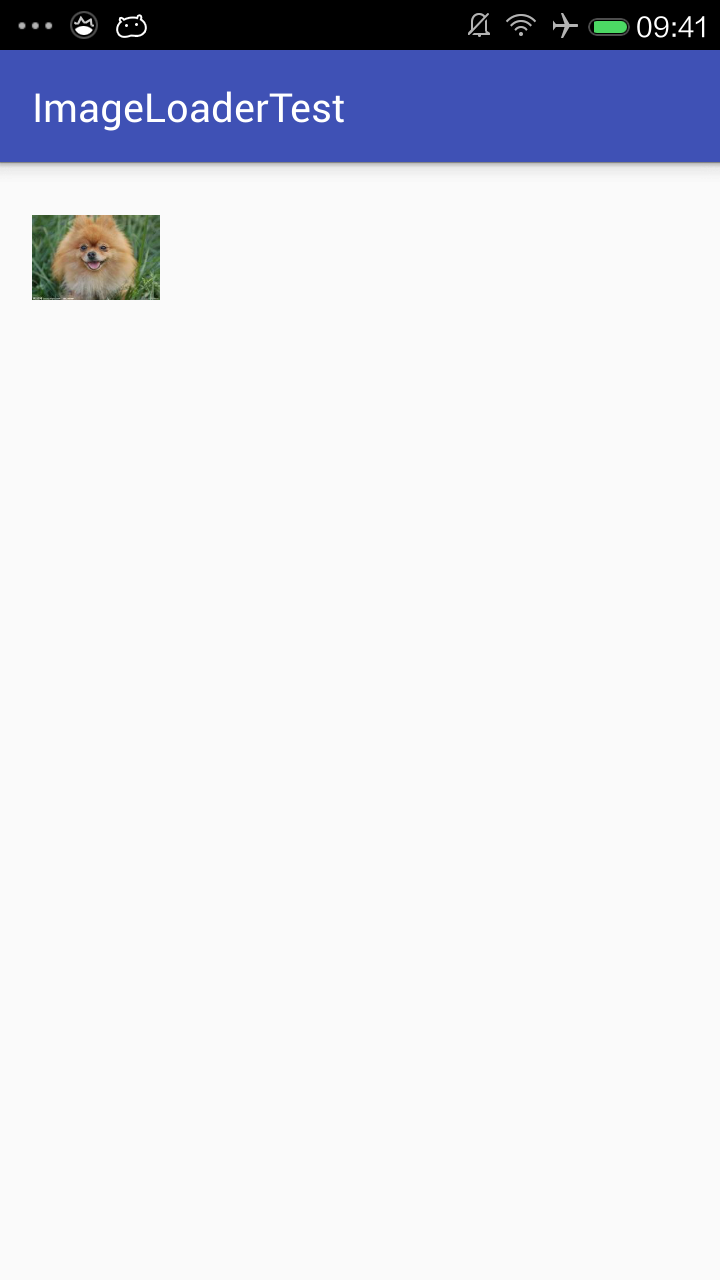
ImageLoaderUtil.displayImage(url_image,imageView,ImageLoaderUtil.getAvatarDisplayOptions());显示的效果图:
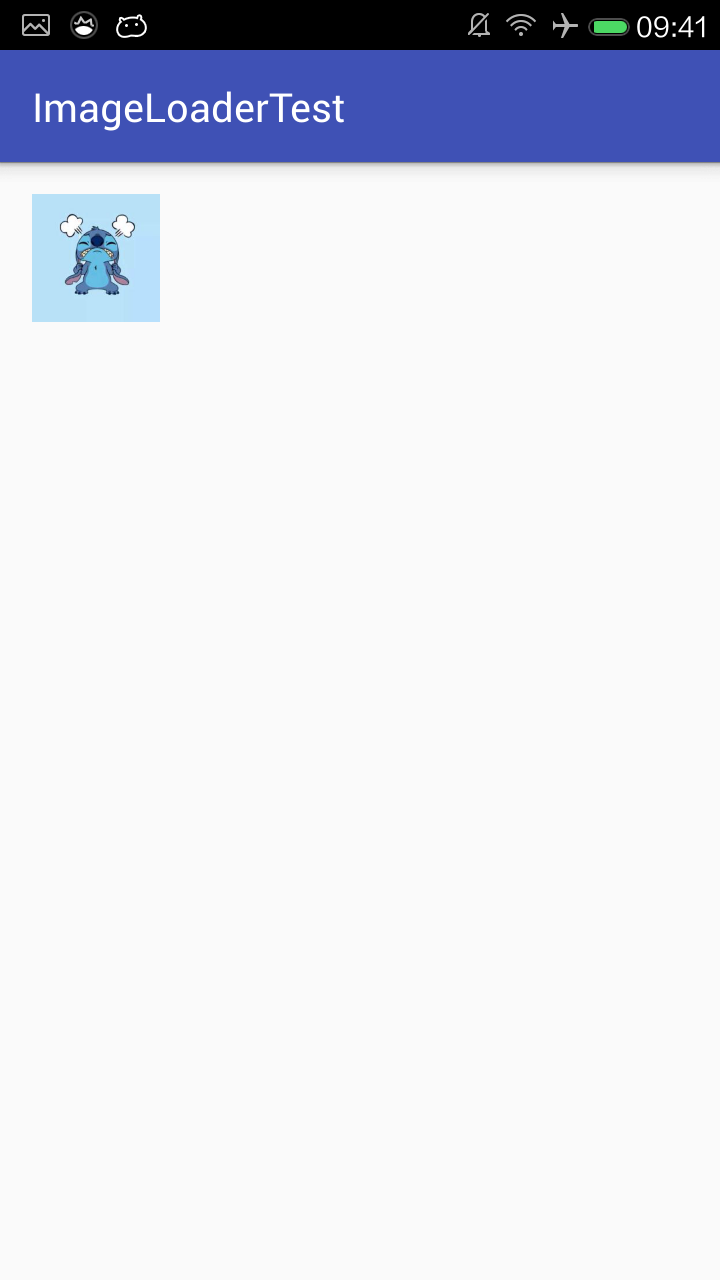
当网络路径不存在图片时(显示预设的图片):
ImageLoaderUtil是我自己封装的一个类:
主要我们得编写init()方法:
public static void init(Context context) {
        File cacheDir = getCacheDirectory(context);  //缓存文件夹路径

        ImageLoaderConfiguration config = new ImageLoaderConfiguration.Builder(context)
                .memoryCacheExtraOptions(480, 800) // default = device screen dimensions 内存缓存文件的最大长宽
                .diskCacheExtraOptions(480, 800, null)  // 本地缓存的详细信息(缓存的最大长宽),最好不要设置这个
//                .taskExecutor("")
//        .taskExecutorForCachedImages("")
        .threadPoolSize(3) // default  线程池内加载的数量
                .threadPriority(Thread.NORM_PRIORITY - 2) // default 设置当前线程的优先级
                .tasksProcessingOrder(QueueProcessingType.FIFO) // default
                .denyCacheImageMultipleSizesInMemory()
                .memoryCache(new LruMemoryCache(2 * 1024 * 1024)) //可以通过自己的内存缓存实现
                .memoryCacheSize(2 * 1024 * 1024)  // 内存缓存的最大值
                .memoryCacheSizePercentage(13) // default
                .diskCache(new UnlimitedDiscCache(cacheDir)) // default 可以自定义缓存路径
                .diskCacheSize(50 * 1024 * 1024) // 50 Mb sd卡(本地)缓存的最大值
                .diskCacheFileCount(100)  // 可以缓存的文件数量
                // default为使用HASHCODE对UIL进行加密命名, 还可以用MD5(new Md5FileNameGenerator())加密
                .diskCacheFileNameGenerator(new HashCodeFileNameGenerator())
                .imageDownloader(new BaseImageDownloader(context)) // default
                .imageDecoder(new BaseImageDecoder(true)) // l
                .defaultDisplayImageOptions(DisplayImageOptions.createSimple()) // default
                .writeDebugLogs() // 打印debug log
                .build(); //开始构建
        ImageLoader.getInstance().init(config);
    }
可参照注释对应了解参数信息。
完整的ImageLoaderUtil类:
package constraintlayout.test.test.viviant.imageloadertest.util;

import android.content.Context;
import android.util.Log;
import android.widget.ImageView;

import com.nostra13.universalimageloader.cache.disc.impl.UnlimitedDiscCache;
import com.nostra13.universalimageloader.cache.disc.naming.HashCodeFileNameGenerator;
import com.nostra13.universalimageloader.cache.memory.impl.LruMemoryCache;
import com.nostra13.universalimageloader.core.DisplayImageOptions;
import com.nostra13.universalimageloader.core.ImageLoader;
import com.nostra13.universalimageloader.core.ImageLoaderConfiguration;
import com.nostra13.universalimageloader.core.assist.QueueProcessingType;
import com.nostra13.universalimageloader.core.decode.BaseImageDecoder;
import com.nostra13.universalimageloader.core.download.BaseImageDownloader;

import java.io.File;

import constraintlayout.test.test.viviant.imageloadertest.R;

/**
 * 作者:viviant on 2016/6/30 09:22
 * 描述:
 */
public class ImageLoaderUtil {

    private static final String PICTURE_CACHE_DIR = "picture";
    private static String TAG = "ImageLoaderUtil";

    public static void init(Context context) {
        File cacheDir = getCacheDirectory(context);  //缓存文件夹路径

        ImageLoaderConfiguration config = new ImageLoaderConfiguration.Builder(context)
                .memoryCacheExtraOptions(480, 800) // default = device screen dimensions 内存缓存文件的最大长宽
                .diskCacheExtraOptions(480, 800, null)  // 本地缓存的详细信息(缓存的最大长宽),最好不要设置这个
//                .taskExecutor("")
//        .taskExecutorForCachedImages("")
        .threadPoolSize(3) // default  线程池内加载的数量
                .threadPriority(Thread.NORM_PRIORITY - 2) // default 设置当前线程的优先级
                .tasksProcessingOrder(QueueProcessingType.FIFO) // default
                .denyCacheImageMultipleSizesInMemory()
                .memoryCache(new LruMemoryCache(2 * 1024 * 1024)) //可以通过自己的内存缓存实现
                .memoryCacheSize(2 * 1024 * 1024)  // 内存缓存的最大值
                .memoryCacheSizePercentage(13) // default
                .diskCache(new UnlimitedDiscCache(cacheDir)) // default 可以自定义缓存路径
                .diskCacheSize(50 * 1024 * 1024) // 50 Mb sd卡(本地)缓存的最大值
                .diskCacheFileCount(100)  // 可以缓存的文件数量
                // default为使用HASHCODE对UIL进行加密命名, 还可以用MD5(new Md5FileNameGenerator())加密
                .diskCacheFileNameGenerator(new HashCodeFileNameGenerator())
                .imageDownloader(new BaseImageDownloader(context)) // default
                .imageDecoder(new BaseImageDecoder(true)) // l
                .defaultDisplayImageOptions(DisplayImageOptions.createSimple()) // default
                .writeDebugLogs() // 打印debug log
                .build(); //开始构建
        ImageLoader.getInstance().init(config);
    }

    /**
     * 获取缓存文件
     *
     * @param context
     * @return
     */
    public final static File getCacheDirectory(Context context) {
        String cacheDir = SystemUtility.getAppCachePath();
        return createDir(cacheDir + PICTURE_CACHE_DIR);
    }

    private final static File createDir(String dir) {
        File appCacheDir = new File(dir);
        if (!appCacheDir.exists()) {
            if (!appCacheDir.mkdirs()) {
                Log.i(TAG, "createDir# Unable to create external cache directory");
                return null;
            }
        }
        return appCacheDir;
    }

    /**
     *显示出错,替换的图片
     * @return
     */
    public static DisplayImageOptions getAvatarDisplayOptions() {
        DisplayImageOptions avatarOptions = new DisplayImageOptions.Builder()
                .showImageOnLoading(R.drawable.error)
                .showImageForEmptyUri(R.drawable.error)
                .showImageOnFail(R.drawable.error)
                .cacheInMemory(true).cacheOnDisk(true).build();
        return avatarOptions;
    }

    /**
     * 显示图片
     *
     * @param url
     * @param imageView
     * @param options
     */
    public static void displayImage(String url, ImageView imageView,
                                    DisplayImageOptions options) {
        ImageLoader.getInstance().displayImage(url, imageView, options);
    }

}
四、用法总结及源码下载:
ImageLoader的用法总的来说还是很便捷的,我们可以设置相应的参数来初始化配置,并且它的优点是应用进行大量的访问网络图片。以上是我对该框架的一些使用方法进行总结,不足之处,欢迎批评。
源码下载(AndroidStudio直接导入):
https://github.com/viviant1224/ImageLoaderTest


 1606
1606

 被折叠的 条评论
为什么被折叠?
被折叠的 条评论
为什么被折叠?
 到【灌水乐园】发言


