


经过前面的铺垫,DataLoader的整体架构和依赖部件都已分析完毕:
PyTorch Dataloader源码分析(一)
PyTorch DataLoader源码分析(二)
三、DataLoader迭代器详解
这一章主要介绍DataLoader的核心部分——_SingleProcessDataLoaderIter和_MultiProcessDataLoaderIter。两者的区别顾名思义,一个用于单进程,一个用于多进程。
从代码实现上看,当用户选择的num_workers等于0时,
DataLoader返回_SingleProcessDataLoaderIter迭代器,否则返回_MultiProcessDataLoaderIter迭代器。
class DataLoader(object):
    ... ...
    def __iter__(self):
        if self.num_workers == 0:
            return _SingleProcessDataLoaderIter(self)
        else:
            return _MultiProcessingDataLoaderIter(self)
前面介绍过DataLoaderIter的工作流程:

无论是_SingleProcessDataLoaderIter还是_MultiProcessDataLoaderIter,工作流程都如上图,只不过各个部件的执行单元和执行时序有差别(后面会解释)。
1、_BaseDataLoaderIter父类
class _BaseDataLoaderIter(object):
    def __init__(self, loader):
        self._dataset = loader.dataset
        self._dataset_kind = loader._dataset_kind
        self._IterableDataset_len_called = loader._IterableDataset_len_called
        self._auto_collation = loader._auto_collation
        self._drop_last = loader.drop_last
        self._index_sampler = loader._index_sampler
        self._num_workers = loader.num_workers
        self._pin_memory = loader.pin_memory and torch.cuda.is_available()
        self._timeout = loader.timeout
        self._collate_fn = loader.collate_fn
        self._sampler_iter = iter(self._index_sampler)
        self._base_seed = torch.empty((), dtype=torch.int64).random_(generator=loader.generator).item()
        self._num_yielded = 0

    def __iter__(self):
        return self

    def _next_index(self):
        return next(self._sampler_iter)  # may raise StopIteration

    def _next_data(self):
        raise NotImplementedError

    def __next__(self):
        data = self._next_data()
        self._num_yielded += 1
        if self._dataset_kind == _DatasetKind.Iterable and \
                self._IterableDataset_len_called is not None and \
                self._num_yielded > self._IterableDataset_len_called:
            warn_msg = ("Length of IterableDataset {} was reported to be {} (when accessing len(dataloader)), but {} "
                        "samples have been fetched. ").format(self._dataset, self._IterableDataset_len_called,
                                                              self._num_yielded)
            if self._num_workers > 0:
                warn_msg += ("For multiprocessing data-loading, this could be caused by not properly configuring the "
                             "IterableDataset replica at each worker. Please see "
                             "https://pytorch.org/docs/stable/data.html#torch.utils.data.IterableDataset for examples.")
            warnings.warn(warn_msg)
        return data

    next = __next__  # Python 2 compatibility

    def __len__(self):
        return len(self._index_sampler)

    def __getstate__(self):
        # TODO: add limited pickling support for sharing an iterator
        # across multiple threads for HOGWILD.
        # Probably the best way to do this is by moving the sample pushing
        # to a separate thread and then just sharing the data queue
        # but signalling the end is tricky without a non-blocking API
        raise NotImplementedError("{} cannot be pickled", self.__class__.__name__)
_BaseDataLoaderIter中最重要的就是__next__方法,根据迭代器协议,遍历DataLoader的for循环每次都会调用其返回迭代器的__next__方法。在_BaseDataLoaderIter的__next__方法中,会固定调用__next_data方法获得数据,这么做应该是为了复用代码。因此,在_SingleProcessDataLoaderIter和_MultiProcessDataLoaderIter中,关注的重点便是其各自的__next_data方法。
2、_SingleProcessDataLoaderIter迭代器
_SingleProcessDataLoaderIter的实现非常简洁。对应到流程图上,‘self._next_index()’负责从sampler中拿到index,‘self._dataset_fetcher.fetch(index)’负责用index获得tensor,而’_utils.pin_memory.pin_memory(data)‘负责将pageble tensor转换成pinned tensor。这几个步骤从时序上来看是串行的,都由主进程执行,总耗时为所有部件耗时的总和。
class _SingleProcessDataLoaderIter(_BaseDataLoaderIter):
    def __init__(self, loader):
        super(_SingleProcessDataLoaderIter, self).__init__(loader)
        assert self._timeout == 0
        assert self._num_workers == 0

        self._dataset_fetcher = _DatasetKind.create_fetcher(
            self._dataset_kind, self._dataset, self._auto_collation, self._collate_fn, self._drop_last)

    def _next_data(self):
        index = self._next_index()  # may raise StopIteration
        data = self._dataset_fetcher.fetch(index)  # may raise StopIteration
        if self._pin_memory:
            data = _utils.pin_memory.pin_memory(data)
        return data
3、_MultiProcessDataLoaderIter迭代器
_MultiProcessDataLoaderIter的工作流程和上图一样,没有变化,区别在于各部件的工作时序:Fetcher和Pin_memory这两步由单独的进程和线程执行,和主进程可以并行,目的便是使得DataLoader的耗时和网络的计算可以overlap,从而加快训练过程。之所以选择Fetcher和Pin_memory这两个步骤做并行,是因为DataLoader中主要的耗时操作(CPU bound和IO bound)都在这两个步骤中。
虽然工作流程没有变化,由于加入了多进程/多线程,时序理解起来还是略显复杂。在具体分析代码前,先通过下图大致展示其内部workflow以及重要数据结构:
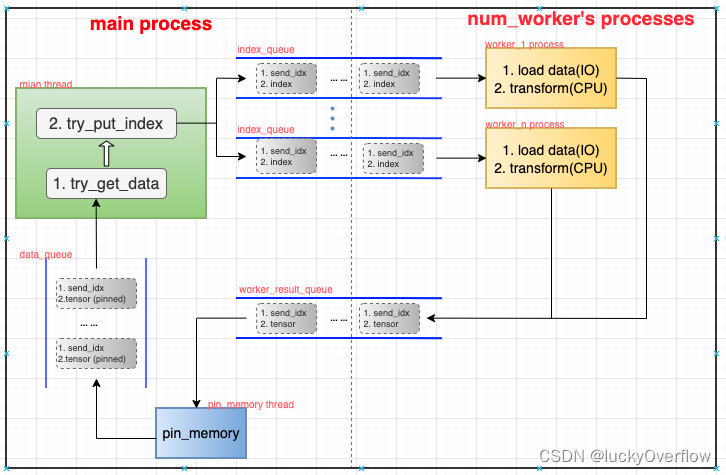
构成_MultiProcessDataLoaderIter主体部分的主要是多个进程/线程和多个queue,进程/线程分别为:
主进程(主线程) main_thread。每次从data_queue中取一个数据,然后通过sampler获得一个index,发给对应index_queue。
- 主进程(pin_memory线程) pin_memory_thread。每次从worker_result_queue中取一个数据,将其从pageble tensor转换成pinned tensor,然后送到data_queue中。
- 子进程(num_worker个子进程) worker_1~n_process。每个进程负责:每次从index_queue中取一个下标数据,先将其从磁盘load到内存中,然后做一系列用户定义的前处理操作,完成后将其送到worker_result_queue中。
多个queue充当这多个进程/线程之间生产-消费关系的缓冲:
- index_queue。存放数据为(send_idx, index),由main_thread生产,worker_1~n_process消费。其中send_idx是main_thread维护的记录任务顺序和数量的计数器,每发送一个index到index_queue中,send_idx便会加一,具体用途后续解释。
- worker_result_queue。存放数据为(send_idx, pageble tensor),由worker_1~n_process产生,pin_memory_thread消费。
- data_queue。存放数据为(send_idx, pinned tensor),由pin_memory_thread产生,main_thread消费。
这多个进程/线程各司其职,相互之间唯一的联系便是多个queue队列,当某个队列为空时,该队列的消费线程/进程便会被阻塞,符合典型的生产-消费模型。下面通过源码详细分析一下内部细节。
先看下_MultiProcessDataLoaderIter代码的主体结构,有个全局认识:
class _MultiProcessingDataLoaderIter(_BaseDataLoaderIter):
    def __init__(self, loader):
        # 调用时机:用户初始化DataLoader对象时,若num_worker > 0,便会构造_MultiProcessDataLoaderIter对象,进入该__init__方法。
        # 职责:从DataLoader对象中获得用户参数,初始化numworker个子进程、pin_memory线程以及多个队列queue,
        #      并下发2*num_worker数量的任务(即index)。

    def _try_get_data(self, timeout=_utils.MP_STATUS_CHECK_INTERVAL):
        # 调用时机:由_get_data方法调用。
        # 职责:从data_queue中取数据,并对各种异常进行处理。

    def _get_data(self):
        # 调用时机:由_next_data方法调用。
        # 职责:调用_try_get_data方法获取数据,并检查数据是否获取成功。

    def _next_data(self):
        # 调用时机:用户每次对DataLoader对象进行for循环迭代时,都会进入该方法。
        # 职责:作为迭代器的入口,该方法负责返回用户需要的数据,每次的工作流程如下:
        #         1、检查本次需要获取的数据是否已在缓存中(不在queue中),若在则直接从缓存取。
        #         2、若不在缓存中,则调用_get_data获取数据。
        #         3、若该数据不是本次应该等待的数据(即该数据的idx不等于ecvd_idx),则存到缓存中,返回第一步,否则进入下一步。
        #         4、获取数据后,调用_process_data做近一步处理并返回数据。

    def _try_put_index(self):
        # 调用时机:由_process_data方法调用。
        # 职责:1、从sampler对象中获得index(调用父类的_next_index方法)
        #      2、将(send_idx, index)送入对应的index_queue中
        #      3、send_idx加一

    def _process_data(self, data):
        # 调用时机:由_next_data方法调用。
        # 职责:先对rcvd_idx加一,再调用_try_put_index方法,然后返回之前从_get_data中获取的数据。
接下来针对这个几方法逐个进行解析(只抓主要流程,与shutdown处理相关的逻辑暂时略过)。
(1) __init__方法
def __init__(self, loader):
        super(_MultiProcessingDataLoaderIter, self).__init__(loader)
        ... ...
        # 1、创建多进程/线程间用于维护数据顺序的数据结构
        self._send_idx = 0  # idx of the next task to be sent to workers
        self._rcvd_idx = 0  # idx of the next task to be returned in __next__
        self._task_info = {}

        # 2、根据用户参数将num_worker个子进程和pin_memory线程创建并初始化
        self._index_queues = []
        self._workers = []
        for i in range(self._num_workers):
            index_queue = multiprocessing_context.Queue()
            # index_queue.cancel_join_thread()
            w = multiprocessing_context.Process(... ...)
            w.daemon = True
            w.start()
            self._index_queues.append(index_queue)
            self._workers.append(w)

        if self._pin_memory:
            self._data_queue = queue.Queue()
            pin_memory_thread = threading.Thread(... ...)
            pin_memory_thread.daemon = True
            pin_memory_thread.start()
        else:
            self._data_queue = self._worker_result_queue

        # 3、发送2*num_worker个index,让多进程/线程工作起来
        for _ in range(2 * self._num_workers):
            self._try_put_index()
在_MultiProcessDataLoaderIter对象主要的成员结构中,多个queue和进程/线程在前面已经介绍过各自用途,并梳理过它们之间的数据流关系。但是有三个重要的成员还没谈到,那就是send_idx、rcvd_idx和task_info。
在介绍这三个成员的用途前,我们先思考一个问题 :“_MultiProcessDataLoaderIter和_SingleProcessDataLoaderIter在功能上是等价的吗?”。
使用多进程/线程除了在性能上有较大区别外,在功能上也会产生意外的区别:在_SingleProcessDataLoaderIter中,所有操作都是串行的,先通过sampler对象拿到index,再用index去load对应数据。只要sampler产生的index序列一致,每次拿到的数据序列便一致。这个特性我们暂且称之为“顺序一致性”。换到多进程/线程场景中,“顺序一致性”就难以维持了。虽然主进程中main_thread拿到的index仍是串行的,可以保证发送index的”顺序一致性“,但使用index去load数据的操作是由多个子进程完成,严格来说,这num_worker个子进程除了load数据,还要做数据预处理,这两步很耗时,分别属于IO密集型和CPU密集型任务,就算每个子进程的负载(待处理数据量)一样,但耗时可能相差甚大(某个进程在占据CPU的过程中都可能被打断而切换,除非绑核),因此,num_worker个子进程的执行速度是无法保证的,这就导致worker_result_queue中的数据不一定是按照main_thread中产生的index的顺序。
为了解决在多进程/线程下导致的这种“顺序不一致”问题,便引入了send_idx、rcvd_idx和task_info成员。那具体如何解决呢?一个朴素的想法是“为每个index和tensor数据都附加一个id,用以标识该数据对应main_thread中产生index的顺序。每次从queue中拿数据时都检查其id的合法性,即顺序一致且递增,如果是该数据是乱序的,先缓存起来,再从queue中拿下一个,直到获取有合法id的数据为止”,_MultiProcessDataLoaderIter的做法便是如此。
其中,send_idx表示这是main_thread中产生的第几个index,rcvd_idx表示main_thread已经成功获取到的第几个index对应的tensor数据,而task_info便是用于缓存在queue中拿到的乱序的数据。具体的逻辑在后续的代码分析中。
(2)_next_data方法
def _next_data(self):
        while True:
            ... ...
            # 1、检查本次要拿的数据是否已经在缓存中
            if len(self._task_info[self._rcvd_idx]) == 2:
                data = self._task_info.pop(self._rcvd_idx)[1]
                return self._process_data(data)

            # 2、数据不在缓存中,调用_get_data从queue中拿数据
            idx, data = self._get_data()

            # 3、检查刚拿的数据是否顺序一致
            if idx != self._rcvd_idx:
                # 不一致则放到缓存中
                self._task_info[idx] += (data,)
            else:
                del self._task_info[idx]
                # 一致则交给_process_data处理
                return self._process_data(data)
在_next_data中出现的这个判断“if len(self._task_info[self._rcvd_idx]) == 2”,表示的含义就是“_rcvd_idx对应的数据是否已经在缓存中”。之所以可以这么判断,是因为_task_info字典中的数据有两种情况:
- { _send_idx : (worker_queue_idx,) }
- { _send_idx : (worker_queue_idx, data, ) }
在__init__中可以看到,_task_info刚开始是个空的字典,情况1的赋值操作在_try_put_index方法中:
self._task_info[self._send_idx] = (worker_queue_idx,)
如果_next_data中拿到的对应_rcvd_idx的数据是顺序一致的,则删除_task_info中该项,如果顺序不一致,则将拿到的data添加到_task_info的对应项中:
# 不一致则放到缓存中
self._task_info[idx] += (data,)
因此_task_info[_rcvd_idx]如果有两个item,即“len(self._task_info[self._rcvd_idx]) == 2”,就表示该_rcvd_idx对应的数据已经在缓存_task_info中了。
(3)_get_data和_try_get_data
def _try_get_data(self, timeout=_utils.MP_STATUS_CHECK_INTERVAL):
        # Returns a 2-tuple:
        #   (bool: whether successfully get data, any: data if successful else None)
        try:
            data = self._data_queue.get(timeout=timeout)
            return (True, data)
        except Exception as e:
            ... ...
            if isinstance(e, queue.Empty):
                return (False, None)

def _get_data(self):
        if self._timeout > 0:
            success, data = self._try_get_data(self._timeout)
            if success:
                return data
            else:
                raise RuntimeError('DataLoader timed out after {} seconds'.format(self._timeout))
        elif self._pin_memory:
            while self._pin_memory_thread.is_alive():
                success, data = self._try_get_data()
                if success:
                    return data
            else:
                raise RuntimeError('Pin memory thread exited unexpectedly')
        else:
            while True:
                success, data = self._try_get_data()
                if success:
                    return data
_get_data中主要就是根据用户传入的参数(timeout和pin_memory)选择调用_try_get_data的参数。_try_get_data的主要工作就是从_data_queue中取数据然后返回出去,返回的数据有两种状态(True, data)和(False, None)。
(4)_try_put_index和_process_data
def _try_put_index(self):
        try:
        # 1、调用sampler获取index
            index = self._next_index()
        ... ...
        for _ in range(self._num_workers):  # find the next active worker, if any
            worker_queue_idx = next(self._worker_queue_idx_cycle)
            if self._workers_status[worker_queue_idx]:
                break

        # 2、将获得和index和send_idx打包送到对应的_index_queue中
        self._index_queues[worker_queue_idx].put((self._send_idx, index))
        # 3、更新用于保证数据顺序一致性的成员
        self._task_info[self._send_idx] = (worker_queue_idx,)
        self._send_idx += 1

def _process_data(self, data):
        self._rcvd_idx += 1
        self._try_put_index()
        ... ...
        return data
_process_data的逻辑比较简单,给_rcvd_idx加一,然后调用_try_put_index,而_try_put_index的核心职责已经在标注在上述代码注释中,其中第3步与前面通过判断len(self._task_info[self._rcvd_idx])是否等于2的操作相对应。
至此,_MultiProcessDataLoaderIter就介绍完毕了。遗憾的是,为了抓住主体结构,上述贴的代码中去除了很多其他判断逻辑,这些逻辑对于多进程/线程的运行鲁棒性具有重要的意义。


 1798
1798


 被折叠的 条评论
为什么被折叠?
被折叠的 条评论
为什么被折叠?
 到【灌水乐园】发言


