k8s-数据卷NFS共享卷
1. k8s数据卷NFS共享卷
-
NFS数据卷:提供对NFS挂载支持,可以自动将NFS共享路径挂载到Pod中
-
NFS:是一个主流的文件共享服务器。
-
安装示例:
# yum install nfs-utils -y
# vi /etc/exports
/ifs/kubernetes *(rw,no_root_squash)
# mkdir -p /ifs/kubernetes
# systemctl start nfs
# systemctl enable nfs
注:每个Node上都要安装nfs-utils包
-
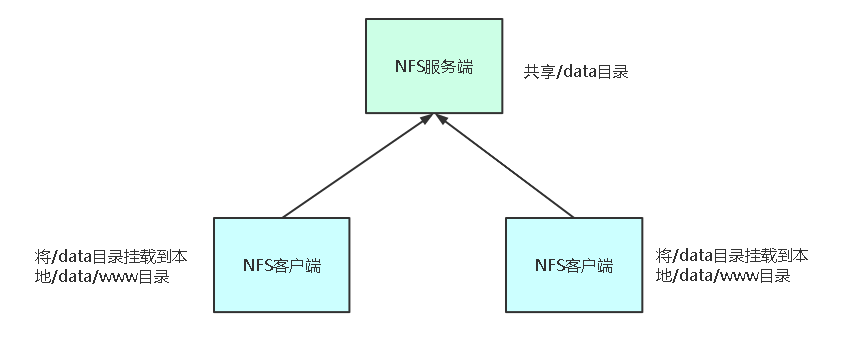
NFS共享卷架构图

-
示例:将网站程序通过NFS数据卷共享,让所有Pod使用
-
示例代码:
apiVersion: apps/v1
kind: Deployment
metadata:
  name: web-nfs
spec:
  selector:
    matchLabels:
      app: nginx-nfs
  replicas: 3
  template:
    metadata:
      labels:
        app: nginx-nfs
    spec:
      containers:
      - name: nginx-nfs
        image: nginx
        volumeMounts:
        - name: wwwroot
          mountPath: /usr/share/nginx/html
        ports:
        - containerPort: 80
      volumes:
      - name: wwwroot
        nfs:
          server: 10.100.24.85
          path: /ifs/kubernetes
2. 案例
2.1 安装和配置nfs
-
安装nfs
[root@k8s-node1 ~]# yum install nfs-utils -y [root@k8s-node2 ~]# yum install nfs-utils -y [root@k8s-node3 ~]# yum install nfs-utils -y -
用node3做本次的nfs共享磁盘
-
修改nfs配置文件
[root@k8s-node3 ~]# vi /etc/exports [root@k8s-node3 ~]# cat /etc/exports /ifs/kubernetes *(rw,no_root_squash) -
创建nfs共享目录
[root@k8s-node3 ~]# mkdir -p /ifs/kubernetes -
创建index.html文件
[root@k8s-node3 ~]# cd /ifs/kubernetes/
[root@k8s-node3 kubernetes]# vim index.html
[root@k8s-node3 kubernetes]# cat index.html
<h1>hello world!</h1>
-
-
每个node都启动并设置开机启动
[root@k8s-node3 ~]# systemctl start nfs      #启动nfs
[root@k8s-node3 ~]# systemctl enable nfs     # 设置开机启动
Created symlink from /etc/systemd/system/multi-user.target.wants/nfs-server.service to /usr/lib/systemd/system/nfs-server.service.
2.2 挂载nfs盘到pod容器
-
创建代码目录
[root@k8s-master yaml]# mkdir -p nfs/ [root@k8s-master yaml]# cd nfs/ -
编写pod代码
[root@k8s-master nfs]# vim nfs.yaml [root@k8s-master nfs]# cat nfs.yaml apiVersion: apps/v1 kind: Deployment metadata: name: web-nfs spec: selector: matchLabels: app: nginx-nfs replicas: 3 template: metadata: labels: app: nginx-nfs spec: containers: - name: nginx-nfs image: nginx volumeMounts: - name: wwwroot mountPath: /usr/share/nginx/html ports: - containerPort: 80 volumes: - name: wwwroot nfs: server: 10.100.24.85 path: /ifs/kubernetes -
启动服务
[root@k8s-master nfs]# kubectl apply -f nfs.yaml deployment.apps/web-nfs created -
检查服务是否启动
[root@k8s-master nfs]# kubectl get pods,service -o wide NAME READY STATUS RESTARTS AGE IP NODE NOMINATED NODE READINESS GATES pod/configmap-demo-pod 1/1 Running 0 2d4h 10.244.107.209 k8s-node3 <none> <none> pod/my-hostpath 1/1 Running 0 4h45m 10.244.107.211 k8s-node3 <none> <none> pod/secret-demo-pod 1/1 Running 0 46h 10.244.107.210 k8s-node3 <none> <none> pod/web-nfs-84f8d7bf8d-6mj75 1/1 Running 0 2m42s 10.244.107.212 k8s-node3 <none> <none> pod/web-nfs-84f8d7bf8d-n4tpk 1/1 Running 0 2m42s 10.244.169.144 k8s-node2 <none> <none> pod/web-nfs-84f8d7bf8d-qvd2z 1/1 Running 0 2m42s 10.244.36.84 k8s-node1 <none> <none> NAME TYPE CLUSTER-IP EXTERNAL-IP PORT(S) AGE SELECTOR service/kubernetes ClusterIP 10.96.0.1 <none> 443/TCP 13d <none> -
检查内容是否存在
[root@k8s-master nfs]# curl -I 10.244.107.212
HTTP/1.1 200 OK
Server: nginx/1.19.6
Date: Mon, 28 Dec 2020 12:43:19 GMT
Content-Type: text/html
Content-Length: 22
Last-Modified: Mon, 28 Dec 2020 12:17:10 GMT
Connection: keep-alive
ETag: "5fe9ccc6-16"
Accept-Ranges: bytes

[root@k8s-master nfs]# curl  10.244.107.212
<h1>hello world!</h1>


 本文详细介绍了如何在Kubernetes中使用NFS作为数据卷,包括安装配置nfs服务器,创建共享目录,挂载到Pod,并通过示例展示了如何创建一个基于NFS的Deployment。通过步骤操作演示了如何实现Pod共享NFS文件夹,适合K8s开发者参考。


 846
846

 被折叠的 条评论
为什么被折叠?


