


#import "ViewController.h"
#import "AppInfo.h"
@interface ViewController ()
@property (nonatomic,strong) NSArray *appList;
@end

@implementation ViewController

- (void)viewDidLoad {
    [super viewDidLoad];
    // Do any additional setup after loading the view, typically from a nib.

    //搭建界面,九宫格
//    UIView *view1=[[UIView alloc] initWithFrame:CGRectMake(20, 20, 80, 90)];
//    view1.backgroundColor=[UIColor redColor];
//    [self.view addSubview:view1];
//
//    UIView *view2=[[UIView alloc] initWithFrame:CGRectMake(120, 20, 80, 90)];
//    view2.backgroundColor=[UIColor redColor];
//    [self.view addSubview:view2];
//
//    UIView *view3=[[UIView alloc] initWithFrame:CGRectMake(220, 20, 80, 90)];
//    view3.backgroundColor=[UIColor redColor];
//    [self.view addSubview:view3];

#define  KAppViewW 80
#define  KAppViewH 90
#define  KColCount 3
    //option 可以在storyboard复制
   // ios7在原点  ios6在状态栏下面
#define  KStartY 20


    //320-3*80=80/4=20
    CGFloat marginX=(self.view.bounds.size.width-KColCount*KAppViewW)/(KColCount+1);
    CGFloat marginY=10;

    for (int i=0; i<12; i++) {

        //行 0,1,2=>0 3,4,5=>1
        int row=i/KColCount;
        //列 0,3,6=>0 1,4,7=>1
        int col=i%KColCount;
        CGFloat x=marginX+col*(marginX+KAppViewW);
        CGFloat y=KStartY+marginY+row*(marginY+KAppViewH);
        UIView *appView=[[UIView alloc] initWithFrame:CGRectMake(x, y, KAppViewW, KAppViewH)];

        [self.view addSubview:appView];

        //实现视图内部细节
    //1>UIImageView
        UIImageView *icon=[[UIImageView alloc] initWithFrame:CGRectMake(0, 0, KAppViewW, 50)];

        icon.image=[UIImage imageNamed:dict[@"icon"]];
        //设置图像填充模式,等比例显示(CTRL+6)
        icon.contentMode=UIViewContentModeScaleAspectFit;
        [appView addSubview:icon];

        //2>UILabel->应用程序名称
        UILabel *label=[[UILabel alloc]initWithFrame:CGRectMake(0, CGRectGetMaxY(icon.frame), KAppViewW, 20)];
        label.text=dict[@"name"];
        //设置字体
        label.font=[UIFont systemFontOfSize:13.0];
        label.textAlignment=NSTextAlignmentCenter;
        [appView addSubview:label];
        //3>UIButton-->下载按钮
        UIButton *button=[[UIButton alloc]initWithFrame:CGRectMake(0, CGRectGetMaxY(label.frame), KAppViewW, 20)];
        //背景图片
//        button.backgroundColor=[UIColor yellowColor];
        [button setBackgroundImage:[UIImage imageNamed:@"buttongreen"] forState:UIControlStateNormal];
        [button setBackgroundImage:[UIImage imageNamed:@"buttongreen_highlighted"] forState:UIControlStateHighlighted];

        //按钮都是有状态的,不同状态可以对应不同的标题
        [button setTitle:@"下载" forState:UIControlStateNormal];
        //***一定不要使用以下方法,修改按钮标题
//        button.titleLabel.text=@"aaa"; 没有显示
        //提示:按钮的字体是不区分状态的!

        //修改字体(titleLabel是只读的)
//        readOnly表示不允许修改titleLabel的指针,但是可以修改label的字体
        button.titleLabel.font=[UIFont systemFontOfSize:12.0];

        [appView addSubview:button];

        //CGRectGetMaxY(frame)=frame.origin.y+frame.size.height;


    }

 }
-(NSArray *)appList
{
    if(_appList==nil){
        _appList=[NSArray arrayWithContentsOfFile:[[NSBundle mainBundle]pathForResource:@"app.plist" ofType:nil]];


    }
       return _appList;

}
- (void)didReceiveMemoryWarning {
    [super didReceiveMemoryWarning];
    // Dispose of any resources that can be recreated.
}

@end
字典转模型
   //AppList保存字典模型
        NSArray *array=[NSArray arrayWithContentsOfFile:[[NSBundle mainBundle]pathForResource:@"app.plist" ofType:nil]];
        //创建一个临时数组
        NSMutableArray *arrayM=[NSMutableArray array];
        //遍历数组,依次转换模型
        for(NSDictionary *dict in array ){
            AppInfo *appInfo=[[AppInfo alloc] init];
            appInfo.name=dict[@"name"];
            appInfo.icon=dict[@"icon"];

            [arrayM addObject:appInfo];

        }
        //将临时数组的属性为其赋值
        _appList=arrayM;
取:
for (int i=0; i<12; i++) {
NSDictionary *dict=self.appList[i];
AppInfo *appInfo=self.appList[i];
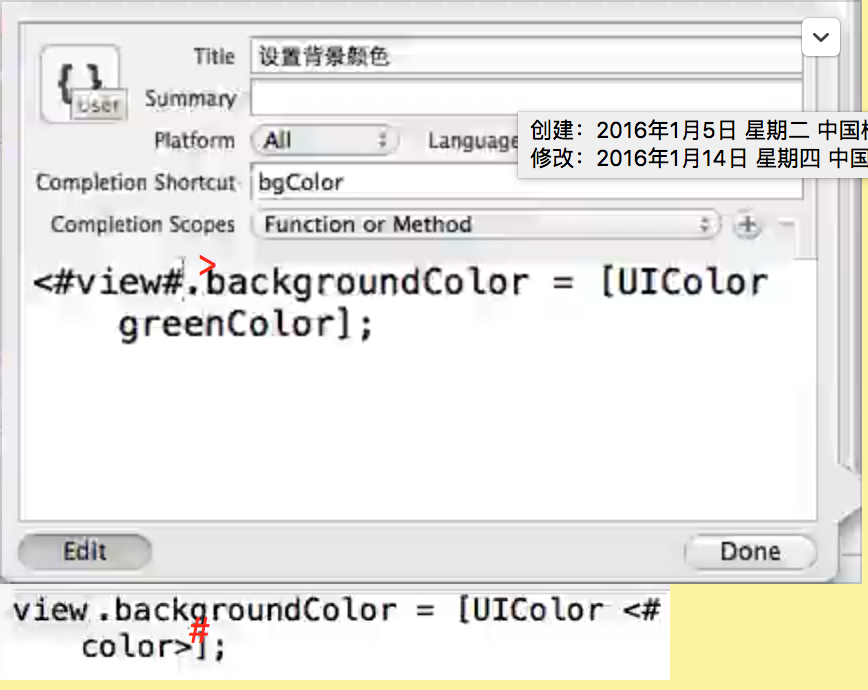
NSLog(@"%@===",appInfo.name);介绍几个xcode插件
提供了图像名称填写的自动化
颜色更加可视化
Reveal作为分析APP UI的利器
VVDocumenter Xcode快速添加注释插件
快捷键
ctrl+shift+o 显示源代码
commoand +6 显示方法或者在上面选择
esc键提示
xcode代码块语法
id和instanceType区别
.h
/**通常在写模型实例化方法时,以下两个方法,都需要实现*/
/**使用字典实例化模型*/
-(id)initWithDict:(NSDictionary *)dict;
/**类方法可以快速实例化一个对象*/
+(id) appInfoWithDict:(NSDictionaty *)dict;
.m
-(id) initWithDict:(NSDictionary *)dict
{
  self=[super init];
if(self){
//用字典给属性赋值
self.name=dict[@"name"];
self.icon=dict[@"icon"];
}
//self是对象
return self;
}


+(id) appInfoWithDict:(NSDictionary *)dict{
//self是class
return [[self alloc] initWithDict:dict];
}
调用
for(NSDictionary *dict in array){

//类方法可以快速实例化一个对象
 AppInfo *appInfo=[[AppInfo alloc] initWithDict:dict];
//就会有自动提示
[AppInod appInfoWithDict:dict];

}
id换成instanceType
instanttype主要用于在类方法实例化对象时,让编辑器主动推断对象的实际类型
**以避免使用id,会照成开发中不必要的麻烦,减少出错几率.
instanttype是苹果ios7才开始主推的
C++11 auto
在Swift语言中,绝大多数类的实例化,都不需要再指定类型
instancetype 只能用于返回值使用!!!不能当做参数使用,(id可以)
KVC-key value coding键值编码:是一种间接修改/读取对象属性的一种方法
self.name=dict[@"name"];
self.icon=dict[@"icon"];
参数1.数值 2.属性名称
[self setValue:dict[@"name"]  forKeyPath:@"name"];
[self setValue:dict[@"icon"]  forKeyPath:@"icon"];
或者
[self setValuesForKeysWithDictionary:dict];

错误提示:[UIImage imageNamed:nil];
CUiCatalog:Invalid asset name supplied:(null),or invalid scale factor:2.000000

setValue:forUndefinedKey:]: this class is not key value coding-compliant for the key name
类 setValue 方法,没有匹配的键值

使用KVC的注意事项
1.plist中的键值名称必须与模型中一致
2模型中的属性可以不全部出现在plist中

-(UIImage *)image {
if(_image ==nil){
_image =[UIImage imageNamed:self.icon];
}
return _image;
}

/**
@property
1.生成getter方法
2.生成setter方法
3.生成带下划线的成员变量(记录属性内容)
readOnly的属性不会生成带下划线的成员变量
*/
@property(nonatomic,strong,readonly) UIImage *image;
会报错

readOnly还有set方法
-(void)setImage:(UIImage *)image{ }
但是下划线成员变量没有了


合成指令(xcode 4.1的老代码)
@synthesize image=_image;
//主动指定属性使用的成员变量名称
这样就在readOnly也可以生成成员变量

/**返回所有plist中的数据模型数组*/
+(NSArray *)appList;

+(NSArray *)appList{
return arrayM;
}


调用 [AppInfo appList];/* 应用程序列表 /
@property (nonatomic, strong) NSArray *appList;
for (int i = 0; i < self.appList.count; i++) {
appList.count获得数组的个数
动画监听
[self.view addSubview:label];

    //增加动画效果 首尾式动画,修改对象的属性:frame,bounds,alpha 初始透明度

     label.alpha=0.0;
//    [UIView beginAnimations:nil context:nil];
//    [UIView  setAnimationDuration:1.0f];
//    label.alpha=1.0;
//    [UIView commitAnimations];
    // 缺点:不容易监听动画完成时间,而且不容易实现动画嵌套.


    //禁用按钮
    button.enabled=NO;


    //换一种方式

    //动画结束之后删除
    [UIView animateWithDuration:1.0f animations:^{
        NSLog(@"动画开始");
        //要修改的动画属性
        label.alpha=1.0;
    } completion:^(BOOL finished) {
        [UIView animateWithDuration:1.0 animations:^{
            label.alpha=0.0;
        } completion:^(BOOL finished) {
            //动画完成后,所做的操作
            NSLog(@"动画完成");
            [label removeFromSuperview];
        }];
        NSLog(@"_____");

        /*
         2016-01-15 09:45:17.996 01-应用程序管理[1427:28852] 动画开始
         2016-01-15 09:45:19.000 01-应用程序管理[1427:28852] _____
         2016-01-15 09:45:20.005 01-应用程序管理[1427:28852] 动画完成
         */

        //^表示的是block 块代码,是一个预先准备好的代码块.,可以当做参数传递,在需要的时候执行!
    }];
XIB
1.storyBoard 重量级,能够描述一个应用程序所有的界面
2.XIB轻量级,在Xcode4.0之前,是主要的图像界面搭建工具,在现在,仍然是主流的界面开发技术,适合于开发小块的自定义视图.
- (void)viewDidLoad
{
    [super viewDidLoad];


    //XIB的测试代码
    //加载XIB XIB中可以包含多个自定义视图,通常只保存一个
    NSArray *array=[[NSBundle mainBundle] loadNibNamed:@"AppView" owner:nil options:nil];

    UIView *firstview=    [array firstObject];
    UIView *lastview=    [array lastObject];


    NSLog(@"%@",array);

    /*2016-01-17 12:34:14.393 01-应用程序管理[3495:110074] (
     "<UIView: 0x7f934cb04fb0; frame = (0 0; 80 90); autoresize = RM+BM; layer = <CALayer: 0x7f934cb001c0>>",
     "<UISegmentedControl: 0x7f934b43f030; frame = (0 0; 121 29); opaque = NO; autoresize = RM+BM; layer = <CALayer: 0x7f934b43f450>>",
     "<UITextField: 0x7f934c80b090; frame = (0 0; 97 30); text = ''; clipsToBounds = YES; opaque = NO; autoresize = RM+BM; layer = <CALayer: 0x7f934c80bdd0>>",
     "<UITableView: 0x7f934c01b200; frame = (0 0; 600 600); clipsToBounds = YES; autoresize = RM+BM; gestureRecognizers = <NSArray: 0x7f934ca0f4c0>; layer = <CALayer: 0x7f934ca087e0>; contentOffset: {0, 0}; contentSize: {600, 0}>"
     )*/

    //从XIB来加载自定义视图
       UIView *view=[[[NSBundle mainBundle] loadNibNamed:@"HMAppView" owner:nil options:nil] lastObject];
    //设置视图位置
    view.frame=CGRectMake(x, y, kAppViewH, kAppViewW);

    [self.view addSubview:view];

//    image+label+button
    //实现视图内部细节
    AppInfo *appInfo=self.appList[i];

    //UIImageView
    UIImageView *icon=appInfo.subviews[0];

    //设置图像 其他的图片属性可以直接设置,也不要设置subView
    icon.image=appInfo.imagel;
自定义视图
使得一个xib文件和custom class关联一个.m和.h文件,并做连线
在要使用的控件里面导入#import “AppView.h”
然后上面的UIImageView *icon=appview.subView[0];就可以改成
UIImgaeView *icon=appView.iconView;
这样就不用担心[0,1,2]写死的下标了.
开发小结
- 运行示例程序,确定开发思路
- 搭建界面,编写代码
- 九宫格的布局
- 字典转模型,在iOS开发中,非常重要
/* 使用字典实例化模型 /
- (instancetype)initWithDict:(NSDictionary *)dict;
/* 类方法可以快速实例化一个对象 / - (instancetype)appInfoWithDict:(NSDictionary *)dict;
- (instancetype)initWithDict:(NSDictionary *)dict;
// KVC赋值
[self setValuesForKeysWithDictionary:dict];
- 实现了按钮的监听方法
- 导入XIB,简化代码搭建界面
- 自定义视图,使用模型设置视图的内容
重构:
原则:让代码放在最应该存在的地方
方法:
1. 设定开发计划,开发步骤
2. “每一个步骤告一段落后,需要暂停,审核代码”,有针对性的重构!
目前要做到的,尽量不要出现重复的代码!
====================================================================================
Reveal使用
1. Build Settings 搜索Other
将Other Linker Flags 设置为 -ObjC
2. Reveal.framework拖到项目中即可
~/资源库/Caches/
找到com.ittybittyapps.Reveal文件夹删除
~/资源库/Preferences/
找到com.ittybittyapps.Reveal.plist删除
又可以使用30天


 3474
3474

 被折叠的 条评论
为什么被折叠?
被折叠的 条评论
为什么被折叠?
 到【灌水乐园】发言


