


想要在UIView内部绘制一下东西,需要自定义UIView,并且实现UIView的- (void)drawRect:(CGRect)rect方法,为什么需要实现drawRect:方法才能绘图到view上,是因为在drawRect:方法中才能取得跟view相关联的图形上下文,
那么什drawRect:方法在什么时候被调用呢?
1)当view第一次显示到屏幕上(View被加到UIWindow上显示出来)时
2)调用
view
的
setNeedsDisplay
或者
setNeedsDisplayInRect:
时
在View内部绘制图形大概可分为三个步骤
1)获取与当前View相关的图形上下文 CGContextRef ctx = UIGraphicsGetCurrentContext();
2)设置绘图路径、绘图状态
3)把绘图信息渲染到View上(确切的说渲染到View的涂层上) CGContextStrokePath(ctx); 或者 CGContextFillPath(ctx);
首先自定义一个View并且继承UIView,并实现- (void)drawRect:(CGRect)rect,在该方法中实现绘图代码
- (void)drawRect:(CGRect)rect {

    drawLine();
}
具体绘制图形的代码在下面的函数中实现,只要在drawRect:方法调用相应绘图函数即可。
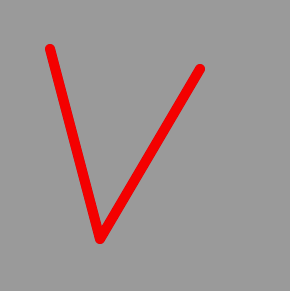
一、画直线
/**
 *  画直线
 */
void drawLine()
{
    // 1.获取图形上下文
    CGContextRef ctx = UIGraphicsGetCurrentContext();

    // 2.设置绘图路径、绘图状态
    CGContextMoveToPoint(ctx, 10, 10);
    CGContextAddLineToPoint(ctx, 100, 100);

    // 第一条线
    CGContextSetLineWidth(ctx, 10); // 设置线宽
    /*
     设置颜色常用的有两种方式
     方式一:
     CGContextSetRGBStrokeColor() // 设置路径空心颜色
     CGContextSetRGBFillColor() // 设置路径的实心颜色
     方式二:
     [[UIColor redColor] set];// 这种方式设置路径颜色同意设置,不分空心、实心
     */

    CGContextSetRGBStrokeColor(ctx, 1, 0, 0, 1); // 设置线的空心颜色
//    [[UIColor redColor] set];
    CGContextSetLineCap(ctx, kCGLineCapRound); // 设置线头尾的形状

    // 第二条线
    CGContextAddLineToPoint(ctx, 160, 50);
    CGContextSetLineJoin(ctx, kCGLineJoinRound); // 设置两条线的连接处的样式

    // 3.把上下文的绘图信息渲染到View上
    /*
     渲染上下文信息有两种方式
     1、CGContextStrokePath(ctx);空心渲染
     2、CGContextFillPath(ctx);实心渲染
     注意: 1、直线只有空心渲染,无实心渲染;设置实心渲染无效,无法绘制直线
          2、非直线图形空心渲染、实现渲染有明显差别
     */
    CGContextStrokePath(ctx);
}
效果图
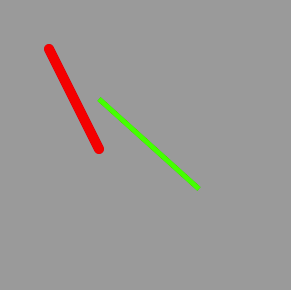
二、画两条线宽、颜色不同的直线
/**
 *  画两条不同状态的线
 */
void drawDiffLine()
{
    CGContextRef ctx = UIGraphicsGetCurrentContext();

    // 设置第一条线的绘图路径、状态
    CGContextMoveToPoint(ctx, 50, 50);
    CGContextAddLineToPoint(ctx, 100, 150);
    CGContextSetLineWidth(ctx, 10);
    CGContextSetLineCap(ctx, kCGLineCapRound);
    [[UIColor redColor] set];

    CGContextStrokePath(ctx);


   // 设置第二条线的绘图路径、状态
    CGContextMoveToPoint(ctx, 100, 100);
    CGContextAddLineToPoint(ctx, 200, 190);
    CGContextSetLineWidth(ctx, 5);
    [[UIColor greenColor] set];
    CGContextSetLineCap(ctx, kCGLineCapButt);
    CGContextStrokePath(ctx);

    /*
     总结: 当路径不同段的状态不一样时,每一种状态需要都渲染一次。
     */
}
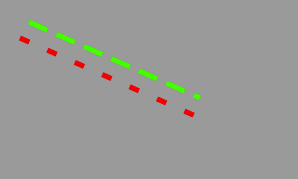
三、画虚线
/**
 *  画虚线
 */
void drawDottedLine()
{
    /*
    CGContextSetLineDash(<#CGContextRef c#>, <#CGFloat phase#>, <#const CGFloat *lengths#>, <#size_t count#>)

     c : 图形上下文
     phase : 绘制虚线的起点,(不是虚线的坐标点),在虚线的开头截取一段,然后在坐标起点开始画虚线
     lengths : 设置虚线打印段、不打印段的长度,
     如 {3, 5}, 3个像素需要打印(打印段的长度),5个像素不需要打印(不需要打印段的长度)
     打印段与不打印段可以设置为多个段, 如:{2, 4, 6, 1}, 2和6为打印段, 4和1为不打印段
     count : 一般设置为 lengths 数组的个数
     */


    CGContextRef ctx = UIGraphicsGetCurrentContext();

    // 第一条虚线
    CGContextMoveToPoint(ctx, 20, 20);
    CGContextAddLineToPoint(ctx, 200, 100);
    CGContextSetLineWidth(ctx, 5);
    [[UIColor greenColor] set];
    CGFloat lengths1[] = {20, 10};
    CGContextSetLineDash(ctx, 20, lengths1, 2);
    CGContextStrokePath(ctx);

    // 第二条虚线
    CGContextMoveToPoint(ctx, 20, 40);
    CGContextAddLineToPoint(ctx, 200, 120);
    CGContextSetLineWidth(ctx, 5);
    [[UIColor redColor] set];
    CGFloat lengths2[] = {10, 20};
    CGContextSetLineDash(ctx, 0, lengths2, 2);
    CGContextStrokePath(ctx);
}
效果图
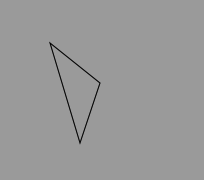
四、画三角形
/**
 *  画三角形
 */
void drawTriAngle()
{
    CGContextRef ctx = UIGraphicsGetCurrentContext();

    // 设置起点
    CGContextMoveToPoint(ctx, 50, 50);

    // 第一条线
    CGContextAddLineToPoint(ctx, 80, 150);
    // 第二条线
    CGContextAddLineToPoint(ctx, 100, 90);

    /*
     连接第一个点和最后一个点有两种方式
     方式一: 在第一个点和最后一个点添加一条直线
     方式二: CGContextClosePath(ctx);
     */
//    CGContextAddLineToPoint(ctx, 50, 50);
    CGContextClosePath(ctx);

    // 渲染
    CGContextStrokePath(ctx);

}
效果图
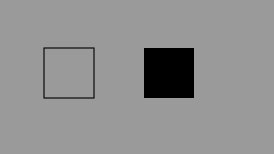
五、画矩形
/**
 *  画矩形
 */
void draw4Rect()
{
    CGContextRef ctx = UIGraphicsGetCurrentContext();

    CGContextAddRect(ctx, CGRectMake(50, 50, 50, 50));
    CGContextStrokePath(ctx);// 画空心


    CGContextAddRect(ctx, CGRectMake(150, 50, 50, 50));
    CGContextFillPath(ctx); // 画实心
}
效果图
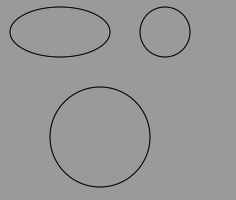
六、画圆、椭圆
/**
 *  画圆、椭圆
 */
void drawCircle()
{
    CGContextRef ctx = UIGraphicsGetCurrentContext();

    CGContextAddArc(ctx, 100, 140, 50, 0, M_PI * 2, 0); // 第一个圆

    // 矩形的长宽相等时就是一个圆形
    CGContextAddEllipseInRect(ctx, CGRectMake(140, 10, 50, 50)); // 第二个圆

    //椭圆 , 通过一个矩形就可以确定一个椭圆
    CGContextAddEllipseInRect(ctx, CGRectMake(10, 10, 100, 50));

    // 渲染
    CGContextStrokePath(ctx);
}
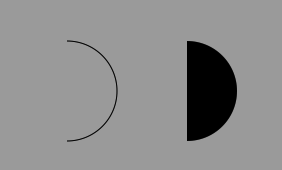
七、画圆弧
/**
 *  画圆弧
 */
void drawArc()
{
    CGContextRef ctx = UIGraphicsGetCurrentContext();

    /*
     x/y : 圆弧圆心的坐标
     radius : 圆弧的半径
     startAngle : 开始角度
     endAngle : 结束角度
     clockwise : 开始角度到结束角度的方向, 0 : 顺时针   1 : 逆时针
     */
    CGContextAddArc(ctx, 80, 100, 50, -M_PI_2, M_PI_2, 0);
    CGContextStrokePath(ctx);

    CGContextAddArc(ctx, 200, 100, 50, -M_PI_2, M_PI_2, 0);
    CGContextFillPath(ctx);
}
八、画文字
/**
 *  画文字
 */
void drawText()
{
    /*
     调用OC方法画文字时,不需要获取手动的获取图形上下文,在OC方法中会自动回去上下文
     直接调用画文字方法即可
     */
    // 画文字
    NSString *str = @"QuartzD很流逼";

    // 设置文字显示的属性
    NSMutableDictionary *attrDic1 = [NSMutableDictionary dictionary];
    attrDic1[NSForegroundColorAttributeName] = [UIColor redColor];
    attrDic1[NSFontAttributeName] = [UIFont systemFontOfSize:17];

    [str drawAtPoint:CGPointMake(50, 50) withAttributes:attrDic1];

    NSMutableDictionary *attrDic2 = [NSMutableDictionary dictionary];
    attrDic2[NSForegroundColorAttributeName] = [UIColor greenColor];
    attrDic2[NSFontAttributeName] = [UIFont systemFontOfSize:20];

    [str drawInRect:CGRectMake(50, 100, 150, 100) withAttributes:attrDic2];
}
九、画图片
/**
 *  画图片
 */
void drawImage()
{
    /*
     调用OC方法画图片时,不需要获取手动的获取图形上下文,在OC方法中会自动回去上下文
     直接调用画图片方法即可
     */
    UIImage *image = [UIImage imageNamed:@"weixin"];
    /*
     在View某一个点画图片,绘制出来显示的为原图片的大小
     */
    [image drawAtPoint:CGPointZero];

    /*
     在View上的一个矩形框绘制图片,绘制出来图片显示的大小为填充整个矩形框,
     图片会被拉升
     */
    [image drawInRect:CGRectMake(120, 10, 150, 150)];

    //平铺图片
    [image drawAsPatternInRect:CGRectMake(0, 200, 250, 250)];
}

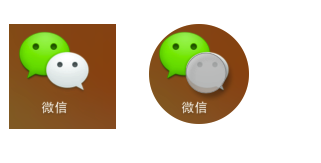
十、裁剪
/**
 *  裁剪,(在制定的范围内绘制图形,不在该范围内的无法绘制,不显示)
 */
void drawClip()
{
    CGContextRef ctx = UIGraphicsGetCurrentContext();

    UIImage *image = [UIImage imageNamed:@"weixin"];
    [image drawAtPoint:CGPointMake(10, 50)];

    CGContextAddArc(ctx, 200, 100, 50, 0, M_PI * 2, 1);
    CGContextClip(ctx);
   [image drawAtPoint:CGPointMake(150, 50)];
    CGContextStrokePath(ctx);
}
效果图


 294
294

 被折叠的 条评论
为什么被折叠?
被折叠的 条评论
为什么被折叠?
 到【灌水乐园】发言


