


背景
本系列教程,是作为团队内部的培训资料准备的。主要以实验的方式来体验 SpringSecurity 的各项Feature。
SpringSecurity提供了开箱即用的remember-me功能,就是长下面这样:

直接在5-SpringSecurity:RBAC及方法授权的项目 springboot-security-rbac 中进行实验 ,核心依赖为 Web 与 SpringSecurity :
<dependencies>
    <dependency>
        <groupId>org.springframework.boot</groupId>
        <artifactId>spring-boot-starter-web</artifactId>
    </dependency>
    <dependency>
        <groupId>org.springframework.boot</groupId>
        <artifactId>spring-boot-starter-security</artifactId>
    </dependency>

    <dependency>
        <groupId>org.springframework.boot</groupId>
        <artifactId>spring-boot-devtools</artifactId>
        <scope>runtime</scope>
        <optional>true</optional>
    </dependency>
    <dependency>
        <groupId>org.projectlombok</groupId>
        <artifactId>lombok</artifactId>
        <optional>true</optional>
    </dependency>
    <dependency>
        <groupId>org.springframework.boot</groupId>
        <artifactId>spring-boot-starter-test</artifactId>
        <scope>test</scope>
    </dependency>
</dependencies>
实验0:开启RememberMe
直接在最后加一个配置:.and().rememberMe()便开启了RememberMe功能,此时再到登录页,就会看到有个可勾选的checkbox。
@Override
protected void configure(HttpSecurity http) throws Exception {
    http.authorizeRequests()
            .antMatchers("/user/add").hasRole("dev")
            .antMatchers("/user/query").hasAuthority("ROLE_test")
            .antMatchers("/user/**").authenticated()
            .anyRequest().permitAll() // Let other request pass
            .and()
            .formLogin()
            .and()
            .rememberMe();
}
填写账号、密码并勾选Remember me on this computer.之后,先打开浏览器控制台,然后点击登录,可以观察到Cookie中除了JSESSIONID之外,还多了一个remember-me。

实验1:解析remember-me
从.and().rememberMe()这个配置项一直跟到源码AbstractRememberMeServices类,可以看到有个encodeCookie(String[] cookieTokens)方法,里面最后返回是一个Base64编码的字符串。
protected String encodeCookie(String[] cookieTokens) {
    StringBuilder sb = new StringBuilder();
    for (int i = 0; i < cookieTokens.length; i++) {
        try {
            sb.append(URLEncoder.encode(cookieTokens[i], StandardCharsets.UTF_8.toString()));
        }
        catch (UnsupportedEncodingException ex) {
            this.logger.error(ex.getMessage(), ex);
        }
        if (i < cookieTokens.length - 1) {
            sb.append(DELIMITER);
        }
    }
    String value = sb.toString();
    sb = new StringBuilder(new String(Base64.getEncoder().encode(value.getBytes())));
    while (sb.charAt(sb.length() - 1) == '=') {
        sb.deleteCharAt(sb.length() - 1);
    }
    return sb.toString();
}
这里先利用线上的工具进行Base64解码:

接着,再用Java自带的工具类解码:

可以观察到解码后的字符串一致,由三部分构成:用户名:时间戳:类似MD5或去了连词符的UUID,其中时间戳经过计算是14天,这在源码中得到了证实。具体规则经过查阅官方文档,是这样的:


实验2:什么是Base64编码
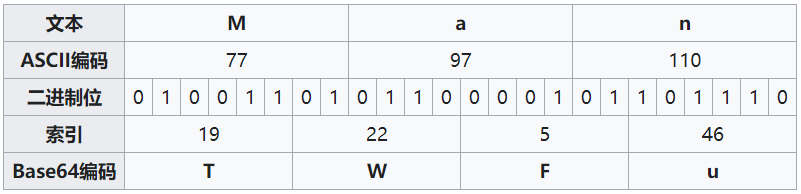
Base64编码,是选出64个字符作为一个基本字符集(A-Z,a-z,0-9,+,/,再加上作为补充的"=",实际是65个字符),其它所有符号都按照规则转换成这个字符集中的字符。正常编码转成Base64编码,满足3 * 8 = 24 = 4 * 6。即每3个字节的正常编码可以转成由4个字节组成的正常编码。编码规则如下:
- 计算机中,每个字节由8个二进制位构成,将每3个字节作为一组,一共是24个二进制位;
- 将这24个二进制位分为4组,每个组有6个二进制位;
- 在每组前面加00,扩展成32个二进制位,即4个字节;
- 根据码表,得到扩展后的每个字节的对应符号,便是Base64的编码值。
码表(参考RFC2045):

- 将3个字节编码为4个字符
Note:如果要编码的字节数不能被3整除,最后会多出1个或2个字节。

Reference
If you have any questions or any bugs are found, please feel free to contact me.
Your comments and suggestions are welcome!


 909
909


 被折叠的 条评论
为什么被折叠?
被折叠的 条评论
为什么被折叠?
 到【灌水乐园】发言


