简介
随着 RecyclerView 控件的发布,已经有越来越多的人开始放弃 ListView 而转向 RecyclerView。
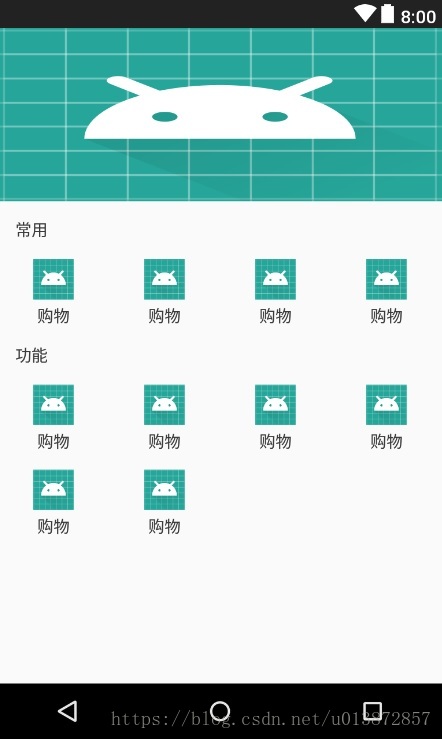
RecyclerView 已经被人玩出了各种花样,但是关于多种布局的 ItemView 的实现网上的资料还是很少,多种布局的 ItemView 其实使用场景非常多,只不过因为有很多代替方案所以可能会很少有人会使用 RecyclerView 来实现,比如下面这样:

int curWidth = 0, curLineTop = 0;
int horizontalCount = 0;//横向已经摆放的个数
int widthDivider = -1;//横向间隔
int lastViewType = MENU_ITEM_TYPE;//上一个 View 的类型
int lastHeight = 0;//上一个 View 的高度
for (int i = 0; i < getItemCount(); i++) {
    //遍历所有的子 View 进行计算处理
    View view = recycler.getViewForPosition(i);
    addView(view);

    measureChildWithMargins(view, 0, 0);

    //获取当前 View 的大小
    int width = getDecoratedMeasuredWidth(view);
    int height = getDecoratedMeasuredHeight(view);

    int viewType = getItemViewType(view);

    if (viewType == TITLE_ITEM_TYPE || viewType == BANNER_ITEM_TYPE) {
        //Banner 和子标题宽度及摆放方式其实是相同的,这里不做区分
        if (i != 0) {
            curLineTop += lastHeight;
        }
        layoutDecorated(view, 0, curLineTop, width, curLineTop + height);
        horizontalCount = 0;
        curWidth = 0;
        lastHeight = height;
        lastViewType = viewType;
    } else {
        if (widthDivider == -1) {
            widthDivider = (getWidth() - width * spanCount) / (spanCount + 1);
        }
        if (horizontalCount >= spanCount) {
            //需要换行
            curLineTop += lastHeight;//高度需要改变
            layoutDecorated(view, widthDivider, curLineTop, widthDivider + width, curLineTop + height);
            horizontalCount = 1;
            curWidth = width + widthDivider * 2;
            lastHeight = height;
            lastViewType = viewType;
        } else {
            //未换行,高度不变,横向距离变化
            if (curWidth == 0) {
                curWidth = widthDivider;
            }
            if(i != 0 && lastViewType != MENU_ITEM_TYPE){
                curLineTop += lastHeight;
            }
            layoutDecorated(view, curWidth, curLineTop, curWidth + width, curLineTop + height);
            curWidth += width + widthDivider;
            horizontalCount++;
            lastHeight = height;
            lastViewType = viewType;
        }
    }
    if(i == getItemCount() - 1){
        curLineTop += lastHeight;
    }
}
//计算总高度,滑动时需要使用
totalHeight = Math.max(curLineTop, getVerticalSpace());
verticalScrollOffset = 0;
}
上面的注释写的很清楚了,还是比较简单的,除此之外还需要使 RecyclerView 可以上下滑动:
```java
@Override
public boolean canScrollVertically() {
    return true;
}

@Override
public int scrollVerticallyBy(int dy, RecyclerView.Recycler recycler, RecyclerView.State state) {
    int travel = dy;
    if (verticalScrollOffset + dy < 0) {
        travel = -verticalScrollOffset;
    } else if (verticalScrollOffset + dy > totalHeight - getVerticalSpace()) {//如果滑动到最底部
        travel = totalHeight - getVerticalSpace() - verticalScrollOffset;
    }
    verticalScrollOffset += travel;
    offsetChildrenVertical(-travel);
    return travel;
}
下面当上全部代码:
package com.zhangke.widget;

import android.support.v7.widget.RecyclerView;
import android.view.View;

/**
 * 多种 ItemView 布局的 LayoutManger
 * <p>
 * Created by ZhangKe on 2018/4/8.
 */
public class MultiItemLayoutManger extends RecyclerView.LayoutManager {


    public static final int BANNER_ITEM_TYPE = 0;
    public static final int TITLE_ITEM_TYPE = 1;
public static final 


 本文介绍了如何使用 LayoutManager 在 RecyclerView 中实现多种 ItemView 布局。RecyclerView 作为 ListView 的替代品,其灵活性受到开发者青睐。然而,关于它的多布局实现资料较少。通过 MultiItemLayoutManger,可以方便地处理复杂场景下的布局需求。文中提供了完整代码示例,并指导了如何在实际项目中应用。
 最低0.47元/天 解锁文章


 1467
1467

 被折叠的 条评论
为什么被折叠?


