


简介
这篇主要介绍 sync.Once、sync.WaitGroup和sync.Mutex
sync.Once
once 顾名思义 只执行一次 废话不说 我们看源码 英文介绍直接略过了 感兴趣的建议读一读 获益匪浅
其结构体如下
Once 是一个严格只执行一次的object
type Once struct {
	// 建议看下源码的注解,done 放在结构体第一个 所以其 地址就是 结构体的地址 不用加偏移量 则生成的汇编代码很紧凑,
	// 且cpu减少一次偏移量计算,执行效率高。所以对其频繁的访问(形成 hot path)速度更快。
	done uint32
	m    Mutex     // 互斥锁
}
其当然只有一个函数 Do 我们来看下源码
 // Do 严格执行一次 f
func (o *Once) Do(f func()) {
	// Note: Here is an incorrect implementation of Do:
	//
	//	if atomic.CompareAndSwapUint32(&o.done, 0, 1) {
	//		f()
	//	}
	//
	// Do guarantees that when it returns, f has finished.
	// This implementation would not implement that guarantee:
	// given two simultaneous calls, the winner of the cas would
	// call f, and the second would return immediately, without
	// waiting for the first's call to f to complete.
	// This is why the slow path falls back to a mutex, and why
	// the atomic.StoreUint32 must be delayed until after f returns.

	// 上面英文翻译过来大意如下:
	// 注意 上述 代码里利用 CompareAndSwapUint32 来实现 是一个错误的示例。
	// 因为 Do 函数要确保 协程 返回时 f已经执行完毕了(因为如果f没执行完毕,
	// 某协程就返回,这时f当中配置项 可能还没初始化, 那么该协程 要调用 f 里
	// 定义的 配置项 可能 会报空指针异常),但是这种实现不能保证:例如 有两个
	// 同时对Do的调用,操作cas成功的调用会执行f(其实cas 中 比较 赋值 返回 这三种操作是
	// 直接调用操作系统 lock 命令实现的原子操作),另一个操作cas失败不会等第一个调用
	// 操作f 就直接返回。这就是为什么慢路径操作(doShow)会使用互斥锁,以及为什么 StoreUint32
	// 必须等 f 执行完毕后才能调用的原因。

	// 其实啰嗦了一大堆 就是要保证 所有调用 返回时 保证 f中初始化的配置文件 结构体 可用 不能报空指针异常等。


	// 这里是 第一波同时调用后(f已经执行完毕) ,后续调用可以直接对o.done来判断
	// 后续o.doSlow还要不要走,以便不执行加锁等影响效率的操作.
	// 另外done如果调用过多就是热路径, 会直接内联到调用处,我的理解是 直接将&o.done 替换成一个 变量 这个变量就是1

	if atomic.LoadUint32(&o.done) == 0 {
		// Outlined slow-path to allow inlining of the fast-path.
		o.doSlow(f)
	}
}
其中 doSlow 函数如下
func (o *Once) doSlow(f func()) {
	o.m.Lock() // 加锁
	defer o.m.Unlock() // defer 压栈 最后执行
	if o.done == 0 { // 第一波同时调用 都在 锁这边 阻塞,则保证就一个执行 其余的直接返回就行 这就是为什么 必须要判断两次 o.done==0(第一次判断 见atomic.LoadUint32处 )
		defer atomic.StoreUint32(&o.done, 1)  // defer 压栈 函数 f 执行完毕后 再修改 done的值
		f() // 执行函数
	}
}
sync.WaitGroup
WaitGroup结构体如下
type WaitGroup struct {

	noCopy noCopy

	// 原子类的 数据存储 为 64位,其中高32位存 待完成的任务(协程)数,低32位存储 在信号sema处阻塞的协程数(一般情况下是主协程,所以 waiter 一般为1)
	state atomic.Uint64 // high 32 bits are counter, low 32 bits are waiter count.
	sema  uint32   // 信号量 阻塞了多少协程(一般是主协程) 阻塞逻辑根据这个参数控制 一般情况最大也就是1
}
其中关于 32 位和 64位等平台 运行差异可以自行搜索查看,不在赘述
其中最重要的函数是 Add(delta int), Done(), Wait().
下面举一个小例子
func demo(wg *sync.WaitGroup) {
	fmt.Println("this is demo")
	wg.Done()  // 执行完任务后 任务数减1

}

func TestWaitGroup(t *testing.T) {
	var wg sync.WaitGroup
	wg.Add(5)   // Add 函数 用来 添加需要 执行多少任务
	for i := 0; i < 5; i++ {
		go func() {
			demo(&wg)
		}()
	}
	wg.Wait()  // 主协程阻塞 等待 任务完成
}
其中 Add(delta int)函数 讲解 如下:
// Add 添加一个 delta 数量的未完成任务;delta可以为负数
func (wg *WaitGroup) Add(delta int) {
	if race.Enabled {   // 一般为false ,测试情况下为true
		if delta < 0 {
			// Synchronize decrements with Wait.
			race.ReleaseMerge(unsafe.Pointer(wg))
		}
		race.Disable()
		defer race.Enable()
	}
	state := wg.state.Add(uint64(delta) << 32)  // state 高32为 加 delta
	v := int32(state >> 32)  // 高32位为 待完成协程数
	w := uint32(state) // 阻塞等待协程数;一般为主协程阻塞 w一般为 0和1 ,有大神知道例外情况不,欢迎补充
	if race.Enabled && delta > 0 && v == int32(delta) {
		// The first increment must be synchronized with Wait.
		// Need to model this as a read, because there can be
		// several concurrent wg.counter transitions from 0.
		race.Read(unsafe.Pointer(&wg.sema))
	}
	if v < 0 {  // 待完成任务数 <0 例如: Add(2) 但是 Done()了 3次
		panic("sync: negative WaitGroup counter")
	}
	if w != 0 && delta > 0 && v == int32(delta) {  // Add和Wait在并发条件下被调用,不合理
		panic("sync: WaitGroup misuse: Add called concurrently with Wait")
	}
	if v > 0 || w == 0 {   // 当待完成的任务大于0 或者 等待任务是0 (没走到主协程调用wait),则返回
 		return
	}
	// This goroutine has set counter to 0 when waiters > 0.
	// Now there can't be concurrent mutations of state:
	// - Adds must not happen concurrently with Wait,
	// - Wait does not increment waiters if it sees counter == 0.
	// Still do a cheap sanity check to detect WaitGroup misuse.
	if wg.state.Load() != state {   // 误用
		panic("sync: WaitGroup misuse: Add called concurrently with Wait")
	}
	// Reset waiters count to 0.
	wg.state.Store(0)  // 先将 state 置为 0,走到这一步时,肯定是 v==0&&w>0,这时开始唤醒 沉睡的协程(主程序),所以为了复用wg需要初始化其参数
	for ; w != 0; w-- { // 根据 waiter数量 唤醒 每个在sema处阻塞的协程,下面函数执行完毕后 sema为1
 		runtime_Semrelease(&wg.sema, false, 0) // 释放 信号量 唤醒 沉睡的协程,这里 wg.sema采用cas自增1
 	}
}
Done()函数源码 如下
// Done decrements the WaitGroup counter by one.
func (wg *WaitGroup) Done() {  // Done 就是 协程完毕后 非完成协程数减1
	wg.Add(-1)
}
Wait()函数 源码 如下:
func (wg *WaitGroup) Wait() {
	if race.Enabled {
		race.Disable()
	}
	for {   // 请注意 for循环 目前只会执行一次循环 Wait的阻塞机制不在 for 循环处(至少 通常情况下是)

		state := wg.state.Load()
		v := int32(state >> 32)
		w := uint32(state)
		if v == 0 {   // 如果 非完成的协程数为0,则Wait直接返回。例如: 主程序还没走到 Wait()代码处,前面调用了sleep函数,
			          // 则到Wait时可能所有协程都执行完毕了,这时 v==0
			// Counter is 0, no need to wait.
			if race.Enabled {
				race.Enable()
				race.Acquire(unsafe.Pointer(wg))
			}
			return
		}
		// Increment waiters count.
		if wg.state.CompareAndSwap(state, state+1) {  // 这里是 cas对state进行自增;主程序来增state的低32位也就是 waiter数,
			                                          // 这里大家应该就明白了 Wait只有主程序调用所以 state低32位最大是1(其他情况请大神告诉下)
			if race.Enabled && w == 0 {
				// Wait must be synchronized with the first Add.
				// Need to model this is as a write to race with the read in Add.
				// As a consequence, can do the write only for the first waiter,
				// otherwise concurrent Waits will race with each other.
				race.Write(unsafe.Pointer(&wg.sema))
			}
 			runtime_Semacquire(&wg.sema)   // 在这边阻塞(看其源码是调用这个函数的协程阻塞,也就是主协程阻塞),这时 未完成协程大于0;其会一直阻塞直到 sema大于0(Add函数最后代码部分),然后就对 sema进行递减 唤醒协程(主协程);
			                               // 目前sema就两个值 跟 state一样 0 ,1 所以逻辑相对简单。其源码 见 runtime/sema.go 感兴趣的可以看看
 			if wg.state.Load() != 0 {  // 查看state是否被重置了(见 Add wg.state.Store(0)  ) 如果没有 panic
				panic("sync: WaitGroup is reused before previous Wait has returned")
			}
			if race.Enabled {
				race.Enable()
				race.Acquire(unsafe.Pointer(wg))
			}
			return   // 唤醒主协程后 退出 Wait()函数
		}
	}
}
sync.Mutex
锁 就是我锁上 你不能用 我打开你才能用 sync.Mutex 主要采用了 自旋(runtime_doSpin(): 操作系统命令 pause)和睡眠(runtime_SemacquireMutex: 类似 linux futex阻塞) )方式来 使得 协程进行阻塞也就是上锁。采用释放信号量 (runtime_Semrelease)来唤醒阻塞协程(可以唤醒任意一个或者队列第一个)或者自旋直接获取锁(无需信号量参与)
看似挺简单 但其源码 我利用业余时间大概看了一周左右吧 虽然也就二百多行 但是是我看过有限源码里比较难理解的了,所以再向大神对齐的路上是愈来愈拉胯了看来,下面我们开始分析下源码
我们看下Mutex锁结构体
type Mutex struct {
	state int32  // 锁的状态
	sema  uint32 // 信号量
}
其实现了如下锁接口:
type Locker interface {
	Lock()
	Unlock()
}
首先需要先认识几个参数 如下:
const (
	mutexLocked      = 1 << iota // 锁上锁标志
	mutexWoken                   // 有协程被唤醒标志
	mutexStarving                // 当前锁饥饿标志
	mutexWaiterShift = iota      // state左移右移 位数 用来计算 waiters数量

	// Mutex fairness.
	//
	// Mutex can be in 2 modes of operations: normal and starvation.
	// In normal mode waiters are queued in FIFO order, but a woken up waiter
	// does not own the mutex and competes with new arriving goroutines over
	// the ownership. New arriving goroutines have an advantage -- they are
	// already running on CPU and there can be lots of them, so a woken up
	// waiter has good chances of losing. In such case it is queued at front
	// of the wait queue. If a waiter fails to acquire the mutex for more than 1ms,
	// it switches mutex to the starvation mode.
	//
	// In starvation mode ownership of the mutex is directly handed off from
	// the unlocking goroutine to the waiter at the front of the queue.
	// New arriving goroutines don't try to acquire the mutex even if it appears
	// to be unlocked, and don't try to spin. Instead they queue themselves at
	// the tail of the wait queue.
	//
	// If a waiter receives ownership of the mutex and sees that either
	// (1) it is the last waiter in the queue, or (2) it waited for less than 1 ms,
	// it switches mutex back to normal operation mode.
	//
	// Normal mode has considerably better performance as a goroutine can acquire
	// a mutex several times in a row even if there are blocked waiters.
	// Starvation mode is important to prevent pathological cases of tail latency.

	// 以上翻译如下:
	// Mutex 公平锁
	// Mutex 有两种模式 :正常模式和饥饿模式
	// 正常模式下获取锁的顺序是先进先出,但是一个唤醒的等待者需要和一个新到达的协程竞争锁。
	// 新到达的协程有一个优势,它们已经在cpu上运行了而且数量很多,所以刚被唤醒的协程就失去
	// 了抢占锁的机会,这时它就会排在队列的头部。如果一个协程超过1ms没获取锁,那么锁状态就会
	// 切换为饥饿模式。

     // 饥饿模式下 直接将锁从正在执行 unlock操作 的协程交给 队列头部排队的协程,即使锁未锁
     // 定状态新到达的协程也不能获得锁,也不进行自旋。相反他们会直接查到队列尾部

	// 这是从 正常模式到饥饿模式 还得从饥饿模式切换回去呢 要满足两个条件
	// (1) 协程是队列最后一个 (2) 它等待时间少于1ms

	// 正常模式性能要好很多,因为即使有阻塞的等待协程,一个协程也可以连续多次获取锁 ?? 这是为啥

 	// 1ms
	starvationThresholdNs = 1e6
)
那说完了这些 以上这些参数跟 mutex啥关系呢 我们来看一张图

看到了吧 直接用 位图 前三位来表示mutex的各种状态 后29位来表示 waiters的数量
接下来 我们来看下 mutex 实现的 Locker的两个函数
Lock()函数
我们先来梳理下其粗粒度的流程图:
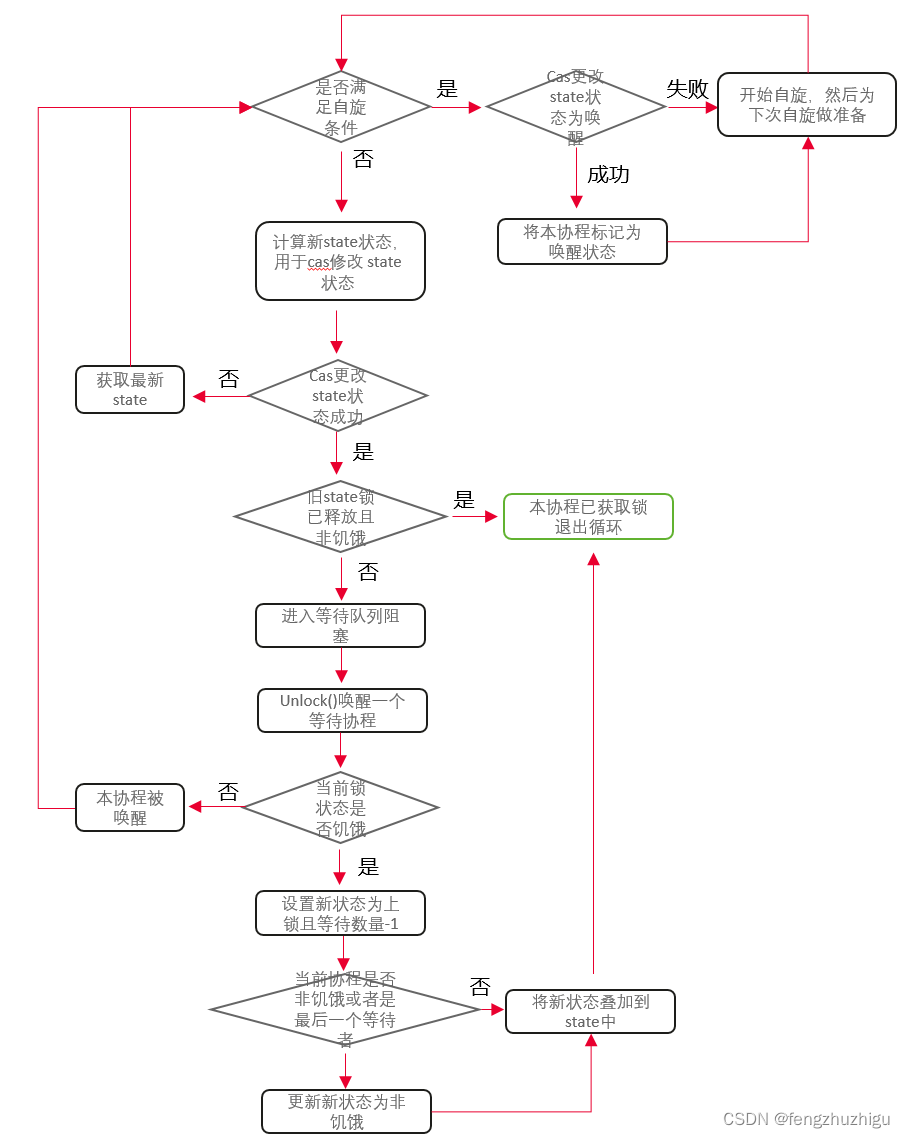
下面代码可以按照上图进行梳理
// Lock()  先采用cas快速获取锁 如果获取失败 就 阻塞等待锁释放 ps: 阻塞其实有三种情况 1 自旋 2. 进入 等待队列 3. 前两种都失败 继续 for重试1,2两种情况 这也会造成阻塞的效果
func (m *Mutex) Lock() {
	// Fast path: grab unlocked mutex.
	if atomic.CompareAndSwapInt32(&m.state, 0, mutexLocked) {
		if race.Enabled {
			race.Acquire(unsafe.Pointer(m))
		}
		return
	}
	// Slow path (outlined so that the fast path can be inlined)
	m.lockSlow()
}
其中最重要的 是 lockSlow()函数 是重点 也是难点
其代码如下:
// 其实说白了 就是根据锁当前的状态和当前协程的状态 来 更新 锁状态 更新 当前协程状态 然后在一定条件下阻塞协程(pause 或者加入队列)
func (m *Mutex) lockSlow() {
	var waitStartTime int64 // 当前协程等待的时间
	starving := false       // 当前协程状态
	awoke := false          // 当前协程是否被唤醒
	iter := 0               // 当前协程自旋次数
	old := m.state          // 当前锁状态
	for {
		// Don't spin in starvation mode, ownership is handed off to waiters
		// so we won't be able to acquire the mutex anyway.

		// 自旋条件:非饥饿模式、锁锁着、没达到最大自旋次数 自旋就是 浪费cpu的时钟周期 所以要 限制自旋的次数
		if old&(mutexLocked|mutexStarving) == mutexLocked && runtime_canSpin(iter) {
			// Active spinning makes sense.
			// Try to set mutexWoken flag to inform Unlock
			// to not wake other blocked goroutines.

			// 协程唤醒条件: 当前协程非唤醒、锁非唤醒、等待的协程数不为0 则更新锁为唤醒状态 更新成功后 协程变为唤醒状态
			// 将锁 置为唤醒模式 是防止 mutex解锁时再唤醒其他协程
			if !awoke && old&mutexWoken == 0 && old>>mutexWaiterShift != 0 &&
				atomic.CompareAndSwapInt32(&m.state, old, old|mutexWoken) {
				awoke = true
			}
			// 协程开始睡眠 底层调用的 操作系统 pause
			runtime_doSpin()
			// 自旋数加1
			iter++
			// 重新获取 state值 用于比较计算
			old = m.state
			continue
		}

		// 不能自旋时,要么cas更新 state某个标志位和waiters数量 要么 继续 for循环 执行如下逻辑。
		// 其实不能自旋就两种情况:
		// 1. 本协程原因 自旋达到了 阈值
		// 2. 别的协程原因 修改了 state 使得 old&(mutexLocked|mutexStarving) == mutexLocked 为false 咦 这不废话吗

		// 以下代码主要开始准备计算 new 用cas来更新 state
		new := old
		// Don't try to acquire starving mutex, new arriving goroutines must queue.

		// 如果是非饥饿模式 new 状态 变为 上锁(新来的协程 锁状态不是饥饿 就不用去queue里等待 可以直接尝试获取锁 所以要更新 new)
		if old&mutexStarving == 0 {
			new |= mutexLocked
		}
		// 等待协程数加1条件: 当前锁锁着或者为饥饿状态(于此相反的 是 非锁定且非饥饿状态 可以直接尝试获取锁 无需增加等待记数)
		if old&(mutexLocked|mutexStarving) != 0 {
			new += 1 << mutexWaiterShift
		}
		// The current goroutine switches mutex to starvation mode.
		// But if the mutex is currently unlocked, don't do the switch.
		// Unlock expects that starving mutex has waiters, which will not
		// be true in this case.

		// new更新为饥饿状态:当前协程 饥饿状态(等待超过1ms) 并且 锁锁着
		if starving && old&mutexLocked != 0 {
			new |= mutexStarving
		}

		// 看了几篇帖子 还是没整明白这里 先 todo吧
		if awoke {
			// The goroutine has been woken from sleep,
			// so we need to reset the flag in either case.
			if new&mutexWoken == 0 {
				throw("sync: inconsistent mutex state")
			}

			// 清除 唤醒标记
			new &^= mutexWoken
		}

		// 开始采用cas 根据 new 修改 state cas 成功后 (有可能就只更新了 协程等待数) 进行 计算等待时间 入等待队列 等 操作
		if atomic.CompareAndSwapInt32(&m.state, old, new) {

			// 如果原先的 状态是 锁已释放 且 是非饥饿状态,则这个协程可直接获取锁 且可直接 执行 Lock()后的代码,没必要执行下面 入队列 等逻辑了
			if old&(mutexLocked|mutexStarving) == 0 {
				break // locked the mutex with CAS
			}

			// 走到这里 证明 原先锁 未释放 或者 是饥饿状态  则 需要将 协程加入队列(头或者尾部)注意这里 我们不管 new是啥状态 只管原先old的状态
			// If we were already waiting before, queue at the front of the queue.
			// 如果原先等待过 则 cas成功后 直接 加入等待队列头 设置计算本协程等待时间
			queueLifo := waitStartTime != 0

			// 等待时间初始化 作为基准时间
			if waitStartTime == 0 {
				waitStartTime = runtime_nanotime()
			}

			// 将当前协程 加入等待队列(已等待过直接加入等待头部)使用sleep源语进行阻塞
			runtime_SemacquireMutex(&m.sema, queueLifo, 1)

			// 下面代码是本协程出队列被唤醒后 执行的
			// 加入等待队列后 计算等待时间 超过阈值 修改本协程状态为 饥饿
			starving = starving || runtime_nanotime()-waitStartTime > starvationThresholdNs

			// 获取当前锁状态
			old = m.state
			// 当前锁为饥饿 则直接获取锁 (防止协程被饿死),否则就去自旋
			if old&mutexStarving != 0 {
				// If this goroutine was woken and mutex is in starvation mode,
				// ownership was handed off to us but mutex is in somewhat
				// inconsistent state: mutexLocked is not set and we are still
				// accounted as waiter. Fix that.
				// 协程是被唤醒的 且锁是饥饿模式下 锁一定是未锁定,且是未被唤醒状态(如果是唤醒状态 todo)或者 队列位空 则抛出异常
				if old&(mutexLocked|mutexWoken) != 0 || old>>mutexWaiterShift == 0 {
					throw("sync: inconsistent mutex state")
				}

				// 等待队列数量减1 同时 设定锁为锁定状态  delta 最终是要 加在 atomic.AddInt32 上 下面式子 可以分解为
				// 1. 设定锁为锁定状态 	atomic.AddInt32(&m.state, mutexLocked)
				// 2. 等待队列数量减1  atomic.AddInt32(&m.state, - 1<<mutexWaiterShift)
				// 由于 其在 state 中的 二进制表示  互不影响 所以可以 合并成 int32(mutexLocked - 1<<mutexWaiterShift)
				delta := int32(mutexLocked - 1<<mutexWaiterShift)
				// 如果当前协程处于非饥饿状态 或者本协程是最后一个 等待者 则 将锁状态置为正常状态(改为正常状态 是因为饥饿模式下 所有协程都会入队列sleep 不会自旋等待 性能消耗大)
				if !starving || old>>mutexWaiterShift == 1 {
					// Exit starvation mode.
					// Critical to do it here and consider wait time.
					// Starvation mode is so inefficient, that two goroutines
					// can go lock-step infinitely once they switch mutex
					// to starvation mode.
					delta -= mutexStarving
				}

				// 因为是被唤醒的 则直接更新状态 就行 不用cas 更新完成后直接退出 Lock() 执行 其后代码
				atomic.AddInt32(&m.state, delta)
				break
			}

			// 本协程被唤醒 自旋次数清零 且从for循环重新开始
			awoke = true
			// 自旋次数清零
			iter = 0
		} else {
			// 自旋或者 cas修改锁状态失败 继续获取 state 从 for循环开始 这时 本协程 既没有 修改本身任何状态 也没有修改state任何状态
			old = m.state
		}
	}

	if race.Enabled {
		race.Acquire(unsafe.Pointer(m))
	}
}
Unlock()
unlock就比较简单了 我们直接看它
func (m *Mutex) Unlock() {
	if race.Enabled {
		_ = m.state
		race.Release(unsafe.Pointer(m))
	}

	// Fast path: drop lock bit.
	// 因为 Unlock 只能一个协程执行 所以 可以直接修改 锁状态 锁解锁
	new := atomic.AddInt32(&m.state, -mutexLocked)
	// 如果 等待协程数量不为0 或者 锁饥饿 或者 锁为唤醒状态 执行慢解锁流程 否则 解锁完毕
	if new != 0 {
		// Outlined slow path to allow inlining the fast path.
		// To hide unlockSlow during tracing we skip one extra frame when tracing GoUnblock.
		m.unlockSlow(new)
	}
}
其中 unlockSlow()函数 代码如下
func (m *Mutex) unlockSlow(new int32) {
	if (new+mutexLocked)&mutexLocked == 0 {
		fatal("sync: unlock of unlocked mutex")
	}

	// 如果锁 非 饥饿
	if new&mutexStarving == 0 {
		old := new
		for {
			// If there are no waiters or a goroutine has already
			// been woken or grabbed the lock, no need to wake anyone.
			// In starvation mode ownership is directly handed off from unlocking
			// goroutine to the next waiter. We are not part of this chain,
			// since we did not observe mutexStarving when we unlocked the mutex above.
			// So get off the way.

			// 如果 等待的协程为0 没必要再去更新 state 状态了 直接返回
			// 如果锁上锁了 表示已经有协程获取到了锁 不用再唤醒 且 等待协程减1了 直接返回
			// 如果锁是唤醒状态 说明已经有协程被唤醒了 (自旋的没入队列的协程被唤醒 这就是为什么 自旋的协程比 入队列协程更容易获取锁的原因)
			// 如果锁是 饥饿状态 todo 不用更新 等待协程数量?? 为啥不执行 	runtime_Semrelease(&m.sema, true, 1) ??
			if old>>mutexWaiterShift == 0 || old&(mutexLocked|mutexWoken|mutexStarving) != 0 {
				return
			}
			// Grab the right to wake someone.

			// 等待协程数-1 锁状态 置为以唤醒
			new = (old - 1<<mutexWaiterShift) | mutexWoken
			if atomic.CompareAndSwapInt32(&m.state, old, new) {
				// 唤醒一个协程
				runtime_Semrelease(&m.sema, false, 1)
				return
			}
			old = m.state
		}
	} else {
		// Starving mode: handoff mutex ownership to the next waiter, and yield
		// our time slice so that the next waiter can start to run immediately.
		// Note: mutexLocked is not set, the waiter will set it after wakeup.
		// But mutex is still considered locked if mutexStarving is set,
		// so new coming goroutines won't acquire it.
		//  饥饿模式下 直接唤醒队列头协程,注意此时state还没加锁状态 唤醒的 协程会设置,也会 执行 等待队列数减1等
		// 注意 在饥饿模式下 锁仍然被认为是 锁定的状态 (我个人认为只是效果一样,因为饥饿状态 别的协程过来 会直接插到 队列尾部 不会去获取锁 因为不会自旋)
		runtime_Semrelease(&m.sema, true, 1)
	}
}
两种阻塞技术
- 自旋时 我们可以看到lockSlow()函数 使用了 runtime_doSpin() 这个函数 其 调用链是:
runtime_doSpin() -----> runtime/proc.go/runtime.sync_runtime_doSpin.procyield----> runtime/asm_amd64.s(amd系统 不同系统实现不一样)
其汇编实现代码 如下
TEXT runtime·procyield(SB),NOSPLIT,$0-0
	MOVL	cycles+0(FP), AX // 将记数存入 AX (30次)
again:
	PAUSE   // 暂停
	SUBL	$1, AX // 记数器-1
	JNZ	again // 不为0 继续
	RET // 返回
我们看到 其汇编代码还是比较简单了 主要使用了 x86 和 x86_64的 指令 pause
pause 的主要作用做下简单介绍 :
- 优化自旋锁:它提示处理器当前处于自旋等待,从而可以采用优化措施 例如 减少功耗和避免内存竞争等
- 降低功耗:核心执行pause时,会进入一个低功耗状态,可以减少热量和能耗
- 减少总线竞争:它告诉处理器当前循环不需要频繁的访问内存子系统
- 自旋失败 入队列时 调用 runtime_SemacquireMutex(s *uint32, lifo bool, skipframes int) 其 调用链是:
runtime_SemacquireMutex(…)---->runtime/sema/ sync_runtime_SemacquireMutex(…)
实现比较复杂 主要实现逻辑是 将本协程的 运行时状态堆栈情况存入内存 然后 sleep ; 唤醒后 恢复堆栈内容 继续运行lockSlow() 后续代码, 其sleep(阻塞)根据不同的平台有不同实现原理,linux环境下阻塞使用的 是 ‘futex’,在windows系统可能会使用‘WaitForSingleObject ’ 等系统调用, 感兴趣的小伙伴可以研究下 。
还是有一些小疑问 没解决 先放着吧 有大神知道的可以解答下 疑问点都标注在注解中了
总结
无


 1041
1041


 被折叠的 条评论
为什么被折叠?
被折叠的 条评论
为什么被折叠?
 到【灌水乐园】发言


