


1 Hibernate简介
- Hibernate是一个orm(object relation mapping 对象关系映射)框架,处于项目的持久层,也叫持久层框架(持久层框架还有ojb等)。
- Hibernate本质就是对JDBC进行了轻量级的封装。
2 使用Hibernate的好处
①引入Hibernate可以使工作人员角色细化,让程序员更关心业务流程。让数据库人员更关注数据库相关的各种操作。
②分层更加清晰,耦合性更小
③通用性强:可以更轻松地从一个数据库平台转移到别的平台
④对象化:把关系数据库编程Java对象,更加方便操作
⑤性能保证:Hibernate可能按不同的数据库,处理不同的操作是用最优化的SQL语句,不用我们去想,对于分等算法,在Hibernate中会显得更简单,可靠。
⑥增加了程序的鲁棒性
3 一些概念和开发方式
①介绍:Hibernate开发的三种方式:
- 由Domain Object->mapping->db。(官方推荐)
- 由DB开始,用工具生成mapping和Domain Object。(使用较多)
- 由映射文件开始。
②数据持久层/对象关系映射文件【该文件会说明表和对象的关系,以及对象的属性和表的字段的对应关系;命名规范:Domain对象名.hbm.xml】
4 简单示例
①引入Hibernate开发包(http://pan.baidu.com/s/1qYwe6ny)
②创建数据表,编写Domain代码
③编写Employee.hbm.xml文件(对象关系映射文件)
<?xml version="1.0" encoding="utf-8" ?>
<!-- 映射文件需要一个dtd来指定格式 -->
<!DOCTYPE hibernate-mapping PUBLIC
    "-//Hibernate/Hibernate Mapping DTD 3.0//EN"
    "http://hibernate.sourceforge.net/hibernate-mapping-3.0.dtd">

<hibernate-mapping package="com.test.domain">
    <class name="Employee" table="employee">
        <!-- id元素用于指定主键属性 -->
        <id name="id" column="id" type="java.lang.Integer">
            <!-- 该元素用于指定主键值生成策略(共7种, sequence等) -->
            <generator class="sequence">
                <param name="sequence">employee_seq</param>
            </generator>
        </id>
        <!-- 对其他属性的配置 -->
        <property name="name" type="java.lang.String">
            <column name="name" not-null="false"></column>
        </property>
        <property name="email" type="java.lang.String">
            <column name="email" not-null="false"></column>
        </property>
        <property name="hiredate" type="java.util.Date">
            <column name="hiredate" not-null="false"></column>
        </property>
    </class>
</hibernate-mapping>④手动配置hibernate.cfg.xml文件(Hibernate的核心配置文件),该文件用于配置连接的数据库的类型,driver,用户名,密码等(hibernate-distribution-3.3.1.GA-dist\hibernate-distribution-3.3.1.GA\project\etc)
<?xml version='1.0' encoding='utf-8'?>
<!DOCTYPE hibernate-configuration PUBLIC
        "-//Hibernate/Hibernate Configuration DTD 3.0//EN"
        "http://hibernate.sourceforge.net/hibernate-configuration-3.0.dtd">

<hibernate-configuration>
    <session-factory>
        <!-- hibernate设计者,给我提供了一些常用配置 -->
        <property name="connection.driver_class">oracle.jdbc.driver.OracleDriver</property>
        <property name="connection.username">scott</property>
        <property name="connection.password">tiger</property>
        <property name="connection.url">jdbc:oracle:thin:@localhost:1521:orcl</property>
        <!-- 配置dialect方言,明确告诉Hibernate使用哪种数据库 -->
        <property name="dialect">org.hibernate.dialect.OracleDialect</property>

        <!-- 管理设置的映射文件 -->
        <mapping resource="com/test/domain/Employee.hbm.xml"/>

    </session-factory>
</hibernate-configuration>⑤编写testMain.java文件,测试crud
public static void deleteEmployee() {
    Session session = MySessionFactory.getSessionfactory().openSession();

    Transaction ts = session.beginTransaction();

    session.delete(session.load(Employee.class, 3));

    ts.commit();

    session.close();
}

public static void updateEmployee() {
    Session session = MySessionFactory.getSessionfactory().openSession();

    Transaction ts = session.beginTransaction();

    // 修改用户
    Employee employee = (Employee) session.load(Employee.class, 3);

    employee.setName("你好啊");
    ts.commit();

    session.close();
}

public static void addEmployee() {
    // 1 创建Configuration,该对象用于读取hibernate.cfg.xml文件,并完成初始化
//      Configuration configuration = new Configuration().configure("hibernate.cfg.xml");
    Configuration configuration = new Configuration().configure(); // 默认是hibernate.cfg.xml
    // 2 创建SessionFactory【这是一个会话工厂,是一个重量级的对象】
    SessionFactory sessionfactory = configuration.buildSessionFactory();
    // 3 创建session,相当于jdbc connection【】
    Session session = sessionfactory.openSession();
    // 4 对Hibernate来说,要求在进行CRUD操作时,使用事务提交
    Transaction transcation = session.beginTransaction();

    // 添加一个雇员
    Employee employee = new Employee();
    employee.setName("jiaozenglian");
    employee.setEmail("jiao@sohu.com");
    employee.setHiredate(new Date());

    // 保存
    session.save(employee); // ==> insert into ...
    // 提交
    transcation.commit();
    session.close();
}MySessionFactory.java文件(由于配置对象比较耗费资源,故将其设置为单例)
import org.hibernate.SessionFactory;
import org.hibernate.cfg.Configuration;
public final class MySessionFactory {
    private static SessionFactory sessionfactory = null;
    static {
        sessionfactory = new Configuration().configure().buildSessionFactory();
    }

    public static SessionFactory getSessionfactory() {
        return sessionfactory;
    }
}
5 切换数据库
①首先,重新配置hibernate.cfg.xml文件
<?xml version='1.0' encoding='utf-8'?>
<!DOCTYPE hibernate-configuration PUBLIC
        "-//Hibernate/Hibernate Configuration DTD 3.0//EN"
        "http://hibernate.sourceforge.net/hibernate-configuration-3.0.dtd">

<hibernate-configuration>
    <session-factory>
        <!-- hibernate设计者,给我提供了一些常用配置 -->
        <property name="connection.driver_class">com.mysql.jdbc.Driver</property>
        <property name="connection.username">root</property>
        <property name="connection.password">111111</property>
        <property name="connection.url">jdbc:mysql://localhost:3306/test</property>
        <!-- 配置dialect方言,明确告诉Hibernate使用哪种数据库 -->
        <property name="dialect">org.hibernate.dialect.MySQLDialect</property>
        <!-- 显示出对应的sql语句 -->
        <property name="show_sql">true</property>
        <!-- 让Hibernate自动给我们创建表       create:表示创建该表   update:表示如果没有该表才创建 -->
        <property name="hbm2ddl.auto">update</property>
        <!-- 管理设置的映射文件 -->
        <mapping resource="com/test/domain/Employee.hbm.xml"/>

    </session-factory>
</hibernate-configuration>②配置Employee.hbm.xml文件
<?xml version="1.0" encoding="utf-8" ?>
<!-- 映射文件需要一个dtd来指定格式 -->
<!DOCTYPE hibernate-mapping PUBLIC
    "-//Hibernate/Hibernate Mapping DTD 3.0//EN"
    "http://hibernate.sourceforge.net/hibernate-mapping-3.0.dtd">

<hibernate-mapping package="com.test.domain">
    <class name="Employee" table="employee">
        <!-- id元素用于指定主键属性 -->
        <!--<id name="id" column="id" type="java.lang.Integer">
             该元素用于指定主键值生成策略(共7种, sequence等)
            <generator class="sequence">
                <param name="sequence">employee_seq</param>
            </generator>
        </id> -->
        <!-- 这里针对MySQL主键自动增长方式,进行配置 -->
        <id name="id" column="id" type="java.lang.Integer">
            <generator class="increment"></generator>
        </id>
        <!-- 如果用户希望自己设定id,使用assigned
        <id name="id" column="id" type="java.lang.Integer">
            <generator class="assigned"/>
        </id>   -->
        <!-- 对其他属性的配置 ------------以下可以不变 -->
        <property name="name" type="java.lang.String">
            <column name="name" length="64" not-null="false"></column>
        </property>
        <property name="email" type="java.lang.String">
            <column name="email" not-null="false"></column>
        </property>
        <property name="hiredate" type="java.util.Date">
            <column name="hiredate" not-null="false"></column>
        </property>
    </class>
</hibernate-mapping>
6 Hibernate基本原理图
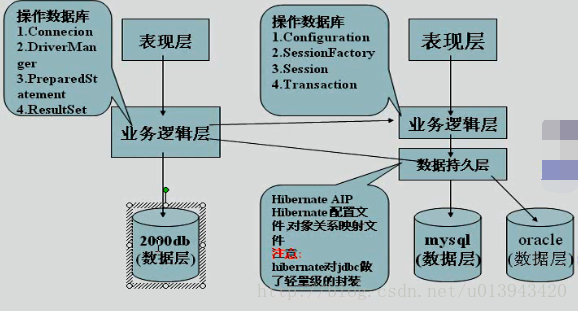
只有Configuration是一个类class,其他三个都是接口interface。
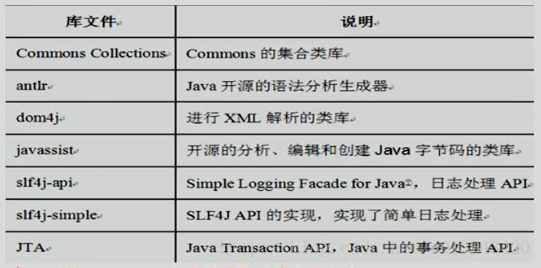
- Hibernate需要的其他库:
7 优化updateEmployee添加事务回滚
public static void updateEmployee() {
    // 回滚事务
    Session session = MySessionFactory.getSessionfactory().openSession();

    Transaction ts = null;
    try {
        ts = session.beginTransaction();
        // 修改用户
        Employee employee = (Employee) session.load(Employee.class, 3);

        employee.setName("nihao");

        ts.commit();

    } catch (Exception e) {
        if(ts!=null) {
            ts.rollback();
        }
        e.printStackTrace();
        throw new RuntimeException(e.getMessage());
    } finally {
        if(session!=null && session.isOpen()) {
            session.close();
        }
    }
}


 1972
1972

 被折叠的 条评论
为什么被折叠?
被折叠的 条评论
为什么被折叠?
 到【灌水乐园】发言


