


开发拦截器的步骤:
(1)写一个拦截器类实现Interceptor接口
(2)在struts.xml文件中进行配置
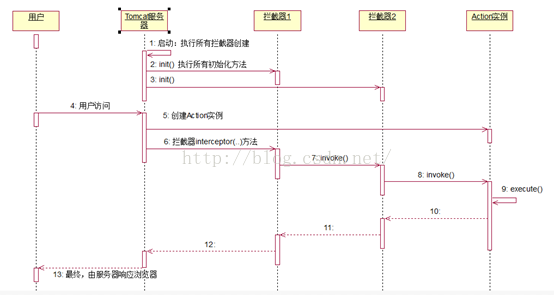
案例:测试拦截器和Action的执行流程
HelloAction类
package cn.itcast.interceptor;

import com.opensymphony.xwork2.ActionSupport;

public class HelloAction extends ActionSupport {
	public HelloAction(){
		System.out.println("1.HelloAction对象创建了...");
	}
	public String execute(){
		System.out.println("3.执行了请求处理的业务方法execute()");
		return SUCCESS;
	}
}
package cn.itcast.interceptor;

import com.opensymphony.xwork2.ActionInvocation;
import com.opensymphony.xwork2.interceptor.Interceptor;
//自定义拦截器
public class HelloInterceptor implements Interceptor {
	public HelloInterceptor(){
		System.out.println("Interceptor对象创建了...");
	}
	public void destroy() {
		System.out.println("Interceptor对象销毁了...");
	}

	public void init() {
		System.out.println("自定义interceptor初始化了..");
	}

	public String intercept(ActionInvocation invocation) throws Exception {
		System.out.println("2.拦截器业务处理开始");
		String result = invocation.invoke();//执行拦截器,返回值类型是执行方法的返回值
		System.out.println("4.拦截器业务处理结束");
		return result;
	}


}
<struts>
	<package name="interceptor" extends="struts-default">
		<interceptors>
			<interceptor name="helloInterceptor" class="cn.itcast.interceptor.HelloInterceptor"></interceptor>
			<interceptor-stack name="helloStack">
			<!-- 应用默认的拦截器 -->
				<interceptor-ref name="defaultStack"></interceptor-ref>
				<!-- 引用自定义的拦截器 -->
				<interceptor-ref name="helloInterceptor"></interceptor-ref>
			</interceptor-stack>
		</interceptors>
		<!-- 执行拦截器 -->
		<default-interceptor-ref name="helloStack"></default-interceptor-ref>
		<action name="hello" class="cn.itcast.interceptor.HelloAction" method="execute">
			<result name="success">/index.jsp</result>
		</action>
	</package>
</struts>
控制台打印:
Interceptor对象创建了...
自定义interceptor初始化了..
自定义interceptor初始化了..
然后通过浏览器访问HelloAction类可以发现控制台打印顺序

分析结果:
我们可以总结拦截器的执行流程:


 551
551


 被折叠的 条评论
为什么被折叠?
被折叠的 条评论
为什么被折叠?
 到【灌水乐园】发言


