


Swift版本的一些解释
NSLayoutConstraint的一些主要属性:
1.firstItem, firstAttribute, secondItem, secondAttribute
表示view和相应的属性。如果约束描述的是view的绝对的height或者width,则第二个view为nil,第二个attribute则为.notAnAttribute。可能的NSLayoutAttribute有:
.width,.height.top,.bottom.left,.right,.leading,.trailing.centerX,.centerY.firstBaseline,.lastBaseline
.firstBaseline主要用于多行标签,是指距离label的顶部一些距离,.lastBaseline是指距离label底部一些距离。可参考:
- First Baseline and Last Baseline Properties in UIStackView
- Understanding “firstBaseLine” vs. “baseLine” AutoLayout Constraint
2.multiplier, constant
即a1 = ma2 + c,a1和a2是两个属性,m是multiplier,c是constant。
有些情况下,第一个属性的值等于第二个属性的值,则multiplier为1,constant为0
如果描述的是view的width或者height,则multiplier为1,constant则为width或者height的值
3.relation
NSLayoutRelation是来说明两个属性之前的关系,可以是.equal、.lessThanOrEqual或者.greaterThanOrEqual
4.priority
priority值的范围是从1000到1。
constraint是属于view的,一个view可以有多个约束。UIView也有一个constraints属性,并有如下的实例方法:
addConstraint(_:),addConstraints(_:)removeConstraint(_:),removeConstraints(_:)
那约束应该添加到哪个view上?
- 如果是view的width的约束,则添加到当前的view
- 如果是view距离其superview的顶部的约束,则添加到其superview上
- 如果是view与其兄弟view的顶部对齐的约束,则添加到其共同的superview上
从iOS8开始,就不再明确的向一个特定的视图来添加约束。而是使用NSLayoutConstraint类的activate(_:)方法来active(激活)约束,该方法需要一个约束数组。激活的约束会被自动添加到正确的view当中,这样开发人员就不无需确定是哪个view了。deactivate(_:)方法从view中移除约束。constraint还有一个isActive属性,可以用来激活或者取消激活约束。
NSLayoutConstraint的属性大部分是只读的,除了priority、constant、isActive。如果你想改变其它的已存在的约束,你需要先移除约束,然后再添加一个新的。
NSLayoutConstraint的初始化方法init(item:attribute:relatedBy:toItem:attribute:multiplier:constant:)
例子说明:
1.原来的方法,代码很冗余,如下:
        let v1 = UIView(frame:CGRect(x: 100, y: 111, width: 132, height: 194))
        v1.backgroundColor = UIColor.green
        let v2 = UIView()
        v2.backgroundColor = UIColor.red
        let v3 = UIView()
        v3.backgroundColor = UIColor.blue

        v1.addSubview(v2)
        v1.addSubview(v3)

        v2.translatesAutoresizingMaskIntoConstraints = false
        v3.translatesAutoresizingMaskIntoConstraints = false

            v1.addConstraint(
                NSLayoutConstraint(item: v2,
                    attribute: .leading,
                    relatedBy: .equal,
                    toItem: v1,
                    attribute: .leading,
                    multiplier: 1, constant: 0)
            )
            v1.addConstraint(
                NSLayoutConstraint(item: v2,
                    attribute: .trailing,
                    relatedBy: .equal,
                    toItem: v1,
                    attribute: .trailing,
                    multiplier: 1, constant: 0)
            )
            v1.addConstraint(
                NSLayoutConstraint(item: v2,
                    attribute: .top,
                    relatedBy: .equal,
                    toItem: v1,
                    attribute: .top,
                    multiplier: 1, constant: 0)
            )
            v2.addConstraint(
                NSLayoutConstraint(item: v2,
                    attribute: .height,
                    relatedBy: .equal,
                    toItem: nil,
                    attribute: .notAnAttribute,
                    multiplier: 1, constant: 10)
            )
            v3.addConstraint(
                NSLayoutConstraint(item: v3,
                    attribute: .width,
                    relatedBy: .equal,
                    toItem: nil,
                    attribute: .notAnAttribute,
                    multiplier: 1, constant: 20)
            )
            v3.addConstraint(
                NSLayoutConstraint(item: v3,
                    attribute: .height,
                    relatedBy: .equal,
                    toItem: nil,
                    attribute: .notAnAttribute,
                    multiplier: 1, constant: 20)
            )
            v1.addConstraint(
                NSLayoutConstraint(item: v3,
                    attribute: .trailing,
                    relatedBy: .equal,
                    toItem: v1,
                    attribute: .trailing,
                    multiplier: 1, constant: 0)
            )
            v1.addConstraint(
                NSLayoutConstraint(item: v3,
                    attribute: .bottom,
                    relatedBy: .equal,
                    toItem: v1,
                    attribute: .bottom,
                    multiplier: 1, constant: 0)
            )
效果如下:
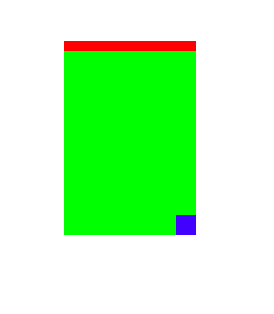
上面的约束,写起来非常的冗长。所幸的时,在iOS9中可以使用anchor来达到同样的效果,而且代码也很简单
2.使用Anchor
            NSLayoutConstraint.activate([
                v2.leadingAnchor.constraint(equalTo: v1.leadingAnchor),
                v2.trailingAnchor.constraint(equalTo: v1.trailingAnchor),
                v2.topAnchor.constraint(equalTo: v1.topAnchor),
                v2.heightAnchor.constraint(equalToConstant: 10),
                v3.widthAnchor.constraint(equalToConstant: 20),
                v3.heightAnchor.constraint(equalToConstant: 20),
                v3.trailingAnchor.constraint(equalTo: v1.trailingAnchor),
                v3.bottomAnchor.constraint(equalTo: v1.bottomAnchor)
            ])
3.使用Visual format
func dictionaryOfNames(_ arr:UIView...) -> [String:UIView] {
    var d = [String:UIView]()
    for (ix,v) in arr.enumerated() {
        d["v\(ix+1)"] = v
    }
    return d
}

            let d = dictionaryOfNames(v1,v2,v3)
            NSLayoutConstraint.activate([
                NSLayoutConstraint.constraints(
                    withVisualFormat: "H:|[v2]|", options: [], metrics: nil, views: d),
                NSLayoutConstraint.constraints(
                    withVisualFormat: "V:|[v2(10)]", options: [], metrics: nil, views: d),
                NSLayoutConstraint.constraints(
                    withVisualFormat: "H:[v3(20)]|", options: [], metrics: nil, views: d),
                NSLayoutConstraint.constraints(
                    withVisualFormat: "V:[v3(20)]|", options: [], metrics: nil, views: d),
                // uncomment me to form a conflict
//                NSLayoutConstraint.constraintsWithVisualFormat(
//                    "V:[v3(10)]|", options: [], metrics: nil, views: d),
].joined().map{$0})- 要使用visual format,需提供一个字典,把每个view的name和实际的view真正对应起来
- 注意
constraints(withVisualFormat:...)方法返回值为数组(上面相当于是数组的数组),而activate(_:)方法参数需要的是一个数组
参考文章:
在iOS中适配屏幕可用到的有:autoresizingMask和NSLayoutConstraint
UIView autoresizingMask
如果视图的autoresizesSubviews属性声明被设置为YES,则其子视图会根据autoresizingMask属性的值自动进行尺寸调整。否则的话,必须通过重载layoutSubviews方法来自己实现。
例如,子view要位于屏幕的左上角:
subView.autoresizingMask = UIViewAutoresizingFlexibleBottomMargin |UIViewAutoresizingFlexibleRightMargin;
NSLayoutConstraint
iOS6中的Auto Layout:使用代码添加约束
大致翻译下,翻译自:Auto Layout in iOS 6: Adding constraints through code
在Xcode中创建一个Single View Application,把product name命名为ConstraintsCodeDemo。
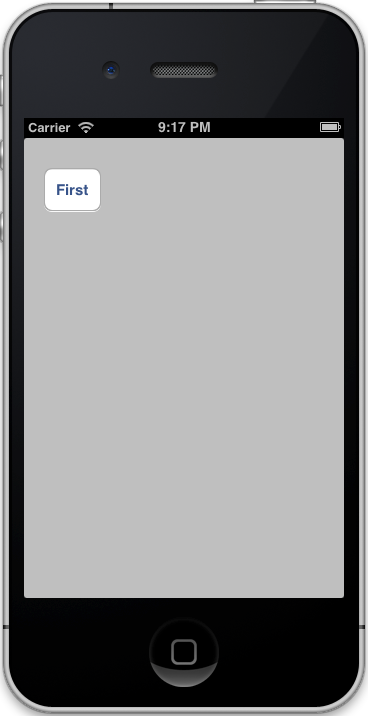
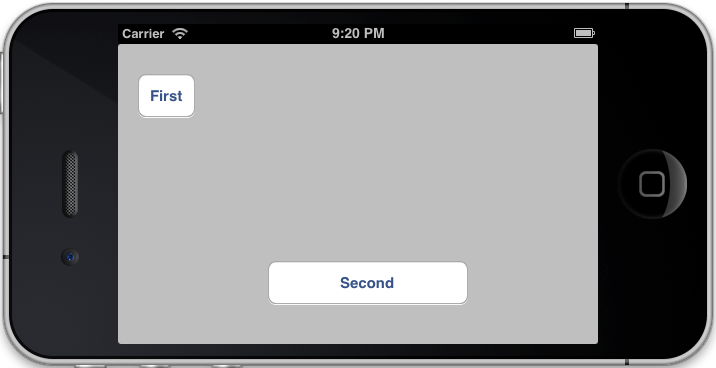
我们将会创建一个简单地button,把它放在view的左上角。在viewController.m中创建如下的实例变量:
@implementation ViewController
{
  UIButton *firstButton;
}
在viewDidLoad中创建button并把它添加到view上:
- (void)viewDidLoad
{
  [super viewDidLoad];

  firstButton = [UIButton buttonWithType:UIButtonTypeRoundedRect];
  [firstButton setTitle:@"First" forState:UIControlStateNormal];
  [firstButton sizeToFit];
  firstButton.translatesAutoresizingMaskIntoConstraints = NO;

  [self.view addSubview:firstButton];
}
把translatesAutoresizingMaskIntoConstraints属性置为NO,是为了disable掉springs and struts(即相当于可伸缩和不可变)方法。这个属性是为了向后兼容。我们将要添加一个leading constraint,这样button就会在view中偏移20。在viewDidLoad中添加如下的代码:
NSLayoutConstraint *constraint = [NSLayoutConstraint constraintWithItem:firstButton attribute:NSLayoutAttributeLeading relatedBy:NSLayoutRelationEqual toItem:self.view attribute:NSLayoutAttributeLeading multiplier:1.0f constant:20.f];

[self.view addConstraint:constraint];
Auto Layout 使用的视图之间的关系式为:
A = B * m + c
也可以表示为:
viewA-attribute = viewB-attribute * multiplier + constant
在这个例子中,关系式将会是这样子的:
firstButton.NSLayoutAttributeLeading = self.view.NSLayoutAtrributeLeading * 1.0f + 20f
button左边缘的位置等于父视图的左边缘距离加上20。
在viewDidLoad方法中,再添加如下的约束:
constraint = [NSLayoutConstraint constraintWithItem:firstButton attribute:NSLayoutAttributeTop relatedBy:NSLayoutRelationEqual toItem:self.view attribute:NSLayoutAttributeTop multiplier:1.0f constant:30.f];

[self.view addConstraint:constraint];
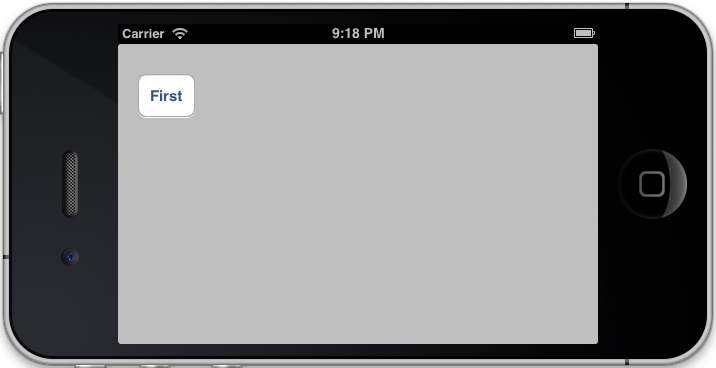
这个约束是将在其父视图的上边缘30个点处显示button。编译并运行。button将会在距离左边20和距离上边30处显示。
按住cmd+< 水平显示view
在接口中创建一个新的实例变量
UIButton *secondButton;
在ViewDidload中添加如下的代码,把第二个按钮添加到view中
secondButton = [UIButton buttonWithType:UIButtonTypeRoundedRect];
[secondButton setTitle:@"Second" forState:UIControlStateNormal];
[secondButton sizeToFit];
secondButton.translatesAutoresizingMaskIntoConstraints = NO;

[self.view addSubview:secondButton];
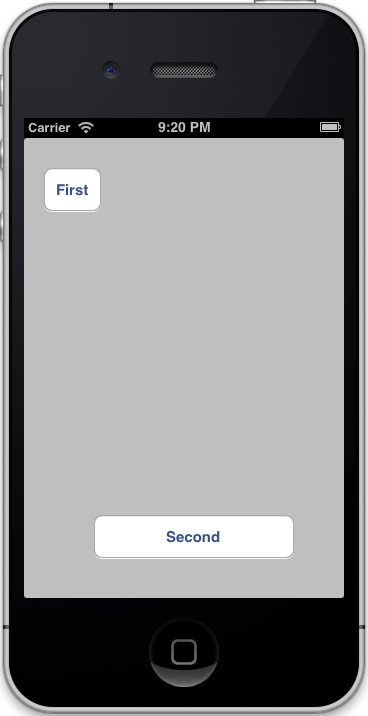
这个button将会位于其父视图的X轴居中,并距离底部40个点。在viewDidLoad中添加如下的约束。
constraint = [NSLayoutConstraint constraintWithItem:secondButton attribute:NSLayoutAttributeBottom relatedBy:NSLayoutRelationEqual toItem:self.view attribute:NSLayoutAttributeBottom multiplier:1.0f constant:-40.f];

[self.view addConstraint:constraint];

constraint = [NSLayoutConstraint constraintWithItem:secondButton attribute:NSLayoutAttributeCenterX relatedBy:NSLayoutRelationEqual toItem:self.view attribute:NSLayoutAttributeCenterX multiplier:1.0f constant:0.0f];

[self.view addConstraint:constraint];
第二个button固定宽度为200,添加上如下的约束:
constraint = [NSLayoutConstraint constraintWithItem:secondButton attribute:NSLayoutAttributeWidth relatedBy:NSLayoutRelationEqual toItem: nil attribute:NSLayoutAttributeNotAnAttribute multiplier:1.0f constant:200.0f];

[self.view addConstraint:constraint];
注意这个约束仅仅与自己有关,与它的父视图无关,因为这是个固定的大小。由于这个原因 toItem 为nil,attribute 参数为NSLayoutAttributeNotAnAttribute。编译并运行。button在X轴居中,并在距离其父视图底部40个点处显示。
按住cmd+< 水平显示view
可以在github上下载ConstraintsCodeDemo
大致翻译自LEARN TO LOVE AUTO LAYOUT… PROGRAMMATICALLY
简介
在这个新的一节我将向你展示如何使用代码来Auto Layout。这意味着我们将不会使用xib 或者 storyboards,仅仅使用代码。
在打开Xcode之前,先来介绍下 Visual Format Language(VFL)和管理布局所需的功能。
通过VFL,你可以使用简单地语法来定义约束。例如你可以定义元素的宽度,通过使用如下的字符串:
"H:[element(100)]"
或者高度
"V:[element(100)]"
第一个大写的字符表示的是你想要修改的哪一个尺寸。H代表水平,V代表垂直。[element(100)]相当于element键值对应的view,V方向上的尺寸为100
约束由NSLayoutConstraint类定义。你可以通过UIView的addConstraint(s):方法来添加约束,removeConstraint(s):来移除约束。
开始编码吧
下载这个工程打开viewController.m。
主view包含了2个子view:redView和yellowView。在下面的例子中你将会把这些view放置到主view中,仅仅通过使用Auto Layout。
setupViews方法来创建和配置这些views“
- (void)setupViews
{
    self.redView = [UIView new];
    self.redView.translatesAutoresizingMaskIntoConstraints = NO;
    self.redView.backgroundColor = [UIColor colorWithRed:0.95 green:0.47 blue:0.48 alpha:1.0];

    self.yellowView = [UIView new];
    self.yellowView.translatesAutoresizingMaskIntoConstraints = NO;
    self.yellowView.backgroundColor = [UIColor colorWithRed:1.00 green:0.83 blue:0.58 alpha:1.0];

    [self.view addSubview:self.redView];
    [self.view addSubview:self.yellowView];

}
非常重要:当你通过代码来处理Auto Layout时,你应该关闭掉translatesAutoresizingMaskIntoConstraints。这将保证view没有约束会自动的创建,否则的话,任何你设置的约束都可能会与autoresizing约束冲突(当你从IB中添加约束时,它会自动的将这个属性设置为NO)。
例子1:使用VFL约束的简单例子
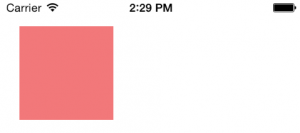
在example_1函数中,这段代码在主view的左上角添加了一个方块,如下:
1.首先,创建一个字典,把key和要使用VFL定义的view联系起来。
NSDictionary *viewsDictionary = @{@"redView":self.redView};
2.通过NSLayoutConstraint 的constraintsWithVisualFormat:options:metrics:views: 方法来创建第一个约束。
这个方法返回一个约束数组。取决于你传递给函数的VFL,它会创建一个或者多个约束。
在这个例子中,我们使用如下的代码来塑造redView的宽度和高度;
NSArray *constraint_H = [NSLayoutConstraint constraintsWithVisualFormat:@"V:[redView(100)]"
                                                                options:0
                                                                metrics:nil
                                                                  views:viewsDictionary];

NSArray *constraint_V = [NSLayoutConstraint constraintsWithVisualFormat:@"H:[redView(100)]"
                                                                options:0
                                                                metrics:nil
                                                                  views:viewsDictionary];
如前所述,VFL使用H或者V定义约束的方向。方括号中的是视图的引用,圆括号里的是我们将要设定的属性的值。
我们使用”redView”来表示redView,是因为我们先前在viewsDictionary字典中定义了一个key,把viewsDictionary作为参数传递给views。
然后把定义的约束添加到redView上:
[self.redView addConstraints:constraint_H];
[self.redView addConstraints:constraint_V];
3.为了定义一个view的约束,需要给Auto Layout足够的信息来获取大小和位置信息。我们已经给出了redView的大小信息,现在我们把它放置在主视图中。再一次的,我们使用先前的函数,仅仅改变是visual format string。
NSArray *constraint_POS_V = [NSLayoutConstraint constraintsWithVisualFormat:@"V:|-30-[redView]"
                                                                    options:0
                                                                    metrics:nil
                                                                      views:viewsDictionary];

NSArray *constraint_POS_H = [NSLayoutConstraint constraintsWithVisualFormat:@"H:|-20-[redView]"
                                                                    options:0
                                                                    metrics:nil
                                                                      views:viewsDictionary];
@”H:|-30-[redView]” 代表的是”RedView“距离其父视图的左边30个点。
然而当使用@”H:[redView]-30-|”这种方式时,表示的是从其父视图的右边计算。
管道字符”|“可以理解为方括号中的对象的”父视图“的引用。
对于垂直方向也同样如此,管道符号在左边表示是”上边“,在右边表示的是”下边“,因此这样写:
NSArray *constraint_POS_V = [NSLayoutConstraint constraintsWithVisualFormat:@"V:|-30-[redView]"
                                                                    options:0
                                                                    metrics:nil
                                                                      views:viewsDictionary];
上述的代码定义了redView距离其父视图的上边30个点。
你也可以让系统使用默认的距离,通过像这样创建VFL:
@"V:|-[redView]"
在这个字符串中并未给出数字信息。iOS将会使用一个默认的距离。要记住的是要使用”-“来分隔管道和元素。
现在把最新的约束添加到view上让其生效。
接受这些约束的是主视图,不要把约束添加到redView上。要轻松地记住如何附加约束,要记住的是父视图对其子视图有分配的位置的责任。所以在这种情况下,主视图接收约束来安排 redView。
[self.view addConstraints:constraint_POS_V];
[self.view addConstraints:constraint_POS_H];
例子2:SIMPLE CONSTRAINTS WITH VFL AND MULTIPLE VIEWS
在viewDidLoad中注释掉example_1,移除example_2函数的注释。
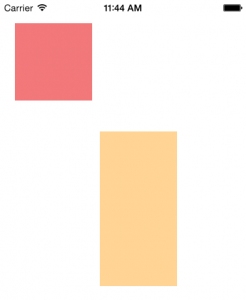
在这个例子中我们处理两个view,我们创建对两个都适用的约束。最终结果如下:
步骤1和2,与先前的例子相同。设置viewsDictionary,定义大小的约束。这次需要给yellowView添加信息:
NSArray *yellow_constraint_H = [NSLayoutConstraint constraintsWithVisualFormat:@"V:[yellowView(200)]"
                                                                       options:0
                                                                       metrics:nil
                                                                         views:viewsDictionary];

NSArray *yellow_constraint_V = [NSLayoutConstraint constraintsWithVisualFormat:@"H:[yellowView(100)]"
                                                                       options:0
                                                                       metrics:nil
                                                                         views:viewsDictionary];
[self.yellowView addConstraints:yellow_constraint_H];
[self.yellowView addConstraints:yellow_constraint_V];
3.父视图需要处理子视图的位置。因此我们为主视图创建约束来定义红色和黄色view的位置。
水平方向的信息;
NSArray *constraint_POS_H = [NSLayoutConstraint constraintsWithVisualFormat:@"H:|-20-[redView]-10-[yellowView]"
                                                                    options:0
                                                                    metrics:nil
                                                                      views:viewsDictionary];
@”H:|-20-[redView]-10-[yellowView]“有多个约束:
- redView距离其父视图左边20
- yellowView的左边距离redView的右边10
如下添加垂直方向的信息:
@"V:|-30-[redView]-40-[yellowView]"
字符串表示的是:
- redView距离其父视图的顶部30
- yellowView的顶部距离redView的底部40
再次的,我们把约束添加到主视图:
[self.view addConstraints:constraint_POS_V];
[self.view addConstraints:constraint_POS_H];
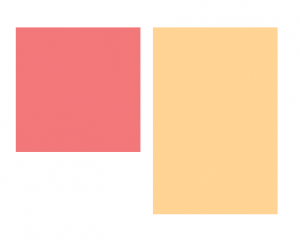
例子3:使用对齐选项
上面的例子放置的view有些混乱。我们将以一种跟清晰的方式来组织它,将把views顶部对齐:
实现它很简单。调用constraintsWithVisualFormat:options:metrics:views函数,给options指定一个参数。实际上,这个参数代表的是对齐选项(至少在这个时候是)。
NSArray *constraint_POS = [NSLayoutConstraint constraintsWithVisualFormat:@"H:|-20-[redView]-10-[yellowView]"
                                                                  options:NSLayoutFormatAlignAllTop
                                                                  metrics:nil
                                                                    views:viewsDictionary];
来看下VFL字符串:@”H:|-20-[redView]-10-[yellowView]“。如上面的例子,它定义了水平方向的行为。Options参数值为NSLayoutFormatAlignAllTop。
例子4:SIMPLE CONSTRAINTS WITH VFL AND METRICS
我们几乎已经完全了解了constraintsWithVisualFormat:options:metrics:views方法,除了metrics方法。
在第4个例子中的第一步,你将会看到另一个字典定义:
NSDictionary *metrics = @{@"redWidth": @100,
                          @"redHeight": @100,
                          @"yellowWidth": @100,
                          @"yellowHeight": @150,
                          @"topMargin": @120,
                          @"leftMargin": @20,
                          @"viewSpacing":@10
                          };
它和viewsDictionary很类似。它定义了要在VFL字符串中使用的键对应的值。
@"V:[redView(redHeight)]"
@"H:[redView(redWidth)]"
@"V:|-topMargin-[redView]"
@"H:|-leftMargin-[redView]-viewSpacing-[yellowView]"
例子5:DYNAMIC SYZE
Auto Layout的一个优势是可以创建动态的接口。
如果你记得以前的文章,我们创建了可以适配屏幕大小的views。你也可以通过使用VFL来达到同样的目的。
在example_5函数中,在第2步你可以看到定义一个view可以根据其父视图来改变大小。
NSArray *constraint_POS_V = [NSLayoutConstraint constraintsWithVisualFormat:@"V:|-vSpacing-[redView]-vSpacing-|"
                                                                    options:0
                                                                    metrics:metrics
                                                                      views:viewsDictionary];

NSArray *constraint_POS_H = [NSLayoutConstraint constraintsWithVisualFormat:@"H:|-hSpacing-[redView]-hSpacing-|"
                                                                    options:0
                                                                    metrics:metrics
                                                                      views:viewsDictionary];
来看下水平数据的字符串。@”H:|-hSpacing-[redView]-hSpacing-|”,我们仅仅定义了redView到其父视图左右边距。
例子6:DEFINING CONSTRAINTS THROUGH RELATIONS
Auto Layout的另一个很酷的特点是可以把一个view的属性和另一个view的属性关联起来。
创建这种关系的方法是constraintWithItem:attribute:relatedBy:toItem:attribute:multiplier:constant。
通过这个方法,可以创建如下的约束:“redView的宽度是yellowView的高度加上20”
在例子6中,redView的行为和在以前的例子中一样,而yellowView只有redView大小的一半,且在redView中居中。结果如下:
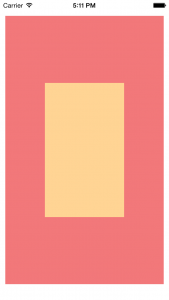
步骤1和步骤2,如同例子5一样创建redView。
在步骤3中,使用上述的方法来构建大小关系。
// SET THE WIDTH
[self.view addConstraint:[NSLayoutConstraint
      constraintWithItem:self.yellowView
               attribute:NSLayoutAttributeWidth
               relatedBy:NSLayoutRelationEqual
                  toItem:self.redView
               attribute:NSLayoutAttributeWidth
              multiplier:0.5
                constant:0.0]];
首先,如同以前的例子,我们给主视图附加上位置约束。这个方法构建了如下的约束:
yellowView.width = redView.width * 0.5 + 0.0;
它使用一个等于关系(NSLayoutRelationEqual)来连接yellowView的宽度(NSLayoutAttributeWidth),等于redView的宽度乘以multiplier(0.5),并加上一个常量值(0.0)。
构建高度的约束也类似,它只是给attribute参数定义不同的值(NSLayoutAttributeHeight):
[self.view addConstraint:[NSLayoutConstraint
      constraintWithItem:self.yellowView
               attribute:NSLayoutAttributeHeight
               relatedBy:NSLayoutRelationEqual
                  toItem:self.redView
               attribute:NSLayoutAttributeHeight
              multiplier:0.5
                constant:0.0]];
移到步骤4,把yellowView居中到redView。
所需的关系式为:
yellowView.center.x = redView.center.x * 1.0 + 0.0;
yellowView.center.y = redView.center.y * 1.0 + 0.0;
通过调用先前的方法,使用NSLayoutAttributeCenterX和NSLayoutAttributeCenterY属性,multiplier设为1,constant设为0.
[self.view addConstraint:[NSLayoutConstraint
      constraintWithItem:self.yellowView
               attribute:NSLayoutAttributeCenterX
               relatedBy:NSLayoutRelationEqual
                  toItem:self.redView
               attribute:NSLayoutAttributeCenterX
              multiplier:1.0
                constant:0.0]];

[self.view addConstraint:[NSLayoutConstraint
      constraintWithItem:self.yellowView
               attribute:NSLayoutAttributeCenterY
               relatedBy:NSLayoutRelationEqual
                  toItem:self.redView
               attribute:NSLayoutAttributeCenterY
              multiplier:1.0
                constant:0.0]];
我们也可以通过不同的关系类型(NSLayoutRelationLessThanOrEqual 和 NSLayoutRelationGreaterThanOrEqual)来构建约束和链接其他的属性。
而当我们想要构建没有关系的约束时,可以给第二item传递nil,给第二个attribute传递NSLayoutAttributeNotAnAttribute,然后指定我们所需的constant。
GOOD NIGHT
还有一些其它的资源可以看一看:


 4522
4522

 被折叠的 条评论
为什么被折叠?
被折叠的 条评论
为什么被折叠?
 到【灌水乐园】发言


