


通过前面的教程,对 Django 开发应用的一般流程有了清晰的认识。本讲主要内容:
1.数据记录批量入库
2.用户自定义模板标签及过滤器
3.深入理解 MTV 模式
来看一个 MTV 模式图(来自互联网):

使用命令 django-admin startapp choicetest 来创建 choicetest 应用,并创建同名模板文件夹,结合选择题测试应用的开发过程展开本讲。本讲中的选择题来自卓帆系统和百日冲刺及高中信息技术教材的内容,特此鸣谢。
一、urls.py 部分
from django.urls import path
from choicetest.views import *
#choicequeston 路由
path('ch_index/', ch_index, name="chindex"),
path('ch_judge/', ch_judge, name="chjudge"),
path('ch_zhuofang/', ch_zhuofang, name="chzhuofang"),
path('ch_hundreday/', ch_hundreday, name="chhundreday"),
path('ch_correct/', ch_correct, name="chcorrect"),
path 函数有多个参数,这里介绍用到三个参数,第一个是给浏览器访问或 views.py 中 redirect()函数访问的地址、第二个是 views.py 中定义的视图函数、第三个参数 name 是这个 url 的名称,在模板文件中使用的形式为{% url ‘<name>’ [参数] %},当然你可以在模板文件中使用第一参数构成的绝对地址。
二、views.py 部分
from almond.models import  Choicetimu, Examination
def ch_index(request):
    pass
def ch_zhuofang(request):
    pass
def ch_hundreday(request):
    pass
def ch_correct(request):
    pass
def ch_judge(request):
    pass
1. 视图函数 ch_index 作用是查询学生完成选择题的进度、正确率,对应的模板让学生选择部分选择题来练习。看代码及解释。
def ch_index(request):
    curuser = request.user
    #获取选择题总数
    choiceset_count = Choicetimu.objects.all().count()
    #获取学生做对的选择题的 id 号的记录集
    rightset = Examination.objects.filter( Q( esid = curuser.sid ) & Q( whidname = 'chid' ) & Q( egrade = 2 ) ).distinct('whidval').order_by('whidval')
    rights = [v.whidval for v in rightset]
    #获取学生做错的选择的 id 号的记录集
    errorset = Examination.objects.filter( Q( esid = curuser.sid ) & Q( whidname = 'chid' ) & Q( egrade = 0 ) ).distinct('whidval').order_by('whidval')
    errors = [v.whidval for v in errorset]
    #错题集要减去订正的
    errors = sorted(list(set(errors) - set(rights)))
    #做对、做错、已做的题目数
    rightlen = len(rights);    errorlen = len(errors);    r_e_len = rightlen+errorlen
    #进度及正确率,把不需要的变量删除
    rightrate = 0 if r_e_len==0 else rightlen/r_e_len*100
    progressrate = r_e_len/choiceset_count*100
    del rightset,errorset,rightlen
    #准备好列表,在模板中应用。django 模板中没有生成列表字典的功能,可以这里传过去。或自定义模板标签定义过滤器
    zflist = list(range(1,16))
    chlist = list(range(1,choiceset_count+1))

    return render(request, 'choicetest/ch_index.html', locals() )
2. 视图函数 ch_zhuofang、ch_hundreday、cn_correct 的作用分别是根据用户选择卓帆、百日冲刺或订正选择题,它们的模板是 ch_test.html, 放在一起说吧。
- 选择题目
#视图函数 ch_zhuofang 片断,卓帆题目中选择,百日冲刺的题目相似不列出
curuser = request.user
yourchoice = request.POST
if yourchoice['zhfan'] == '0':
choicecount = int(yourchoice['choicecount0'])
if choicecount<=0 or choicecount>50:
choicecount=25
##随机抽取题目 order_by('?')
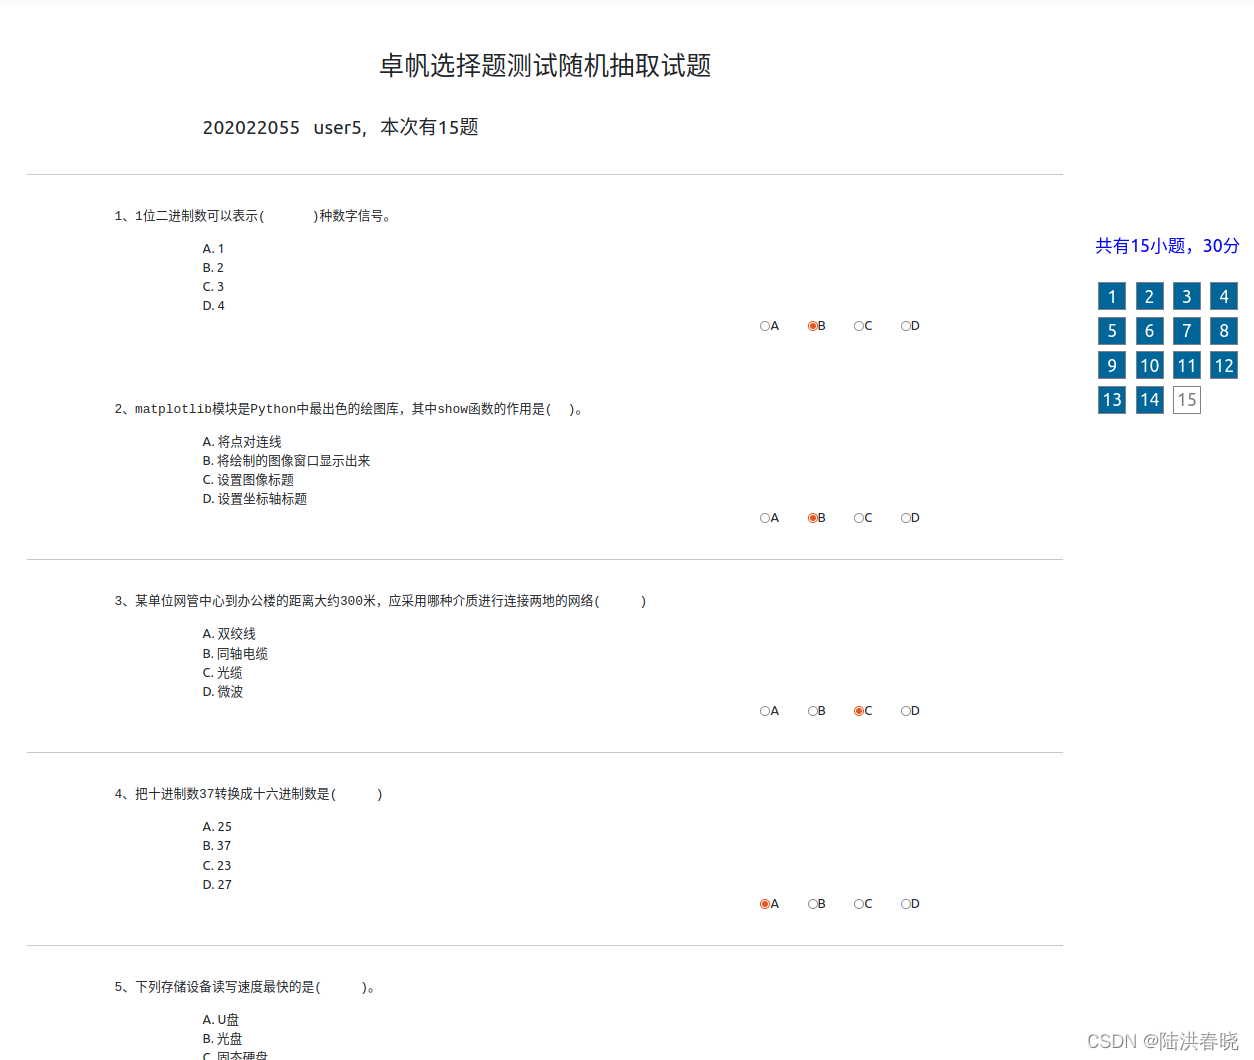
dxt = Choicetimu.objects.filter(Q( cbigitem = '卓帆')).order_by('?')[:choicecount]
title = "卓帆选择题测试随机抽取试题"
elif 1<= int( yourchoice['zhfan']) <=15:
choicecount=25
youch = str(yourchoice["zhfan"])
#选择卓帆 15 套中的某一套选择题练习
dxt = Choicetimu.objects.filter(Q( cbigitem='卓帆' ) & Q( csmallitem = youch) )
title = "卓帆选择题测试第"+ youch +"套"
#视图函数 ch_correct,订正题目的选择
curuser = request.user
choicecount=25
#下面语句是选择做错的,排除已经订正的,抽取 25 道,不足以实际为准
sqlstr = f"""select * from choicetimu where cid in (select distinct whidval from examination
where esid={curuser.sid} and whidname='chid' and whidval>0 and egrade=0 and
whidval not in (select distinct whidval from examination where esid={curuser.sid} and whidval>0 and egrade>0)) order by cid limit {choicecount} """
title = "选择题订正"
dxt = Choicetimu.objects.raw(sqlstr)
- 整理试题集
选择题的顺序很重要,将来学生做完成提交到 ch_judge 视图时要评分,评分后还以一致顺序回馈到学生端。
#整理题目的顺序,id 号放在列表中 dxt_cid_lst
dxt_cid_lst = []
for item in dxt:
    dxt_cid_lst.append(item.cid)
    choicecount += 1
#实际试题数,若为 0 返回到本应用的首页
if choicecount == 0:
        return redirect('/ch_index')
#设置 session,评分时使用,确认试题顺序
request.session['dxt_cid_lst'] = str(dxt_cid_lst)
request.session['title'] = title
#这部分代码片断,三个视图是一致的
return render(request, 'choicetest/ch_test.html', locals() )
3. 视图函数 ch_judge 作用是评分,还是通过代码来讲解。
curuser = request.user
title = request.session.get('title','-1')
#获取上述三个视图函数传递过来的题目顺序
dxt_cid_lst = eval(request.session.get('dxt_cid_lst','-1'))
#获取表单提交的学生答案
data_form  = request.POST.copy()
#每道题目构建一个 Examination 模型对象,放入列表 Exam_lst 中
Exam_lst = [];
#dxt_dct 放置试题,整理顺序
dxt_dct = {};
for item in  Choicetimu.objects.filter( Q ( cid__in = dxt_cid_lst)):
    dxt_dct[item.cid] = item

#累计学生成绩
dxt_stu_grade = 0
dxt_stu_answer = dict()
#根据题目的顺序,给每道题目评分
for chid in dxt_cid_lst:
	std_item = dxt_dct[chid]
	stu_item = dxt_stu_answer[cid]  = data_form.get(f'dxt{chid}', 'None')
	if  stu_item == std_item.canswer :
		#每题 2 分
		dxt_stu_grade += 2
		#准备模型对象
		exam = Examination(esid = curuser, whidname='chid', whidval = chid, eanswer = stu_answer, egrade = 2 )
		Exam_lst.append(exam)
	else:
		if stu_answer != 'None':
			#做错了,不得分,记录也要存入数据库
			#对没有做的题目,不做 处理
			exam = Examination(esid = curuser, whidname='chid', whidval = chid, eanswer = stu_answer, egrade = 0 )
			Exam_lst.append(exam)

	if len(Exam_list)>0:
		#bulk_create 方法,记录批量存入数据库
		Examination.objects.bulk_create(Exam_lst)
	return render(request, 'choicetest/ch_judge.html', locals()  )
二、models.py 部分
上述用到了 Choicetimu 模型,对应了数据表 choicetimu,是存取选择题 的中介。Examination 是操作答题记录的模型。
本讲中随机获取记录:Choicetimu.objects.filter(Q( cbigitem = '卓帆')).order_by('?')[:choicecount];也用到了原生 sql 命令来查询订正题的记录的:Choicetimu.objects.raw(sqlstr);对于学生练习的多个选择题的答案,有多个 Examination 对象,准备好入在一个列表 Exam_lst,使用 Examination.objects.bulk_create(Exam_lst) 可批量入库。可见,django 模型提供了很大的便利。
Choicetimu 模型定义,对应的表是 choicetimu。
class Choicetimu(models.Model):
    cid = models.AutoField(primary_key=True)
    csub = models.IntegerField(blank=True, null=True)
    ctitle = models.TextField(blank=True, null=True)
    cana = models.TextField(blank=True, null=True)
    canb = models.TextField(blank=True, null=True)
    canc = models.TextField(blank=True, null=True)
    cand = models.TextField(blank=True, null=True)
    canswer = models.TextField(blank=True, null=True)
    cbigitem = models.TextField(blank=True, null=True)
    csmallitem = models.TextField(blank=True, null=True)
    ctag = models.TextField(blank=True, null=True)
在视图 ch_judge 中 item.ctag = stu_answer,把学生答案存入字段 ctag 中一并传入模板中,可靠地做到了答案与试题一一对应。
三、templates 部分
有 3 个模板文件,ch_index.html、ch_test.html、ch_judge.html。先介绍自字义模板标签,再介绍 3 个模板的关键部分。
1. 自定义模板标签和过滤器
在项目的根目录下创建目录 templatetags 中创建文件 mytags.py,文件名自取。在 settings.py 中加一段,指明模板标签文件的位置:
'OPTIONS': {
            ............
            'libraries':{
                'mytags':'templatetags.mytags'
            }
看看 mytags.py 的内容,很简单,就是 python 的函数
from atexit import register
from django import template
register = template.Library()

#遵循这个定义形式,定义注册名 avg 的过滤器
@register.filter(name='avg')
def myavg(value):
    return sum(value)/len(value)

@register.filter(name='max')
def mymax(value):
    return max(value)

@register.filter(name='ls')
def dtols(value):
    return list(value)

@register.filter(name='ran')
def mylist(value,i=0):
	'''
	这个是带参数的过滤器
    产生从 1 开始的:{% for i in 15|ran 1%}
     '''
	return list(range(i,value))

@register.filter(name='plus')
def mod(value,i):
    return value*int(i)

@register.filter(name='mod')
def mod(value,i):
    return  0 if int(value)%int(i)==0 else 10-int(value)%int(i)

#根据下标返回元素,可以是列表或字典
@register.filter(name='index')
def index(value,i):
    return value[i]

@register.filter(name='split')
def split(value, key):
    return value.split(key)

#以下是一个 在模板中定义变量的标签
class SetVarNode(template.Node):
    def __init__(self, var_name, var_value):
        self.var_name = var_name
        self.var_value = var_value

    def render(self, context):
        try:
            value = template.Variable(self.var_value).resolve(context)
        except template.VariableDoesNotExist:
            value = ""
        context[self.var_name] = value
        return u""

def set_var(parser, token):
    """
        {% set <var_name>  = <var_value> %}
    """
    parts = token.split_contents()
    if len(parts) < 4:
        raise template.TemplateSyntaxError("'set 标签使用形式:  {% set <var_name>  = <var_value> %}")
    return SetVarNode(parts[1], parts[3])
#注册标签
register.tag('set',set_var)
这里有个效率问题:尽量在视图函数中把所需的简单变量、列表、字典准备好,在模板中少用过滤器处理数据,效率会更高。
2.模板文件内容介绍
在模板文件的最部,{% load mytags %}引入自定义的模板标签及过滤器。
ch_index.html 部分内容,

{% block content%}
<div class='row'>
    <div class="col-md-1"></div>
    <div class="col-md-10" >
        <div class='row'><h3>选择题完成情况:</h3></div>
         <font size="5">{{curuser.sclass}}  {{curuser.sname}}  {{curuser.sno}} 正确率:
         {% if r_e_len > 0 %}
             {{ rightrate | floatformat:"2" }}%
         {% else %}
             None
         {% endif%}
         进度:{{ progressrate |floatformat:"2" }}%
         {% if errorlen > 0 %}
		      <!-- a href="{% rul 'chcorrect' %}" target="_blank"  -->
             <a href="/ch_correct/" target="_blank"> 订正 </a>
         {% endif %}<br>
           </font>
         <br>
         {% for i in chlist%}
            {% if i in rights  %}
                <div style="color:blue;display: inline-block;" align="center">✓</div>
            {% elif i in errors %}
                <div style="color:red; display: inline-block;" align="center">✗</div>
            {% else %}
                <div style="color:grey;display: inline-block;" align="center">.</div>
            {% endif%}
          {% endfor%}
    </div>
</div>
{% endblock %}
ch_test.html部分内容,代码注释如下
<br>
<form name="eqt" method="post" action="/ch_judge/">
  <div class="container py-5" >
    {% for rec in dxt %}
    <div class="row" >
      <div class="col-md-1"> </div>
      <div class="col-md-10" >
          <!--显示题干-->
          <a id="targ{{rec.cid}}" name="{{rec.cid}}">
          {{forloop.counter}}、{{rec.ctitle|safe}}
          </a>
      </div>
      </div>
    <div class="row" >
      <div class="col-md-2"> </div>
      <div class="col-md-8" >
            <!--显示选项-->
            A. {{rec.cana|safe}} <br>
            B. {{rec.canb|safe}} <br>
            C. {{rec.canc|safe}} <br>
            D. {{rec.cand|safe}} <br>
      </div>
    </div>

    <div class="row" >
      <div class="col-md-7"> </div>
      <div class="col-md-5" >
            <div align="center">
              <!--表单元素,点击后 右侧栏对应题号深色,表示已做-->
              <label> <input type="radio" name="dxt{{rec.cid}}" value="A" onclick="haddo('nvref{{rec.cid}}')">A   </label>
              <label> <input type="radio" name="dxt{{rec.cid}}" value="B" onclick="haddo('nvref{{rec.cid}}')">B   </label>
              <label> <input type="radio" name="dxt{{rec.cid}}" value="C" onclick="haddo('nvref{{rec.cid}}')">C   </label>
              <label> <input type="radio" name="dxt{{rec.cid}}" value="D" onclick="haddo('nvref{{rec.cid}}')">D   </label>
            </div>
      </div>
  </div>
  <br>
  {% endfor %}

  <div class="row" >
    <div class="col-md-3"> <input type="submit" value=" 提 交 "></div>
    <div class="col-md-8" >
    </div>
  </div>
</form>
<br>
<!-- 右侧提示栏,深色表示已做,白色表示没做。点击可以跳转到相应的题目 -->
<div id='infoti' class="info-div" > 共有{{ choicecount }}小题,{{choicecount|plus:2}}分</div>
<div id='nvtodo' class="nav-div">
    {% for i in dxt_cid_lst %}
        <div class='aido' id='nvref{{i}}'   style="width:35px;height:35px;border:1px solid grey;color:gray;background:#ffffff;
        margin: 4px 4px 4px 4px; display: inline-block;padding:0px  0px 5px ;cursor:pointer;font-size:22px;"
        align="center"
        onclick='location.href="#{{i}}"'>{{forloop.counter}}</div>
    {% endfor %} <br>
</div>
ch_judge.html部分内容,

<!--选择题 评分 -->
    <div  class="row" >
        <div class="col-md-1"></div>
        <div class="col-md-10">
            <table align="left" >
                <tr><td> <font align="center" size="5"><br/>一、选择题:(共{{25}}小题),共得分:{{dxt_stu_grade}}</font> </td><td> </td></tr>
                {% for id in dxt_cid_lst %}
                    {% with  dxt_dct|index:id as rec %}
                    <tr><td colspan="2"><a id="targ{{forloop.counter}}" name="{{forloop.counter}}">   </a>
                        <pre>{{forloop.counter}}、{{rec.ctitle | safe}}</pre></td></tr>
                    <tr><td colspan"2">
                             A. {{rec.cana | safe}} <br>
                      B. {{rec.canb | safe}} <br>
                      C. {{rec.canc | safe}} <br>
                      D. {{rec.cand | safe}} <br>
                    {% if rec.canswer == dxt_stu_answer|index:id %}
                        <font color='blue'> 标准答案:{{rec.canswer }}       你的答案:{{dxt_stu_answer|index:i }}</font>
                    {% else %}
                        <font color='red'> 标准答案:{{rec.canswer }}       你的答案:{{dxt_stu_answer|index:id }}</font>
						<!--错题,右侧题号显示为红色-->
                        <script> document.getElementById('nvref{{forloop.counter}}').style="width:35px;height:35px;border:1px solid red;color:white;background:#ff0000;margin:4px 4px 4px 4px; display: inline-block;padding:0px 0px 5px;cursor:pointer;font-size:22px;"  </script>
                    {% endif %}
                    </td></tr>
                    {% endwith %}
                {% endfor %}
            </table>
        </div>
        <div class="col-md-1"></div>
    </div>
过滤器使用的例子,dxt_dct|index:id用管道符`|`加过滤器及参数的形式来调用,之间不要有空格。
总感觉这样写的教程缺乏吸引力,编程特别是网站方面的教程该如何写作才能出彩呢,期望您的建议。


 1634
1634


 被折叠的 条评论
为什么被折叠?
被折叠的 条评论
为什么被折叠?
 到【灌水乐园】发言


