


 本文介绍了SpringBoot自定义Starter的原理和步骤,包括创建Starter项目、定义配置属性类、编写服务类和自动配置类,以及如何实现条件装配和配置提示。通过自定义Starter,可以方便地封装和复用项目中的统一能力,提高开发效率。
SpringBoot秉承“约定大于配置”的开发方式,使得我们基于Spring Boot开发项目的效率变得十分高。
以jar包封装一些统一的规范能力:
项目中要用的统一能力可以通过集中封装的方式集成到一个一个独立分发的jar包中提供给其他的项目使用,这样就把一些统一的规范集中管控,从而缩小了泛化的可能性,当然也抑制了工程的自由度,这个要根据项目的实际情况做一个平横。SpringBoot提供了更好的方式来实现这个目标,那就是Starter
Starter是实现SpringBoot“约定大于配置”的核心技术之一。
自定义starter
SpringBoot通过starter方式提供了封装更为精准的独立服务能力,让使用方开箱即用。目前很多开源系统都提供了starter方式,这样大大降低了我们使用这些优秀开源系统的门槛,也极大提高了开发效率。
命名规范:
1、官方命名空间(SpringBoot旗下项目)
spring-boot-starter-{name} 使用前缀 spring-boot-starter-
2、非官方自定义命名空间
{name}-spring-boot-starter 使用后缀 -spring-boot-starter
开发Starter的步骤:
1、创建Starter项目
2、定义Starter需要的配置类(xxxProperties)
3、编写服务类
4、编写自动配置类
5、加载自动装配(两种方式:注解或者spring.factories,后续在实例中介绍)
6、编写配置提示文件,spring-configuration-metadata.json(不是必须的)
---------------------------------------------- 快速上手 -----------------------------------------------
1、创建spring boot项目,命名为mymsgstarter-spring-boot-starter。项目结构见图。其中MsgProperties、MsgAutoConfiguration、MsgService分别为配置属性类、配置类、和服务类。
2、添加依赖
<dependency>
            <groupId>org.springframework.boot</groupId>
           <artifactId>spring-boot-autoconfigure</artifactId>
            <version>2.2.2.RELEASE</version>
</dependency>
3、配置属性类MsgProperties,使用@ConfigurationProperties(prefix=“mystarter.config”)声明,并设置prefix前缀(这里也可以定义属性类中的属性msg默认值)。
import org.springframework.boot.context.properties.ConfigurationProperties;

/**
* @Description: 属性配置类
* @Author: Top
* @Version: V1.0
* @Date: 2020/6/4 2:18 下午
*/
@ConfigurationProperties(prefix = "mystarter.config")
public class MsgProperties {

String name;

Integer age;

public String getName() {
return name;
}

public void setName(String name) {
this.name = name;
}

public Integer getAge() {
return age;
}

public void setAge(Integer age) {
this.age = age;
}
}
4、服务类MsgService,定义msg属性,此类为普通的service,提供给其他服务调用。
public class MsgService {
private MsgProperties personConfigProperties;

public MsgService(){};

public MsgService(MsgProperties personConfigProperties){
this.personConfigProperties = personConfigProperties;
}

public String getName(){
return personConfigProperties.getName();
}
}
5、自动配置类MsgAutoConfiguration。注入配置属性类,并把配置属性类中的msg值赋予给service中msg。因为我们没有去自动构建MsgService的实例,接下来开始构建MsgService
@Configuration
@EnableConfigurationProperties(MsgProperties.class)
@ConditionalOnClass(MsgService.class)
public class MsgAutoConfiguration {

@Bean
public MsgService personService(MsgProperties properties){
return new MsgService(properties);
}
}
6、自动装配(非常重要的一步)
Spring Boot会默认扫描跟启动类平级的包,如果Starter的目录结构和目标项目的目录结构一样,那现在就可以在目标项目中引入依赖使用了
如果我们的Starter跟启动类不在同一个主包下,如何让MsgAutoConfiguration 生效?
方式一:在resources下创建一个META-INF文件夹,然后在META-INF文件夹中创建一个spring.factories文件,文件中指定自动配置的类
org.springframework.boot.autoconfigure.EnableAutoConfiguration=cm.zjg.common. MsgAutoConfiguration
 Spring Boot启动时会去读取spring.factories文件,然后根据配置激活对应的配置类,到底为止就简单的实现了一个Starter包。可以引入使用了

 现在可以在其他的项目中引入这个Starter包:
<dependency> <groupId>com.zjg</groupId>
                <artifactId>mymsgstarter-spring-boot-starter</artifactId>
                <version>0.0.6-SNAPSHOT</version>
</dependency>
引入依赖之后就直接可以使用MsgService,MsgService在项目启动的时候已经自动初始化好。
@RestController
       @RequestMapping("/api/{edition}/page")
       public class MyPageHelperController {

      @Autowired
       private MsgService msgService;

       @GetMapping("/myPage")
       @ResponseBody
       public Result expenseStatement(HttpServletRequest request, HttpServletResponse response,
       @PathVariable("edition") String edition,
       @RequestParam(value = "pageNum", required = false) Integer pageNum,
       @RequestParam(value = "pageSize", required = false) Integer pageSize) {
       System.out.println(msgService);
       System.out.println(msgService.getName());
       return null;
        }
   }
  方式二:很多时候我们不想引入了Starter包就执行初始化的逻辑,想要用户来指定是否开启Starter包的自动装配功能,比如常用的  @EnableAsync这个注解就是用于开启异步执行的功能
                同样的我们也可以通过注解的方式来开启是否自动配置,如果用注解的方式,那么spring.factories就不需要编写了,也不需要考虑包结构是否一致的问题了。
import org.springframework.context.annotation.Import;

import java.lang.annotation.*;

@Target(ElementType.TYPE)
@Retention(RetentionPolicy.RUNTIME)
@Documented
@Inherited
@Import({MsgAutoConfiguration.class})
public @interface EnableMsgConfigure {
}

核心是@Import({UserAutoConfigure.class})这行代码,通过导入的方式实现把UserAutoConfigure实例加入SpringIOC容器中,这样就能开启自动配置了。
使用方式就是在启动类上加上该注解,代码入下:
@SpringBootApplication
@MapperScan("com.example.demo.dao")
@ EnableMsgConfigure
public class DemoApplication {

public static void main(String[] args) {
SpringApplication.run(DemoApplication.class, args);
}
}
在某些场景下,UserAutoConfigure中会配置多个对象,对于这些对象,不想全部配置,也想让用户指定需要开启配置的时候再去构建对象,这个时候我们可以通过@ConditionalOnProperty来指定是否开启配置的功能,代码如下:
package com.demo.starter.config;

import com.demo.starter.properties.DemoProperties;
import com.demo.starter.service.DemoService;
import org.springframework.beans.factory.annotation.Autowired;
import org.springframework.boot.autoconfigure.condition.ConditionalOnProperty;
import org.springframework.boot.context.properties.EnableConfigurationProperties;
import org.springframework.context.annotation.Bean;
import org.springframework.context.annotation.Configuration;

/**
 * 描述:配置类
 *
 * @Author shf
 * @Date 2019/5/7 21:50
 * @Version V1.0
 **/
@Configuration
@EnableConfigurationProperties(DemoProperties.class)
@ConditionalOnProperty(
        prefix = "demo",
        name = "isopen",
        havingValue = "true"
)
public class DemoConfig {
    @Autowired
    private DemoProperties demoProperties;

    @Bean(name = "demo")
    public DemoService demoService(){
        return new DemoService(demoProperties.getSayWhat(), demoProperties.getToWho());
    }
}
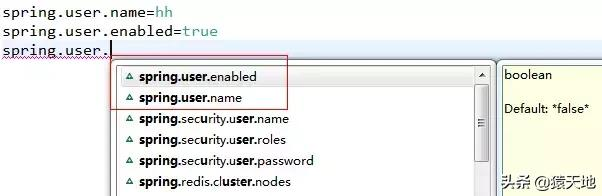
通过上面的配置,只有当启动类加了@EnableUserClient并且配置文件中spring.user.enabled=true的时候才会自动配置UserClient 。
在自定义Starter包的过程中,还有一点也比较重要,就是需要对配置的内容项进行提示,需要注意的是Eclipse中是不支持提示的,我用的Spring Tools 4 for Eclipse,如下图:
Spring Boot 必备技能之Starter自定义
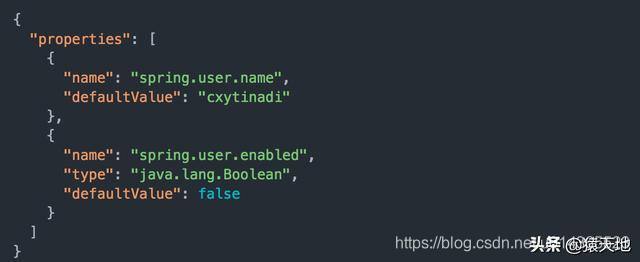
定义提示内容需要在META-INF中创建一个
spring-configuration-metadata.json
Spring Boot 必备技能之Starter自定义
name:配置名
type:配置的数据类型
defaultValue:默认值
starter改造成适配springboot工程和springmvc工程方案
有2个地方需要修改:
(1)咱现有starter中,配置参数的编码方式是:@ConfigurationProperties(prefix = “ccb.framework.config.xxx”),这种方式是springboot特有的方式,把这种方式调整成spring兼容的模式即可
(2)starter组件中,springboot部分依赖,修改作用域为provided
经过上面两个步骤的修改,从代码层面,所有的编码都是适配springboot、spring的。其中第二部调整starter中springboot的maven作用域为provided之后,springboot工程在引入该starter的时候,因为springboot工程默认已经有了starter需要的依赖(springboot依赖包),所以不需要单独再添加依赖;springmvc工程引入该starter的时候,spring工程也已经有了starter所需要的基本依赖(spring依赖包),所以也不需要单独添加依赖,其实就是共用了工程(springboot/spring)本身的依赖。
另外:改造之后的starter,在springboot工程中天然支持,自动装配依然有效;但是spring工程中,需要添加扫码路径即可,如:
<context:component-scan base-package=“top.mowang, cm.zjg”>
</context:component-scan>


 被折叠的 条评论
为什么被折叠?
被折叠的 条评论
为什么被折叠?
 到【灌水乐园】发言


