


本脚本是一个基于Python的应用,旨在演示如何使用SuperGlue算法进行图像之间的特征匹配。SuperGlue是一个强大的特征匹配工具,能够在不同的图像之间找到对应的关键点。这个工具尤其适用于计算机视觉任务,如立体视觉、图像拼接、对象识别和追踪等场景。脚本使用PyTorch框架,并且可以选择在CPU或GPU上运行。
脚本的工作流程如下:
- 解析命令行参数,用于设置输入输出目录、图像尺寸、SuperGlue配置等。
- 根据用户选择,决定算法是在CPU还是GPU上执行。
- 加载预设的配置,初始化SuperPoint和SuperGlue模型。
- 定义图像预处理函数来调整图像大小。
- 加载两幅图像,调整它们的大小,并将它们转换为PyTorch张量。
- 使用SuperPoint提取关键点和描述符。
- 使用SuperGlue算法匹配两幅图像的关键点。
- 可视化并打印匹配的关键点坐标。
- 如果设置了输出目录,将结果图像写到磁盘上。
这个脚本展示了如何在实践中使用深度学习模型来处理实际问题,并提供了图像匹配演示。
#! /usr/bin/env python3
import argparse
import matplotlib.cm as cm
import cv2
from pathlib import Path
import torch
from models.matching import Matching
from models.utils import (make_matching_plot_fast, frame2tensor)
torch.set_grad_enabled(False)  # 关闭PyTorch的梯度计算,提高效率,因为我们不需要进行模型训练

# 创建命令行参数解析器,以便从命令行接收参数
parser = argparse.ArgumentParser(description='SuperGlue',
                                 formatter_class=argparse.ArgumentDefaultsHelpFormatter)
# 添加命令行参数
parser.add_argument('--input', type=str, default='assets/freiburg_sequence/',
                    help='Input directory or video file')
parser.add_argument('--output_dir', type=str, default=None,
                    help='Directory to write output frames (default: None)')
parser.add_argument('--resize', type=int, nargs='+', default=[1241, 376],
                    help='Resize input frames (default: [640, 480])')
parser.add_argument('--superglue', choices={'indoor', 'outdoor'}, default='outdoor',
                    help='SuperGlue weights (default: indoor)')
parser.add_argument('--show_keypoints', action='store_true',
                    help='Show detected keypoints (default: False)')
parser.add_argument('--no_display', action='store_true',
                    help='Do not display images (useful when running remotely)')
parser.add_argument('--force_cpu', action='store_true',
                    help='Force PyTorch to run on CPU')

# 解析命令行参数
opt = parser.parse_args()

# 确定程序是运行在GPU还是CPU
device = 'cuda' if torch.cuda.is_available() and not opt.force_cpu else 'cpu'

# 设置SuperPoint和SuperGlue的配置参数
config = {
    'superpoint': {
        'nms_radius': 4,
        'keypoint_threshold': 0.005,
        'max_keypoints': -1
    },
    'superglue': {
        'weights': opt.superglue,
        'sinkhorn_iterations': 20,
        'match_threshold': 0.2,
    }
}

# 创建Matching类的实例,用于图像匹配
matching = Matching(config).eval().to(device)
keys = ['keypoints', 'scores', 'descriptors']

# 函数:处理图像尺寸调整
def process_resize(w, h, resize):
    # 确保resize参数是合法的
    assert(len(resize) > 0 and len(resize) <= 2)
    # 如果只提供了一个值,基于最大维度调整比例
    if len(resize) == 1 and resize[0] > -1:
        scale = resize[0] / max(h, w)
        w_new, h_new = int(round(w*scale)), int(round(h*scale))
        # 如果提供的值是-1,保持原有尺寸
    elif len(resize) == 1 and resize[0] == -1:
        w_new, h_new = w, h
    else:  # len(resize) == 2:  # 如果提供了两个值,直接使用这两个值作为新的宽和高
        w_new, h_new = resize[0], resize[1]

    # 如果新的分辨率太小或太大,给出警告
    if max(w_new, h_new) < 160:
        print('警告:输入分辨率非常小,结果可能会有很大差异')
    elif max(w_new, h_new) > 2000:
        print('警告:输入分辨率非常大,可能会导致内存不足')

    return w_new, h_new

# 定义load_image函数,用于加载和预处理图像
def load_image(impath, resize):
    grayim = cv2.imread(impath, 0)
    # 以灰度模式读取图像
    if grayim is None:
        raise Exception('Error reading image %s' % impath)
    w, h = grayim.shape[1], grayim.shape[0]
    w_new, h_new = process_resize(w, h, resize)
    # 调用process_resize函数计算调整后的尺寸
    grayim = cv2.resize(grayim, (w_new, h_new), interpolation=cv2.INTER_AREA)
    # 使用cv2.resize函数调整图像尺寸
    return grayim
    # 返回调整后的灰度图像


image_path_0 = "/home/fairlee/786D6A341753F4B4/KITTI/sequences_kitti_00_21/01/image_0/000000.png"
frame0 = load_image(image_path_0, opt.resize)

image_path_1 = "/home/fairlee/786D6A341753F4B4/KITTI/sequences_kitti_00_21/01/image_0/000001.png"
frame1 = load_image(image_path_1, opt.resize)


if __name__ == '__main__':
    # 将第一帧图像转换为张量,并移动到指定设备上
    frame_tensor0 = frame2tensor(frame0, device)
    # 使用SuperPoint提取第一帧图像的关键点和描述符
    last_data = matching.superpoint({'image': frame_tensor0})
    # 为第一帧图像的关键点、得分和描述符添加'0'后缀,以区分不同帧
    last_data = {k + '0': last_data[k] for k in keys}
    # 将第一帧图像的张量存储在last_data字典中
    last_data['image0'] = frame_tensor0
    # 存储第一帧图像
    last_frame = frame0
    # 存储第一帧图像的ID
    last_image_id = 0

    # 将第二帧图像转换为张量,并移动到指定设备上
    frame_tensor1 = frame2tensor(frame1, device)
    # 使用SuperGlue进行特征匹配,将第一帧图像的数据与第二帧图像的张量传递给matching函数
    pred = matching({**last_data, 'image1': frame_tensor1})
    # 获取第一帧图像的关键点坐标,并将其转换为NumPy数组
    kpts0 = last_data['keypoints0'][0].cpu().numpy()
    # 获取第二帧图像的关键点坐标,并将其转换为NumPy数组
    kpts1 = pred['keypoints1'][0].cpu().numpy()

    # 获取匹配结果,将其转换为NumPy数组
    matches = pred['matches0'][0].cpu().numpy()
    # 获取匹配置信度,将其转换为NumPy数组
    confidence = pred['matching_scores0'][0].cpu().numpy()

    # 找到有效的匹配,即匹配索引大于-1的位置
    valid = matches > -1
    # 获取第一帧图像中有效匹配的关键点坐标
    mkpts0 = kpts0[valid]
    # 获取第二帧图像中与第一帧图像有效匹配的关键点坐标
    mkpts1 = kpts1[matches[valid]]

    stem0, stem1 = last_image_id, 1
    # 打印匹配的关键点信息
    print(f"Matched keypoints in frame {stem0} and {stem1}:")
    for i, (kp0, kp1) in enumerate(zip(mkpts0, mkpts1)):
        print(f"Match {i}: ({kp0[0]:.2f}, {kp0[1]:.2f}) -> ({kp1[0]:.2f}, {kp1[1]:.2f})")

    color = cm.jet(confidence[valid])
    text = [
        'SuperGlue',
        'Keypoints: {}:{}'.format(len(kpts0), len(kpts1)),
        'Matches: {}'.format(len(mkpts0))
    ]
    k_thresh = matching.superpoint.config['keypoint_threshold']
    m_thresh = matching.superglue.config['match_threshold']
    small_text = [
        'Keypoint Threshold: {:.4f}'.format(k_thresh),
        'Match Threshold: {:.2f}'.format(m_thresh),
        'Image Pair: {:06}:{:06}'.format(stem0, stem1),
    ]

    out = make_matching_plot_fast(
        last_frame, frame1, kpts0, kpts1, mkpts0, mkpts1, color, text,
        path=None, show_keypoints=opt.show_keypoints, small_text=small_text)

    if not opt.no_display:
        cv2.imshow('SuperGlue matches', out)
        cv2.waitKey(0)
        cv2.destroyAllWindows()

    if opt.output_dir is not None:
        stem = 'matches_{:06}_{:06}'.format(stem0, stem1)
        out_file = str(Path(opt.output_dir, stem + '.png'))
        print('\nWriting image to {}'.format(out_file))
        cv2.imwrite(out_file, out)
第二个版本的代码:
#! /usr/bin/env python3
import cv2
import torch
from models.matching import Matching
from models.utils import (frame2tensor)
torch.set_grad_enabled(False)

# 设置SuperPoint和SuperGlue的配置参数
config = {
    'superpoint': {
        'nms_radius': 4,
        'keypoint_threshold': 0.005,
        'max_keypoints': -1
    },
    'superglue': {
        'weights': 'outdoor',
        'sinkhorn_iterations': 20,
        'match_threshold': 0.2,
    }
}

device = 'cuda' if torch.cuda.is_available() else 'cpu'
# 创建Matching类的实例,用于图像匹配
matching = Matching(config).eval().to(device)
keys = ['keypoints', 'scores', 'descriptors']

# 对于灰度图像,返回的NumPy数组将是一个二维数组,其中数组的形状对应于图像的高度和宽度(H x W)。
# 每个元素的值代表了对应像素的亮度,通常是一个0到255的整数(对于8位灰度图像)。
frame0 = cv2.imread("/home/fairlee/000001.jpg", 0)
frame1 = cv2.imread("/home/fairlee/000000.jpg", 0)

def match_frames(frame0, frame1, device, matching, keys):
    """
    Match keypoints between two frames and return the matched coordinates and confidence scores.

    Parameters:
    - frame0: Numpy array, first image frame.
    - frame1: Numpy array, second image frame.
    - device: The device to perform computation on.
    - matching: Matching object with a method to match points between frames.
    - keys: List of keys to extract from the matching data.

    Returns:
    A tuple of (mkpts0, mkpts1, confidence_scores), where:
    - mkpts0: Matched keypoints in the first frame.
    - mkpts1: Matched keypoints in the second frame.
    - confidence_scores: Confidence scores of the matches.
    """
    # Convert frames to tensors and move to the device
    frame_tensor0 = frame2tensor(frame0, device)
    frame_tensor1 = frame2tensor(frame1, device)

    # Get data from the first frame
    last_data = matching.superpoint({'image': frame_tensor0})
    last_data = {k + '0': last_data[k] for k in keys}
    last_data['image0'] = frame_tensor0

    # Perform matching
    pred = matching({**last_data, 'image1': frame_tensor1})

    # Extract keypoints and convert to Numpy arrays
    kpts0 = last_data['keypoints0'][0].cpu().numpy()
    kpts1 = pred['keypoints1'][0].cpu().numpy()

    # Extract matches and confidence scores, convert to Numpy arrays
    matches = pred['matches0'][0].cpu().numpy()
    confidence = pred['matching_scores0'][0].cpu().numpy()

    # Filter valid matches
    valid = matches > -1
    mkpts0 = kpts0[valid]
    mkpts1 = kpts1[matches[valid]]

    return mkpts0, mkpts1, confidence[valid]
结果:
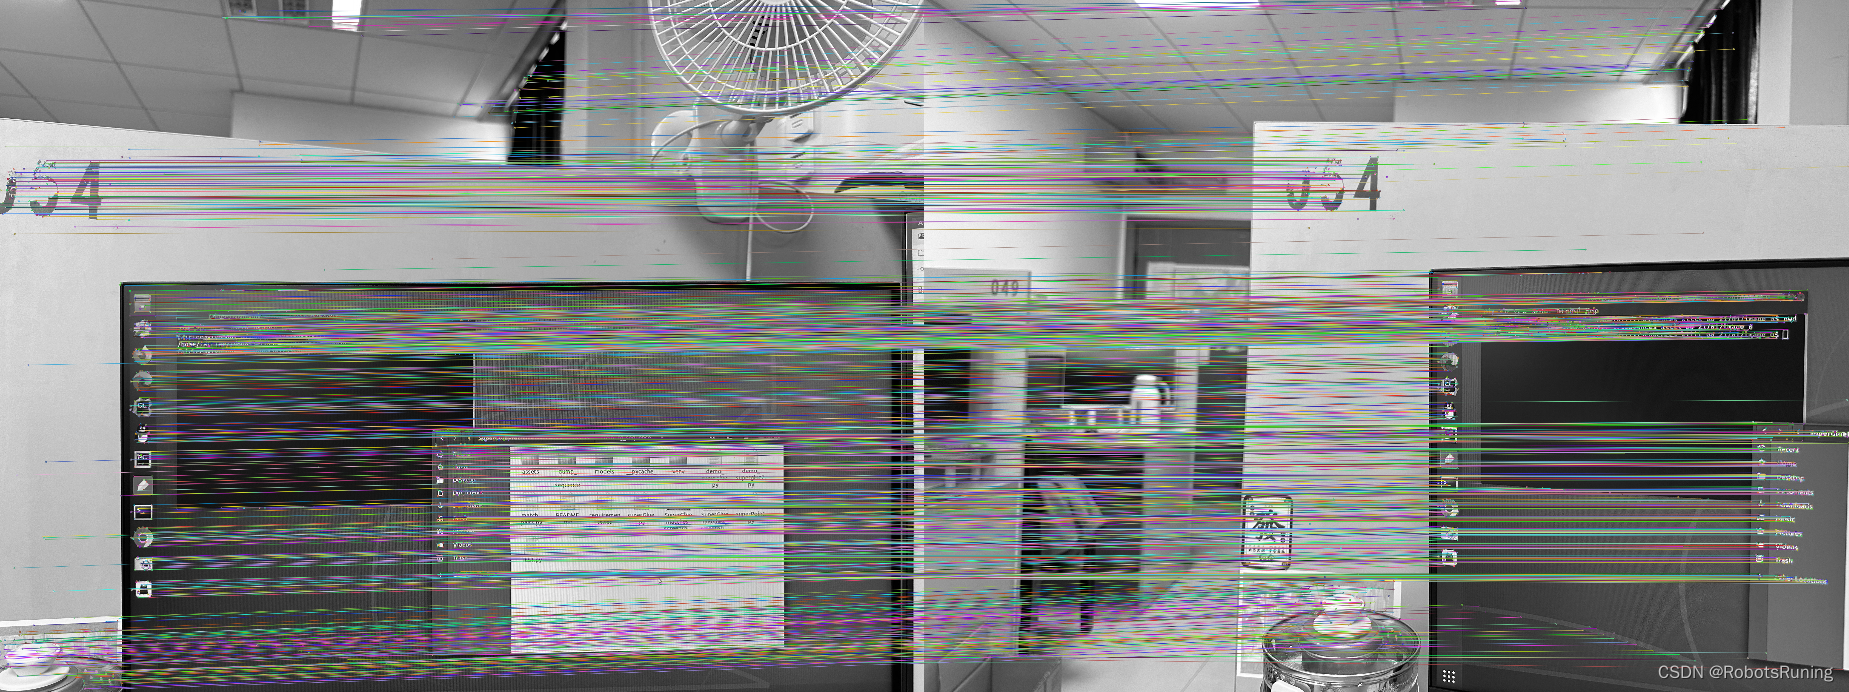
通过运行这段代码,我们可以看到SuperGlue算法在图像特征匹配方面的强大能力。代码首先处理输入图像,然后使用SuperPoint模型提取特征点和描述子,接着SuperGlue模型根据描述子进行关键点匹配。匹配过程的结果会被可视化显示出来,如果指定了输出目录,还会将结果图像保存下来。


 864
864


 被折叠的 条评论
为什么被折叠?
被折叠的 条评论
为什么被折叠?
 到【灌水乐园】发言


