


DockerFile
用来构建docker的镜像文件,可以理解为命令参数脚本。
构建步骤
- 编写一个DockerFile文件
- Docker build构建成为一个镜像
- docke run运行镜像
- docker push发布镜像,可以发布到docker hub或者腾讯云、阿里云仓库
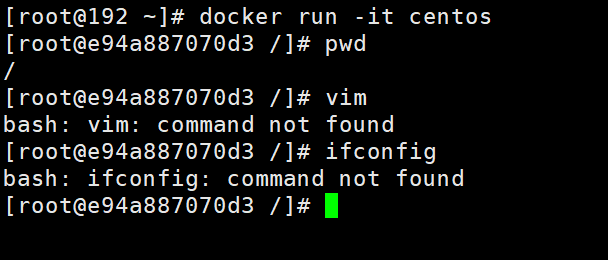
官方的Centos DockerFile示例
路径请点击这里获取
![[外链图片转存失败,源站可能有防盗链机制,建议将图片保存下来直接上传(img-csAtnqYf-1631416860087)(C:\Users\hubertxxu.TENCENT\AppData\Roaming\Typora\typora-user-images\image-20210911155955311.png)]](https://img-blog.csdnimg.cn/f3fb6f9468fb4a1381a6e07518913e48.png?x-oss-process=image/watermark,type_ZHJvaWRzYW5zZmFsbGJhY2s,shadow_50,text_Q1NETiBA6Z2Z6Z2Z5rWB5reM55qE5p-v5rqq,size_20,color_FFFFFF,t_70,g_se,x_16)
可以看到centos的官方镜像就是一个压缩包,我们后面制作镜像的时候可以以此为基础来构建更多更复杂的镜像。
DockerFile基础知识
-
每条指令都是大写字母
-
按照从上到下的顺序来执行构建
-
**#**代表注释
-
每一条指令都会创建一个新的镜像层并提交

docker是面向开发的,我们以后要发布项目,做镜像,就要编写dockerfile文件,这个文件十分简单!
Docker镜像逐渐成为企业的交付标准,必须掌握!
DockerFile命令
FROM # 基础镜像 比如centos
MAINTAINER # 镜像是谁写的 姓名+邮箱
RUN # 镜像构建时需要运行的命令
ADD # 添加,比如添加一个tomcat压缩包
WORKDIR # 镜像的工作目录
VOLUME # 挂载的目录
EXPOSE # 指定暴露端口,跟-p一个道理
RUN # 最终要运行的
CMD # 指定这个容器启动的时候要运行的命令,只有最后一个会生效,而且可被替代
ENTRYPOINT # 指定这个容器启动的时候要运行的命令,可以追加命令
ONBUILD # 当构建一个被继承Dockerfile 这个时候运行ONBUILD指定,触发指令
COPY # 将文件拷贝到镜像中
ENV # 构建的时候设置环境变量
构建自己的Centos镜像
Docker hub中99%的镜像都是从FROM scratch开始的。
-
新建一个文件夹,用于生成镜像
[root@VM-87-165-centos /home]# mkdir myCentos [root@VM-87-165-centos /home]# cd myCentos/ [root@VM-87-165-centos /home/myCentos]# ls [root@VM-87-165-centos /home/myCentos]# touch DockerFile [root@VM-87-165-centos /home/myCentos]# ls DockerFile [root@VM-87-165-centos /home/myCentos]# -
看看官方的centos不支持哪些指令,我们可以扩展一下,用来区别我们自己做的centos
-
编写我们自己的DockerFile
注意: 如果你的dockerfile文件名字就叫做DockerfIle,那么是可以直接使用docker build 来编译的 如果不是 则需要使用docker build -f 文件名
# Dockerfile文件 # 给官方的centos增加一些指令 FROM centos # 基础镜像来自centos MAINTAINER hubertxxu<xupenghu@outlook.com> # 贡献值名字 国际管理是姓名+邮箱 ENV MYPATH /usr/local # 构建的时候设置环境变量 WORKDIR $MYPATH # 镜像的工作目录 RUN yum -y install vim RUN yum -y install net-tools # 安装额外的指令 EXPOSE 80 # 指定暴露端口,跟-p一个道理 CMD echo $MYPATH CMD echo "----end----" CMD /bin/bash-
编译镜像
# docker build -t # -t表示要加上一个tag 镜像名:tag版本号 一定要注意后面还有一个 . docker build -t xphcentos:0.1 . [root@VM-87-165-centos /home/myCentos]# docker build -t xphcentos:0.1 . Sending build context to Docker daemon 2.048kB Step 1/9 : FROM centos ---> 300e315adb2f Step 2/9 : MAINTAINER hubertxxu<xupenghu@outlook.com> # 贡献值名字 国际管理是姓名+邮箱 ---> Using cache ---> 0e034ae6adb0 Step 3/9 : ENV MYPATH /usr/local # 构建的时候设置环境变量 ---> Using cache ---> 24612400590d Step 4/9 : WORKDIR $MYPATH # 镜像的工作目录 ---> Using cache ---> 23c0397642dd Step 5/9 : RUN yum -y install vim ---> Using cache ---> ca8405aefd6e Step 6/9 : RUN yum -y install net-tools # 安装额外的指令 ---> Using cache ---> 47bfc2326313 Step 7/9 : CMD echo $MYPATH ---> Running in def1557cd308 Removing intermediate container def1557cd308 ---> 2229c0494132 Step 8/9 : CMD echo "----end----" ---> Running in 55c9738a5fb0 Removing intermediate container 55c9738a5fb0 ---> c1a2b589b27c Step 9/9 : CMD /bin/bash ---> Running in c179518a4dfc Removing intermediate container c179518a4dfc ---> a2a04f681253 Successfully built a2a04f681253 Successfully tagged xphcentos:0.1-
运行&&测试镜像
[root@VM-87-165-centos /home/myCentos]# docker images REPOSITORY TAG IMAGE ID CREATED SIZE xphcentos 0.1 a2a04f681253 4 minutes ago 293MB portainer/portainer latest 580c0e4e98b0 5 months ago 79.1MB hello-world latest d1165f221234 6 months ago 13.3kB centos latest 300e315adb2f 9 months ago 209MB [root@e554346292fa local # 构建的时候设置环境变量 # 镜像的工作目录]# [root@e554346292fa local # 构建的时候设置环境变量 # 镜像的工作目录]# ls [root@e554346292fa local # 构建的时候设置环境变量 # 镜像的工作目录]# touch a.c [root@e554346292fa local # 构建的时候设置环境变量 # 镜像的工作目录]# vim a.c [root@e554346292fa local # 构建的时候设置环境变量 # 镜像的工作目录]# [root@e554346292fa local # 构建的时候设置环境变量 # 镜像的工作目录]# # 大家还是不要把注释写道dockerfile里.... -
查看构建过程
# docker history 镜像id
[root@VM-87-165-centos /home/myCentos]# docker history 69f7327342dd
IMAGE          CREATED          CREATED BY                                      SIZE      COMMENT
69f7327342dd   2 minutes ago    /bin/sh -c #(nop)  CMD ["/bin/sh" "-c" "/bin…   0B
b54fed430b0d   2 minutes ago    /bin/sh -c #(nop)  CMD ["/bin/sh" "-c" "echo…   0B
df12bb78568c   2 minutes ago    /bin/sh -c #(nop)  CMD ["/bin/sh" "-c" "echo…   0B
4b97837e46ca   2 minutes ago    /bin/sh -c yum -y install net-tools # 安装额…      14.4MB
4736aae26eb0   2 minutes ago    /bin/sh -c yum -y install vim                   69.5MB
a6a7d7735d3f   2 minutes ago    /bin/sh -c #(nop) WORKDIR /usr/local            0B
15ecf0e4cf7c   2 minutes ago    /bin/sh -c #(nop)  ENV MYPATH=/usr/local        0B
0e034ae6adb0   11 minutes ago   /bin/sh -c #(nop)  MAINTAINER hubertxxu<xupe…   0B
300e315adb2f   9 months ago     /bin/sh -c #(nop)  CMD ["/bin/bash"]            0B
<missing>      9 months ago     /bin/sh -c #(nop)  LABEL org.label-schema.sc…   0B
<missing>      9 months ago     /bin/sh -c #(nop) ADD file:bd7a2aed6ede423b7…   209MB
[root@VM-87-165-centos /home/myCentos]#
拿到一个镜像的时候,我们也可以用这条命令来看看该镜像的构建过程
-
发布镜像
[root@VM-87-165-centos /home/myCentos]# docker push hubertxxu/xphcentos:0.0.1 The push refers to repository [docker.io/hubertxxu/xphcentos] 1707ae60266f: Pushed 0afd14bb6dd8: Pushing [=====================================> ] 51.94MB/69.52MB 0afd14bb6dd8: Pushing [======================================> ] 53.61MB/69.52MB 0afd14bb6dd8: Pushed 2653d992f4ef: Pushing [==================================================>] 216.5MB 2653d992f4ef: Pushed 0.0.1: digest: sha256:206cda7867719048ef1a7ccb39acd486be093af8e7b1c15944e3f08620feae45 size: 952 [root@VM-87-165-centos /home/myCentos]#![[外链图片转存失败,源站可能有防盗链机制,建议将图片保存下来直接上传(img-frsABTKr-1631416860092)(C:\Users\hubertxxu.TENCENT\AppData\Roaming\Typora\typora-user-images\image-20210911170719704.png)]](https://img-blog.csdnimg.cn/292ebde053ba4f82ba7790e1ecb58e69.png?x-oss-process=image/watermark,type_ZHJvaWRzYW5zZmFsbGJhY2s,shadow_50,text_Q1NETiBA6Z2Z6Z2Z5rWB5reM55qE5p-v5rqq,size_20,color_FFFFFF,t_70,g_se,x_16)
如果在发布中遇到如下问题
denied: requested access to the resource is denied参考这篇文章解决,主要是要给需要上传的镜像重新打一个tag。然后还要看一下自己有没有登录dockerhub账号。
docker tag xphcentos:0.2 hubertxxu/xphcentos:0.0.1
-
-
构建一个esp8266编译镜像
前面的文章我们讲过,如何基于centos来搭建一个esp8266的环境,现在我们全部使用docker file来完成,然后构建一个esp8266专用的编译镜像。
# esp8266 镜像构建脚本
FROM centos
MAINTAINER hubertxxu<xupenghu@outlook.com>

ENV MYPATH /usr/home
WORKDIR $MYPATH

COPY README.md	/usr/home/README.md

ADD xtensa-lx106-elf-linux64-1.22.0-92-g8facf4c-5.2.0.tar.gz /opt/toolchain/
ADD gperf-3.1.tar.gz /opt/
ADD ESP8266_RTOS_SDK.tar.gz /home/esp8266/


RUN yum -y install gcc git wget make ncurses-devel flex bison python36 gcc-c++

RUN ln -s /usr/bin/python3 /usr/bin/python
RUN pip3 install pyserial

RUN cd /opt/gperf-3.1
RUN mkdir build&&cd build
RUN /opt/gperf-3.1/configure --prefix=/usr CFLAGS='-O2 -v'
RUN make&&make install


ENV IDF_PATH=/home/esp8266/ESP8266_RTOS_SDK
ENV PATH=$PATH:/opt/toolchain/xtensa-lx106-elf/bin

CMD echo "----end----"
CMD /bin/bash
一个完整的工程请参考我的GitHub仓库,如果对你有用欢迎star鼓励。


 2万+
2万+


 被折叠的 条评论
为什么被折叠?
被折叠的 条评论
为什么被折叠?
 到【灌水乐园】发言


