


1. 絮絮叨叨
- 要么是注解跟我有仇,要么是公司配发的笔记本跟我有仇,要么是因为心急吃不了热豆腐
- 痛定思痛:从头开始,新建一个Java项目,实现一个超级简单的注解@Hello
- 通过获取被标识类的类名,创建对应的Hello类;Hello类中,有一个sayHello()方法,可以打印原类的类名
- 在此,记录一下如何定义一个简单的Java编译时注解处理器
2. 基础知识
2.1 AbstractProcessor
- 自定义Java编译时注解处理器,一般都是通过继承
AbstractProcessor实现的 - AbstractProcessor类实现了
Processor接口,为自定义注解处理器提供了便利 - 一般的话,只需要重写
process()方法即可,其他方法按需重写public synchronized void init(ProcessingEnvironment processingEnv) public Set<String> getSupportedAnnotationTypes() public SourceVersion getSupportedSourceVersion() public boolean process(Set<? extends TypeElement> annotations, RoundEnvironment roundEnv)
init()方法
- 注解处理器都使用默认构造函数(入参和方法体都为空)进行创建,init() 方法以在注解处理器创建好后执行一些初始化工作
ProcessingEnvironment是JDK为注解处理器提供的注解处理的工具框架- 通过processingEnv,可以获取注解处理中经常使用到的、有用的工具类实例,如
Messager、Filer、Elements等
getSupportedAnnotationTypes()方法
- 在该方法中,可以指定注解处理器支持的注解,准确地说是注解的Name,如
MyAnnotion.class.getCanonicalName() - AbstractProcessor的默认实现:获取类头部
@SupportedAnnotationTypes注解的value,其value是一个String[];如果是没有使用@SupportedAnnotationTypes,则返回一个空的set - 总结: 注解处理器支持的注解,要么在方法体里面指定,要么通过
@SupportedAnnotationTypes指定
getSupportedSourceVersion()方法
- 在该方法中,可以指定Java源代码的版本(source version)
- AbstractProcessor的默认实现:获取类头部
@SupportedSourceVersion注解的value,其value是一个枚举类SourceVersion;如果是没有使用@SupportedSourceVersion,则返回SourceVersion.RELEASE_6 - 总结: 注解处理器支持的sourceVersion,要么该方法体中指定,要么通过
@SupportedSourceVersion指定
process()方法(重头戏)
- 核心方法,用于处理对被注解(已注册的)标注的element,如方法、类、接口等的处理
- process方法对注解的处理不是一次到位的,可能存在多个round
- 每次都是处理上一轮的element上标注的注解,并返回这些注解是否已经被注解处理器声明
- 如果返回true,后续的注解处理器将不会处理这些注解
对"声明"的理解
- 之所以叫编译时注解处理器,是因为源代码被compiler编译成字节码前,会先扫描源代码中的注解
- 如果注解有对应的注解处理器,则会调用process() 方法处理被注解标注的element

- 这个处理过程可能会产生新的源代码、甚至修改已有的源代码,因此需要进行多轮的注解处理
- 参考文档:聊聊AbstractProcessor和Java编译流程
2.2 令人眼花缭乱的Element
-
自定义编译时注解处理器,对一个新人来说,最让人头痛的事情:
- 各种Element,完全不知道该使用哪种
- 写代码时,写一句,百度一下,测试一下,速度慢得让人捉急
-
仔细想想,一个Java类包括这几大部分:包名、类名、成员变量、构造函数/成员方法
-
Element对应的就是组成一个Java程序的各种元素,分别对应
PackageElement、TypeElement、VariableElement、ExecutableElement -
同时,有的类或方法使用了泛型,还有一个
TypeParameterElement对应泛型参数元素 说明 PackageElement 对应包,提供对包和其成员的信息访问 TypeElement 对应类或接口, 提供对类型和它的成员的信息访问。是一种特殊的类,而注解是一种特殊的接口 VariableElement 对应字段、enum常量、方法或构造函数的入参、局部变量、资源变量和异常参数 ExecutableElement 对应类或接口中的方法、构造函数、初始化程序(静态的或实例的)。其中,也包括注解中的方法(注解元素的定义可以看作是一种特殊的方法定义) TypeParameterElement 对应类、接口、方法或构造函数的类型参数,也就是定义泛型时的 E、T之类的泛型通配符 -
JDK源码的实现中,Element 是一个接口,TypeElement等具体元素是继承这个接口的新接口
2.3 ElementKind
- 以
VariableElement为例,它可以表示字段、enum常量、方法或构造函数的入参、局部变量、资源变量以及异常参数 - VariableElement究竟是哪一种具体的元素,可以通过
Element.getKind()方法知道,该方法返回值为ElementKind枚举类 - JDK中,ElementKind枚举类定义了Element的类型,例如:
PACKAGE表示包,PARAMETER表示方法或构造函数的入参,CONSTRUCTOR表示构造函数等 - 想要了解更多,直接查看JDK源码中的ElementKind枚举类
ElementKind vs ElementType
-
初一看到ElementKind,就想起了annotation定义时使用到的ElementType
-
ElementType在自定义annotation时,用于标识annotation可以修饰的Element,如字段、函数入参、方法等
@Retention(RUNTIME) @Target({ElementType.FIELD, ElementType.PARAMETER, ElementType.METHOD}) @Qualifier public @interface MultiMember { } -
二者都是枚举类,且值有所类似,但是二者的侧重点不同
-
ElementKind侧重于表示Element对应的类型,一般用于获取Element的种类(kind)
-
ElementType侧重于标识注解可能出现的位置,或者说标识注解可以修饰的Element类型,在定义注解时使用
如何判断元素种类?建议使用getKind()方法,而非instanceof
-
尽量避免使用
instanceof判断Element的具体类型,因为TypeElement可能是类,也可能是接口 -
下面的代码,只能判断出该元素是一个
TypeElement,而具体是类或接口都无法分辨 -
可以为它是一个类,实际是一个接口,获取到类名后就实例化一个对象,结果系统运行出错
// 只是一个举例,笔者这样写代码并没有通过编译 // java.lang.Class.CastException: com.sun.tools.javac.code.Symbol$MethodSymbol cannot be cast to javax.lang.model.element.TypeElement if (element instanceof TypeElement) { Class clazz = Class.forName(((TypeElement) element).getQualifiedName().toString()); Object obj = clazz.newInstance(); } -
建议使用
Element.getKind()方法配合ElementKind判断元素的种类if (element.getKind() == ElementKind.CLASS)// 准确的判断方法
2.5 TypeMirror & TypeKind
TypeMirror:获取元素所定义的类型
- 通过对Element的学习,我们知道VariableElement可能是种类为
PARAMETER的方法或构造函数的入参 - Java中,各种各样的数据类型:基本数据类型、数组、引用类型、null、泛型等,PARAMETER元素究竟是哪一种数据类型?
- JDK中,Java编程语言各种类型对应的接口为
TypeMirror,可以通过Element.asType()方法获得该元素对应的TypeMirror - 同Element一样,TypeMirror也有很多的子接口,对应不同的类型
- 例如,
PrimitiveType表示基本数据类型(char、byte、int等),ArrayType表示数组类型,ExecutableType表示方法、构造函数或初始化程序 - 具体有哪些TypeMirror,可以自行阅读JDK源码
TypeKind
-
PrimitiveType表示基本数据类型,而Java的基本数据类型就有8种 -
究竟是哪种基本数据类型,可以通过
TypeMirror.getKind()方法获得,该方法返回值为TypeKind枚举类 -
JDK的
TypeKind枚举类,定义了TypeMirror的类型,如BOOLEAN、VOID、PACKAGE等 -
和Element一样,若想进一步判断具体是哪种type,不建议直接通过
instanceof判断,而是通过TypeMirror.getKind()进行类型判断if (typeMirror instanceof ArrayType) // 不太准确的判断方法 if (typeMirror.getKind() == TypeKind.INT) // 准确的判断方法 -
想要了解更多,直接查看JDK源码中的TypeKind枚举类
2.6 总结
- Element对应构成Java程序的各种元素,ElementKind枚举类定义了元素的种类
- TypeMirror对应Java编程语言的类型,TypeKind枚举类定义了TypeMirror的类型
- 一个不是很形象的理解,欢迎与我交流
- 如果将Java程序解析成一棵语法树,程序中的各种element就是语法树节点,如对应package声明的PackageElement节点,对应方法、构造函数或语句块的ExecutableElement节点
- 想要进一步知道节点对应哪种Element,则需要通过
Element.getKind()获取ElementKind - TypeMirror则可以看作是面照妖镜,通过这面镜子可以知道节点的本质(type)。例如,一个VariableElement可能是boolean类型,则对应TypeKind.BOOLEAN;也可能是接口,对应TypeKind.DECLARED
3. 自定义Java编译时处理器
- 定义一个
@Hello注解,作用于Java类 - 创建
HelloProcessor注解处理器,其逻辑:自动生成对应的Hello类,该类中有一个sayHello()方法,打印原始类名、自报家门
3.1 项目结构
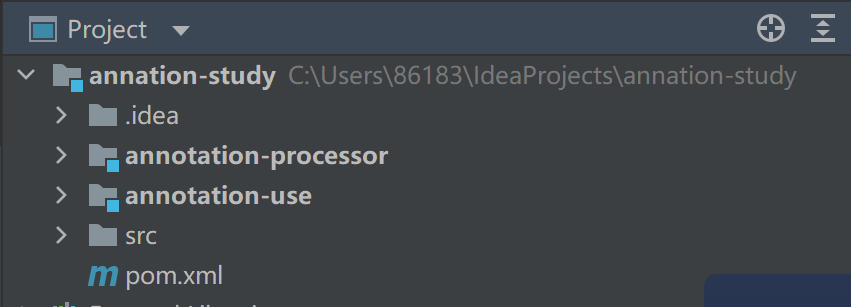
- 创建maven项目:annotation-study作为聚合模块和父模块,然后创建三个子模块:
- annotation-processor:定义注解和注解处理器的模块
- annotation-use:使用注解和注解处理器的模块
关于 注解处理器一直不生效 的问题
-
最开始的时候,笔者尝试将注解和注解处理器分开:注解放到
annotation-defined模块,注解处理器放到annotation-processor模块 -
然后,在
annotation-use模块引入annotation-defined<dependencies> <dependency> <groupId>org.example</groupId> <artifactId>annotation-defined</artifactId> <version>1.0-SNAPSHOT</version> </dependency> </dependencies> -
使用注解时,发现注解不知什么原因,处理器一直没有生效
-
一通忙碌后,尝试着在annotation-use模块引入annotation-processor,注解才生效了
<dependencies> <dependency> <groupId>org.example</groupId> <artifactId>annotation-defined</artifactId> <version>1.0-SNAPSHOT</version> </dependency> <dependency> <groupId>org.example</groupId> <artifactId>annotation-processor</artifactId> <version>1.0-SNAPSHOT</version> </dependency> </dependencies> -
因此,为了方便,笔者将注解和注解处理器都放入
annotation-processor模块
3.2 代码编写
-
在annotation-processor模块的
sunrise.annotation包下,创建@Hello注解@Target(ElementType.TYPE) @Retention(RetentionPolicy.SOURCE) public @interface Hello { } -
在annotation-processor模块的
sunrise.annotation.processor包下,创建HelloProcessor注解处理器// 通过@SupportedAnnotationTypes注册注解处理器,与重写getSupportedAnnotationTypes()方法等价 @SupportedAnnotationTypes("sunrise.annotation.Hello") public class HelloProcessor extends AbstractProcessor { // 用于消息传递和元素的处理的工具实例 private Messager messager; private Elements elementUtils; private Filer filer; @Override public synchronized void init(ProcessingEnvironment processingEnv) { super.init(processingEnv); // 通过init()方法,完成初始化工作 this.messager = processingEnv.getMessager(); this.elementUtils = processingEnv.getElementUtils(); this.filer = processingEnv.getFiler(); } // 也可以使用@SupportedSourceVersion规定source version而无需重写方法 @Override public SourceVersion getSupportedSourceVersion() { // 一般直接返回最近的source version即可 // return SourceVersion.latestSupported(); // 这里规定source version至少为8 if (SourceVersion.latest().compareTo(SourceVersion.RELEASE_8) > 0) { return SourceVersion.latest(); } return SourceVersion.RELEASE_8; } @Override public boolean process(Set<? extends TypeElement> annotations, RoundEnvironment roundEnv) { // 一条简单的信息打印,用于辅助process方法是否被执行 messager.printMessage(Diagnostic.Kind.NOTE, "source version -- " + getSupportedSourceVersion()); // 遍历注解处理器可以处理的注解,获得被注解说明的元素 for (TypeElement annotation : annotations) { String annotationName = annotation.getSimpleName().toString(); Set<? extends Element> elements = roundEnv.getElementsAnnotatedWith(annotation); for (Element element : elements) { // 该注解处理器只处理@Hello,而且@Hello的Target为Type,进一步要求为CLASS if (element.getKind() != ElementKind.CLASS) { messager.printMessage(Diagnostic.Kind.ERROR, "@" + annotationName + "must be used for a class"); } // 获取被说明类的包名和类名,为创建对应的Hello类做准备 TypeElement classElement = (TypeElement) element; String simpleName = classElement.getSimpleName().toString(); PackageElement packageElement = elementUtils.getPackageOf(classElement); String packageName = packageElement.getQualifiedName().toString(); // 借助JavaPoet模板引擎,生成对应的Hello类 TypeSpec typeSpec = generateClassFile(simpleName, packageName); // 生成对应的Java文件 JavaFile javaFile = JavaFile.builder(packageName, typeSpec).build(); try { javaFile.writeTo(filer); } catch (IOException e) { messager.printMessage(Diagnostic.Kind.ERROR, "Failed to generate Java file for class ", element); } } } return roundEnv.processingOver(); } private TypeSpec generateClassFile(String simpleName, String packageName) { // 定义FieldSpec,存储类名 FieldSpec nameField = FieldSpec.builder(String.class, "className", Modifier.PRIVATE).build(); // 定义无参构造函数,自动完成类名的初始化 MethodSpec constructor = MethodSpec.constructorBuilder() .addModifiers(Modifier.PUBLIC) .addStatement("this.$N = $S", nameField, simpleName) .build(); // 定义sayHello方法 String msg = "Hello, this is "; MethodSpec sayHello = MethodSpec.methodBuilder("sayHello") .addModifiers(Modifier.PUBLIC) .addStatement("System.out.println($S + className)", msg) .build(); // 创建类 ClassName helloClass = ClassName.get(packageName, simpleName + "Hello"); return TypeSpec.classBuilder(helloClass) .addModifiers(Modifier.PUBLIC) .addField(nameField) .addMethod(constructor) .addMethod(sayHello) .build(); } } -
在annotation-use模块的
sunrise.annotation.use包下创建AnnotationUse1类并使用@Hello注解@Hello public class AnnotationUse { }
3.3 如何让注解生效
-
这里笔者采用最原始的方式让注解处理器生效:注解处理器器加入到classPath中,使得javac在编译的过程中可以找到自定义的注解处理器
-
具体做法;
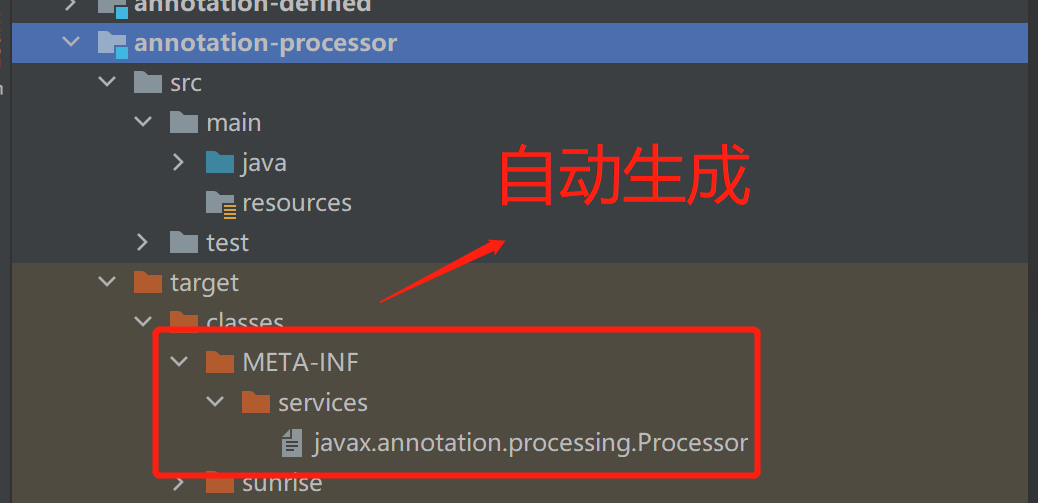
- 在annotation-processor模块的resources下,创建
META-INF/services目录 - 在META-INF/services目录添加
javax.annotation.processing.Processor文件,在Processor文件中注册注解处理器 - 注意: ① 使用注解处理器对应类的完全限定名;② 多个注解处理器,换行区分
sunrise.annotation.processor.HelloProcessor
# processor2
# processor3
- 在annotation-processor模块的resources下,创建
-
在annotation-processor模块的pom.xml文件中添加以下内容,从而对compiler进行设置,否则会出现
Bad service configuration file ...错误<build> <plugins> <plugin> <groupId>org.apache.maven.plugins</groupId> <artifactId>maven-compiler-plugin</artifactId> <configuration> <source>1.8</source> <target>1.8</target> <!-- 解决告警:编码GBK的不可映射字符--> <encoding>UTF-8</encoding> <compilerArgument>-proc:none</compilerArgument> </configuration> </plugin> </plugins> </build> -
在root模块annation-study下,执行maven命令打包项目
mvn clean package -
完成编译后,会发现annation-use模块的target目录中,出现了
AnnotationUseHello.java文件 -
该source文件也完成了编译,生成了对应的.class文件
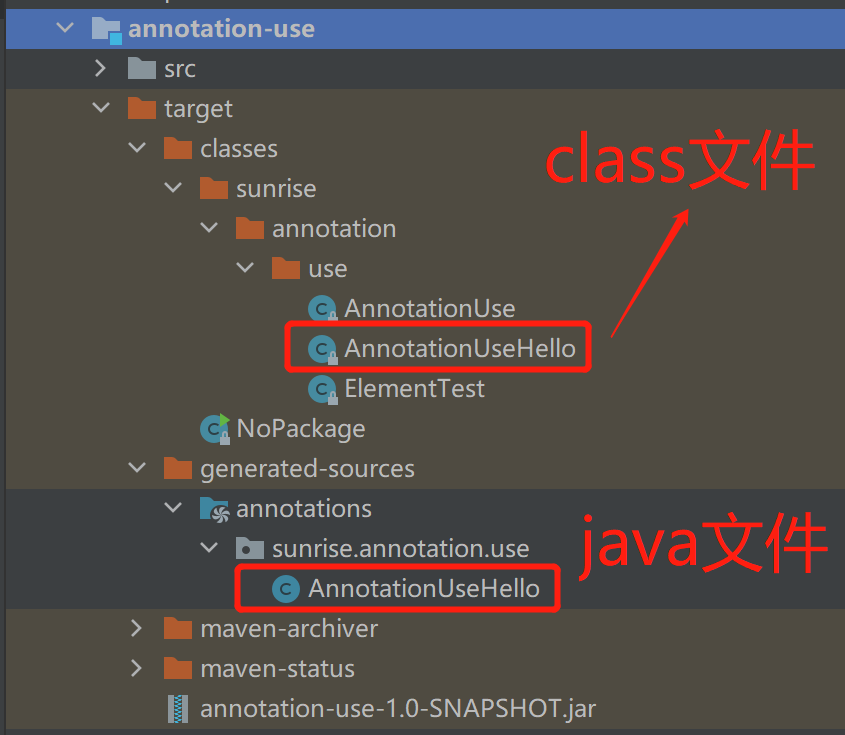
-
AnnotationUseHello类的代码如下,可以看出:AnnotationUseHello类和源类AnnotationUse在同一个包,其sayHello()方法成功打印了源类的名称
package sunrise.annotation.use;

import java.lang.String;

public class AnnotationUseHello {
  private String className;

  public AnnotationUseHello() {
    this.className = "AnnotationUse";
  }

  public void sayHello() {
    System.out.println("Hello, this is " + className);
  }
}
3.4 使用自动生成的Hello类
-
创建Main类,在其mian()方法中使用通过注解处理器生成的Hello类
package sunrise.annotation.use.main; import sunrise.annotation.use.AnnotationUseHello; public class Main { public static void main(String[] args) { AnnotationUseHello hello = new AnnotationUseHello(); hello.sayHello(); } } -
执行结果如下:

-
至此,一个简单的@Hello注解的编译时注解处理器便完成了
4. 其他的知识
4.1 Google的@AutoService注解
-
Java Annotation Processing and Creating a Builder中,介绍了很多让编译时注解处理器生效的方法
-
结合其他资料,除了上面介绍的
META-INF/services方法,主流的另一种方法是使用Google提供@AutoService注解 -
首先,需要引入auto-service依赖
<dependency> <groupId>com.google.auto.service</groupId> <artifactId>auto-service</artifactId> <version>1.0</version> </dependency> -
在注解处理器类的声明处加上@AutoService注解
@AutoService(Processor.class) @SupportedAnnotationTypes("sunrise.annotation.Hello") public class HelloProcessor extends AbstractProcessor -
通过maven命令,重新打包整个项目,发现annotation-processor模块中自动生成对应的
META-INF/services目录和文件
关于 Google的auto-service不生效 的问题
-
如果发现没有自动生成,请将之前在pom.xml文件中配置的compiler参数注释掉
-
自己也不知道原因,摸索以后发现的解决办法 😂
<!-- <compilerArgument>-proc:none</compilerArgument> -->
4.2 如何解决Bad service configuration file ...问题
-
若不对compiler进行设置,编译annotation-processor模块将会失败
-
报错信息如下:
-- 英文版本 [ERROR] Bad service configuration file, or exception thrown while constructing Processor object: javax.annotation.processing.Processor: Provider sunrise.annotation.processor.HelloProcessor not found -- 中文版本 [ERROR] 服务配置文件不正确, 或构造处理程序对象javax.annotation.processing.Processor: Provider sunrise.annotation.processor.HelloProcessor not found时抛出异常错误 -
错误原因:
- javac编译源代码时,试图使用
javax.annotation.processing.Processor中注册的HelloProcessor,而HelloProcessor尚未完成编译
- javac编译源代码时,试图使用
解决办法1
-
为annotation-processor模块设置
-proc:none这个编译参数,让其忽略Annotation Processing阶段<build> <plugins> <plugin> <groupId>org.apache.maven.plugins</groupId> <artifactId>maven-compiler-plugin</artifactId> <configuration> <source>1.8</source> <target>1.8</target> <!-- 解决告警:编码GBK的不可映射字符--> <encoding>UTF-8</encoding> <compilerArgument>-proc:none</compilerArgument> </configuration> </plugin> </plugins> </build>
解决办法2(没有尝试过)
-
将编译划分成两个阶段,第一阶段只进行Processor的编译,第二阶段进行整个模块的编译
<build> <plugins> <plugin> <groupId>org.apache.maven.plugins</groupId> <artifactId>maven-compiler-plugin</artifactId> <version>3.8.0</version> <configuration> <source>1.8</source> <target>1.8</target> <encoding>UTF-8</encoding> </configuration> <executions> <execution> <id>default-compile</id> <configuration> <compilerArgument>-proc:none</compilerArgument> <includes> <include>sunrise/annotation/processor/HelloProcessor.java</include> <!--include dependencies required for LogMeCustomAnnotationProcessor --> </includes> </configuration> </execution> <execution> <id>compile-project</id> <phase>compile</phase> <goals> <goal>compile</goal> </goals> </execution> </executions> </plugin> </plugins> </build> -
参考文档:Bad service configuration file, or exception thrown while constructing Processor object
4.3 Messager的NOTE的作用
-
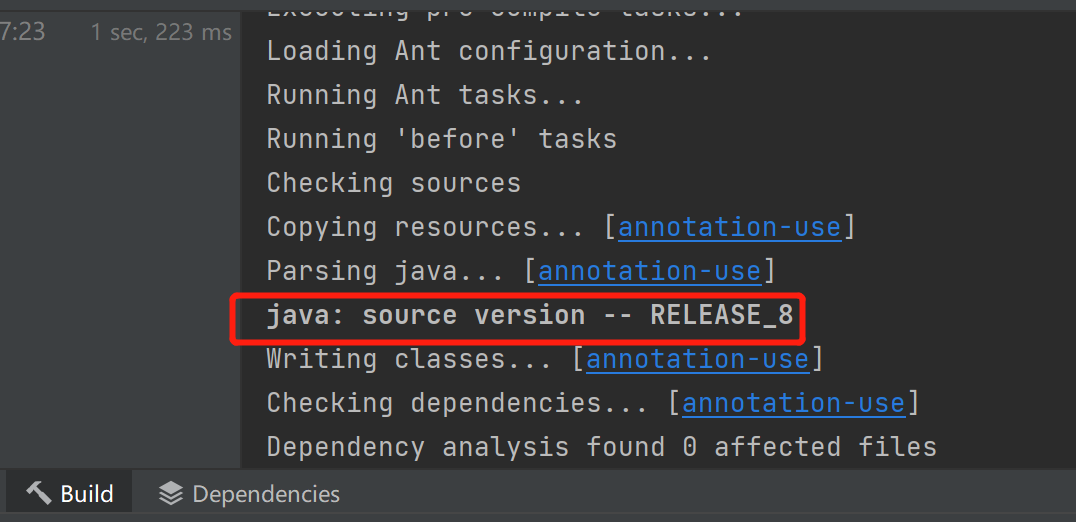
在HelloProcessor的process()方法中,有这样的两行代码
// 一条简单的信息打印,用于辅助process方法是否被执行 messager.printMessage(Diagnostic.Kind.NOTE, "source version -- " + getSupportedSourceVersion()); -
但是,在maven的打包过程中,好像并没有出现包含
source version信息 -
那NOTE类型的信息,可以在哪里查看呢?
-
本人发现:如果通过idea的Compile功能编译AnnotationUse类,在底部的
Build窗口中将有对应的信息打印
-
在学习编译时注解处理器的辛酸历程中,总结出来一个道理:
- 如果发现注解貌似没生效,可以编译使用了注解的类
- 然后查看Build窗口是否有打印NOTE类型的信息,从而判断注解是否真的没生效
- 如果有需要,可以查看博客:AnnotationProcessor 处理器不工作怎么定位?
4.4 通过代码加深对Element的理解
-
定义
@MyAnnotation注解,作用于方法@Target(ElementType.METHOD) @Retention(RetentionPolicy.SOURCE) public @interface MyAnnotation { } -
创建注解处理器
MyAnnotationProcessor:通过Element和TypeMirror的方法,获取被标注方法的相关信息@AutoService(Processor.class) @SupportedAnnotationTypes("sunrise.annotation.MyAnnotation") @SupportedSourceVersion(SourceVersion.RELEASE_8) public class MyAnnotationProcessor extends AbstractProcessor { private Messager messager; private Elements elementUtils; @Override public synchronized void init(ProcessingEnvironment processingEnv) { super.init(processingEnv); this.messager = processingEnv.getMessager(); elementUtils = processingEnv.getElementUtils(); } @Override public boolean process(Set<? extends TypeElement> annotations, RoundEnvironment roundEnv) { for (TypeElement annotation : annotations) { Set<? extends Element> elements = roundEnv.getElementsAnnotatedWith(annotation); for (Element element : elements) { ExecutableElement method = (ExecutableElement) element; messager.printMessage(Diagnostic.Kind.NOTE, "方法:ExecutableElement: " + method.getSimpleName() + "(), ElementKind: " + method.getKind()); // 获取方法对应的类 TypeElement classElement = (TypeElement) method.getEnclosingElement(); messager.printMessage(Diagnostic.Kind.NOTE, "方法所属的类:TypeElement: " + classElement.getQualifiedName() + ", ElementKind: " + classElement.getKind()); // 获取方法的入参 messager.printMessage(Diagnostic.Kind.NOTE, "方法的入参: "); List<? extends VariableElement> parameters = method.getParameters(); for (VariableElement param : parameters) { // 获取参数名和参数类型 TypeMirror typeMirror = param.asType(); messager.printMessage(Diagnostic.Kind.NOTE, "VariableElement: " + typeMirror.getKind() + " " + param.getSimpleName() + ", ElementKind: " + param.getKind()); } // 获取方法的泛型类型 messager.printMessage(Diagnostic.Kind.NOTE, "方法的类型参数: "); List<? extends TypeParameterElement> typeParameters = method.getTypeParameters(); for (TypeParameterElement typeParameter : typeParameters) { messager.printMessage(Diagnostic.Kind.NOTE, "TypeParameterElement: " + typeParameter + ", ElementKind: " + typeParameter.getKind()); } // 获取类的包名 PackageElement packageElement = elementUtils.getPackageOf(classElement); String packageName = packageElement.getQualifiedName().toString(); messager.printMessage(Diagnostic.Kind.NOTE, "包:PackageElement: " + (StringUtils.isNotEmpty(packageName) ? packageName : "no package") + ", ElementKind: " + packageElement.getKind()); // 获取包中的所有类或接口 messager.printMessage(Diagnostic.Kind.NOTE, "包中的类或接口如下: "); List<? extends Element> enclosedElements = packageElement.getEnclosedElements(); messager.printMessage(Diagnostic.Kind.NOTE, packageName + " has following class or interface:"); for (Element enclosedElement : enclosedElements) { ElementKind kind = enclosedElement.getKind(); if (kind == ElementKind.CLASS || kind == ElementKind.INTERFACE) { messager.printMessage(Diagnostic.Kind.NOTE, ((TypeElement) enclosedElement).getQualifiedName()); } } } } return true; } } -
创建
ElementTest类,在其print()方法中使用@MyAnnotationpublic class ElementTest { @MyAnnotation public <E> void print(E element, int a) { System.out.println(a + ": " + element); } } -
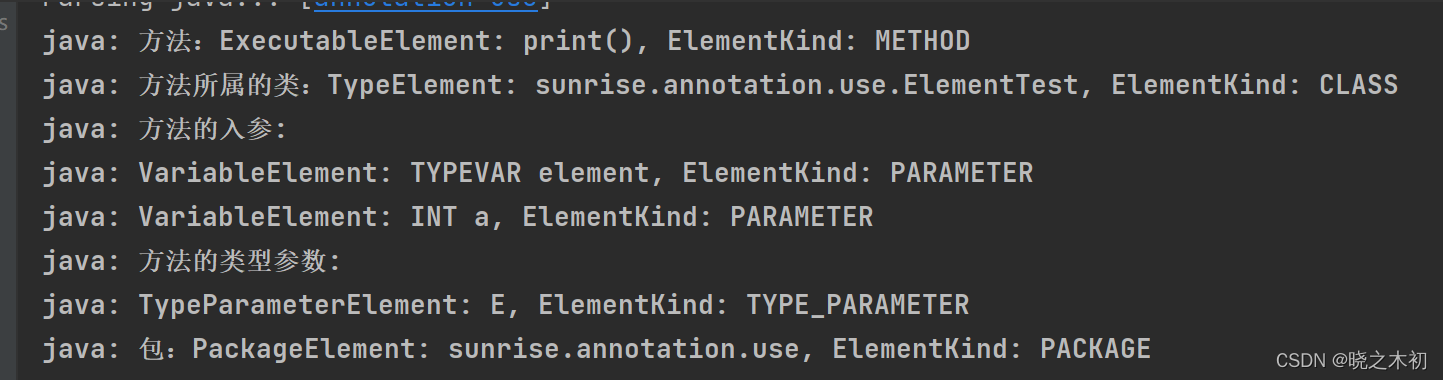
使用idea编译ElementTest类,Build窗口打印的信息,部分截图如下:
5. 结语
- 本文可以说,只是如何定义编译时注解处理器的入门教程,还有很多很强大的功能等待解锁
一些参考文档
- 自定义Java注解处理器( 第一篇学习文章,当时啥都不懂,把自己看得晕乎乎的)
- Java注解之编译时注解(讲解的比较全面,但不符合自己的学习习惯)
- JAVA编译时注解、Java注解之编译时注解(对Element的讲解)
- java注解之编译时注解RetentionPolicy.CLASS 基本用法(通过JavaPoet创建Java文件:)
- 实现一个简单的Java编译时注解处理器、注解 - APT编译时注解处理器(基于Android的编译时注解处理器)
- Android编译时注解APT实战(AbstractProcessor)(里面的方法入参,标注的是TypeElement,貌似不正确)
如何实现@Factory注解
- 英文文档:Annotation Processing 101
- 中文翻译:Java中的注解(Annotation)处理器解析
- 还有一篇:Java进阶–编译时注解处理器(APT)详解
- 参考文档中,既讲解了编译时注解处理器的一些基础知识,还讲解了如何自定义@Factory注解
- 包括如何再避免上一轮的数据影响一轮的process()方法,也间接证明了注解的处理是多轮的
SPI机制
- 后续的话,可以学习一下SPI机制。毕竟自己工作中接触到的一个组件,就是使用SPI机制来提供自定义插件的接口的 😂
- SPI学习文档:JDK SPI 的使用和源码分析
如何修改已有的代码
- 很多时候,我们不仅需要生成新的Java代码,还需要修改已有的Java代码
- 通过JCTree可以实现已有代码的修改: Android(Java)编译时注解修改代码、JCTree实现编译时织入


 679
679

 被折叠的 条评论
为什么被折叠?
被折叠的 条评论
为什么被折叠?
 到【灌水乐园】发言


