


(一)Bloom介绍
Bloom(辉光、光晕、泛光)是一种常见的摄像机后处理(PostProcessing)效果,用于再现真实世界相机的成像伪影。这种效果会产生从图像中明亮区域边界延伸的光条纹(或羽毛),从而产生一种极其明亮的光线压倒捕捉场景的相机的错觉。
辉光简单的说法,就是有些地方足够亮,看上去是溢出到周围的区域,下面是playcanvas官方提供的辉光效果对比图
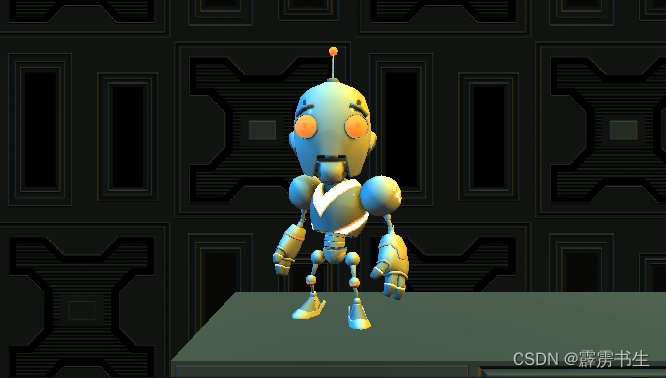
图1 未使用辉光效果
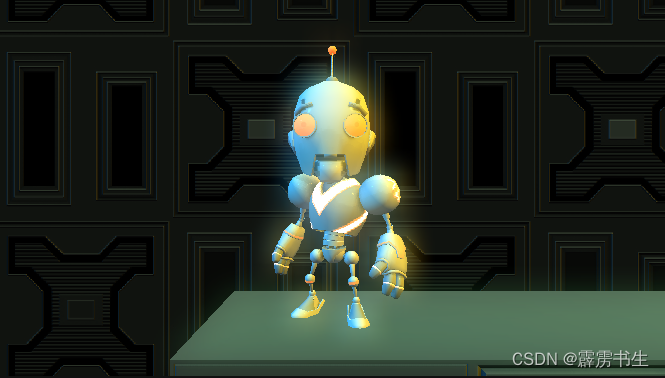
图2 使用辉光效果
(二)Bloom实现原理
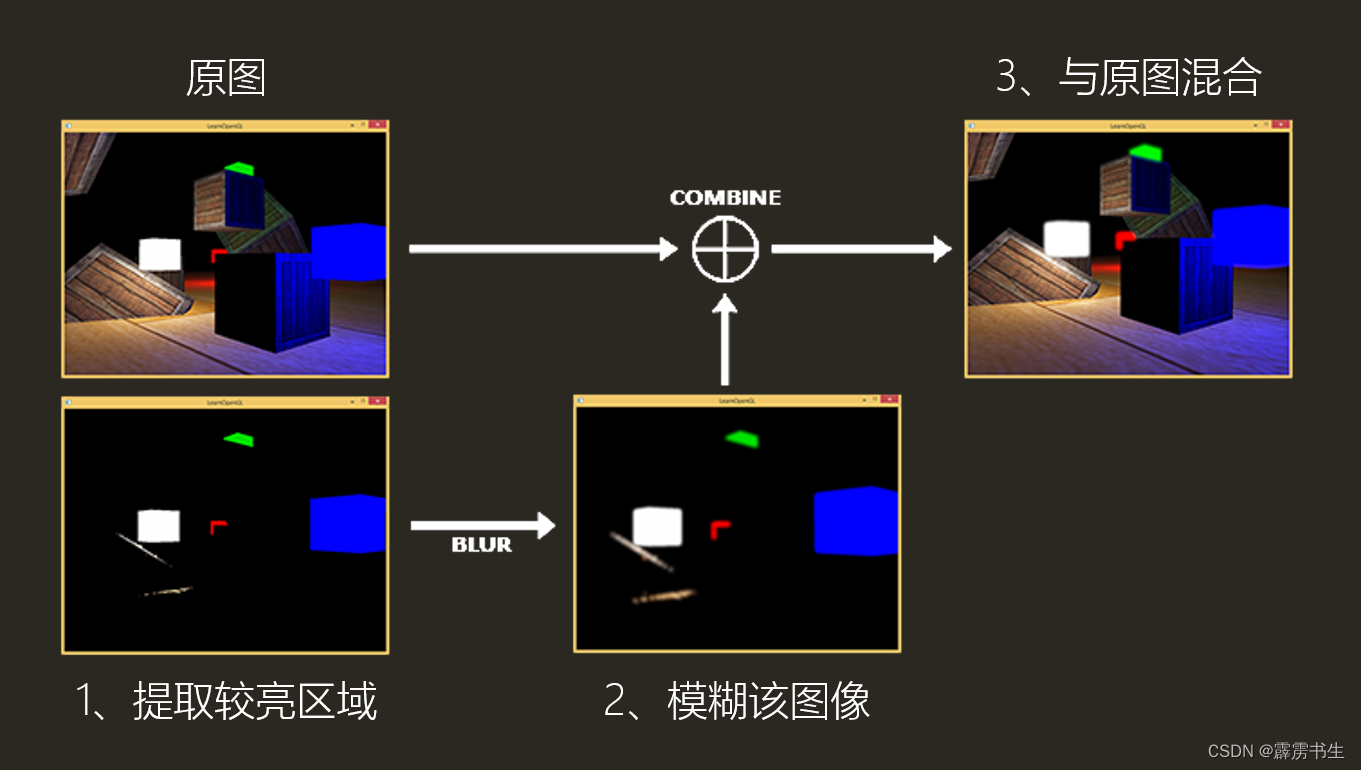
bloom的实现原理很简单:就是取camera获取图像的高亮部分,进行高斯模糊,并和原图进行合并就可以实现。
1. 提取较亮区域
通过阈值提取较亮区域的像素点
varying vec2 vUv0;

uniform sampler2D uBaseTexture
uniform float uBloomThreshold;

float luminance(vec4 color)
{
    return  0.2125 * color[0] + 0.7154 * color[1] + 0.0721 * color[2];
}

void main(void)
{
    vec4 color = texture2D(uBaseTexture, vUv0);

    // 只保留亮度超过阈值亮度的像素点
    float val = clamp(luminance(color) - uBloomThreshold, 0.0, 1.0);
    gl_FragColor = color * val;

    //这是playcanvas官网提供提取亮度高于某个阈值的算法,但还不知道它的原理
    //gl_FragColor = clamp((color - uBloomThreshold) / (1.0 - uBloomThreshold), 0.0, 1.0);
}
2. 高斯模糊
接下来,就是如何得到模糊图uBloomTexture
一般模糊图像的算法,我们可以选择常见的高斯模糊,它可以减少图像噪声、降低细节层次
高斯模糊的实现原理,这里不做多赘述,这里提供2篇文章供参考。
参考第二篇文章,我们在JavaScript中,计算我们高斯卷积核的权重和位移
var SAMPLE_COUNT = 15;

//高斯曲线
function computeGaussian(n, theta) {
    return ((1.0 / Math.sqrt(2 * Math.PI * theta)) * Math.exp(-(n * n) / (2 * theta * theta)));
}

function calculateBlurValues(sampleWeights, sampleOffsets, dx, dy, blurAmount) {

    // Create temporary arrays for computing our filter settings.
    // The first sample always has a zero offset.
    sampleWeights[0] = computeGaussian(0, blurAmount);
    sampleOffsets[0] = 0;
    sampleOffsets[1] = 0;

    // Maintain a sum of all the weighting values.
    var totalWeights = sampleWeights[0];

    // Add pairs of additional sample taps, positioned
    // along a line in both directions from the center.
    var i, len;
    for (i = 0, len = Math.floor(SAMPLE_COUNT / 2); i < len; i++) {
        // Store weights for the positive and negative taps.
        var weight = computeGaussian(i + 1, blurAmount);
        sampleWeights[i * 2] = weight;
        sampleWeights[i * 2 + 1] = weight;
        totalWeights += weight * 2;


        var sampleOffset = i * 2 + 1.5;


        sampleOffsets[i * 4] = dx * sampleOffset;
        sampleOffsets[i * 4 + 1] = dy * sampleOffset;
        sampleOffsets[i * 4 + 2] = -dx * sampleOffset;
        sampleOffsets[i * 4 + 3] = -dy * sampleOffset;
    }

    // Normalize the list of sample weightings, so they will always sum to one.
    for (i = 0, len = sampleWeights.length; i < len; i++) {
        sampleWeights[i] /= totalWeights;
    }
}
在fragment shader中,对图像进行卷积模糊(注意:这里的shader只对水平或垂直一个方向卷积)
#define SAMPLE_COUNT 15

varying vec2 vUv0;

uniform sampler2D uBloomTexture;
uniform vec2 uBlurOffsets[15];
uniform float uBlurWeights[15];

void main(void)
{
    vec4 color = vec4(0.0);
    for (int i = 0; i < SAMPLE_COUNT; i++)
    {
        color += texture2D(uBloomTexture, vUv0 + uBlurOffsets[i]) * uBlurWeights[i];
    }
    gl_FragColor = color;
}
最后,我们需要进行2次方向的滤波处理
原理具体参考文章二中,如何将高斯滤波器分为水平方向和垂直方向的滤波器的原理
// Pass 2: draw from rendertarget 1 into rendertarget 2(垂直方向)
calculateBlurValues(this.sampleWeights, this.sampleOffsets, 1.0 / this.targets[1].width, 0, this.blurAmount);
scope.resolve("uBlurWeights[0]").setValue(this.sampleWeights);
scope.resolve("uBlurOffsets[0]").setValue(this.sampleOffsets);
scope.resolve("uBloomTexture").setValue(this.targets[0].colorBuffer);
this.drawQuad(this.targets[1], this.blurShader);

// Pass 3: draw from rendertarget 2 back into rendertarget 1(水平方向)
calculateBlurValues(this.sampleWeights, this.sampleOffsets, 0, 1.0 / this.targets[0].height, this.blurAmount);
scope.resolve("uBlurWeights[0]").setValue(this.sampleWeights);
scope.resolve("uBlurOffsets[0]").setValue(this.sampleOffsets);
scope.resolve("uBloomTexture").setValue(this.targets[1].colorBuffer);
this.drawQuad(this.targets[0], this.blurShader);
3. 混合原图和模糊图
那我们最后的fragment shader就可以这样实现,原图+模糊图进行混合
varying vec2 vUv0;

//bloom 强度
uniform float uBloomEffectIntensity;

uniform sampler2D uBaseTexture;
uniform sampler2D uBloomTexture;

void main(void)
{
    vec4 bloom = texture2D(uBloomTexture, vUv0) * uBloomEffectIntensity;
    vec4 base = texture2D(uBaseTexture, vUv0);

    //将原图变暗,防止两图叠加后,像素溢出1
    base *= (1.0 - clamp(bloom, 0.0, 1.0));

    //合并原图和模糊图,得到最终的bloom效果
    gl_FragColor = base + bloom;
}
(三)在playcanvas编辑器中使用
1. 创建脚本bloom.js
// --------------- POST EFFECT DEFINITION --------------- //
var SAMPLE_COUNT = 15;

function computeGaussian(n, theta) {
    return ((1.0 / Math.sqrt(2 * Math.PI * theta)) * Math.exp(-(n * n) / (2 * theta * theta)));
}

function calculateBlurValues(sampleWeights, sampleOffsets, dx, dy, blurAmount) {
    // Look up how many samples our gaussian blur effect supports.

    // Create temporary arrays for computing our filter settings.
    // The first sample always has a zero offset.
    sampleWeights[0] = computeGaussian(0, blurAmount);
    sampleOffsets[0] = 0;
    sampleOffsets[1] = 0;

    // Maintain a sum of all the weighting values.
    var totalWeights = sampleWeights[0];

    // Add pairs of additional sample taps, positioned
    // along a line in both directions from the center.
    var i, len;
    for (i = 0, len = Math.floor(SAMPLE_COUNT / 2); i < len; i++) {
        // Store weights for the positive and negative taps.
        var weight = computeGaussian(i + 1, blurAmount);
        sampleWeights[i * 2] = weight;
        sampleWeights[i * 2 + 1] = weight;
        totalWeights += weight * 2;

        // To get the maximum amount of blurring from a limited number of
        // pixel shader samples, we take advantage of the bilinear filtering
        // hardware inside the texture fetch unit. If we position our texture
        // coordinates exactly halfway between two texels, the filtering unit
        // will average them for us, giving two samples for the price of one.
        // This allows us to step in units of two texels per sample, rather
        // than just one at a time. The 1.5 offset kicks things off by
        // positioning us nicely in between two texels.
        var sampleOffset = i * 2 + 1.5;

        // Store texture coordinate offsets for the positive and negative taps.
        sampleOffsets[i * 4] = dx * sampleOffset;
        sampleOffsets[i * 4 + 1] = dy * sampleOffset;
        sampleOffsets[i * 4 + 2] = -dx * sampleOffset;
        sampleOffsets[i * 4 + 3] = -dy * sampleOffset;
    }

    // Normalize the list of sample weightings, so they will always sum to one.
    for (i = 0, len = sampleWeights.length; i < len; i++) {
        sampleWeights[i] /= totalWeights;
    }
}

/**
 * @class
 * @name BloomEffect
 * @classdesc Implements the BloomEffect post processing effect.
 * @description Creates new instance of the post effect.
 * @augments PostEffect
 * @param {GraphicsDevice} graphicsDevice - The graphics device of the application.
 * @property {number} bloomThreshold Only pixels brighter then this threshold will be processed. Ranges from 0 to 1.
 * @property {number} blurAmount Controls the amount of blurring.
 * @property {number} bloomIntensity The intensity of the effect.
 */
function BloomEffect(graphicsDevice) {
    pc.PostEffect.call(this, graphicsDevice);

    // Shaders
    var attributes = {
        aPosition: pc.SEMANTIC_POSITION
    };

    // Pixel shader extracts the brighter areas of an image.
    // This is the first step in applying a bloom postprocess.
    var extractFrag = [
        "varying vec2 vUv0;",
        "",
        "uniform sampler2D uBaseTexture;",
        "uniform float uBloomThreshold;",
        "",
        "float luminance(vec4 color)",
        "{",
        "    return  0.2125 * color[0] + 0.7154 * color[1] + 0.0721 * color[2]; ",
        "}",
        "",
        "void main(void)",
        "{",
                // Look up the original image color.
        "    vec4 color = texture2D(uBaseTexture, vUv0);",
        "",
                // Adjust it to keep only values brighter than the specified threshold.
        "    float val = clamp(luminance(color) - uBloomThreshold, 0.0, 1.0);",
        "    gl_FragColor = color * val;",
        "}"
    ].join("\n");

    // Pixel shader applies a one dimensional gaussian blur filter.
    // This is used twice by the bloom postprocess, first to
    // blur horizontally, and then again to blur vertically.
    var gaussianBlurFrag = [
        "#define SAMPLE_COUNT " + SAMPLE_COUNT,
        "",
        "varying vec2 vUv0;",
        "",
        "uniform sampler2D uBloomTexture;",
        "uniform vec2 uBlurOffsets[" + SAMPLE_COUNT + "];",
        "uniform float uBlurWeights[" + SAMPLE_COUNT + "];",
        "",
        "void main(void)",
        "{",
        "    vec4 color = vec4(0.0);",
                // Combine a number of weighted image filter taps.
        "    for (int i = 0; i < SAMPLE_COUNT; i++)",
        "    {",
        "        color += texture2D(uBloomTexture, vUv0 + uBlurOffsets[i]) * uBlurWeights[i];",
        "    }",
        "",
        "    gl_FragColor = color;",
        "}"
    ].join("\n");

    // Pixel shader combines the bloom image with the original
    // scene, using tweakable intensity levels.
    // This is the final step in applying a bloom postprocess.
    var combineFrag = [
        "varying vec2 vUv0;",
        "",
        "uniform float uBloomEffectIntensity;",
        "uniform sampler2D uBaseTexture;",
        "uniform sampler2D uBloomTexture;",
        "",
        "void main(void)",
        "{",
                // Look up the bloom and original base image colors.
        "    vec4 bloom = texture2D(uBloomTexture, vUv0) * uBloomEffectIntensity;",
        "    vec4 base = texture2D(uBaseTexture, vUv0);",
        "",
                // Darken down the base image in areas where there is a lot of bloom,
                // to prevent things looking excessively burned-out.
        "    base *= (1.0 - clamp(bloom, 0.0, 1.0));",
        "",
                // Combine the two images.
        "    gl_FragColor = base + bloom;",
        "}"
    ].join("\n");

    this.extractShader = pc.createShaderFromCode(graphicsDevice, pc.PostEffect.quadVertexShader, extractFrag, 'BloomExtractShader', attributes);
    this.blurShader = pc.createShaderFromCode(graphicsDevice, pc.PostEffect.quadVertexShader, gaussianBlurFrag, 'BloomBlurShader', attributes);
    this.combineShader = pc.createShaderFromCode(graphicsDevice, pc.PostEffect.quadVertexShader, combineFrag, 'BloomCombineShader', attributes);

    this.targets = [];

    // Effect defaults
    this.bloomThreshold = 0.25;
    this.blurAmount = 4;
    this.bloomIntensity = 1.25;

    // Uniforms
    this.sampleWeights = new Float32Array(SAMPLE_COUNT);
    this.sampleOffsets = new Float32Array(SAMPLE_COUNT * 2);
}

BloomEffect.prototype = Object.create(pc.PostEffect.prototype);
BloomEffect.prototype.constructor = BloomEffect;

BloomEffect.prototype._destroy = function () {
    if (this.targets) {
        var i;
        for (i = 0; i < this.targets.length; i++) {
            this.targets[i].destroyTextureBuffers();
            this.targets[i].destroy();
        }
    }
    this.targets.length = 0;
};

BloomEffect.prototype._resize = function (target) {

    var width = target.colorBuffer.width;
    var height = target.colorBuffer.height;

    if (width === this.width && height === this.height)
        return;

    this.width = width;
    this.height = height;

    this._destroy();

    // Render targets
    var i;
    for (i = 0; i < 2; i++) {
        var colorBuffer = new pc.Texture(this.device, {
            name: "Bloom Texture" + i,
            format: pc.PIXELFORMAT_RGBA8,
            width: width >> 1,
            height: height >> 1,
            mipmaps: false
        });
        colorBuffer.minFilter = pc.FILTER_LINEAR;
        colorBuffer.magFilter = pc.FILTER_LINEAR;
        colorBuffer.addressU = pc.ADDRESS_CLAMP_TO_EDGE;
        colorBuffer.addressV = pc.ADDRESS_CLAMP_TO_EDGE;
        colorBuffer.name = 'pe-bloom-' + i;
        var bloomTarget = new pc.RenderTarget({
            name: "Bloom Render Target " + i,
            colorBuffer: colorBuffer,
            depth: false
        });

        this.targets.push(bloomTarget);
    }
};

Object.assign(BloomEffect.prototype, {
    render: function (inputTarget, outputTarget, rect) {

        this._resize(inputTarget);

        var device = this.device;
        var scope = device.scope;

        // Pass 1: draw the scene into rendertarget 1, using a
        // shader that extracts only the brightest parts of the image.
        scope.resolve("uBloomThreshold").setValue(this.bloomThreshold);
        scope.resolve("uBaseTexture").setValue(inputTarget.colorBuffer);
        this.drawQuad(this.targets[0], this.extractShader);

        // Pass 2: draw from rendertarget 1 into rendertarget 2,
        // using a shader to apply a horizontal gaussian blur filter.
        calculateBlurValues(this.sampleWeights, this.sampleOffsets, 1.0 / this.targets[1].width, 0, this.blurAmount);
        scope.resolve("uBlurWeights[0]").setValue(this.sampleWeights);
        scope.resolve("uBlurOffsets[0]").setValue(this.sampleOffsets);
        scope.resolve("uBloomTexture").setValue(this.targets[0].colorBuffer);
        this.drawQuad(this.targets[1], this.blurShader);

        // Pass 3: draw from rendertarget 2 back into rendertarget 1,
        // using a shader to apply a vertical gaussian blur filter.
        calculateBlurValues(this.sampleWeights, this.sampleOffsets, 0, 1.0 / this.targets[0].height, this.blurAmount);
        scope.resolve("uBlurWeights[0]").setValue(this.sampleWeights);
        scope.resolve("uBlurOffsets[0]").setValue(this.sampleOffsets);
        scope.resolve("uBloomTexture").setValue(this.targets[1].colorBuffer);
        this.drawQuad(this.targets[0], this.blurShader);

        // Pass 4: draw both rendertarget 1 and the original scene
        // image back into the main backbuffer, using a shader that
        // combines them to produce the final bloomed result.
        scope.resolve("uBloomEffectIntensity").setValue(this.bloomIntensity);
        scope.resolve("uBloomTexture").setValue(this.targets[0].colorBuffer);
        scope.resolve("uBaseTexture").setValue(inputTarget.colorBuffer);
        this.drawQuad(outputTarget, this.combineShader, rect);
    }
});

// ----------------- SCRIPT DEFINITION ------------------ //
var Bloom = pc.createScript('bloom');

Bloom.attributes.add('bloomIntensity', {
    type: 'number',
    default: 1,
    min: 0,
    title: 'Intensity'
});

Bloom.attributes.add('bloomThreshold', {
    type: 'number',
    default: 0.25,
    min: 0,
    max: 1,
    title: 'Threshold'
});

Bloom.attributes.add('blurAmount', {
    type: 'number',
    default: 4,
    min: 1,
    'title': 'Blur amount'
});

Bloom.prototype.initialize = function () {
    this.effect = new BloomEffect(this.app.graphicsDevice);

    this.effect.bloomThreshold = this.bloomThreshold;
    this.effect.blurAmount = this.blurAmount;
    this.effect.bloomIntensity = this.bloomIntensity;

    var queue = this.entity.camera.postEffects;

    queue.addEffect(this.effect);

    this.on('attr', function (name, value) {
        this.effect[name] = value;
    }, this);

    this.on('state', function (enabled) {
        if (enabled) {
            queue.addEffect(this.effect);
        } else {
            queue.removeEffect(this.effect);
        }
    });

    this.on('destroy', function () {
        queue.removeEffect(this.effect);
        this.effect._destroy();
    });
};
2. 将脚本挂载在相机


 419
419


 被折叠的 条评论
为什么被折叠?
被折叠的 条评论
为什么被折叠?
 到【灌水乐园】发言


