


1.vue框架简介
引用网上的说法:vue.js 一个核心思想是数据驱动。所谓数据驱动,是指视图是由数据驱动生成的,我们对视图的修改,不会直接操作 DOM,而是通过修改数据。这个等会通过记账本这个案例进行演示体现。
2.原生与vue框架对比
1.数据的自动绑定
2.页面参数传递和页面状态管理。
3.模块化开发、无刷新保留场景参数更新
4.代码的可阅读性(模块化开发带来的)
5.基于强大的nodejs,拥有npm包管理器,可以很好滴管理包的版本
6.各子组件样式不冲突
7.视图,数据,结构分离
8.虚拟dom
9.各种指令;过滤器
3.原生操作dom到jQuery的演变
基于原生,你想更新页面或者添加数据显示,避免不了要获取节点、创建节点、添加节点、赋值取值(Element.value Element.innerText等)… 直到后续出来一个jQuery框架,可以简化部分代码,并且兼容性很不错
//原生部分代码展示
var inputElements = document.querySelectorAll('input')
var remakeElement = inputElements[0] //输入文本
var moneyElement = inputElements[1] //输入金额
var addHistory = document.getElementById('add-history')
var historyListElement = document.getElementById('history-list')
var deleteHistoryElement = document.querySelectorAll('delete-btn')

var countMoneyElement = document.getElementById('countMoney')
var srElement = document.getElementById('srMoney')
var fyElement = document.getElementById('fyMoney')


function deleteHistory2(event) {
	var deleteMoney = event.target.parentNode.children[1].innerText
	console.log(event.target.parentNode.children[1].innerText)
	computedMoney(deleteMoney,true)
	historyListElement.removeChild(event.target.parentNode)
}

function appenHistory() {
	var remake = remakeElement.value
	var money = moneyElement.value
	if(!remake.trim().length || !money.trim().length){
		alert('请输入内容!')
		return
	}

	var str =
		`<span>${remake}</span><span>${money}</span><div class="delete-btn" onclick="deleteHistory2(event)">x</div>`

	var liElement = document.createElement('li')
	liElement.innerHTML = str
	liElement.classList.add(parseFloat(money) < 0 ? 'minus-wrap' : 'add-wrap')
	historyListElement.appendChild(liElement)

	// 清空输入
	remakeElement.value = ''
	moneyElement.value = ''
	computedMoney(money)

}
//jQuery 代码展示

//选择器
$(this)	//当前 HTML 元素
$("p")	//所有 <p> 元素
$("p.intro")	//所有 class="intro" 的 <p> 元素
$(".intro")	//所有 class="intro" 的元素
$("#intro")	//id="intro" 的元素
$("ul li:first")	//每个 <ul> 的第一个 <li> 元素
$("[href$='.jpg']")	//所有带有以 ".jpg" 结尾的属性值的 href 属性
$("div#intro .head")	//id="intro" 的 <div> 元素中的所有 class="head" 的元素


//常见取值赋值
$("#test").text()
$("#test").html()
$("#val_test").val()
$("a").attr("href")

//事件
$("p").click(function(){
  $(this).hide();
});
4.jQuery到Vue框架
喜大普奔,我们在也不需要关注dom,不需要由我们直接操作dom,所有的dom操作交由Vue框架,我们只需要维护需要显示的数据即可。如下是基于vue框架开发的记账本简单应用的全部代码,可以直接复制打开。看不懂没关系,我们可以看到,整个script部分并没有发现操作dom的代码,但是他可以实现添加删除,并自动计算值。
操作:我们可以复制如下代码,本地新建一个文件,粘贴代码,改文件后缀为.html,然后双击打开!
<!DOCTYPE html>
<html>
	<head>
		<meta charset="utf-8">
		<title>我的账本</title>
		<!-- <link rel="stylesheet" href="./style.css"> -->
		<style>
			* {
				margin: 0;
				padding: 0;
			}

			#app,body {
				display: flex;
				flex-direction: column;
				align-items: center;
				background: #f7f7f7;
				min-height: 100vh;
			}

			.title {
				margin: 20px 0;
			}

			.container {
				width: 350px;
				margin: 30px 0;
			}

			.top-money-wrap {
				display: flex;
				flex-direction: row;
				align-items: center;
				justify-content: space-between;
				margin: 20px 0;
				padding: 20px;
				background: #fff;
				box-shadow: 0 1px 3px rgba(0, 0, 0, 0.12), 0 1px 2px rgba(0, 0, 0, 0.24);
			}

			.top-money-wrap>div {
				flex: 1;
				display: flex;
				flex-direction: column;
				align-items: center;
				justify-content: center;
			}

			.top-money-wrap>div:first-of-type {
				border-right: 1px solid #dedede;
			}

			.top-money-wrap>div .money-add {
				font-size: 20px;
				margin: 5px 0;
				color: #2ecc71;
			}

			.top-money-wrap>div .money-minus {
				font-size: 20px;
				margin: 5px 0;
				color: #c0392b;
			}

			.history-wrap {}

			.history-title {
				margin: 40px 0 10px 0;
				padding-bottom: 10px;
				border-bottom: 1px solid #dedede;
			}

			.add-wrap,
			.minus-wrap {
				padding: 10px;
				margin: 10px 0;
				display: flex;
				flex-direction: row;
				align-items: center;
				justify-content: space-between;
				list-style-type: none;
				border-right: 5px solid #2ecc71;
				position: relative;

				box-shadow: 0 1px 3px rgba(0, 0, 0, 0.12), 0 1px 2px rgba(0, 0, 0, 0.24);
			}

			.minus-wrap {
				border-right: 5px solid #c0392b;
			}

			#add-form .input-wrap label {
				margin: 10px 0;
				display: inline-block;
			}

			#add-form .input-wrap input {
				display: block;
				padding: 10px;
				width: 100%;
				box-sizing: border-box;
				/* box-shadow: 0 1px 3px rgba(0, 0, 0, 0.12), 0 1px 2px rgba(0, 0, 0, 0.24); */
				border: 1px solid #dedede;
				border-radius: 2px;
			}

			#add-form .add-btn {
				cursor: pointer;
				background-color: #9c88ff;
				box-shadow: 0 1px 3px rgba(0, 0, 0, 0.12), 0 1px 2px rgba(0, 0, 0, 0.24);
				color: #fff;
				border: 0;
				display: block;
				font-size: 16px;
				margin: 10px 0 30px;
				padding: 10px;
				width: 100%;
			}

			.delete-btn{
				padding: 2px 5px;
				background: #c0392b;
				color: #fff;
				position: absolute;
				left: -20px;
				bottom: 0;
				opacity: 0;
			}

			.add-wrap:hover .delete-btn{
				opacity: 1;
			}
			.minus-wrap:hover .delete-btn{
				opacity: 1;
			}

		</style>
		<!-- 引入vue框架 -->
		<script src="https://cdn.jsdelivr.net/npm/vue@2.7.10/dist/vue.js"></script>

	</head>
	<body>
		<!-- 模仿:https://vanillawebprojects.com/projects/expense-tracker/ -->
		<div id="app">
			<h2 class="title">账本记录</h2>
			<div class="container">
				<h4>你的余额</h4>
				<h1 id="countMoney">{{countMoney}}元</h1>
				<div class="top-money-wrap">
					<div>
						<h4>收入</h4>
						<p class="money-add" id="srMoney">${{srMoney}}</p>
					</div>

					<div>
						<h4>费用</h4>
						<p class="money-minus" id="fyMoney">${{fyMoney}}</p>
					</div>
				</div>

				<div class="history-wrap">
					<h3 class="history-title">
						历史记录
					</h3>
				</div>
				<ul id="history-list">
					<li v-for="(history,index) in historyList" :key="history.id"
						:class="history.money>0?'add-wrap':'minus-wrap'">
						<span>{{history.text}}</span>
						<span>{{history.money}}</span>
						<div class="delete-btn" id="delete-history" @click="deleteHistory(index)">x</div>
					</li>
				</ul>


				<div class="history-wrap">
					<h3 class="history-title">
						添加新记录
					</h3>
				</div>


				<form id="add-form">
					<div class="input-wrap">
						<label>文本</label>
						<input type="text" placeholder="请输入文本" v-model="inputRemake">
					</div>

					<div class="input-wrap">
						<label>金额(负数为费用,正数为收入)</label>
						<input type="number" placeholder="请输入金额" v-model="inputMoney">
					</div>

					<button class="add-btn" id="add-history" @click="addHistory">添加记录</button>
				</form>

			</div>
		</div>
		<!-- 使用vue框架实现 -->
		<script>
			const vue = new Vue({
				el: "#app",
				data: {
					inputMoney: '',
					inputRemake: '',
					historyList: [
						// {
						// 	text: '奖金',
						// 	money: 111,
						// 	id: 0,
						// },
						// {
						// 	text: '吃饭',
						// 	money: -11,
						// 	id: 1,
						// }
					],
				},
				mounted(){
					var localData =  JSON.parse(localStorage.getItem('app'))

					if(localData){
						this.historyList = localData
					}
				},
				methods: {
					saveLocalData(){
						localStorage.setItem('app',JSON.stringify(this.historyList))
					},
					addHistory(e) {
						e.preventDefault();
						if (!this.inputMoney.trim().length || !this.inputRemake.trim().length) {
							return
						}
						var addData = {
							text: this.inputRemake,
							money: this.inputMoney,
							id: Date.now(),
						}
						this.historyList.push(addData)
						this.inputRemake = ''
						this.inputMoney = ''

						this.saveLocalData()
					},
					deleteHistory(deleteIndex) {
						this.historyList.splice(deleteIndex, 1)
						this.saveLocalData()
					}
				},
				computed: {
					srMoney() { //收入金额统计
						var result = 0
						this.historyList.forEach(item => {
							if (item.money >= 0) {
								result += parseFloat(item.money)
							}
						})
						return result
					},
					fyMoney() { //费用金额统计
						var result = 0
						this.historyList.forEach(item => {
							if (item.money < 0) {
								result += -parseFloat(item.money)
							}
						})
						return result
					},
					countMoney() { //余额统计
						return this.srMoney - this.fyMoney
					}
				}
			})
			console.log('vue=', vue)
			// 为了演示数据变化,页面自动更新,请挨个复制如下代码到控制台(Console)然后回车输出,然后注意页面变化,认真看页面变化别眨眼~
			// vue.inputMoney = 967
			// vue.historyList.push({id:91,text:'hahah',money:-54})
			// vue.historyList.push({id:99,text:'hahah',money:9888})
			// vue.historyList[0].money = 967
		</script>
	</body>
</html>
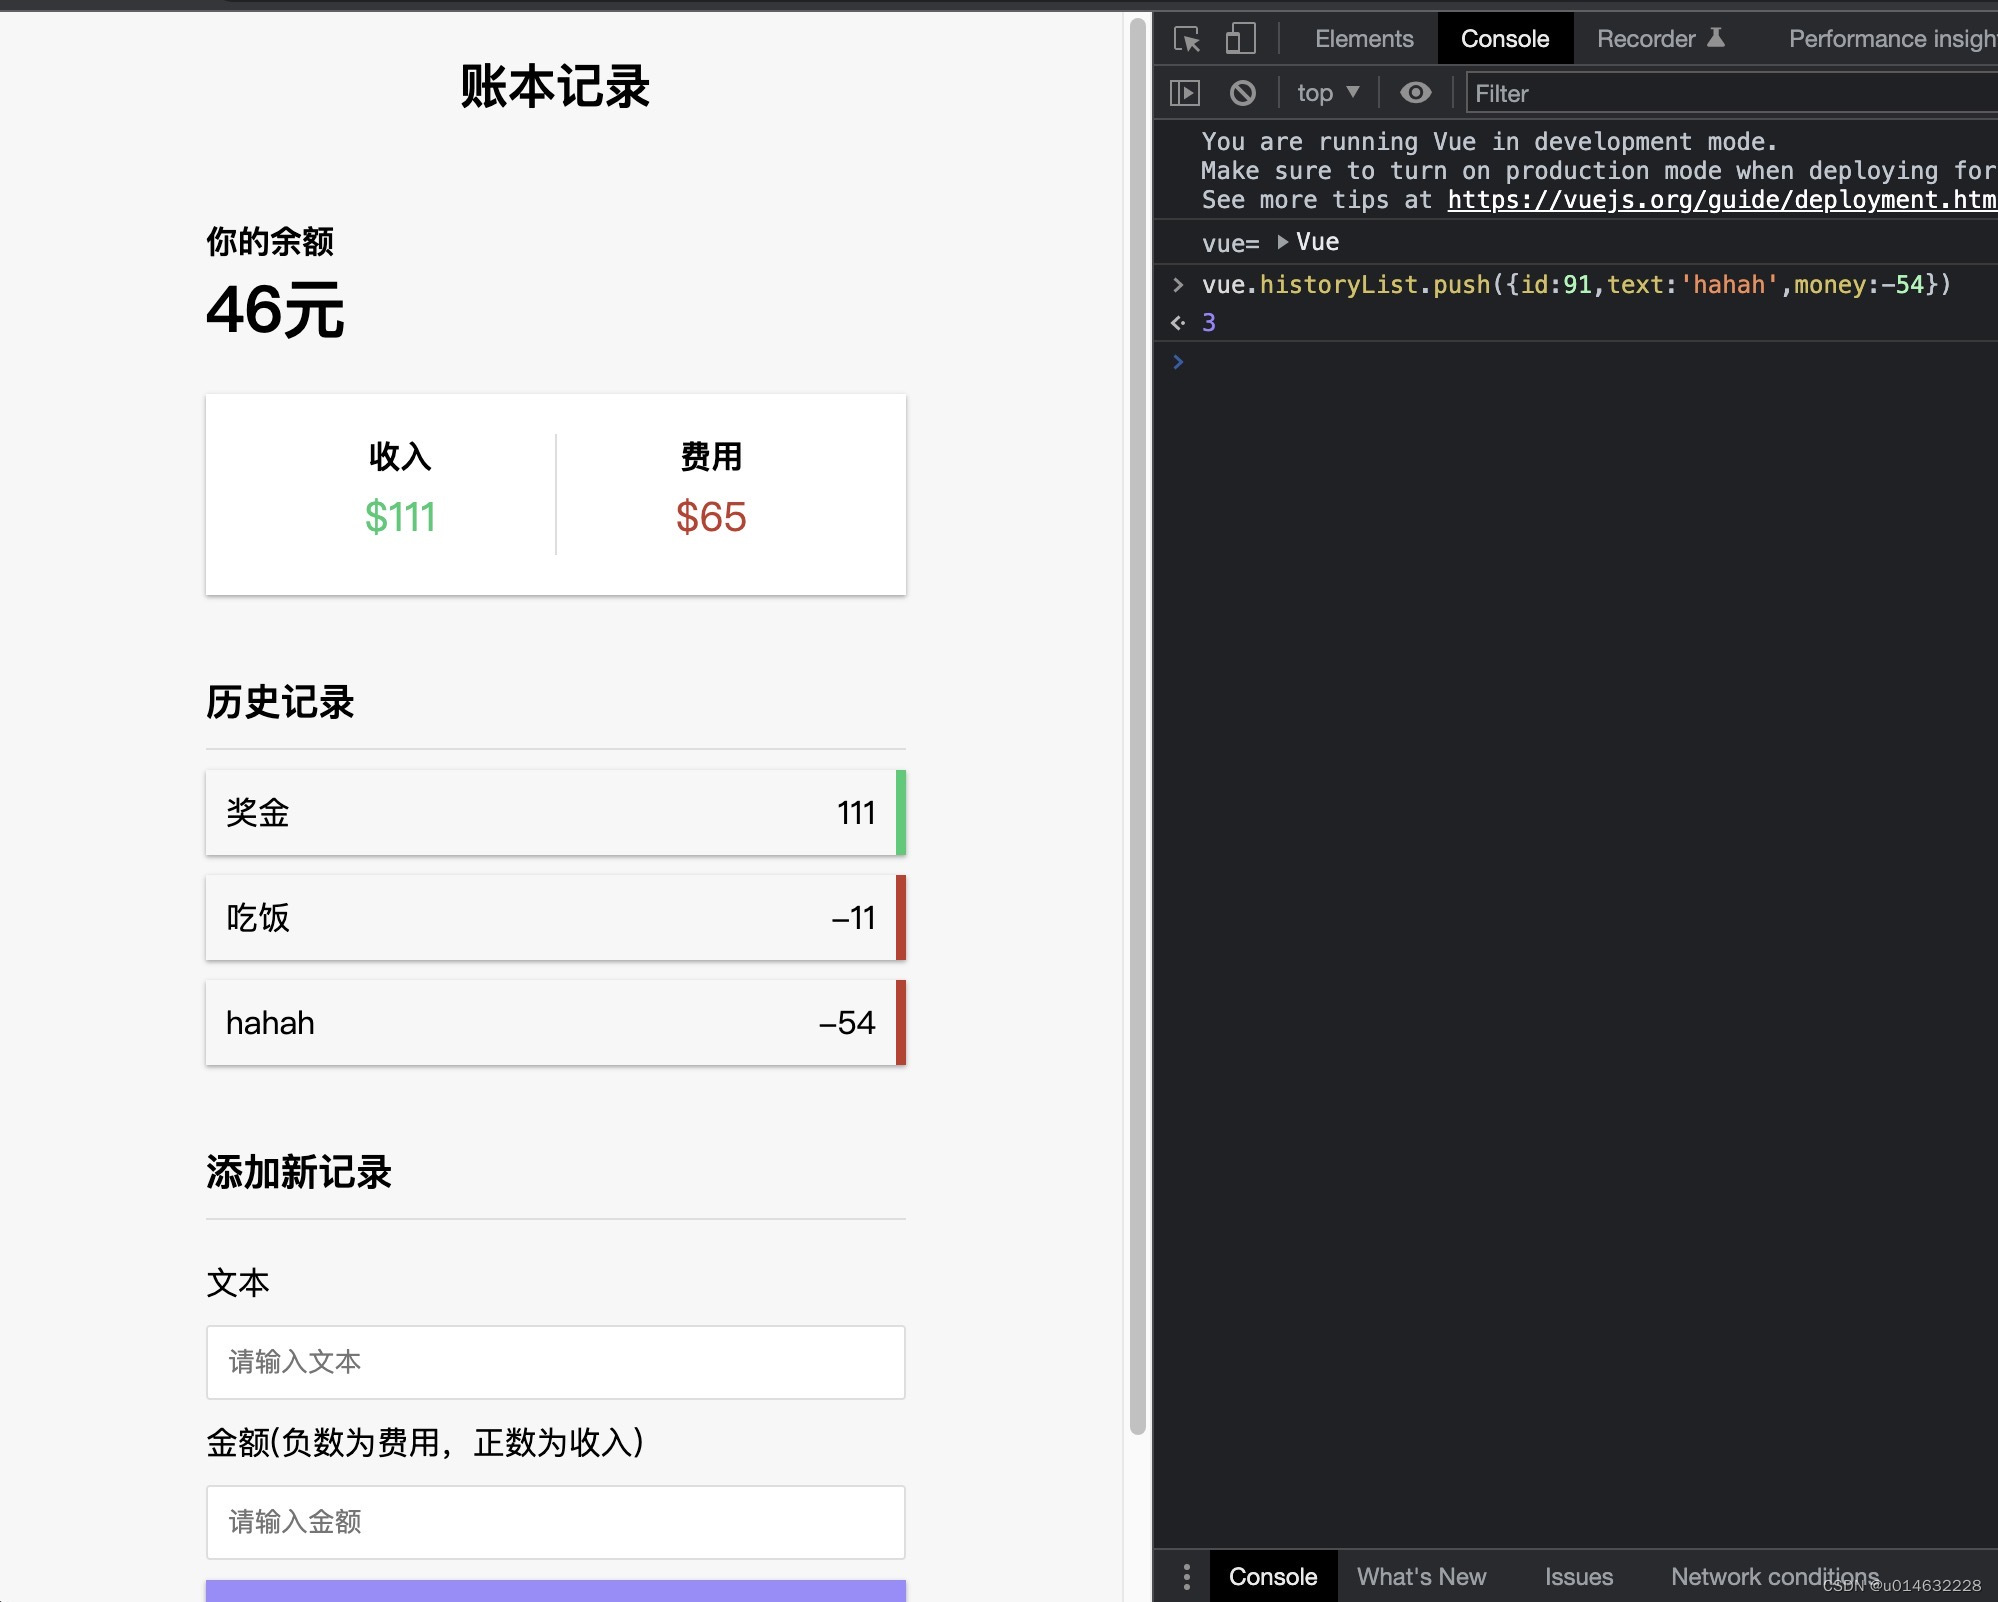
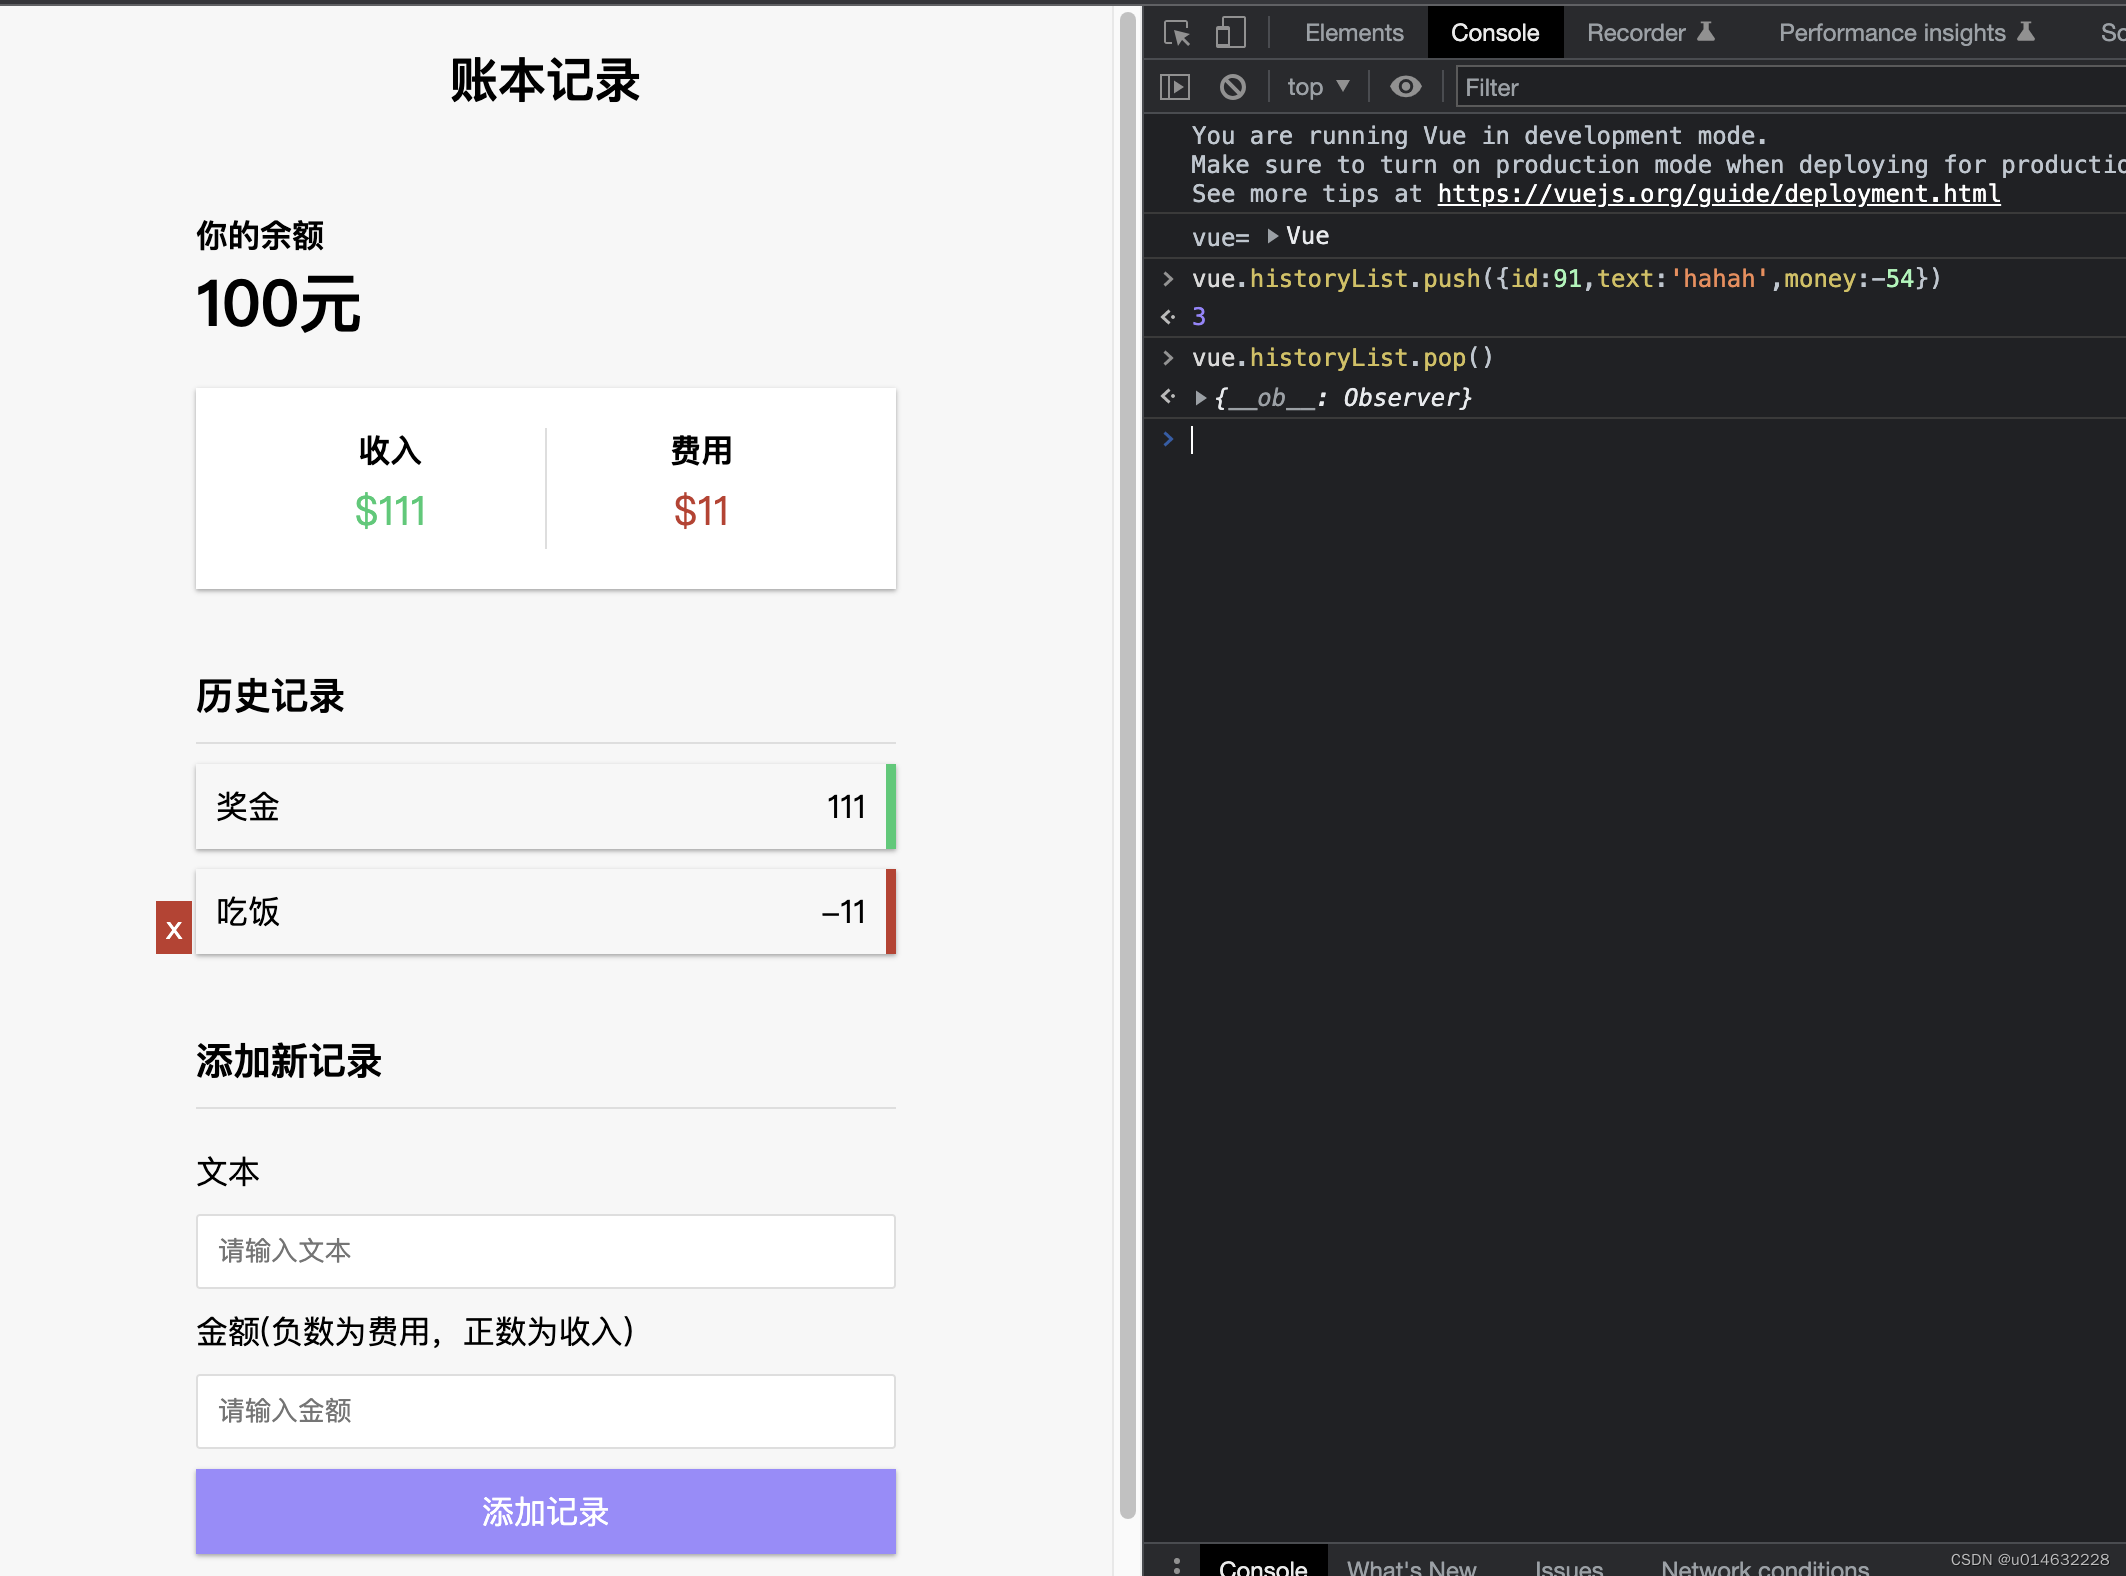
为了演示数据变化,页面自动更新,请挨个复制如下代码到控制台(Console)然后回车输出,然后注意页面变化,认真看页面变化别眨眼~
- vue.inputMoney = 967
- vue.historyList.push({id:91,text:‘hahah’,money:-54})
- vue.historyList.push({id:99,text:‘hahah’,money:9888})
- vue.historyList[0].money = 967
- vue.historyList[0].text = ‘改变了’
- vue.historyList.pop()
5.代码下载&演示图


 1261
1261


 被折叠的 条评论
为什么被折叠?
被折叠的 条评论
为什么被折叠?
 到【灌水乐园】发言


