


简介
开发中,通常都是在 onCreate() 中调用 setContentView(R.layout.custom_layout) 来实现想要的页面布局,
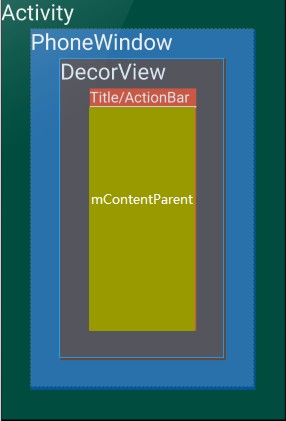
我们知道,页面都是依附在 Window窗口之上的,而 DecorView 即是窗口最顶层的视图。
Android frameworks中,与窗口视图处理相关的类,主要是 Window和它的实现类 PhoneWindow .
public class PhoneWindow extends Window implements MenuBuilder.Callback {
  ......

  //窗口顶层View
   private DecorView mDecor;

  //所有自定义布局的根View, id="@android:id/content"
   private ViewGroup mContentParent;//先记住这个变量,后面会有所介绍
DecorView 其实是 PhoneWindow 中的一个内部类,本质上也是一个View,其只是扩展了 FrameLayout 的实现
private final class DecorView extends FrameLayout implements RootViewSurfaceTaker {...}布局流程
1. Activity中调用 setContentView(R.layout.custom_layout), 具体实现为PhoneWindow 中的同名方法:
 public void setContentView(int layoutResID) {
  //getWindow()获取的即是PhoneWindow对象
  getWindow().setContentView(layoutResID);
}public void setContentView(int layoutResID) {
//初始,mContentParent为空
if (mContentParent == null) {
installDecor();//创建一个DecorView对象
} else {
mContentParent.removeAllViews();
}
//inflate自定义layout, 并将mContentParent作为其根视图
mLayoutInflater.inflate(layoutResID, mContentParent);private void installDecor() {
if (mDecor == null) {
mDecor = generateDecor();//new一个DecorView
mDecor.setDescendantFocusability(ViewGroup.FOCUS_AFTER_DESCENDANTS);
mDecor.setIsRootNamespace(true);
if (!mInvalidatePanelMenuPosted && mInvalidatePanelMenuFeatures != 0) {
mDecor.postOnAnimation(mInvalidatePanelMenuRunnable);
}
}
if (mContentParent == null) {
//设置窗口的修饰文件,并将id为ID_ANDROID_CONTENT的view找出来作为返回值赋值给mContentParent
mContentParent = generateLayout(mDecor);protected ViewGroup generateLayout(DecorView decor) {
// Apply data from current theme.
/** 1,获取<Application android:theme=""/>或<Activity/>节点指定的themes
* 或者获得代码requestWindowFeature()中指定的Features, 并设置 */
TypedArray a = getWindowStyle();
......
/** 2,设置Activity窗口属性特征 */
//获取窗口Features,设置相应的修饰布局文件,这些xml文件位于frameworks/base/core/res/res/layout下
... ...
//窗口是否浮动,一般用于Dialog窗口是否浮动:是否显示在布局的正中间。
mIsFloating = a.getBoolean(R.styleable.Window_windowIsFloating, false);
int flagsToUpdate = (FLAG_LAYOUT_IN_SCREEN|FLAG_LAYOUT_INSET_DECOR)
& (~getForcedWindowFlags());
if (mIsFloating) {
setLayout(WRAP_CONTENT, WRAP_CONTENT);
setFlags(0, flagsToUpdate);
} else {
setFlags(FLAG_LAYOUT_IN_SCREEN|FLAG_LAYOUT_INSET_DECOR, flagsToUpdate);
} <pre name="code" class="java"> //设置窗口是否支持标题栏,隐藏显示标题栏操作在此处。
if (a.getBoolean(R.styleable.Window_windowNoTitle, false)) {
requestFeature(FEATURE_NO_TITLE);
} else if (a.getBoolean(R.styleable.Window_windowActionBar, false)) {
// Don't allow an action bar if there is no title.
requestFeature(FEATURE_ACTION_BAR);
} ........
//当前Activity是否支持全屏
if (a.getBoolean(R.styleable.Window_windowFullscreen, false)) {
setFlags(FLAG_FULLSCREEN, FLAG_FULLSCREEN & (~getForcedWindowFlags()));
}
//设置状态栏的颜色
if (!mForcedStatusBarColor) {
mStatusBarColor = a.getColor(R.styleable.Window_statusBarColor, 0xFF000000);
}
//设置导航栏的颜色
if (!mForcedNavigationBarColor) {
mNavigationBarColor = a.getColor(R.styleable.Window_navigationBarColor, 0xFF000000);
}
......
    WindowManager.LayoutParams params = getAttributes();
    //设置输入法的状态
    if (!hasSoftInputMode()) {
        params.softInputMode = a.getInt(
                R.styleable.Window_windowSoftInputMode,
                params.softInputMode);
    }
    ......
    //设置当前Activity的出现动画效果
    if (params.windowAnimations == 0) {
        params.windowAnimations = a.getResourceId(
                R.styleable.Window_windowAnimationStyle, 0);
    }

    //根据上面所有的窗口Feature来设置layoutResource,作为decorView的子view的布局文件
    int layoutResource;
    int features = getLocalFeatures();
    // System.out.println("Features: 0x" + Integer.toHexString(features));
    if ((features & (1 << FEATURE_SWIPE_TO_DISMISS)) != 0) {
        layoutResource = R.layout.screen_swipe_dismiss;
    } else if ((features & ((1 << FEATURE_LEFT_ICON) | (1 << FEATURE_RIGHT_ICON))) != 0) {
        if (mIsFloating) {
            TypedValue res = new TypedValue();
            getContext().getTheme().resolveAttribute(
                    R.attr.dialogTitleIconsDecorLayout, res, true);
            layoutResource = res.resourceId;
        } else {
            layoutResource = R.layout.screen_title_icons;
        }
        // XXX Remove this once action bar supports these features.
        removeFeature(FEATURE_ACTION_BAR);
    }
    ............
    else{
        layoutResource = R.layout.screen_simple;
    }

    mDecor.startChanging();
  /** 3, 将上面选定的布局文件inflate为View树,添加到decorView中 */
  View in = mLayoutInflater.inflate(layoutResource, null);
   //将layoutResource这个xml布局添加到decorView里面,至此PhoneWindow内部类DecorView就添加了之布局
  decor.addView(in, new ViewGroup.LayoutParams(MATCH_PARENT, MATCH_PARENT));
  //将窗口修饰布局文件中id="@android:id/content"的View赋值给mContentParent,
   //后续自定义的view/layout都将是其子View
  ViewGroup contentParent = (ViewGroup)findViewById(ID_ANDROID_CONTENT);
  if (contentParent == null) {
    throw new RuntimeException("Window couldn't find content container view");
  }
  ......
   return contentParent;
}
简单说明一下 PhoneWindow.generateLayout 都做了什么:
(1)将一些页面特性布局,例如 ActionBar、Title 等添加到 decorView 中,
(2)初始化 mContentParent:
根据代码 ViewGroup contentParent = (ViewGroup)findViewById(ID_ANDROID_CONTENT) ;
可知,原来 mContentParent 就是 id="@android:id/content" 的 ViewGroup。
再回到 PhoneWindow.setContentView() :
mLayoutInflater.inflate(layoutResID, mContentParent); 并且,可以看出为什么在代码中必须要在 setContentView(...)之前才能执行 requestWindowFeature(...) !
(因为Activity的 setContentView() 会去使用 requestWindowFeature 指定的窗口属性,所以需要先设置好窗口属性)
-----------------------------------------------------------
对 requestWindowFeature的补充:
requestWindowFeature 主要用来设置标题栏样式,
如:“无标题栏”、“自定义标题栏布局”、“全屏”、“标题栏进度条”、“icon居左/右” 等等。
如果继承的是 ActionBarActivity 或者是 AppCompatActivity,,使用该方法就会报错。
解决办法:
1. 如果你执意要用这个方法,请继承Activity。
2.supportRequestWindowFeature(Window.FEATURE_PROGRESS);-----------------------------------------------------------
5,. 最后,根据第二步的 PhoneWindow.setContentView() 的最后一行代码,页面中设置的自定义layout会被添加到mContentParent中
mLayoutInflater.inflate(layoutResID, mContentParent);
我们来看看 PhoneWindow.generateLayout()源码中用到的 R.layout.screen_simple 资源:
<LinearLayout xmlns:android="http://schemas.android.com/apk/res/android"
    android:layout_width="match_parent"
    android:layout_height="match_parent"
    android:fitsSystemWindows="true"
    android:orientation="vertical">
<pre name="code" class="html"><!-- ViewStub是延迟加载,默认不显示 -><FrameLayout android:id="@android:id/content"
android:layout_width="match_parent"
android:layout_height="match_parent"
android:foregroundInsidePadding="false"
ndroid:foregroundGravity="fill_horizontal|top"
android:foreground="?android:attr/windowContentOverlay" />
</LinearLayout>
现在我们来梳理一下流程: Activity. setContentView—>PhoneWindow.setContentView—->PhoneWindow.installDecor—–>PhoneWindow. generateLayout——>PhoneWindow .mLayoutInflater.inflate(layoutResID, mContentParent);
一张图总结以上内容:
DecorView测量流程
这一节我们主要关心三个问题:
- onMeasure的两个参数从哪来。
- 最开始的参数是怎么计算出来的。
怎么确定specMode选哪个
DecorView 是应用窗口中最顶层的View, 那么自然而然,一个测量的开始肯定就是从DecorView开始的。
而且,我们还知道,一个测量的开始是从ViewRootImpl的performTraversals方法开始,所以我们理所当然的要从performTraversals 方法开始看起。
只看我们关心的部分代码:
private void performTraversals() {
  ...
  if (!mStopped) {
    boolean focusChangedDueToTouchMode = ensureTouchModeLocally(
            (relayoutResult&WindowManagerGlobal.RELAYOUT_RES_IN_TOUCH_MODE) != 0);
    if (focusChangedDueToTouchMode || mWidth != host.getMeasuredWidth()
            || mHeight != host.getMeasuredHeight() || contentInsetsChanged) {
        // mark
        // 获取测量规格 mWidth和mHeight当前视图frame的大小
        // lp是WindowManager.LayoutParams,默认为MATCH_PARENT
        int childWidthMeasureSpec = getRootMeasureSpec(mWidth, lp.width);
        int childHeightMeasureSpec = getRootMeasureSpec(mHeight, lp.height);
        ......

         // Ask host how big it wants to be
        performMeasure(childWidthMeasureSpec, childHeightMeasureSpec);
        ...
      }
      ...
    }
}在这里我们看到了performMeasure(),那这里肯定就是测量的开始了,但是,重点是我们关心的childWidthMeasureSpec 和childWidthMeasureSpec 是怎么计算出来的, 这里调用了 getRootMeasureSpec(),我们来到这个方法一探究竟。
private static int getRootMeasureSpec(int windowSize, int rootDimension) {
    int measureSpec;
    switch (rootDimension) {

    case ViewGroup.LayoutParams.MATCH_PARENT:
        // Window can't resize. Force root view to be windowSize.
        measureSpec = MeasureSpec.makeMeasureSpec(windowSize, MeasureSpec.EXACTLY);
        break;
    case ViewGroup.LayoutParams.WRAP_CONTENT:
        // Window can resize. Set max size for root view.
        measureSpec = MeasureSpec.makeMeasureSpec(windowSize, MeasureSpec.AT_MOST);
        break;
    default:
        // Window wants to be an exact size. Force root view to be that size.
        measureSpec = MeasureSpec.makeMeasureSpec(rootDimension, MeasureSpec.EXACTLY);
        break;
    }
    return measureSpec;//返回最终的测量规格
这个方法很简单,就是根据rootDimension的值来定义不同的measureSpec:
当是MATCH_PARENT的时候,我们make一个大小是windowSize,规格是 EXACTLY
当是WRAP_CONTENT的时候,我们make一个大小是windowSize,规格是最大为windowSize的 AT_MOST;
其他的情况,也就是rootDimension是具体值,那我们得到的是一个大小为rootDimension,规格为 EXACTLY
通过看上面的代码,我们最终有了一个测量规格,而且,我们可以猜测到宽高值都是固定的,就是我们视图的大小,所以,最后的measureSpec是EXACTLY。
现在我们就来到DecorView.onMeasure(),看看到底是怎么测量的。
protected void onMeasure(int widthMeasureSpec, int heightMeasureSpec) {
   // 获取测量规格, 这里通常是EXACTLY
   final int widthMode = getMode(widthMeasureSpec);
   final int heightMode = getMode(heightMeasureSpec);

   boolean fixedWidth = false;

   // 如果不是EXACTLY,这里还是要获取下视图的大小,然后让测量规格是EXACTLY
   if (widthMode == AT_MOST) {
       final TypedValue tvw = isPortrait ? mFixedWidthMinor : mFixedWidthMajor;
       if (tvw != null && tvw.type != TypedValue.TYPE_NULL) {
           final int w;
           if (tvw.type == TypedValue.TYPE_DIMENSION) {
               w = (int) tvw.getDimension(metrics);
           } else if (tvw.type == TypedValue.TYPE_FRACTION) {
               w = (int) tvw.getFraction(metrics.widthPixels, metrics.widthPixels);
           } else {
               w = 0;
           }

           if (w > 0) {
               // 这里重新设置了测量规格
               // 大小是performMeasure中给出的大小和自己获取的大小的最小值
               final int widthSize = MeasureSpec.getSize(widthMeasureSpec);
               widthMeasureSpec = MeasureSpec.makeMeasureSpec(
                       Math.min(w, widthSize), EXACTLY);
               fixedWidth = true;
           }
       }
   }
   ...
   // 下面同样有一个高度的判断,同样让高的规格为EXACTLY,此处省略
   ......
   super.onMeasure(widthMeasureSpec, heightMeasureSpec);
   ...
}performMeasure中给的测量规格不是精确值的时候,自己又去获取一下并且取两者的最小值,当然最后会把测量规格设置为精确值。判断好后,接着调用了super.onMeasure,我们知道DecorView继承自FrameLayout,所以,现在我们要去FrameLayout的onMeasure方法看看了。
FrameLayout.onMeasure() 源码:
protected void onMeasure(int widthMeasureSpec, int heightMeasureSpec) {
  int count = getChildCount();

  // 如果测量规格有一个不是精确值,这里就为true(DecorView传来的肯定是EXACTLY,所以这里为false)
  final boolean measureMatchParentChildren =
          MeasureSpec.getMode(widthMeasureSpec) != MeasureSpec.EXACTLY ||
          MeasureSpec.getMode(heightMeasureSpec) != MeasureSpec.EXACTLY;
  mMatchParentChildren.clear();

  int maxHeight = 0;
  int maxWidth = 0;
  int childState = 0;

  for (int i = 0; i < count; i++) {
      final View child = getChildAt(i);
      if (mMeasureAllChildren || child.getVisibility() != GONE) {
          // 测量子view
          measureChildWithMargins(child, widthMeasureSpec, 0, heightMeasureSpec, 0);
          final LayoutParams lp = (LayoutParams) child.getLayoutParams();
          // 前一个子view的宽度和当前子view的宽度中取最大值,目的是取所有子view之中的最大宽高值
          maxWidth = Math.max(maxWidth,
                  child.getMeasuredWidth() + lp.leftMargin + lp.rightMargin);
          maxHeight = Math.max(maxHeight,
                  child.getMeasuredHeight() + lp.topMargin + lp.bottomMargin);
          childState = combineMeasuredStates(childState, child.getMeasuredState());
          if (measureMatchParentChildren) { //由于是false,这次不执行下面代码
              // 如果当前view有match_parent的地方,
              // 记录一下当前view
              if (lp.width == LayoutParams.MATCH_PARENT ||
                      lp.height == LayoutParams.MATCH_PARENT) {
                  mMatchParentChildren.add(child);
              }
          }
      }
  }

  // 一些常规的边边角角和保证现在的大小能包含的了所有组件

  // Account for padding too
  maxWidth += getPaddingLeftWithForeground() + getPaddingRightWithForeground();
  maxHeight += getPaddingTopWithForeground() + getPaddingBottomWithForeground();

  // Check against our minimum height and width
  maxHeight = Math.max(maxHeight, getSuggestedMinimumHeight());
  maxWidth = Math.max(maxWidth, getSuggestedMinimumWidth());

  // Check against our foreground's minimum height and width
  final Drawable drawable = getForeground();
  if (drawable != null) {
      maxHeight = Math.max(maxHeight, drawable.getMinimumHeight());
      maxWidth = Math.max(maxWidth, drawable.getMinimumWidth());
  }

  // 保存测量结果
  setMeasuredDimension(resolveSizeAndState(maxWidth, widthMeasureSpec, childState),
          resolveSizeAndState(maxHeight, heightMeasureSpec,
                  childState << MEASURED_HEIGHT_STATE_SHIFT));

  count = mMatchParentChildren.size();
  // 这里有值表明了两点:
  // 1 当前FrameLayout的宽和高的建议规格有不是精确值的
  // 2 子view有含有match_parent的地方
  if (count > 1) {
      for (int i = 0; i < count; i++) {
          final View child = mMatchParentChildren.get(i);

          final MarginLayoutParams lp = (MarginLayoutParams) child.getLayoutParams();
          int childWidthMeasureSpec;
          int childHeightMeasureSpec;

          if (lp.width == LayoutParams.MATCH_PARENT) {
              childWidthMeasureSpec = MeasureSpec.makeMeasureSpec(getMeasuredWidth() -
                      getPaddingLeftWithForeground() - getPaddingRightWithForeground() -
                      lp.leftMargin - lp.rightMargin,
                      MeasureSpec.EXACTLY);
          } else {
              childWidthMeasureSpec = getChildMeasureSpec(widthMeasureSpec,
                      getPaddingLeftWithForeground() + getPaddingRightWithForeground() +
                      lp.leftMargin + lp.rightMargin,
                      lp.width);
          }

          if (lp.height == LayoutParams.MATCH_PARENT) {
              childHeightMeasureSpec = MeasureSpec.makeMeasureSpec(getMeasuredHeight() -
                      getPaddingTopWithForeground() - getPaddingBottomWithForeground() -
                      lp.topMargin - lp.bottomMargin,
                      MeasureSpec.EXACTLY);
          } else {
              childHeightMeasureSpec = getChildMeasureSpec(heightMeasureSpec,
                      getPaddingTopWithForeground() + getPaddingBottomWithForeground() +
                      lp.topMargin + lp.bottomMargin,
                      lp.height);
          }

          child.measure(childWidthMeasureSpec, childHeightMeasureSpec);
      }
  }
}1. for循环遍历测量子view,计算所有子view之中最大的宽和最大的高,并记录下来
2. 然后设置这个FrameLayout的尺寸时,调用 resolveSizeAndState()去最终确认大小
public static int resolveSizeAndState(int size, int measureSpec, int childMeasuredState) {
    int result = size;//size即所有子view之中宽高的最大值
    int specMode = MeasureSpec.getMode(measureSpec);
    int specSize =  MeasureSpec.getSize(measureSpec);
    switch (specMode) {//根据FrameLayout的specMode来最终决定它自身大小
    case MeasureSpec.UNSPECIFIED:
        result = size;
        break;
    case MeasureSpec.AT_MOST://这种模式下,哪个小取哪个
        if (specSize < size) {
            result = specSize | MEASURED_STATE_TOO_SMALL;
        } else {
            result = size;
        }
        break;
    case MeasureSpec.EXACTLY://直接取
        result = specSize;
        break;
    }
    return result | (childMeasuredState&MEASURED_STATE_MASK);
}首先这里去判断测量规格,如果是EXACTLY,则结果直接是MeasureSpec里获取的大小;如果是AT_MOST,这里取两个大小的最小值。
到这里FrameLayout的测量也就完成了,而且我们也看懂了测量是如何从DecorView开始一步步的到child的测量过程,不过这个过程我们还没有细看。
参考文章


 341
341

 被折叠的 条评论
为什么被折叠?
被折叠的 条评论
为什么被折叠?
 到【灌水乐园】发言


