


前言
最近开发中遇到了一个需求,需要RecyclerView滚动到指定位置后置顶显示,当时遇到这个问题的时候,心里第一反应是直接使用RecyclerView的smoothScrollToPosition()方法,实现对应位置的平滑滚动。但是在实际使用中发现并没有到底自己想要的效果。本想着偷懒直接从网上Copy下,但是发现效果并不是很好。于是就自己去研究源码。
该系列文章分为两篇文章。
- 如果你想了解其内部实现,请观看本篇文章,
- 如果你想解决通过smoothScrollToPosition滚动到顶部,或者修改滚动加速,请观看RecyclerView滚动位置,滚动速度设置
什么是可见范围?
在了解RecyclerView的smoothScrollToPosition方法之前,有个知识点,我觉得有必要给大家说一下,因为使用smoothScrollToPosition中遇到的问题都与可见范围有关。
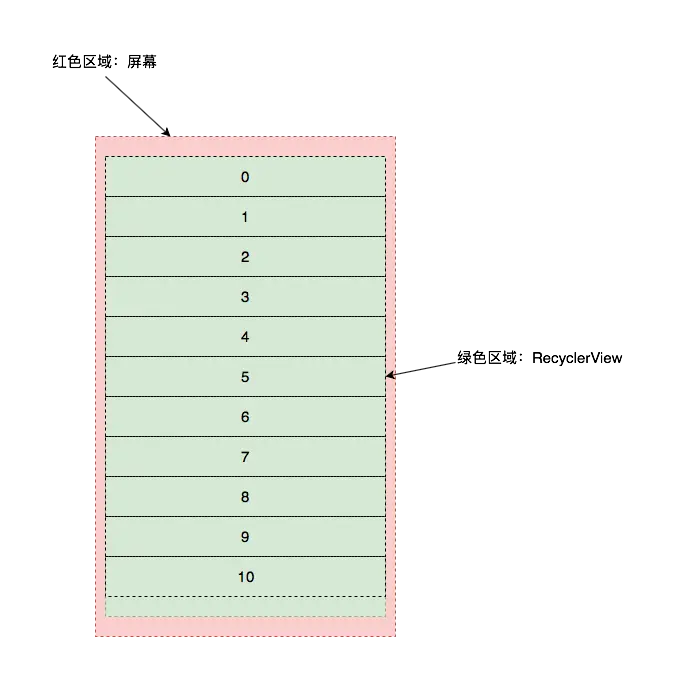
这里所说的可见范围是,RecyclerView第一个可见item的位置与最后一个可见item的位置之间的范围。
一、实际使用中遇见的问题
如果当前滚动位置在可见范围内,是不会发生滚动的
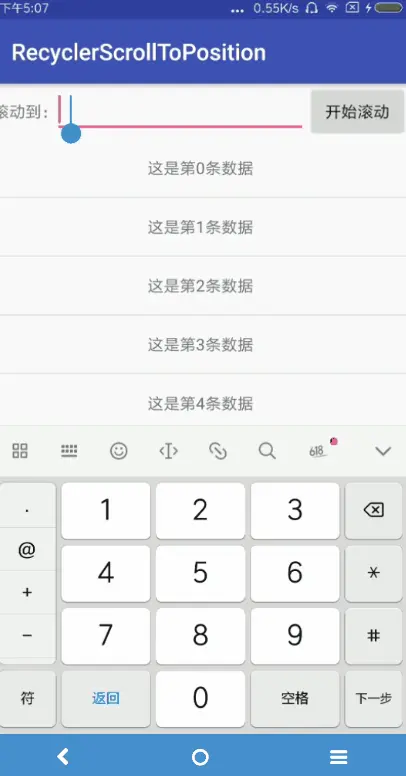
当前RecyclerView的可见范围为0到9,当我们想要滚动到1位置时,发现当前RecyclerView并没有发生滚动。
二、如果当前滚动位置在可见范围之后,会滚动到底部
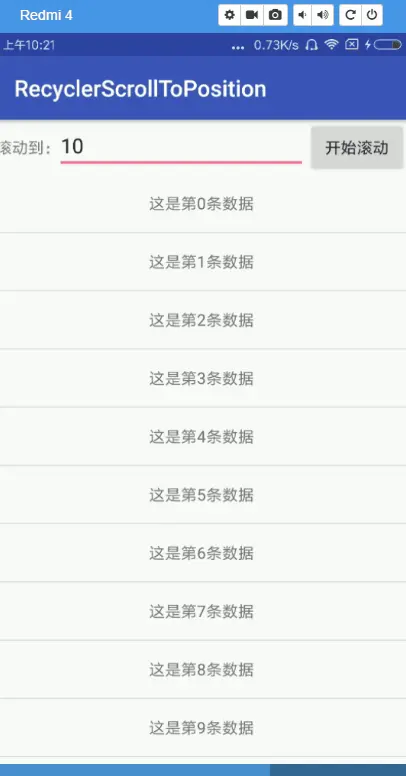
当前RecyclerView的可见范围为0到9,当我们想要滚动到10位置时,发现RecyclerView滚动了,且当前位置对应的视图在RecyclreView的底部。
三、如果当前滚动位置在可见范围之前,会滚动到顶部

这里我们滚动RecyclerView,使其可见范围为10到19,当我们分别滚动到1、3位置时,RecyclerView滚动了。且当前位置对应的视图在RecyclerView的顶部。
二、RecyclerView smoothScrollToPosition源码解析
到了这里我们发现对于不同情况,RecyclerView内部处理是不一样的,所以为了解决实际问题,看源码是必不可少的,接下来我们就一起跟着源码走一遍。来看看RecyclerView具体的滚动实现。(这里需要提醒大家的是这里我采用的是LinearLayoutManager,本文章都是基于LinearLayoutManager进行分析的)
  public void smoothScrollToPosition(int position) {
        if (mLayoutFrozen) {
            return;
        }
        if (mLayout == null) {
            Log.e(TAG, "Cannot smooth scroll without a LayoutManager set. "
                    + "Call setLayoutManager with a non-null argument.");
            return;
        }
        mLayout.smoothScrollToPosition(this, mState, position);
    }
mRecycler.smoothScrollToPosition()方法时,内部调用了LayoutManager的smoothScrollToPosition方法,LayoutManager中smoothScrollToPosition没有实现,具体实现在其子类中,这里我们使用的是LinearLayoutManager,所以我们来看看内部是怎么实现的。
   @Override
    public void smoothScrollToPosition(RecyclerView recyclerView, RecyclerView.State state,
            int position) {
        LinearSmoothScroller scroller = new LinearSmoothScroller(recyclerView.getContext());
        scroller.setTargetPosition(position);//设定目标位置
        startSmoothScroll(scroller);
    }
这里我们可以看到,这里导致RecyclerView滑动的是LinearSmoothScroller,而LinearSmoothScroller的父类是RecyclerView.SmoothScroller,看到这里我相信大家都会感到一丝熟悉,因为我们在对控件内内容进行移动的时候,我们都会使用到一个类,那就是Scroller。这里RecyclerView也自定了一个滑动Scroller。肯定是与滑动其内部视图相关的。
 public void startSmoothScroll(SmoothScroller smoothScroller) {
            if (mSmoothScroller != null && smoothScroller != mSmoothScroller
                    && mSmoothScroller.isRunning()) {
                mSmoothScroller.stop();
            }
            mSmoothScroller = smoothScroller;
            mSmoothScroller.start(mRecyclerView, this);
        }
继续走startSmoothScroll,方法内部判断了如果正在计算坐标值就停止,然后调用start()方法重新开始计算坐标值。接着开始看start()方法。
 void start(RecyclerView recyclerView, LayoutManager layoutManager) {
            mRecyclerView = recyclerView;
            mLayoutManager = layoutManager;
            if (mTargetPosition == RecyclerView.NO_POSITION) {
                throw new IllegalArgumentException("Invalid target position");
            }
            mRecyclerView.mState.mTargetPosition = mTargetPosition;
            mRunning = true;//设置当前scroller已经开始执行
            mPendingInitialRun = true;
            mTargetView = findViewByPosition(getTargetPosition());//根据目标位置查找相应View,
            onStart();
            mRecyclerView.mViewFlinger.postOnAnimation();
        }
在start方法中,会标识当前scroller的执行状态,同时会根据滚动的位置去寻找对应的目标视图。这里需要着重提示一下,findViewByPosition()这个方法,该方法会在Recycler的可见范围内去查询是否有目标位置对应的视图,例如,现在RecyclerView的可见范围为1-9,目标位置为10,那么mTargetView =null,如果可见范围为9-20,目标位置为1,那么mTargetView =null。
最终调用RecyclerView的内部类 ViewFlinger的postOnAnimation()方法。
   class ViewFlinger implements Runnable {
       ....省略部分代码
     void postOnAnimation() {
            if (mEatRunOnAnimationRequest) {
                mReSchedulePostAnimationCallback = true;
            } else {
                removeCallbacks(this);
                ViewCompat.postOnAnimation(RecyclerView.this, this);
            }
        }
   }
这里我们发现,ViewFlinger其实一个Runnable,在postOnAnimation()内部又将该Runnable发送出去了。那下面我们只用关心ViewFlinger的run()方法就行了。
   @Override
        public void run() {
                   ...省略部分代码
            final OverScroller scroller = mScroller;
            //获得layoutManger中的SmoothScroller
            final SmoothScroller smoothScroller = mLayout.mSmoothScroller;
            if (scroller.computeScrollOffset()) {//如果是第一次走,会返回false
                   ...省略部分代码
             }
            if (smoothScroller != null) {
                if (smoothScroller.isPendingInitialRun()) {
                    smoothScroller.onAnimation(0, 0);
                }
                if (!mReSchedulePostAnimationCallback) {
                    smoothScroller.stop(); //stop if it does not trigger any scroll
                }
            }
              ...省略部分代码
        }
ViewFlinger的run()方法内部实现比较复杂, 在该方法第一次执行的时候,会执行,if (scroller.computeScrollOffset()) ,其中scroller是ViewFlinger中的属性mScroller的引用,其中mScroller会在ViewFlinger创建对象的时候,就默认初始化了。那么第一次判断时候,因为还没有开始计算,所以不会进这个if语句块,那么接下来就会直接走下面的语句:
     if (smoothScroller != null) {
                if (smoothScroller.isPendingInitialRun()) {
                    smoothScroller.onAnimation(0, 0);
                }
                if (!mReSchedulePostAnimationCallback) {
                    smoothScroller.stop(); //stop if it does not trigger any scroll
                }
            }
最后发现,只是走了一个onAnimation(0,0),继续走该方法。
 private void onAnimation(int dx, int dy) {
            final RecyclerView recyclerView = mRecyclerView;
            if (!mRunning || mTargetPosition == RecyclerView.NO_POSITION || recyclerView == null) {
                stop();
            }
            mPendingInitialRun = false;
            if (mTargetView != null) {//判断目标视图是否存在,如果存在则计算移动到位置需要移动的距离
                if (getChildPosition(mTargetView) == mTargetPosition) {
                    onTargetFound(mTargetView, recyclerView.mState, mRecyclingAction);
                    mRecyclingAction.runIfNecessary(recyclerView);
                    stop();
                } else {
                    Log.e(TAG, "Passed over target position while smooth scrolling.");
                    mTargetView = null;
                }
            }
            if (mRunning) {//如果不存在,继续去找
                onSeekTargetStep(dx, dy, recyclerView.mState, mRecyclingAction);
                boolean hadJumpTarget = mRecyclingAction.hasJumpTarget();
                mRecyclingAction.runIfNecessary(recyclerView);
                if (hadJumpTarget) {
                    // It is not stopped so needs to be restarted
                    if (mRunning) {
                        mPendingInitialRun = true;
                        recyclerView.mViewFlinger.postOnAnimation();
                    } else {
                        stop(); // done
                    }
                }
            }
        }
在onAnimation方法中,判断了目标视图是否为空,大家应该还记得上文中,我们对目标视图的查找。如果当前位置不在可见范围之内,那么mTargetView =null,就不回走对应的判断语句。继续查看onSeekTargetStep()。
    protected void onSeekTargetStep(int dx, int dy, RecyclerView.State state, Action action) {
        if (getChildCount() == 0) {
            stop();
            return;
        }
        //noinspection PointlessBooleanExpression
        if (DEBUG && mTargetVector != null
                && ((mTargetVector.x * dx < 0 || mTargetVector.y * dy < 0))) {
            throw new IllegalStateException("Scroll happened in the opposite direction"
                    + " of the target. Some calculations are wrong");
        }
        mInterimTargetDx = clampApplyScroll(mInterimTargetDx, dx);
        mInterimTargetDy = clampApplyScroll(mInterimTargetDy, dy);

        if (mInterimTargetDx == 0 && mInterimTargetDy == 0) {
            updateActionForInterimTarget(action);
        } // everything is valid, keep going

    }
直接通过代码,发现并不理解改函数要做什么样的工作,这里我们只知道第一次发生滚动时,mInterimTargetDx=0与mInterimTargetDy =0,那么会走updateActionForInterimTarget()方法。
    protected void updateActionForInterimTarget(Action action) {
        // find an interim target position
        PointF scrollVector = computeScrollVectorForPosition(getTargetPosition());
        ...省略部分代码
        normalize(scrollVector);
        mTargetVector = scrollVector;

        mInterimTargetDx = (int) (TARGET_SEEK_SCROLL_DISTANCE_PX * scrollVector.x);
        mInterimTargetDy = (int) (TARGET_SEEK_SCROLL_DISTANCE_PX * scrollVector.y);

        //计算需要滚动的时间,  默认滚动距离,TARGET_SEEK_SCROLL_DISTANCE_PX = 10000;
        final int time = calculateTimeForScrolling(TARGET_SEEK_SCROLL_DISTANCE_PX);

        //为了避免在滚动的时候出现停顿,我们会跟踪onSeekTargetStep中的回调距离,实际上不会滚动超出实际的距离
        action.update((int) (mInterimTargetDx * TARGET_SEEK_EXTRA_SCROLL_RATIO),
                (int) (mInterimTargetDy * TARGET_SEEK_EXTRA_SCROLL_RATIO),
                //这里存入的时间要比实际花费的时间大一点。
                (int) (time * TARGET_SEEK_EXTRA_SCROLL_RATIO), mLinearInterpolator);
    }
根据官方文档进行翻译:当目标滚动位置对应视图不在RecyclerView的可见范围内,该方法计算朝向该视图的方向向量并触发平滑滚动。默认滚动的距离为12000(单位:px),(也就是说了为了滚动到目标位置,会让Recycler至多滚动12000个像素)。
既然该方法计算了时间,那么我们就看看calculateTimeForScrolling()方法,通过方法名我们就应该了解了该方法是计算给定距离在默认速度下需要滚动的时间。
    protected int calculateTimeForScrolling(int dx) {
        //这里对时间进行了四舍五入操作。
        return (int) Math.ceil(Math.abs(dx) * MILLISECONDS_PER_PX);
    }
其中MILLISECONDS_PER_PX 会在LinearSmoothScroller初始化的时候创建。
  public LinearSmoothScroller(Context context) {
      MILLISECONDS_PER_PX = calculateSpeedPerPixel(context.getResources().getDisplayMetrics());
    }
查看calculateSpeedPerPixel()方法
    private static final float MILLISECONDS_PER_INCH = 25f;// 默认为移动一英寸需要花费25ms
    protected float calculateSpeedPerPixel(DisplayMetrics displayMetrics) {
        return MILLISECONDS_PER_INCH / displayMetrics.densityDpi;
    }
也就是说,当前滚动的速度是与屏幕的像素密度相关, 通过获取当前手机屏幕每英寸的像素密度,与每英寸移动所需要花费的时间,用每英寸移动所需要花费的时间除以像素密度就能计算出移动一个像素密度需要花费的时间。OK,既然我们已经算出了移动一个像素密度需要花费的时间,那么直接乘以像素,就能算出移动该像素所需要花费的时间了。
既然现在我们算出了时间,我们现在只用关心Action的update()方法到底是干什么的就好了,
        //保存关于SmoothScroller滑动距离信息
        public static class Action {
               ...省略代码
             public void update(int dx, int dy, int duration, Interpolator interpolator) {
                mDx = dx;
                mDy = dy;
                mDuration = duration;
                mInterpolator = interpolator;
                mChanged = true;
            }
         }
这里我们发现Action,只是存储关于SmoothScroller滑动信息的一个类,那么初始时保存了横向与竖直滑动的距离(12000px)、滑动时间,插值器。同时记录当前数据改变的状态。
现在我们已经把Action的onSeekTargetStep方法走完了,那接下来,我们继续看Action的runIfNecessary()方法。
   void runIfNecessary(RecyclerView recyclerView) {
                 ....省略代码
                if (mChanged) {
                    validate();
                    if (mInterpolator == null) {
                        if (mDuration == UNDEFINED_DURATION) {
                            recyclerView.mViewFlinger.smoothScrollBy(mDx, mDy);
                        } else {
                            //这里传入的mDx,mDy,mDuration.是Action之前update()方法。保存的信息
                            recyclerView.mViewFlinger.smoothScrollBy(mDx, mDy, mDuration);
                        }
                    } else {
                        recyclerView.mViewFlinger.smoothScrollBy(
                                mDx, mDy, mDuration, mInterpolator);
                    }
              mChanged = false;
                ....省略代码
            }
TNND,调来调去最后又把Action存储的信息传给了ViewFlinger的smoothScrollBy()方法。这里需要注意:一旦调用该方法会将mChanged置为false,下次再次进入该方法时,那么就不会调用ViewFlinger的滑动方法了。
 public void smoothScrollBy(int dx, int dy, int duration, Interpolator interpolator) {
             //判断是否是同一插值器,如果不是,重新创建mScroller
            if (mInterpolator != interpolator) {
                mInterpolator = interpolator;
                mScroller = new OverScroller(getContext(), interpolator);
            }
            setScrollState(SCROLL_STATE_SETTLING);
            mLastFlingX = mLastFlingY = 0;
            mScroller.startScroll(0, 0, dx, dy, duration);
            if (Build.VERSION.SDK_INT < 23) {
                mScroller.computeScrollOffset();
            }
            postOnAnimation();
        }
这里mScroller接受到Acttion传入的滑动信息开始滑动后。最后会调用postOnAnimation(),又将ViewFiinger的run()法发送出去。那么最终我们又回到了ViewFiinger的run()方法。
    public void run() {
         ...省略部分代码
   if (scroller.computeScrollOffset()) {
                final int[] scrollConsumed = mScrollConsumed;
                final int x = scroller.getCurrX();
                final int y = scroller.getCurrY();
                int dx = x - mLastFlingX;
                int dy = y - mLastFlingY;
                int hresult = 0;
                int vresult = 0;
                mLastFlingX = x;
                mLastFlingY = y;
                int overscrollX = 0, overscrollY = 0;
                ...省略部分代码
                if (mAdapter != null) {
                    startInterceptRequestLayout();
                    onEnterLayoutOrScroll();
                    TraceCompat.beginSection(TRACE_SCROLL_TAG);
                    fillRemainingScrollValues(mState);
                    if (dx != 0) {//如果横向方向大于0,开始让RecyclerView滚动
                        hresult = mLayout.scrollHorizontallyBy(dx, mRecycler, mState);
                        overscrollX = dx - hresult;
                    }
                    if (dy != 0) {//如果竖直方向大于0,开始让RecyclerView滚动,获得当前滚动的距离
                        vresult = mLayout.scrollVerticallyBy(dy, mRecycler, mState);
                        overscrollY = dy - vresult;
                    }
                    TraceCompat.endSection();
                    repositionShadowingViews();

                    onExitLayoutOrScroll();
                    stopInterceptRequestLayout(false);
                    if (smoothScroller != null && !smoothScroller.isPendingInitialRun()
                            && smoothScroller.isRunning()) {
                        final int adapterSize = mState.getItemCount();
                        if (adapterSize == 0) {
                            smoothScroller.stop();
                        } else if (smoothScroller.getTargetPosition() >= adapterSize) {
                            smoothScroller.setTargetPosition(adapterSize - 1);
                            //传入当前RecylerView滚动的距离 dx dy
                            smoothScroller.onAnimation(dx - overscrollX, dy - overscrollY);
                        } else {
                            //传入当前RecylerView滚动的距离 dx dy
                            smoothScroller.onAnimation(dx - overscrollX, dy - overscrollY);
                        }
                    }
                }
                enableRunOnAnimationRequests();
             }
这里scroller(拿到之前Action传入的滑动距离信息)已经开始滑动了,故 if (scroller.computeScrollOffset()) 条件为true, 那么scroller拿到当前竖直方向的值就开始让RecyclerView滚动了,也就是代码 mLayout.scrollVerticallyBy(dy, mRecycler, mState);接着又让smoothScroller执行onAnimation()方法。其中传入的参数是RecyclerView已经滚动的距离。那我们现在继续看onAnimation方法。
    private void onAnimation(int dx, int dy) {
            final RecyclerView recyclerView = mRecyclerView;
            if (!mRunning || mTargetPosition == RecyclerView.NO_POSITION || recyclerView == null) {
                stop();
            }
            mPendingInitialRun = false;
            if (mTargetView != null) {
                // verify target position
                if (getChildPosition(mTargetView) == mTargetPosition) {
                    onTargetFound(mTargetView, recyclerView.mState, mRecyclingAction);
                    mRecyclingAction.runIfNecessary(recyclerView);
                    stop();
                } else {
                    Log.e(TAG, "Passed over target position while smooth scrolling.");
                    mTargetView = null;
                }
            }
            if (mRunning) {//获得当前Recycler需要滚动的距离
                onSeekTargetStep(dx, dy, recyclerView.mState, mRecyclingAction);
                boolean hadJumpTarget = mRecyclingAction.hasJumpTarget();
                mRecyclingAction.runIfNecessary(recyclerView);
                if (hadJumpTarget) {
                    // It is not stopped so needs to be restarted
                    if (mRunning) {
                        mPendingInitialRun = true;
                        recyclerView.mViewFlinger.postOnAnimation();
                    } else {
                        stop(); // done
                    }
                }
            }
        }
那么现在代码就明了了,RecylerView会判断在滚动的时候,目标视图是否已经出现,如果没有出现,会调用onSeekTargetStep保存当前RecylerView滚动距离,然后判断RecyclerView是否需要滑动,然后又通过postOnAnimation()将ViewFlinger 发送出去了。那么直到找到目标视图才会停止。
那什么情况下,目标视图不为空呢,其实在RecylerView内部滚动的时候。会判断目标视图是否存在,如果存在会对mTargetView进行赋值操作。由于篇幅限制,这里就不对目标视图的查找进行介绍了,有兴趣的小伙伴可以自己看一下源码。
那接下来,我们就假如当前已经找到了目标视图,那么接下来程序会走onTargetFound()方法。
  protected void onTargetFound(View targetView, RecyclerView.State state, Action action) {
        //计算让目标视图可见的,需要滚动的横向距离
        final int dx = calculateDxToMakeVisible(targetView, getHorizontalSnapPreference());
       //计算让目标视图可见的,需要滚动的横向距离
        final int dy = calculateDyToMakeVisible(targetView, getVerticalSnapPreference());
        final int distance = (int) Math.sqrt(dx * dx + dy * dy);
        final int time = calculateTimeForDeceleration(distance);
        if (time > 0) {
            //更新需要滚动的距离。
            action.update(-dx, -dy, time, mDecelerateInterpolator);
        }
    }
当目标视图被找到以后,会计算让目标视图出现在可见范围内,需要移动的横向与纵向距离。并计算所需要花费的时间。然后重新让RecyclerView滚动一段距离。
这里我们着重看calculateDyToMakeVisible。
    public int calculateDyToMakeVisible(View view, int snapPreference) {
        final RecyclerView.LayoutManager layoutManager = getLayoutManager();
        if (layoutManager == null || !layoutManager.canScrollVertically()) {
            return 0;
        }
        final RecyclerView.LayoutParams params = (RecyclerView.LayoutParams)
                view.getLayoutParams();
        //获取当前view在其父布局的开始位置
        final int top = layoutManager.getDecoratedTop(view) - params.topMargin;
        //获取当前View在其父布局结束位置
        final int bottom = layoutManager.getDecoratedBottom(view) + params.bottomMargin;
        //获取当前布局的开始位置
        final int start = layoutManager.getPaddingTop();
        //获取当前布局的结束位置
        final int end = layoutManager.getHeight() - layoutManager.getPaddingBottom();
        return calculateDtToFit(top, bottom, start, end, snapPreference);
    }
这里我们会根据当前view的top、bottom及当前布局的start、end等坐标信息,然后调用了calculateDtToFit()方法。现在最重要的出现了,也是我们那三个问题出现的原因!!
    public int calculateDtToFit(int viewStart, int viewEnd, int boxStart, int boxEnd, int
            snapPreference) {
        switch (snapPreference) {
            case SNAP_TO_START:
                return boxStart - viewStart;
            case SNAP_TO_END:
                return boxEnd - viewEnd;
            case SNAP_TO_ANY:
                final int dtStart = boxStart - viewStart;
                if (dtStart > 0) {//滚动位置在可见范围之前
                    return dtStart;
                }
                final int dtEnd = boxEnd - viewEnd;
                if (dtEnd < 0) {//滚动位置在可见范围之后
                    return dtEnd;
                }
                break;
            default:
                throw new IllegalArgumentException("snap preference should be one of the"
                        + " constants defined in SmoothScroller, starting with SNAP_");
        }
        return 0;//在可见范围之内,直接返回
    }
我们会根据snapPreference对应的值来计算相应的距离,同时snapPreference的具体值与getVerticalSnapPreference(这里我们是竖直方向)所以我们看该方法。
 protected int getVerticalSnapPreference() {
        return mTargetVector == null || mTargetVector.y == 0 ? SNAP_TO_ANY :
                mTargetVector.y > 0 ? SNAP_TO_END : SNAP_TO_START;
    }
其中mTargetVector与layoutManager.computeScrollVectorForPosition有关。
  @Override
    public PointF computeScrollVectorForPosition(int targetPosition) {
        if (getChildCount() == 0) {
            return null;
        }
        final int firstChildPos = getPosition(getChildAt(0));
        final int direction = targetPosition < firstChildPos != mShouldReverseLayout ? -1 : 1;
        if (mOrientation == HORIZONTAL) {
            return new PointF(direction, 0);
        } else {
            return new PointF(0, direction);
        }
    }
也就是说在LinerlayoutManager为竖直的情况下,snapPreference默认为SNAP_ANY,那么我们就可以得到,下面三种情况。
- 当滚动位置在可见范围之内时
boxStart - viewStart<=0
boxEnd - viewEnd>0
滚动距离为0,故不会滚动 - 当滚动位置在可见范围之前时
boxStart - viewStart> 0
那么实际滚动距离为正值,内容向上滚动,故只能滚动到顶部 - 当滚动位置在可见范围距离之外时
boxEnd - viewEnd<0
那么实际滚动距离为其差值,内容向下滚动,故只能滚动到底部
有可能大家现在看代码已经看晕了,下面我就用一张图来总结整个流程,结合流程图再去看代码,我相信大家能有更好的理解。


 9774
9774

 被折叠的 条评论
为什么被折叠?
被折叠的 条评论
为什么被折叠?
 到【灌水乐园】发言


