


前言
在上一篇文章中Java并发编程之线程篇-线程的由来已经主要讲解了线程的由来,以及进程与线程的关系。接下来我们就继续讲解在Java中线程的相关知识。主要内容包括Java构造与启动线程的方式、线程优先级、线程的状态等知识点。希望大家继续保持一个热爱学习的心。快来和我一起学习吧。
Java程序中进程和线程的关系
在Java中,一个应用程序对应着一个JVM(Java 虚拟机)实例,一般来说名字默认为java.exe或者javaw.exe(windows下可以通过任务管理器查看)。Java采用的是单线程编程模型,即在我们自己的程序中如果没有主动创建线程的话,只会创建一个线程,通常称为主线程。但是要注意,虽然只有一个线程来执行任务,不代表JVM中只有一个线程,JVM实例在创建的时候,同时会创建很多其他的线程(比如垃圾收集器线程,Finalizer线程等)。具体例子如下所示:
public class Main {
    public static void main(String[] args) {
        //获取当前进程中所有堆栈信息
        Map<Thread, StackTraceElement[]> allStackTraces = Thread.getAllStackTraces();
        //打印所有线程名称
        Set<Thread> threads = allStackTraces.keySet();
        for (Thread thread : threads) {
            System.out.println("线程名:" + thread.getName());
        }
    }
}
上述代码中,我们通过Thread.getAllStackTraces()获取当前程序中所有的线程信息,程序输出结果为如下所示:
线程名:Finalizer
线程名:Reference Handler
线程名:Signal Dispatcher
线程名:Common-Cleaner
线程名:main
线程名:Monitor Ctrl-Break
构造线程
在上文我们已经了解了,在Java程序中默认存在的线程,那么现在我们来看看如何在Java中构建相应线程。在Java中构造线程需要创建Thread对象,该对象在构造时,默认会调用Thread类中的init函数来构造线程所需要的属性,如线程所属的线程组、优先级、堆栈大小等。具体代码如下所示:
    /**
     * 初始化一个线程对象
     *
     * @param g 当前新线程所属的线程组
     * @param target 任务对象
     * @param name 当前新线程的名称
     * @param stackSize 当前新线程所需要的堆栈大小
     */
    private void init(ThreadGroup g, Runnable target, String name, long stackSize) {
        //获取创建当前新线程的线程,也就是当前线程的父线程
        Thread parent = currentThread();
        if (g == null) {
            g = parent.getThreadGroup();
        }

        g.addUnstarted();
        this.group = g;

        this.target = target;
        //复用父线程的优先级与daemon属性
        this.priority = parent.getPriority();
        this.daemon = parent.isDaemon();
        //设置当前新线程的名称
        setName(name);

        init2(parent);

        /* Stash the specified stack size in case the VM cares */
        this.stackSize = stackSize;
        //给当前新创建的线程分配id
        tid = nextThreadID();
    }
观察上述步骤,我们可以发现在init函数中有调用了init2函数,我们继续观察该函数,代码如下所示:
    private void init2(Thread parent) {
        //复用父线程的类加载器,
        this.contextClassLoader = parent.getContextClassLoader();
        this.inheritedAccessControlContext = AccessController.getContext();
        //复用父线程的可继承的ThreadLocal
        if (parent.inheritableThreadLocals != null) {
            this.inheritableThreadLocals = ThreadLocal.createInheritedMap(
                    parent.inheritableThreadLocals);
        }
    }
上述代码中,新线程复用了父线程的类加载器与可继承的ThreadLocal。对于ThreadLocal,之前我也写了文章Android Handler机制之ThreadLocal。有需要的小伙伴可以看看。这里我们只需要注意的,线程中的inheritableThreadLocals一般不会使用。除非你需要新创建的线程复用父线程的inheritableThreadLocals。对于类加载器,这里就不过多介绍了。感兴趣的小伙伴可以查阅相关资料。
综上所述。我们可以知道一个新构造的线程对象是与其父线程(parent 线程)息息相关的。新创建的线程会复用父线程的。优先级、类加载器、可继承的ThreadLocal,同时在构造时,还会为该线程分配相应的线程id。至此Java构造线程的方法已经介绍完毕了。
构造线程任务
在Java中创建线程任务,一般有两种方式。第一种继承Thread类并复写其run方法。第二种实现Runnable接口。下面分别对这两种方式进行介绍。具体代码如下所示:
public class Main {

    public static void main(String[] args) {
        //使用继承Thread方式
        MyThreadA myThreadA = new MyThreadA();
        myThreadA.start();
        //使用实现Runnable接口
        Thread thread = new Thread(new MyRunnableB());
        thread.start();
    }

    static class MyThreadA extends Thread {
        @Override
        public void run() {
            System.out.println("MyThreadA线程任务已经启动了”);
        }
    }

    static class MyRunnableB implements Runnable {
        @Override
        public void run() {
            System.out.println("MyRunnableB线程任务已经启动了”);
        }
    }
}
//输出结果:
MyRunnableB线程任务已经启动了
MyThreadA线程任务已经启动了
观察上述代码,可以发现不管采用何种方式来构建线程任务,我们都需要创建相应的Thread对象。并调用其start()方法。start方法的含义是告诉当前Java虚拟机,当前线程已经初始化完毕。如果线程规划器空闲。则立即调用对于Thread的run()方法执行相应任务。如果run()方法执行完毕,线程也随之终止。
那实现Runnable接口与继承Thread来创建线程任务之间到底有什么区别呢?如果我们观察使用Runnable接口的方式,我们发现其实际调用了Thread类的构造函数。如下所示:
 public Thread(Runnable target) {
        this(null, target, "Thread-" + nextThreadNum(), 0);
    }
该构造函数最终会调用我们上文提到的init方法,而该方法最终会将我们传入的Runabale对象赋值给Thread的target属性。我们再仔细观察Thread的run()方法,我们会发现其中有一个判断。如下所示:
  public void run() {
        if (target != null) {
            target.run();
        }
    }
那么现在区别就非常明显了。实现Runnable接口来创建线程任务,主要是为了将具体的任务抽离出来,那么这样不仅避免了Thread类的单继承的局限性,还更符合面向对象的编程思想,同时也降低了线程对象和线程任务的耦合性。
线程的优先级
在上文构造线程章节中,我们曾讲过,Java线程在构建的时候,会复用父线程的优先级。那优先级代表着什么呢?在具体讲解优先级之前,我们需要了解分时操作系统。在现代的操作系统(如:Windows、Linux、Mac OS X等)中基本采用的分时的形式调度运行的线程,操作系统会分出一个个时间片,线程会分配到若干时间片后,当线程的时间片用完之后就会发生线程的调度,等待下次分配。具体如下图所示;

时间片是分时操作系统分配给每个正在运行的进程微观上的一段CPU时间。
通常状况下,一个系统中所有的线程被分配到的时间片长短并不是相等的,不同的操作系统有着自己的时间片分配规则。而线程的优先级的大小只是占了线程分配时间片的一个权重。也就是说,不是设置了优先级越高,线程就能一定获得更多的时间片。
在Java线程中,通过一个整形成员变量priority来控制优先级。优先级的范围为1-10。我们在构建线程的时候可以通过setPriority(int newPriority)方法来设置优先级,当然Java中也默认了三个优先级,分别为MIN_PRIORITY(1)、NORM_PRIORITY(5)、MAX_PRIORITY(10)。具体代码如下所示:
public class Main {

    public static void main(String[] args) {
        //使用实现Runnable接口
        Thread thread1 = new Thread(new MyRunnableB());
        Thread thread2 = new Thread(new MyRunnableB());
        Thread thread3 = new Thread(new MyRunnableB());
        thread1.setPriority(Thread.MIN_PRIORITY);
        thread2.setPriority(Thread.NORM_PRIORITY);
        thread3.setPriority(Thread.MAX_PRIORITY);

        thread1.start();
        thread2.start();
        thread3.start();
    }

    static class MyRunnableB implements Runnable {
        @Override
        public void run() {
            System.out.println("MyRunnableB线程任务已经启动了”);
        }
    }
}
Daemon线程(守护线程)
在上文构造线程章节中,我们曾讲过,Java线程在构建的时候也会复用父线程的Daemon属性。其实在Java中线程分为守护线程及用户线程。所谓守护线程是指在程序运行的时候在后台提供一种通用服务的线程,比如垃圾回收线程就是一个很称职的守护者,并且这种线程并不属于程序中不可或缺的部分。因此,当所有的非守护线程结束时,程序也就终止了,同时会杀死进程中的所有守护线程。反过来说,只要用户线程还在运行,程序就不会终止。具体例子如下所示:
需要注意的是,Daemon属性需要在线程调用start方法之前设置。不能在线程启动的时候设置。
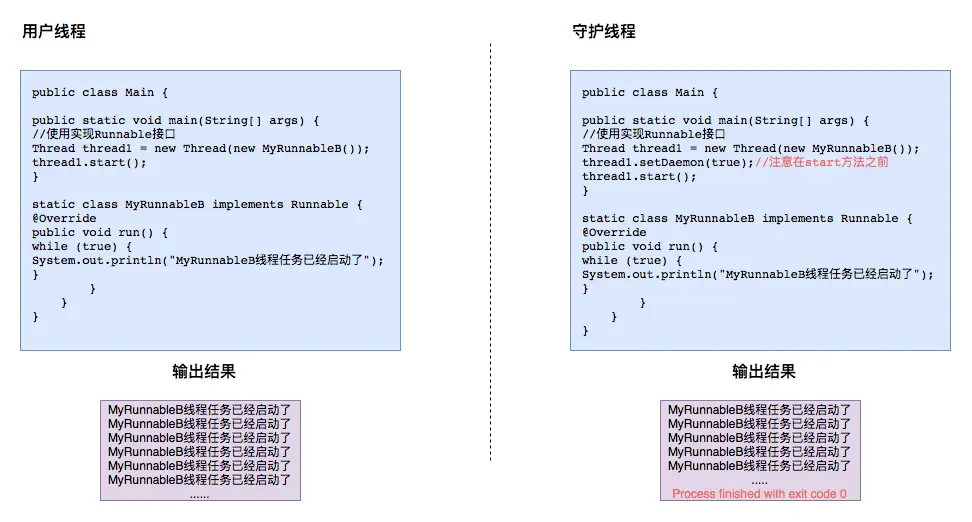
通过观察上诉代码,我们明显可以看见守护进程,程序最后打印了Process finished with exit code 0,也就是暗示程序结束运行了。而使用用户进程的程序一直没有结束,一直在循环打印相应信息,这两者对比,也就是验证了我们之前的结论。
最后
站在巨人的肩膀上,才能看的更远~
- 《Java并发编程的艺术》


 303
303

 被折叠的 条评论
为什么被折叠?
被折叠的 条评论
为什么被折叠?
 到【灌水乐园】发言


