


在平时我们自定义view视图的时候,有时候需要根据不同的属性来改变我们布局,这样就相当做成一个像系统控件那样的模板一样,可以重复使用,就需要通过自定义属性来实现。接下来我们通过一个实例来说明。
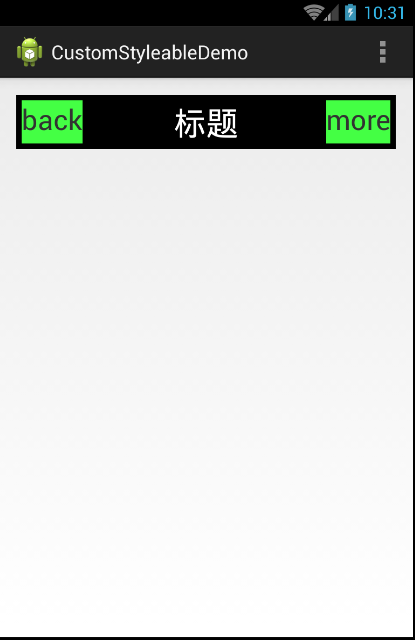
这个例子其实是做了一个模仿actionbar的一个模板,可以动态修改这个模板的布局,左右边的按钮都可以选择隐藏,也可以修改上面的文字的大小与背景
接下来开始实现
1.定义属性
为一个view提供一个可自定义的属性只需在res资源目录values目录下新建一个attrs.xml文件,并在该文件中通过代码定义相应的属性。
在values文件夹下新建attrs.xml文件,在resourecs标签下添加如下:
<declare-styleable name="TopBar">
    <attr name="title" format="string" />
    <attr name="titleColor" format="color" />
    <attr name="titleSize" format="dimension" />
    <attr name="leftText" format="string" />
    <attr name="leftBackground" format="reference|color" />
    <attr name="leftTextSize" format="dimension" />
    <attr name="rightText" format="string" />
    <attr name="rightBackground" format="reference|color" />
    <attr name="rightTextSize" format="dimension" />
</declare-styleable>
上面声明的都是一些自定的属性,后面我们可以布局问价中为这些属性添加值,然后在我们的自定义的view中可以获取到这些值,然后给相应的控件设置值,就达到了我们的目的。
我们可以看到 name表示的是属性的名称,format表示属性值的格式
2.新建MyTopBar.java
package com.xinwa.customstyleabledemo;
import com.example.customstyleabledemo.R;
import android.content.Context;
import android.content.res.TypedArray;
import android.graphics.Color;
import android.graphics.drawable.Drawable;
import android.util.AttributeSet;
import android.view.View;
import android.widget.RelativeLayout;
import android.widget.TextView;
public class MyTopBar extends RelativeLayout{
public static final int LEFT = 0;
public static final int RIGHT = 1;
private String title;
private int titleSize;
private int titleColor;

private String leftText;
private int leftTextSize;
private Drawable leftBackground;

private String rightText;
private int rightTextSize;
private Drawable rightBackground;

private TextView titleText;
private TextView leftButton;
private TextView rightButton;

private LayoutParams titleParams;
private LayoutParams leftParams;
private LayoutParams rightParams;

private OnTopBarClickListener topBarListener;
public MyTopBar(Context context, AttributeSet attrs) {
    super(context, attrs);
    // TODO Auto-generated constructor stub
    //当你在xml布局文件中填写属性时,他会动态查找这个类中的相对应的属性来匹配类型
    TypedArray typeArray = getResources().obtainAttributes(attrs, R.styleable.TopBar);

    title = typeArray.getString(R.styleable.TopBar_title);
    titleSize = (int) typeArray.getDimension(R.styleable.TopBar_titleSize, 0);
    titleColor= typeArray.getColor(R.styleable.TopBar_titleColor,Color.WHITE);

    leftText = typeArray.getString(R.styleable.TopBar_leftText);
    leftTextSize = (int) typeArray.getDimension(R.styleable.TopBar_leftTextSize, 0);
    leftBackground = typeArray.getDrawable(R.styleable.TopBar_leftBackground);

    rightText = typeArray.getString(R.styleable.TopBar_rightText);
    rightTextSize = (int) typeArray.getDimension(R.styleable.TopBar_rightTextSize, 0);
    rightBackground = typeArray.getDrawable(R.styleable.TopBar_rightBackground);

    titleText = new TextView(context);
    leftButton = new TextView(context);
    rightButton = new TextView(context);

    titleText.setText(title);
    titleText.setTextSize(titleSize);
    titleText.setTextColor(titleColor);

    leftButton.setText(leftText);
    leftButton.setTextSize(leftTextSize);
    leftButton.setBackground(leftBackground);

    rightButton.setText(rightText);
    rightButton.setTextSize(rightTextSize);
    rightButton.setBackground(rightBackground);

    titleParams = new LayoutParams(LayoutParams.WRAP_CONTENT,LayoutParams.MATCH_PARENT);
    titleParams.addRule(RelativeLayout.CENTER_IN_PARENT);

    leftParams = new LayoutParams(LayoutParams.WRAP_CONTENT,LayoutParams.MATCH_PARENT);
    leftParams.addRule(RelativeLayout.ALIGN_PARENT_LEFT);

    rightParams = new LayoutParams(LayoutParams.WRAP_CONTENT,LayoutParams.MATCH_PARENT);
    rightParams.addRule(RelativeLayout.ALIGN_PARENT_RIGHT);

    typeArray.recycle();

    addView(titleText, titleParams);
    addView(leftButton, leftParams);
    addView(rightButton, rightParams);

    leftButton.setOnClickListener(new OnClickListener() {

        @Override
        public void onClick(View v) {
            // TODO Auto-generated method stub
            topBarListener.leftClick();
        }
    });
    rightButton.setOnClickListener(new OnClickListener() {

        @Override
        public void onClick(View v) {
            // TODO Auto-generated method stub
            topBarListener.rightClick();
        }
    });
}


public interface OnTopBarClickListener{
    void leftClick();
    void rightClick();
}
public void setOnTopBarClickListener(OnTopBarClickListener topBarListener){
    this.topBarListener = topBarListener;
}

public void setBtnVisible(int id,boolean flag){
    if(id == LEFT){
        if(flag){
            leftButton.setVisibility(View.VISIBLE);
        }else{
            leftButton.setVisibility(View.GONE);
        }
    }else{
        if(flag){
            rightButton.setVisibility(View.VISIBLE);
        }else{
            rightButton.setVisibility(View.GONE);
        }
    }
}
}
上面是这个类的全部代码,接下来一一讲解。
TypedArray typeArray = getResources().obtainAttributes(attrs, R.styleable.TopBar);
系统提供TypedArray这样的数据结构来获取自定义属性集,通过他来获取我们在values文件夹下attrs中声明的属性。
通过typeArray对象的getString(),getColor()等方法我们可以获取定义的属性值。根据format格式来获取对应的值。
actionBar一般是有back,title,more这样的形式,故我们令MyTopBar继承自RelativeLayout,然后根据属性来设置他们的文字内容,
颜色,与背景图片。设置RelativeLayout.Layoutparams设置布局参数,将他们添加到我们的布局。
4. 引用自定义的属性
<?xml version="1.0" encoding="utf-8"?>
<com.xinwa.customstyleabledemo.MyTopBar xmlns:android="http://schemas.android.com/apk/res/android"
xmlns:custom="http://schemas.android.com/apk/res-auto"
android:layout_width="match_parent"
android:layout_height="50dp"
android:background="#000000"
android:padding="5dp"
custom:title="标题"
custom:titleSize="15sp"
custom:titleColor="#ffffff"
custom:leftText="back"
custom:leftTextSize="13sp"
custom:leftBackground="@drawable/blue_button"
custom:rightText="more"
custom:rightTextSize="13sp"
custom:rightBackground="@drawable/blue_button"
/>
我们来看一下下面这俩个:
xmlns:android=”http://schemas.android.com/apk/res/android”
xmlns:custom=”http://schemas.android.com/apk/res-auto”
第一个是我们平时在布局文件中经常能够看到的,是在我们使用系统控件
android:layout_width等时,而当我们想要让自定义的属性生效,得添加我们自己xmlns(xml namespace)名字空间。
然后使用custom:title=”我是标题”,值的格式必须匹配format中声明的属性。
这样经过上面几部就完成自定义的属性了。
简单回顾一个整个过程:首先在attrs.xml文件下定义自己需要声明的属性,然后在自定义view中,通过TypeArray来获取属性,给view设置相应的值,最后在布局文件中运用就好了,得注意添加xmlns,其中custom是随意定义,换成其他都可以。
代码下载地址:资源下载


 394
394

 被折叠的 条评论
为什么被折叠?
被折叠的 条评论
为什么被折叠?
 到【灌水乐园】发言


