


前言
字符画这个话题,似乎早在贴吧时代就已经被玩烂了。在百度图片随便一搜索,就能够看到非常多。然后在这个时代,会编程的人越来越多(尤其是 MATLAB,Python 等非常适合图像处理的脚本语言),类似的教程更是数不胜数。

一、字符画的实现原理
字符画是一系列字符的组合,我们可以把字符看作是比较大块的像素,一个字符能表现一种颜色(暂且这么理解吧),字符的种类越多,可以表现的颜色也越多,图片也会更有层次感。
问题来了,我们是要转换一张彩色的图片,这么多的颜色,要怎么对应到单色的字符画上去?这里就要介绍灰度值的概念了。
灰度值:指黑白图像中点的颜色深度,范围一般从0到255,白色为255,黑色为0,故黑白图片也称灰度图像
我们可以使用灰度值公式将像素的 RGB 值映射到灰度值:
gray = 0.2126 * r + 0.7152 * g + 0.0722 * b
这样就好办了,我们可以创建一个不重复的字符列表,灰度值小(暗)的用列表开头的符号,灰度值大(亮)的用列表末尾的符号。


二、黑白字符画实现代码
demo.py test.jpg -o outfile.txt --width 90 --height 90
代码如下(示例):
from PIL import Image
import argparse

def get_char(r,g,b,a=256):
    if a == 0:
        return ' '
    gray = 0.2126 * r + 0.7152 * g + 0.0722 * b
    length = len(ascii_str)
    unit = 256/length
    return ascii_str[int(gray/unit)]

if __name__ == "__main__":
    parser = argparse.ArgumentParser()
    parser.add_argument('file')  # 需要设置输入文件
    parser.add_argument('-o', '--output')  # 输出文件
    parser.add_argument('--width', type=int, default=80)  # 输出字符画宽
    parser.add_argument('--height', type=int, default=80)  # 输出字符画高

    # 获取参数
    args = parser.parse_args()
    IMG = args.file
    WIDTH = args.width
    HEIGHT = args.height
    OUTPUT = args.output

    ascii_str = list("$@B%8&WM#*oahkbdpqwmZO0QLCJUYXzcvunxrjft/\|()1{}[]?-_+~<>i!lI;:,\"^`'. ")
    im = Image.open(IMG)
    im = im.resize((WIDTH,HEIGHT))
    txt = ''
    for i in range(HEIGHT):
        for j in range(WIDTH):
            txt += get_char(*im.getpixel((j,i))) # (r,g,b,a)
        txt += '\n'

    print(txt)
    #字符画输出到文件
    if OUTPUT:
        with open(OUTPUT,'w') as f:
            f.write(txt)
    else:
        with open("output.txt",'w') as f:
            f.write(txt)
三、彩色字符画生成
代码实现:
import numpy as np
import cv2
from PIL import Image, ImageFont, ImageDraw, ImageFilter
import random
from pathlib import Path
import time
from tqdm import tqdm

def color(
    input: str,
    output: str = None,
    rows: int = 100,
    alphabet='uppercase',
    background='origin7',
    out_height: int = None,
    scale: float = None,
):
    """output colorful text picture"""
    input_path = Path(input)
    # the original image
    origin = Image.open(input_path)
    width, height = origin.size
    print(f'input size: {origin.size}')
    # text amount of the output image
    text_rows = rows
    text_cols = round(width / (height / text_rows) * 1.25)  # char height-width ratio
    origin_ref_np = cv2.resize(
        np.array(origin), (text_cols, text_rows), interpolation=cv2.INTER_AREA
    )
    origin_ref = Image.fromarray(origin_ref_np)
    # font properties
    fontsize = 17
    font = ImageFont.truetype('courbd.ttf', fontsize)
    char_width = 8.88
    char_height = 11
    # output size depend on the rows and cols
    canvas_height = round(text_rows * char_height)
    canvas_width = round(text_cols * char_width)
    # a canvas used to draw texts on it
    canvas = get_background(background, origin, canvas_width, canvas_height)
    print(f'canvas size: {canvas.size}')
    # start drawing
    since = time.time()
    print(f'Start transforming {input_path.name}')
    draw = ImageDraw.Draw(canvas)
    charlist = get_alphabet(alphabet)
    length = len(charlist)

    for i in tqdm(range(text_cols)):
        for j in range(text_rows):
            x = round(char_width * i)
            y = round(char_height * j - 4)
            char = charlist[random.randint(0, length - 1)]
            color = origin_ref.getpixel((i, j))
            draw.text((x, y), char, fill=color, font=font)
    # resize the reproduct if necessary
    if out_height:  # height goes first
        canvas_height = out_height
        canvas_width = round(width * canvas_height / height)
        canvas = canvas.resize((canvas_width, canvas_height), Image.BICUBIC)
    elif scale:
        canvas_width = round(width * scale)
        canvas_height = round(height * scale)
        canvas = canvas.resize((canvas_width, canvas_height), Image.BICUBIC)
    # output filename
    if output:
        output_path = Path(output)
    else:
        output_path = input_path.with_name(
            f'{input_path.stem}_{canvas_width}x{canvas_height}_D{text_rows}_{background}.png'
        )
    canvas.save(output_path)

    print(f'Transformation completed. Saved as {output_path.name}.')
    print(f'Output image size: {canvas_width}x{canvas_height}')
    print(f'Text density: {text_cols}x{text_rows}')
    print(f'Elapsed time: {time.time() - since:.4} second(s)')
代码比较多,这里不做展示,需要的可以去下载。
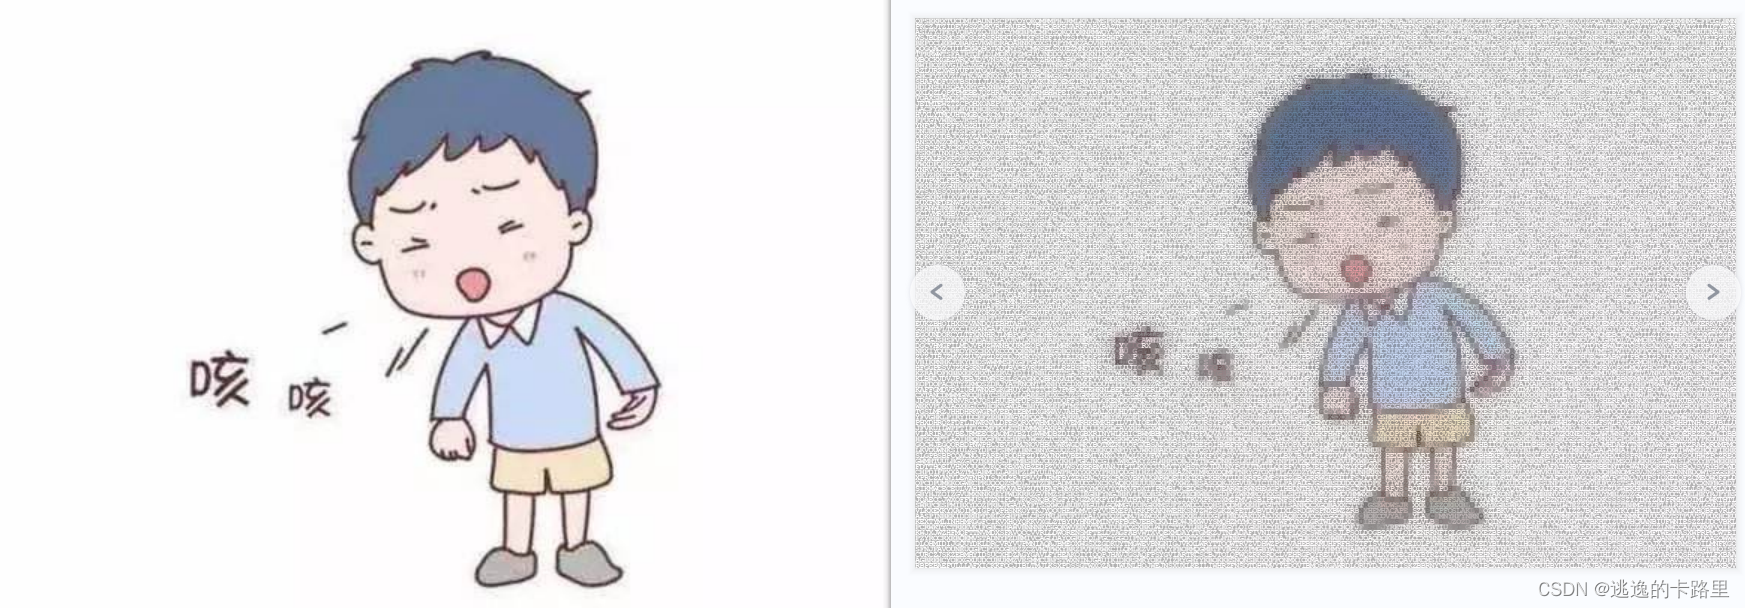
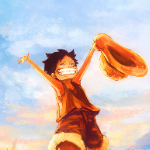
python代码实现把图片生成字符画(黑白色、彩色图片)
总结
关于python代码学习手把手教你将图片变成字符画(骚操作)就介绍到这了,上述实例对大家学习使用Python有一定的参考价值,希望大家阅读完这篇文章能有所收获。


 168
168


 被折叠的 条评论
为什么被折叠?
被折叠的 条评论
为什么被折叠?
 到【灌水乐园】发言


