


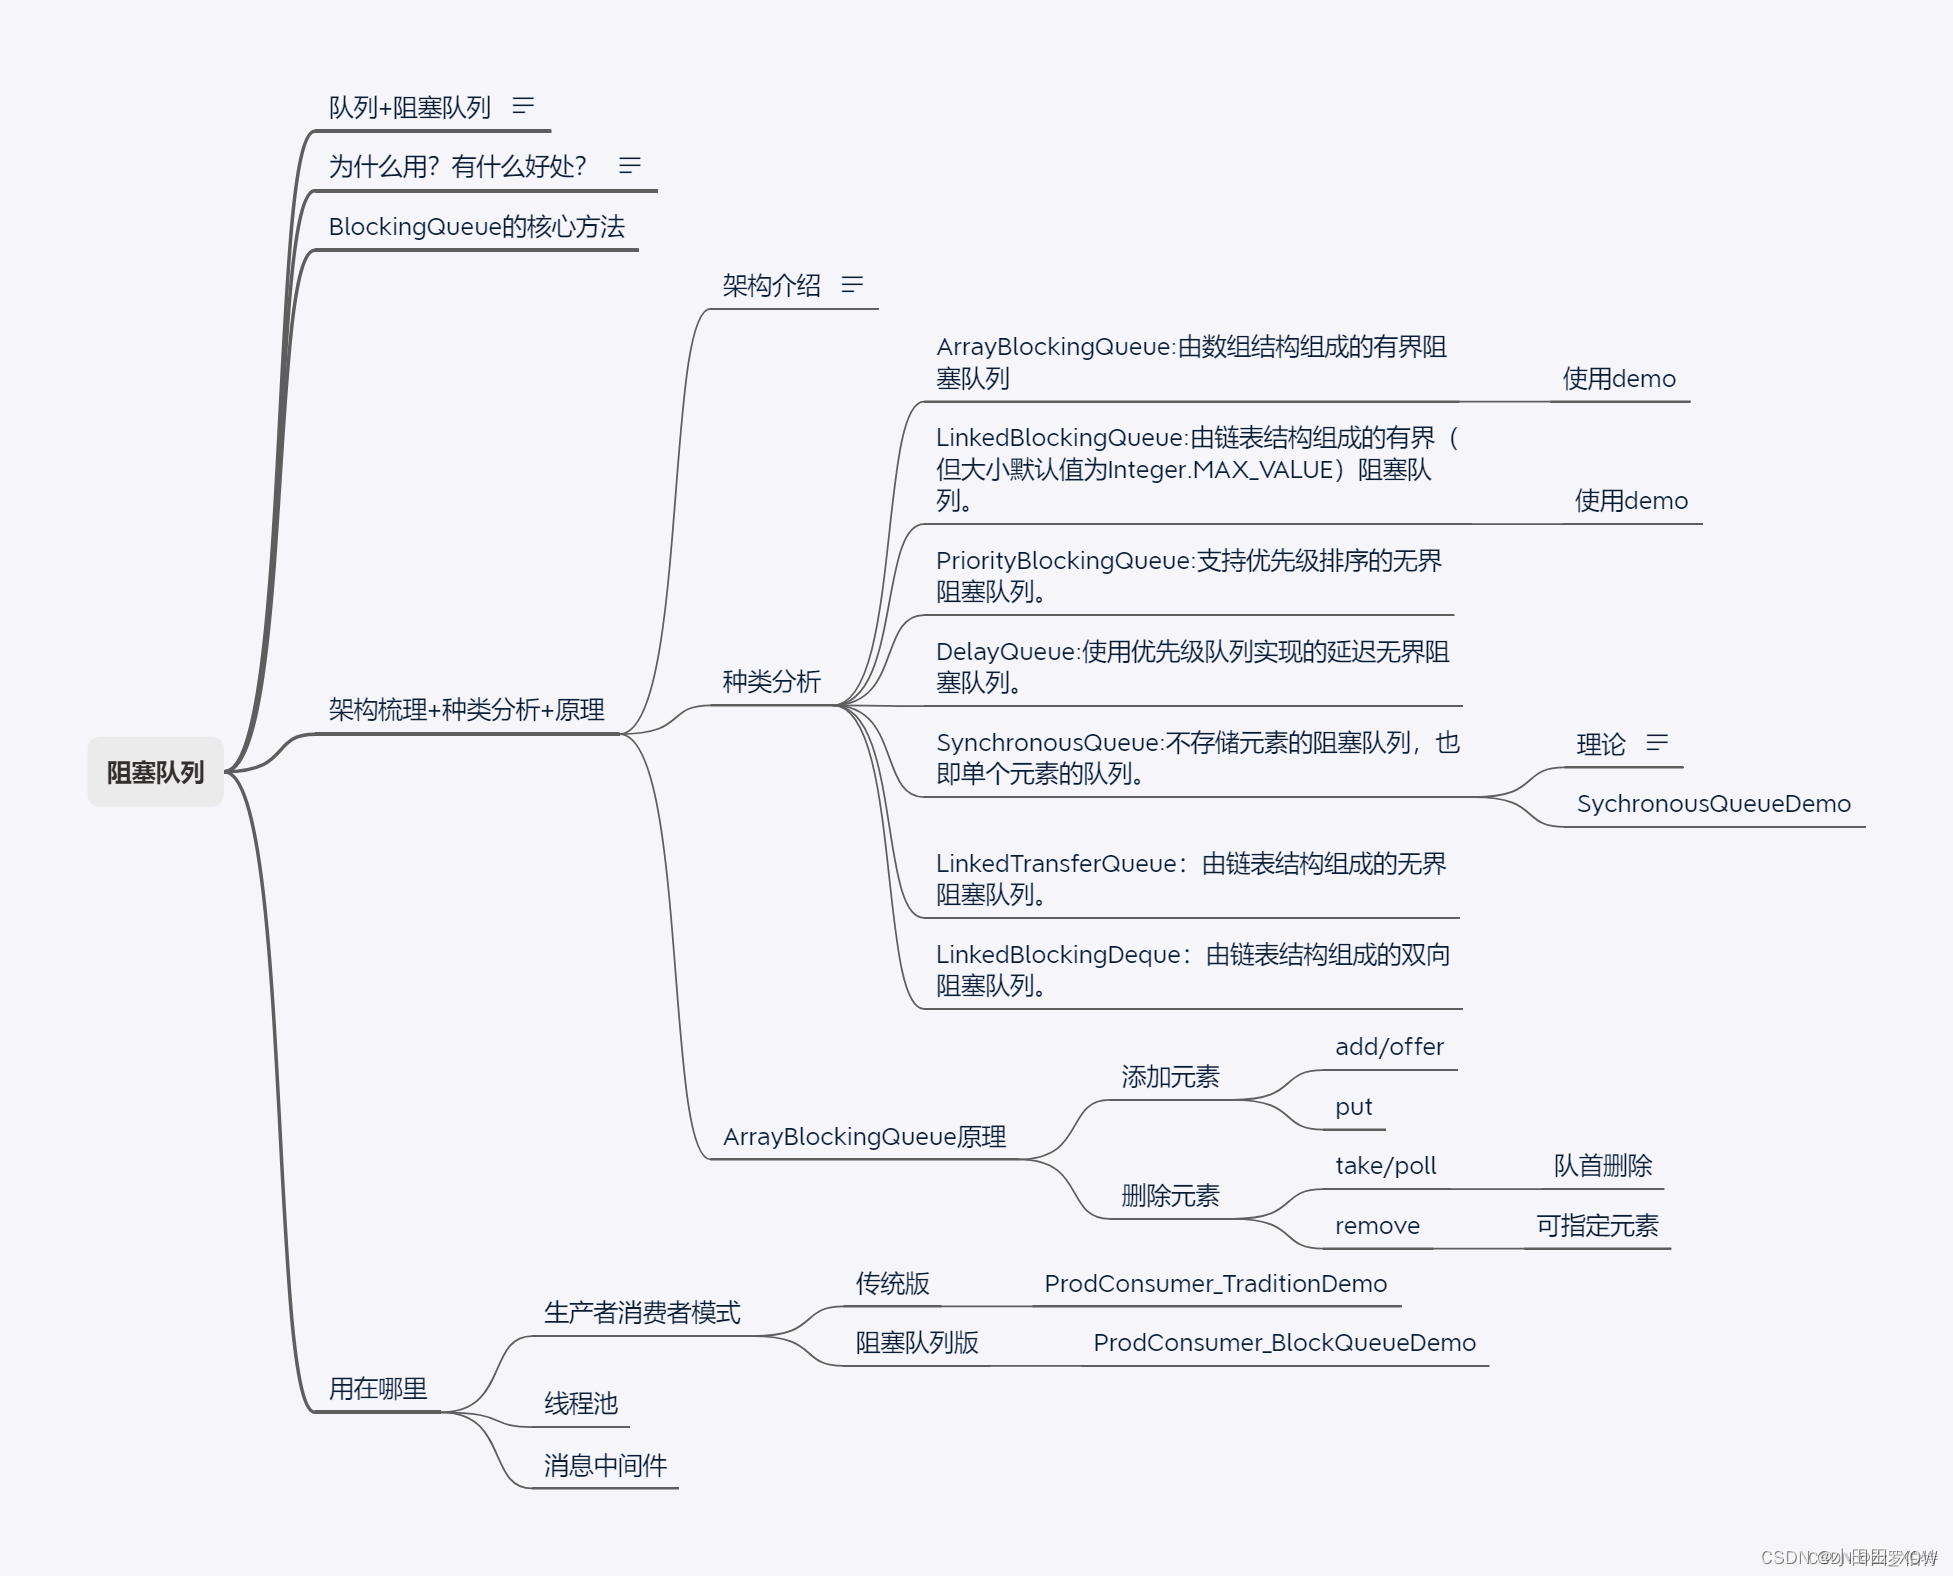
阻塞队列大纲:
什么是阻塞队列
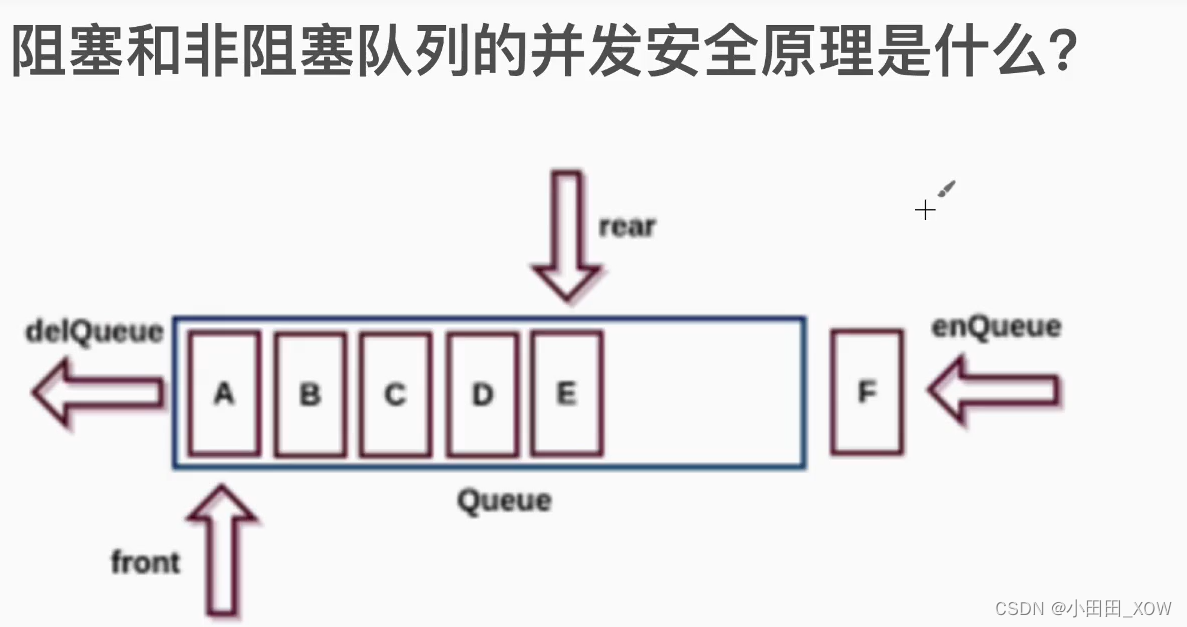
阻塞队列:从名字可以看出,他也是队列的一种,那么他肯定是一个先进先出(FIFO)的数据结构。与普通队列不同的是,他支持两个附加操作,即阻塞添加和阻塞删除方法。
那么阻塞添加跟阻塞删除是什么意思呢?
阻塞队列的特点
如上图,线程1往阻塞队列中添加元素,而线程2从阻塞队列中移除元素。而在这一系列操作必须符合以下规定:
- 阻塞添加:当阻塞队列是满时,往队列里添加元素的操作将被阻塞。
- 阻塞移除:当阻塞队列是空时,从队列中获取元素/删除元素的操作将被阻塞。
上面的解释可能还有点晦涩难懂,那我举个例子吧:
现有三个角色:顾客,休息区,银行办理窗口。(Thread1为顾客,BlockingQueue为休息区,Thread2为银行办理窗口)。
-
正常情况下,一个银行办理窗口同一时间只能对接一个顾客;
-
恰巧今天办理的顾客有3个人,另外2个顾客怎么办,你总不至于给人家说不办了,快回家吧;
-
而正确的做法是你可以让这两个人在休息区等候,等银行窗口空闲了,然后去办理。
一个人正在银行办理业务,你后面的人不能打断(保证了原子性),或者争抢(有序性,先进先出),只能在休息区等待,直到上一个人释放资源,才轮到下一个人。
其实上面的情况面临的问题是:当一个线程占有资源的时候,你后面线程请求不得不阻塞,但这也不一定是缺点,反而更像是一件好事,因为他并不暴力的解决问题。
我们再来看一下关于阻塞的定义:
在多线程中,阻塞的意思是,在某些情况下会挂起线程,一旦条件成熟,被阻塞的线程就会被自动唤醒。
也就是说,线程的wait和notify机制是需要我们自己去手动控制,但是我们自己认为的控制是很容易出现问题的,比如死锁,逻辑判断等…
但是有了阻塞队列,一切的问题就迎刃而解了。
阻塞队列的好处
阻塞队列不用手动控制什么时候该被阻塞,什么时候该被唤醒,简化了操作。
BlockingQueue的主要方法
BlockingQueue提供的部分方法:
根据插入和取出两种类型的操作,具体分为下面一些类型:
| 方法类型 | 抛出异常 | 返回布尔 | 阻塞 | 超时 |
|---|---|---|---|---|
| 插入 | add(E e) | offer(E e) | put(E e) | offer(E e,Time,TimeUnit) |
| 取出 | remove() | poll() | take() | poll(Time,TimeUnit) |
| 队首 | element() | peek() | 无 | 无 |
-
抛出异常是指当队列满时,再次插入会抛出异常(如果队列未满,插入返回值未true);
-
返回布尔是指当队列满时,再次插入会返回false;
-
阻塞是指当队列满时,再次插入会被阻塞,直到队列取出一个元素,才能插入。
-
超时是指当一个时限过后,才会插入或者取出。
生产
add、offer、put这3个方法都是往队列尾部添加元素,区别如下:
add:不会阻塞,添加成功时返回true,不响应中断,当队列已满导致添加失败时抛出IllegalStateException。
offer:不会阻塞,添加成功时返回true,因队列已满导致添加失败时返回false,不响应中断。
put:会阻塞会响应中断。
消费
take、poll方法能获取队列头部第1个元素,区别如下:
take:会响应中断,会一直阻塞直到取得元素或当前线程中断。
poll:会响应中断,会阻塞,阻塞时间参照方法里参数timeout.timeUnit,当阻塞时间到了还没取得元素会返回null
add方法代码
public class BlockingQueueTest {
    public static void main(String[] args) {
        BlockingQueue<String> blockingQueue = new ArrayBlockingQueue<String>(3);
        System.out.println("--------以下为add的相关操作---------");
        addRemoveTest(blockingQueue);
    }

    public static void addRemoveTest(BlockingQueue<String> blockingQueue) {
        System.out.println("添加状态+\t"+blockingQueue.add("1"));
        System.out.println("添加状态+\t"+blockingQueue.add("2"));
        System.out.println("添加状态+\t"+blockingQueue.add("3"));
//        System.out.println("添加状态+\t"+blockingQueue.add("4"));
        System.out.println("队首元素+\t"+blockingQueue.element());
        System.out.println("删除元素+\t"+blockingQueue.remove());
        System.out.println("队首元素+\t"+blockingQueue.element());
        System.out.println("删除元素+\t"+blockingQueue.remove());
        System.out.println("队首元素+\t"+blockingQueue.element());
        System.out.println("删除元素+\t"+blockingQueue.remove());
//        System.out.println("队首元素+\t"+blockingQueue.element());
//        System.out.println("删除元素+\t"+blockingQueue.remove(blockingQueue.element()));
    }
}
未打开注释代码输出如下:
--------以下为add的相关操作---------
添加状态+	true
添加状态+	true
添加状态+	true
队首元素+	1
删除元素+	1
队首元素+	2
删除元素+	2
队首元素+	3
删除元素+	3
当队列已满,继续添加元素时(打开注释代码),输出如下:
--------以下为add的相关操作---------
添加状态+	true
添加状态+	true
添加状态+	true
Exception in thread "main" java.lang.IllegalStateException: Queue full
	at java.util.AbstractQueue.add(AbstractQueue.java:98)
	...略
BlockingQueue的实现类
从整体架构图上来看,BlockingQueue是实现了Queue接口,而Queue是属于Collection接口下的派生类。
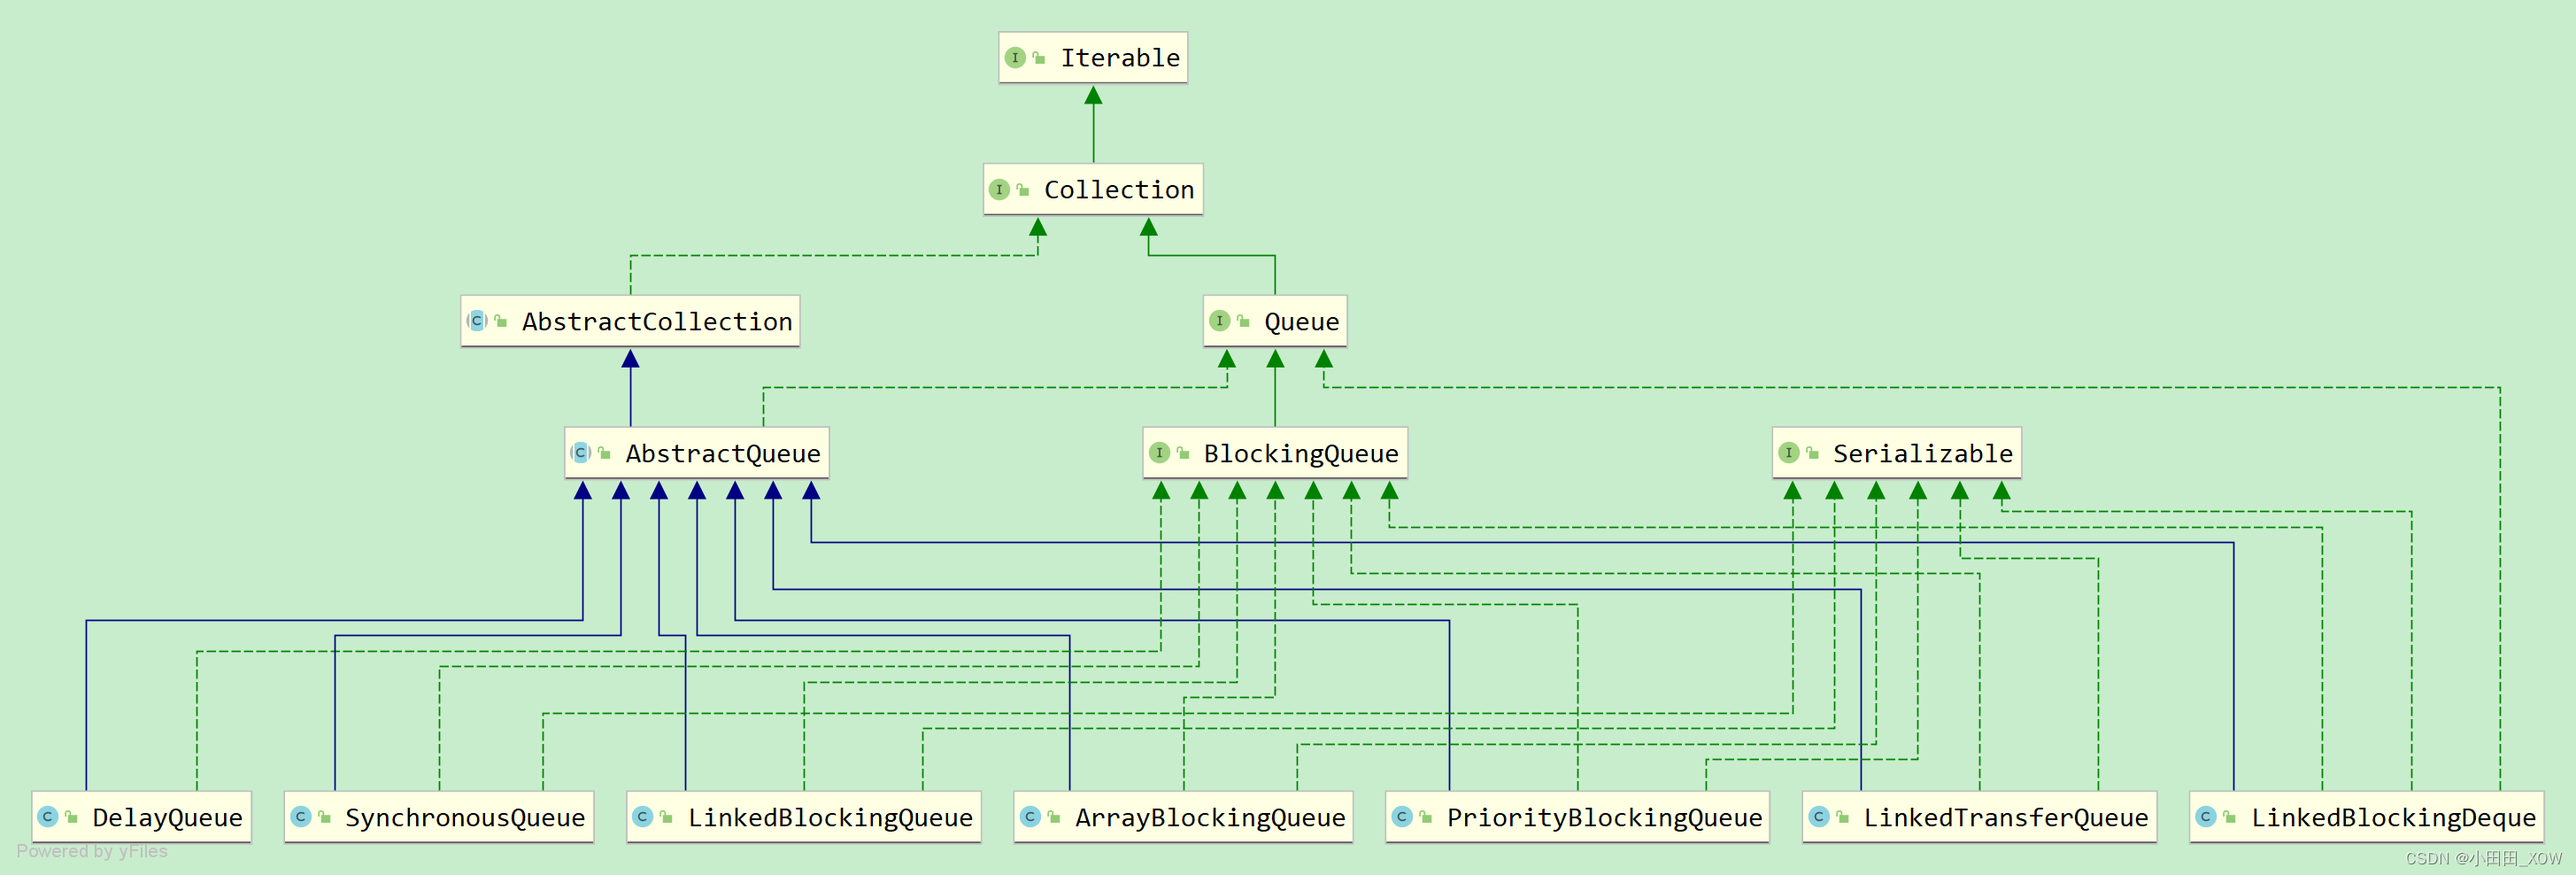
ArrayBlockingQueue 由数组构成的有界阻塞队列
LinkedBlockingQueue 由链表构成的有界阻塞队列
PriorityBlockingQueue 支持优先级排序的无界阻塞队列
DelayQueue 支持优先级的延迟无界阻塞队列
SynchronousQueue 单个元素的阻塞队列
LinkedTransferQueue 由链表构成的无界阻塞队列
LinkedBlockingDeque 由链表构成的双向阻塞队列
粗体标记的三个用得比较多,许多消息中间件底层就是用它们实现的,也是我们下面着重说明的。
SynchronousQueue: 队列只有一个元素,如果想插入多个,必须等队列元素取出后,才能插入,只能有一个“坑位”,用一个插一个。
需要注意的是LinkedBlockingQueue虽然是有界的,但有个巨坑,其默认大小是Integer.MAX_VALUE,高达21亿,一般情况下内存早爆了(在线程池的ThreadPoolExecutor有体现)。
SynchronusQueue
在这里需要特别演示以下synchronusQueue的使用,他是不存储元素的,来一个,消费一个。(同一时间内只能添加一个元素)
代码演示如下:
public class SynchronusQueueTest {
    public static void main(String[] args) {
        BlockingQueue<String> synchronusQueue = new SynchronousQueue<>();

        new Thread(() ->{
            try{
                System.out.println(Thread.currentThread().getName()+"\t put 1");
                synchronusQueue.put("1");
                System.out.println(Thread.currentThread().getName()+"\t put 2");
                synchronusQueue.put("2");
                System.out.println(Thread.currentThread().getName()+"\t put 3");
                synchronusQueue.put("3");
            }catch(Exception e){
                e.getStackTrace();
            }
        },"Prod").start();

        new Thread(() ->{
            try {
                try{ TimeUnit.SECONDS.sleep(3); }catch (InterruptedException e){ e.printStackTrace(); }
                System.out.println(Thread.currentThread().getName()+"\t take "+synchronusQueue.take());
                try{ TimeUnit.SECONDS.sleep(3); }catch (InterruptedException e){ e.printStackTrace(); }
                System.out.println(Thread.currentThread().getName()+"\t take "+synchronusQueue.take());
                try{ TimeUnit.SECONDS.sleep(3); }catch (InterruptedException e){ e.printStackTrace(); }
                System.out.println(Thread.currentThread().getName()+"\t take"+synchronusQueue.take());
            } catch (Exception e) {
                e.printStackTrace();
            }
        },"Cons").start();
    }
输出如下:(有时间间隔)
Prod	 put 1
Cons	 take 1
Prod	 put 2
Cons	 take 2
Prod	 put 3
Cons	 take3
ArrayListBlockingQueue原理
通过源码来看,其实ArrayListBlockingQueue是通过ReentrantLock和Condition条件队列来实现阻塞的。一些成员变量如下:
    //存储数据
    final Object[] items;

    //返回获取数据的索引,主要用于take、poll、peek、remove方法
    int takeIndex;

    //返回添加数据的索引,主要用于 put、offer、add 方法
    int putIndex;

    // 队列元素的个数
    int count;

    //可重入锁
    final ReentrantLock lock;

    //条件对象,用于通知take方法队列的线程
    private final Condition notEmpty;

    //条件对象,用于通知put方法队列的线程
    private final Condition notFull;

	//迭代器
    transient Itrs itrs = null;
添加元素原理
我们再来看看元素的插入是怎么使用这个Condition条件的。添加方法有add,offer,put。我们先来看看**add(offer)**方法:
//add方法
public boolean add(E e) {
        if (offer(e))
            return true;
        else
            throw new IllegalStateException("Queue full");
    }

//offer方法
public boolean offer(E e) {
    //判断是否为null
     checkNotNull(e);
     final ReentrantLock lock = this.lock;
     lock.lock();
     try {
         //判断队列是否满
         if (count == items.length)
             return false;
         else {
             //添加元素到队列
             enqueue(e);
             return true;
         }
     } finally {
         lock.unlock();
     }
 }

//元素入队操作
private void enqueue(E x) {
    //获取当前数组
    final Object[] items = this.items;
    //通过putIndex索引对数组进行赋值
    items[putIndex] = x;
    //索引自增,如果已是最后一个位置,重新设置 putIndex = 0;
    if (++putIndex == items.length)
        putIndex = 0;
    //队列中元素数量加1
    count++;
    //唤醒调用take()方法的线程,执行元素获取操作。
    notEmpty.signal();
}
首先add方法其实本质调用的是offer方法,而在offer的最关键处,也就是enqueue入队操作。
-
reentrantLock保证的线程的互斥性,即同一时间只能有一个线程操作。如果队列已满,返回ture,add方法则是抛出异常;如果队列未满,则开始入队操作。
-
在入队操作时,他会通过一个全局变量putIndex作为索引,指引着新来元素的位置。在这里有个小细节,就是判断putIndex是否与队列长度相等,如果队列已满,而且队列的操作时先进先出,索引下一次来插入元素的位置肯定时队头,也就是索引0的位置;
-
队内已经有元素了,然后开始唤醒take操作来消费元素。这个signal()其实时notify()的升级版
在添加操作中,还有一个put方法,他是会导致线程阻塞的。具体源码如下:
//put方法,阻塞时可中断
 public void put(E e) throws InterruptedException {
     checkNotNull(e);
      final ReentrantLock lock = this.lock;
      lock.lockInterruptibly();//该方法可中断
      try {
          //当队列元素个数与数组长度相等时,无法添加元素
          while (count == items.length)
              //将当前调用线程挂起,添加到notFull条件队列中等待唤醒
              notFull.await();
          enqueue(e);//如果队列没有满直接添加。。
      } finally {
          lock.unlock();
      }
  }
他是通过condition的await方法来实现阻塞的,但由于又添加了lockInterruptibly标识,说明其阻塞可被打断。
获取元素/删除元素原理
添加方法有remove,poll,take。我们先来看看poll方法:
	public E poll() {
		//reentrantLock互斥锁
        final ReentrantLock lock = this.lock;
        lock.lock();
        try {
        	//如果队列为0,返回null,反之进入移除队列
            return (count == 0) ? null : dequeue();
        } finally {
            lock.unlock();
        }
    }
    //移除队列
    private E dequeue() {
        //获取当前队列数据
        final Object[] items = this.items;
        @SuppressWarnings("unchecked")
        //获取当前队头数据
        E x = (E) items[takeIndex];
        //将队头数据置为null
        items[takeIndex] = null;
        //如果队头索引自增与数组长度相等,则将其索引设置为第一位
        if (++takeIndex == items.length)
            takeIndex = 0;
        count--;
        if (itrs != null)
            //更新迭代器中的元素数据
            itrs.elementDequeued();
        //唤醒put/offer/add等方法
        notFull.signal();
        return x;
    }
poll方法他是通过删除队列头数据来进行移除元素的,唤醒与沉睡机制采用reentrantLock的 condition机制。接下来我们来看一下take方法:
public E take() throws InterruptedException {
    final ReentrantLock lock = this.lock;
      lock.lockInterruptibly();//中断
      try {
          //队列没有元素,阻塞移除方法的线程
          while (count == 0)
              notEmpty.await();
          //有元素进行元素移除操作
          return dequeue();
      } finally {
          lock.unlock();
      }
    }
take方法跟poll方法一样,也是通过dequeue()方进行移除元素,但不同的是,他会进行一个线程阻塞,也就是运用condition的await方法,同时这个阻塞时可被打断的,关键词lockInterruptibly。
remove方法相对来说比较复杂,他跟以上两个方法的不同点在于remove可以根据索引来删除元素,而另两个则是通过删除队列的头元素。
	public boolean remove(Object o) {
        //确保传入元素不为null
        if (o == null) return false;
        //获取队列当前数据
        final Object[] items = this.items;
        final ReentrantLock lock = this.lock;
        lock.lock();
        try {
            if (count > 0) {
                final int putIndex = this.putIndex;
                int i = takeIndex;
                //找出O元素的索引值
                do {
                    if (o.equals(items[i])) {//如果匹配到,删除元素,i为o的索引
                        removeAt(i);
                        return true;
                    }
                    //只有一个元素时,重置索引值
                    if (++i == items.length)
                        i = 0;
                } while (i != putIndex);
            }
            return false;
        } finally {
            lock.unlock();
        }
    }
以下是removeAt方法:
void removeAt(final int removeIndex) {
        final Object[] items = this.items;
    	//判断当前元素是否是头部索引值
        if (removeIndex == takeIndex) {
            items[takeIndex] = null;
            if (++takeIndex == items.length)
                takeIndex = 0;
            count--;
            if (itrs != null)
                itrs.elementDequeued();
        } else {
           //如果不是,通过移动元素位置,将要删除的元素置为队尾删除
            final int putIndex = this.putIndex;
            for (int i = removeIndex;;) {
                //确保当前队列大小大于1
                int next = i + 1;
                if (next == items.length)
                    next = 0;
                //如果不是队尾元素,进行元素移动
                if (next != putIndex) {
                    items[i] = items[next];
                    i = next;
                } else {
                    //如果是队尾,元素移动完毕,直接将队尾为null,即删除
                    items[i] = null;
                    this.putIndex = i;
                    break;
                }
            }
            count--;
            if (itrs != null)
                itrs.removedAt(removeIndex);
        }
        notFull.signal();
    }
阻塞队列的应用场景
目前我所接触到的场景有两个:
- 线程池的底层存储;
- 生产消费队列模式。
下面我们将着重讲解生产消费队列模式,线程池我们会在专门的章节说到。
首先,我们先来演示以下如果没有阻塞队列,生产消费模式是怎样写的。然后我们在去用阻塞队列去实现。
传统模式
要求:初始值为0的变量,两个线程交替操作,一个+1,一个-1,执行五轮。
//资源类
class MyResource{
    int number = 0;
    private Lock lock = new ReentrantLock();
    private Condition condition = lock.newCondition();

    //自增
    public void increaseNum(){
        lock.lock();
        try{
            //判断
            while(number != 0){
                condition.await();
            }
            //干活
            number++;
            System.out.println(Thread.currentThread().getName() + "\t" + number);
            //唤醒
            condition.signalAll();
        }catch(Exception e){
            e.getStackTrace();
        }finally {
            lock.unlock();
        }
    }
    //自减
    public void decrNum(){
        lock.lock();
        try{
            //判断
            while(number == 0){
                condition.await();
            }
            //干活
            number--;
            System.out.println(Thread.currentThread().getName() + "\t" + number);
            //唤醒
            condition.signalAll();
        }catch(Exception e){
            e.getStackTrace();
        }finally {
            lock.unlock();
        }
    }

}

public class ProdConsTradTest {
    public static void main(String[] args) {
        MyResource myResource = new MyResource();
        new Thread(() ->{
            for (int i = 0; i < 5; i++) {
                myResource.increaseNum();
            }
        },"Prod").start();

        new Thread(() ->{
            for (int i = 0; i < 5; i++) {
                myResource.decrNum();
            }
        },"Cons").start();
    }
}
输出如下:
Prod	1
Cons	0
Prod	1
Cons	0
Prod	1
Cons	0
Prod	1
Cons	0
Prod	1
Cons	0
其实,通过上述代码以及上述阻塞队列的源码可以知道,传统模式的实现就是ArrayListBlockingQueue的底层代码,通过condition去通知沉睡与唤醒。
阻塞队列模式
class MyData {
    //全局开关
    private volatile boolean flag = true;

    private BlockingQueue<String> queue;

    private AtomicInteger atomicInteger =  new AtomicInteger();

    public MyData(BlockingQueue<String> queue) {
        this.queue = queue;
    }

    public void myProd() throws InterruptedException {
        String data = null;
        boolean isOfferSuccess;
        while(flag){
            data = atomicInteger.incrementAndGet()+"";
            isOfferSuccess = queue.offer(data, 2l, TimeUnit.SECONDS);
            if(isOfferSuccess){
                System.out.println(Thread.currentThread().getName()+"线程\t 插入队列成功 \t 插入队列的值为:"+data);
            }else{
                System.out.println(Thread.currentThread().getName()+"线程\t 插入队列失败");
            }
            TimeUnit.SECONDS.sleep(1);
        }
    }
    public void myCons() throws InterruptedException {
        String result =null;
        while(flag){
            result = queue.poll(2l, TimeUnit.SECONDS);
            if(Objects.isNull(result) || result.equalsIgnoreCase("")){
                flag = false;
                System.err.println(Thread.currentThread().getName() + "\t超过2秒钟没有消费,退出消费");
                return;
            }
            System.out.println(Thread.currentThread().getName() + "\t消费队列\t消费\t" + result + "\t成功");
        }
    }
    public void stop() {
        this.flag = false;
    }
}

public class ProdConsBlockingQueueTest {
    public static void main(String[] args) {
        MyData myData = new MyData(new ArrayBlockingQueue<>(10));

        new Thread(() ->{
            System.out.println(Thread.currentThread().getName()+" \t 生产者线程开始生产");
            try {
                myData.myProd();
            } catch (InterruptedException e) {
                e.printStackTrace();
            }
        },"Pord").start();

        new Thread(() ->{
            System.out.println(Thread.currentThread().getName()+" \t 消费者线程开始消费");
            try {
                myData.myCons();
            } catch (InterruptedException e) {
                e.printStackTrace();
            }
        },"Cons").start();

        try {
            TimeUnit.SECONDS.sleep(5);
        } catch (InterruptedException e) {
            e.printStackTrace();
        }
        System.err.println("5秒钟后,叫停");
        myData.stop();
    }
}
输出如下:
Pord 	 生产者线程开始生产
Cons 	 消费者线程开始消费
Pord线程	 插入队列成功 	 插入队列的值为:1
Cons	消费队列	消费	1	成功
Pord线程	 插入队列成功 	 插入队列的值为:2
Cons	消费队列	消费	2	成功
Pord线程	 插入队列成功 	 插入队列的值为:3
Cons	消费队列	消费	3	成功
Pord线程	 插入队列成功 	 插入队列的值为:4
Cons	消费队列	消费	4	成功
Pord线程	 插入队列成功 	 插入队列的值为:5
Cons	消费队列	消费	5	成功
5秒钟后,叫停
Cons	超过2秒钟没有消费,退出消费
LinkedBlockingQueue和ArrayBlockingQueue区别
队列大小不同;
ArrayBlockingQueue在初始化的时候,必须指定队列的大小;
而LinkedBlockingQueue在初始化的时候,如果你没有指定大小,则会默认Integer.MAX_VALUE,是一个很大的值,这样就会导致数据在一个不可控范围,一旦添加速度远大于移除的速度时,可能会有内存泄漏的风险。
底层实现不同;
ArrayBlockingQueue的底层是一个数组,而LinkedBlockingQueue底层是一个链表结构。官方文档介绍中,LinkedBlockingQueue的吞吐行是高于arrayBlockingQueue;但是在添加或移除元素中,LinkedBlockingQueue则会生成一个额外的Node对象,对GC可能存在影响;
至于为什么说LinkedBlockingQueue的吞吐性是高于arrayBlockingQueue:
吞吐性能强是因为有两个锁,试想一下,Array里面使用的是一个锁,不管put还是take行为,都可能被这个锁卡住,而Linked里面put和take是两个锁,put只会被put行为卡住,而不会被take卡住,因此吞吐性能自然强于Array。 而“less predictable performance”这个也是显而易见的,Array采用的时固定内存,而Linked采用的时动态内存,无论是分配内存还是释放内存(甚至GC)动态内存的性能自然都会比固定内存要差。
锁机制不一样;
ArrayBlockingQueue使用的一个锁来控制,LinkedBlockingQueue使用了2个锁来控制,一个名为putLock,另一个是takeLock,但是锁的本质都是ReentrantLock。
总结
其实在阻塞队列这一块,他对并发理论的运用还是很多的,都是将其封装为底层,然后直接使用,直接让我们不用要去考虑来回通知唤醒,而且也极大的可能性避免了线程死锁问题。
知识来源:


 1342
1342


 被折叠的 条评论
为什么被折叠?
被折叠的 条评论
为什么被折叠?
 到【灌水乐园】发言


