


本片文章是Retrofit 2.1.0的学习笔记,以下简称Retrofit 2,Retrofit 2 的源码只有37个文件,其中注解文件的个数是22个。所以我们平时使用的过程中重点使用其中的15个类。22个注解我们会使用即可(如果有朋友想详细的学习注解的东西建议先看一些注解相关的资料,再回头看里面的设计思想)。下面我们开始学习Retrofit 2.
1、Retrofit 2 入门:
创建实例和Retrofit1.1的区别:
Retrofit 1.1 创建实例:
Retrofit retrofit = new Retrofit.Builder()
.baseUrl("http://localhost:8848")   //  url的结尾可以不是/(斜线)
.build();
Retrofit 2 创建实例:
 Retrofit retrofit = new Retrofit.Builder()
 .baseUrl("http://localhost:8848/")   //  url 的结尾必须以/(斜线)结束, 不然会抛出IllegalArgumentException,所以需要注意下。
 .build();
2、定义接口
官方文档:http://square.github.io/retrofit/
引用 :官方的一句话:Retrofit turns your HTTP API into a Java interface.
定义接口示例:
public interface GitHubService{
      @GET("users/{user}/repos")
      Call<List<Repo>> listRepos(@Path("user") String user);
}
2.1 示例中的注解
@GET("users/{user}/repos") 代表请求方式是get请求。请求参数是listRepos()方法中传的参数。这里我们暂时先简单了解一下,除了@GET 方式,另外还有@POST、@PUT、@DELETE、@PATCH、@HEAD、@OPTIONS以及@HTTP 这几种方式(这里简单了解一下,HTTP方式可以替换前面的7种方式)。
2.2 接口中的方法
示例代码中方法的返回类型是一个Call类型,这种类型一般用于简单的逻辑实现,实现Call类型的回调监听即可。除Call类型之外,实际项目开发中使用Observable类型的情况居多,毕竟使用Retrofit也是为了使代码更加优雅,逻辑更加清晰(订阅者/观察者模式,当然说观察者模式有些不太合乎定义),Observable也就是可订阅者(相当于被观察者),用于响应式编程(这个之后再说)。
2.3 接口方法的参数
@Path注解作用于方法参数,用于URL。除Path之外还有:
@Headers(用于添加请求头)、
@Header(用于添加不固定值的Header,请求头)、
@Body(用于非表单请求体,之后再详细说)、
@Field(用于表单字段,和@FiledMap配合@FormUrlEncoded注解配合)、
@FieldMap(和@FieldMap类似,接收的参数类型是Map<String, String>,如果传的参数类型不是String类型,会调用参数的toString()方法)、
@Part和@PartMap(配合@Multipart注解使用,适合有文件上传的情况。@PartMap的默认接受的参数类型是Map<String, RequestBody>类型,非RequestBody类型会通过Converter转换,Converter转换之后会细说)、
@Query(用于URL,@Query和@QueryMap 类似 @Field和@FieldMap功能,不同的是@Query和@QueryMap中的数据体现在Url上,而@Field和@FieldMap的数据是请求体,但是生成的数据形式是一样的)、
Url(用于URL)
注:{占位符}和Path尽量只用在URL的path部分,url中的参数使用Query和QueryMap代替保证接口定义的简洁
注:Query、Field和Part这三者都是支持数组和实现了Iterable接口的类型,比如List、Set等,方便向后台传递数组
3、使用接口(这里说的接口是interface,不是后台接口)
这里我们以示例接口为例。
// 3.1 Retrofit中调用接口方法需要我们先创建一个代理对象。
Retrofit retrofit = new Retrofit.Builder().baseUrl("http://localhost:8848").build();
GitHubService gitHubService = retrofit.create(GitHubService.class);

// 3.2 得到代理对象之后,就可以调用定义的接口方法了
// 3.2.1 接口方法的返回类型是Call
Call<ResponseBody> call = gitHubService.listRepos("uana_777");
// 这一步和OkHttp的Call类似,不同的是如果是Android系统回调方法执行在主线程
call.enqueue(new Callback<ResponseBody>(){
	@Override
	public void onResponse(Call<ResponseBody> call, Response<ResponseBody> response){
		try{
			System.out.println(response.body().toString());
		} catch(Exception e){
			// 处理异常
		}
	}

    	@Override
    	public void onFilure(Call<ResponseBody> call, Throwable t){
    		// 失败后的处理
		t.printStackTrace();
    	}
});{“code”:200, "msg":"success", "data":{"id":2,"date":"2016-11-04","userName":"uana_777"}, "count":1, "page":0}注:上面说到了Retrofit 的注解:@XX。所以下面我们详细介绍一下这方面。
4、Retrofit 的注解
开始我们提到Retrofit中的注解文件个数是22个。下面我们就详细介绍这22个注解。为了帮助大家更好的理解和记忆,我们把这22个注解分为3个大类。
第一类:Http请求注解 8个
第二类:标志类 3个
第三类:参数类 11个
下面开始详细介绍:
4.1 Http 请求注解
-------------------------------------------------------------------------------------------------------------------------------------------------------------
@GET 对应Http请求方法,get请求,接受字符串格式的参数,与baseUrl组成一个完整的Url,例如:
public interface GitHubService{
	@GET("users/uana_777/repos") // 和创建Retrofit 时baseUrl("http://localhost:8848/")中的参数拼接为一个完整的 url
      	Call<List<Repo>> listRepos();
}
也可以像上面的接口中写的:和@PATH注解的参数一起使用,定义一个灵活的请求地址。例如:
public interface GitHubService{
	@GET("users/{user_name}/repos")  // 对应@PATH("XXX") 参数名称,和baseUrl("http://localhost:8848/")中的参数拼接为一个完整的 url
      	Call<List<Repo>> listRepos(@PATH("user_name") String userName);
}@POST 对应Http请求方法,post请求,和GET注解类似,接受的参数类型是String类型,
-------------------------------------------------------------------------------------------------------------------------------------------------------------@PUT 对应Http请求方法,put请求
-------------------------------------------------------------------------------------------------------------------------------------------------------------@DELETE 对应Http请求方法,delete请求
-------------------------------------------------------------------------------------------------------------------------------------------------------------@PATCH 对应Http请求方法,patch请求
-------------------------------------------------------------------------------------------------------------------------------------------------------------@HEAD 对应Http请求方法,head请求
-------------------------------------------------------------------------------------------------------------------------------------------------------------@OPTIONS 对应Http请求方法,options请求
-------------------------------------------------------------------------------------------------------------------------------------------------------------@HTTP 注:这个可以代替上面7种注解中的任意一种注解,有三个属性:method = “Http请求方式”、path = "请求地址"、hasBody = true Or false
public interface GitHubService{
	/**
 	 * method 表示请求方法,不区分大小写
	 * path 表示请求地址(路径)
 	 * hasBody 表示是否有请求体
 	 */
	@HTTP(method = "get", path = "{user_name}/repo", hasBody = false)
	Call<ResponseBody> getUserInfo(@Path("user_name") String userName);

	@HTTP(method = "get", path = "{user_id}/repo", hasBody = false)
	Call<ResponseBody> getUserInfo(@Path("user_id") int uerId);
}
4.2 标志类
-------------------------------------------------------------------------------------------------------------------------------------------------------------
@FormUrlEncoded 用于表单请求,表示请求体是一个Form表单,比如平时网页登录的时候使用的就是表单请求,Content-Type:multipart/form-data
-------------------------------------------------------------------------------------------------------------------------------------------------------------
@MultiPart 用于表单请求,表示请求体是一个支持文件上传的Form表单,Content-Tpye:multipart/form-data
-------------------------------------------------------------------------------------------------------------------------------------------------------------
@Streaming 标记,表示响应提的数据用流的形式返回,如果使用该注解,默认会把返回的数据全部载入内存,之后你通过流获取数据,其实也就是
读取内存中的数据。所以如果你返回的数据比较大,你就需要使用这个注解
-------------------------------------------------------------------------------------------------------------------------------------------------------------
注:示例代码
package com.github.uana;

import java.util.HashMap;
import java.util.Map;

import okhttp3.MediaType;
import okhttp3.MultipartBody;
import okhttp3.RequestBody;
import okhttp3.ResponseBody;
import retrofit2.Call;
import retrofit2.Retrofit;
import retrofit2.converter.gson.GsonConverterFactory;
import retrofit2.http.Field;
import retrofit2.http.FieldMap;
import retrofit2.http.FormUrlEncoded;
import retrofit2.http.Multipart;
import retrofit2.http.POST;
import retrofit2.http.Part;
import retrofit2.http.PartMap;

/**
 * Retrofit 2 标志类注解
 */
public class Example{

	public interface GitHubService{

		/**
 		 * @FormUrlEncoded 表示是一个表单格式的请求
 		 * (Content-Type:application/x-www-form-urlencoded)
 		 * Field("user_name") 表示将后面的 String name 参数值作为user_name的值,同样的Field("age") 表示 将后面的 int age 参数值作为age的值
 		 */
 		@POST("/form")   // url地址
		@FormUrlEncoded
 		Call<ResponseBody> testFormUrlEncoded(@Field("user_name") String name, @Field("age") int age);

		/**
 		 * Map的key作为表单的键
		 */
		@POST("/form")
		@FormUrlEncoded
		Call<ResponseBody> testFormUrlEncoded(@FieldMap Map<String, Object> map);

		/**
		 *{@link Part}注解,后面的参数类型支持三种:RequestBody、okhttp3.MultipartBody.Part、除以上两种类型之外其他类型的必须带上表单字段(okhttp3.MultipartBody.Part 中已经包含了表单字段的信息)
		 *
		 */
		@POST("/form")
		@Multipart
		Call<ResponseBody> testFileUpLoad(@Part("name") RequestBody name, @Part("age") RequestBody age, @Part MultipartBody.Part file);

		/**
		 * PartMap 注解支持一个Map作为参数,也支持RequestBody类型,如果有其他的类型,会被retrofit2.Converter 转换。
		 *  后面会介绍如何转换,使用com.google.gson.Gson 的retrofit2.Converter。文件只能用 @Part MultipartBody.Part
		 */
		@POST("/form")
		@Multipart
		Call<ResponseBody> testFileUpload(@PartMap<String, RequestBody> args, @Part MultipartBody.Part file);

	}

	/**
 	 * 调用
	 */
	public void test(){

		// 获取Retrofit 对象
		Retrofit retrofit = new Retrofit.Builder()
			.baseUrl("http://localhost:8848/")
			.addConverterFactory(GsonConverterFactory.create())
			.build();

		// 获取接口实例
		GitHubService service = retrofit.create(GitHubService.class);

		// 演示 @FormUrlEncoded 和 @Field
		Call<ResponseBody> call_one = service.testFormUrlEncoded("uana_777", 25);

		// 打印响应结果
		// ResponseBodyPrinter.printRespinseBody(call_one);
		// 自定义处理
		call_one.enqueue(new CallBack<ResponseBody>(){

			@Override
			public void onResponse(Call<ResponseBody> call, Response<ResponseBody> response){

				try{
					//  自己处理响应结果
				}catch(IOException e){
					// 异常处理
				}
			}

			@Override
			public void onFailure(Call<ResponseBody> call, Throwable t){
				// 请求失败的处理
			}

		});

		// =========================//

		// 演示@FormUrlEncoded 和 @FieldMap
		Map<String, Object> params = new HashMap<>();
		params.put("user_name", "uana_777");
		params.put("age", 25);
		Call<ResponseBody> call_two = service.testFormUrlEncoded(params);
		// 打印响应结果
		// ResponseBodyPrintResponseBody(call_two);

		//============================//
		MediaType textType = MediaType.parse("text/plain");
		RequestBody userName = RequestBody.create(textType, "uana_777");
		RequestBody age = RequestBody.create(textType, "25");
		RequestBody file = RequestBody.create(MediaType.parse("application/octet-stream"), "这里是模拟文件的内容");

		// 演示@Multipart 和 @Part
		MultipartBody.Part filePart = MultipartBody.Part.createFormData("file", "test.txt", file);
		Call<ResponseBody> call_three = service.testFileUpload(userName, age, filePart);
		// 打印响应结果
		// ResponseBodyPrinter.printResponseBody(call_three);

		//===========================//

		// 演示@Multipart 和 @Part
		MediaType textType = MediaType.parse("text/plain");
		RequestBody uName = RequestBody.create(textType, "uana_777");
		RequesBody uAge = RequestBody.create(textType, "25");
		RequestBody uFile = RequestBody.create(MediaType.parse("application/octet-stream"), "这是测试数据");
		Map<String, RequestBody> fileUploadParams = new HashMap();

		fileUploadParams.put("user_name", uName);
		fileUploadParams.put("age", uAge);
		// 这里并不会被当成文件处理, 因为没有文件名
		// fileUploadParams.put("file", uFile);
		// 通过part转换一下
		MultipartBody.Part uFilePart = MultipartBody.Part.createFormData("file", "test.txt", uFile);

		Call<ResponseBody> call_four = service.testFileUpload(fileUploadParams, uFilePart);
		// 打印响应的结果
		ResponseBodyPrintResponseBody(call_four);
	}

}
4.3 参数类 (作用于方法参数)
@Part 和@PartMap注解配合@MultiPart注解使用,适合有文件上传的情况
-------------------------------------------------------------------------------------------------------------------------------------------------------------
@Path 用于URL
-------------------------------------------------------------------------------------------------------------------------------------------------------------
-------------------------------------------------------------------------------------------------------------------------------------------------------------
import okhttp3.ResponseBody;
import retrofit2.Call;
import retrofit2.Retrofit;
import retrofit2.http.GET;
import retrofit2.http.Header;
import retrofit2.http.Headers;
import retrofit2.http.Query;

/**
 * Retrofit注解详解 Headers & Header
 */
public class Example {

    	public interface GitHubService {
        	@GET("/headers?showAll=true")
		@Headers({"CustomHeader1: customHeaderValue1", "CustomHeader2: customHeaderValue2"})
        	Call<ResponseBody> testHeader(@Header("CustomHeader3") String customHeaderValue3);

    	}

    	public void test() {
        	Retrofit retrofit = new Retrofit.Builder()
                	.baseUrl("http://localhost:8848/")
                	.build();

        	GitHubService service = retrofit.create(<span style="font-family: Arial, Helvetica, sans-serif;">GitHubService.class</span><span style="font-family: Arial, Helvetica, sans-serif;">);</span>

        	// 演示 @Headers 和 @Header
        	Call<ResponseBody> call = service.testHeader("uana_777");
      		// 打印响应结果
		ResponseBodyPrinter.printResponseBody(call);
	}}
import okhttp3.ResponseBody; import retrofit2.Call; import retrofit2.Retrofit; import retrofit2.http.GET; import retrofit2.http.Query; import retrofit2.http.Url; /** * [Retrofit注解详解 之 Query & QueryMap & Url 注解 */ public class Example { public interface GitHubService{ /** * 当GET、POST...HTTP等方法中没有设置Url时,则必须使用 {@link Url}提供 * 对于Query和QueryMap,如果不是String(或Map的第个泛型参数不是String)时 * 会被调用toString * Url支持的类型有 okhttp3.HttpUrl, String, java.net.URI, android.net.Uri * {@link retrofit2.http.QueryMap} 用法和{@link retrofit2.http.FieldMap} 用法一样,不再说明 */ @GET //当有URL注解时,这里的URL就省略了 Call<ResponseBody> testUrlAndQuery(@Url String url, @Query("showAll") boolean showAll); @GET //当有URL注解时,这里的URL就省略了 Call<ResponseBody> testUrlAndQueryMap(@Url String url, @QueryMap("params") Map<String, Object> params); @GET("headers") Call<ResponseBody> testQueryMap(@QueryMap("params") Map<String, Object> params); @GET("headers") Call<ResponseBody> testQuery(@Query("showall") boolean showAll); } public void test() {Retrofit retrofit = new Retrofit.Builder() .baseUrl("http://localhost:8848/") .build();GitHubService service = retrofit.create(GitHubService.class);Call<ResponseBody> call1 = service.testUrlAndQuery("headers",false);ResponseBodyPrinter.printResponseBody(call1);// 调用}}
注:{占位符}和@PATH尽量只在URL的path部分,url中的参数使用@Query和@QueryMap代替,这样做能保证接口定义的简洁。
注:@Query、@Field 和 @Part 这三者都支持数组和实现了 Iterable 接口类型的参数,比如:List、Set 等。
比如:Call<ResponseBody> test(@Query("ids[]") List<Integer> ids);
5、Gson与Converter
在默认情况下Retrofit只支持将HTTP 的响应体转换为ResponseBody,这也是为什么前面的例子中接口方法的返回值都是Call<ResponseBody>,泛型写的一直是ResponseBody,但是如果响应体只支持ResponseBody 的话为什么设计的时候要设计为泛型的方式呢??(这句话可能有些童鞋不理解,详细说一下,上面这句话意思就是说:如果Retrofit的请求响应体只支持ResponseBody的话,为什么设计Call<T> 为这种格式)。 既然这样设置,就说明Retrofit提供给我们的有类似转换器一类的东西,而这个东西就是Converter,Converter就是Retrofit为我们提供的用于将ResponseBody转换为我们需要的类型的工具。
下面我们写一个示例,看看Converter是如何使用的:
public interface GitHubService{
	@GET("user_info/{user_id}")  // 使用GET注解
	Call<Result<User>> getUserById(@Path("user_id") int uerId); // 设置返回值类型是Result<User> 类型

	@POST("create_user")
	Call<Result<User>> createUser(@Body User user);  // 被@Body注解的User会被Gson转换成RequesBody发送到服务器
}上面的这句话有点拗口,不过不妨事,下面我们通过示例代码看一下:
5.1 如果是AndroidStudio开发的话:在model 的 gradle文件中引入 : (其他的开发工具请自己搜索,这个很简单就不详细说了)
compile 'com.squareup.retrofit2:converter-gson:2.0.2'5.2 通过GsonConverterFactory为Retrofit添加Gson支持:
// Gson 如果能做到全局只用一个最好(这个只是建议) 一般gson的创建会放在Application类中创建。
Gson gson = new GsonBuilder()
		// 配置Gson
		.setDataFormat("yyyy-MM-dd hh:mm:ss")
		.create();

Retrofit retrofit = new Retrofit.Builder()
		.baseUrl("http://localhost:8848/")
		// 在Retrofit 1 的时候可以设置这一步,1的时候默认有gson,2的时候就必须设置了。 这一步其实就是提供给Retrofit 使用这个gson对象将
		// ResponseBody转换为我们想要的类型
		.addConverterFactory(GsonConverterFactory.create(gson))
		.build();
5.3 调用
GitHubService service = retrofit.create(GitHubService.class);
User user = new User();
user.setName("uana_888");
user.setAge(25);
Call<Result<User>> call = service.createUser(user);
6、RxJava 与 CallAdapter
6.1 引入RxJava 库
compile 'com.squareup.retrofit2:adapter-rxjava:2.0.2'6.2 使用RxJavaCallAdapterFactory为Retrofit添加RxJava支持
Retrofit retrofit = new Retrofit.Builder()
	.baseUrl("http://localhost:8848/")
	.addConverterFactory(GsonConverterFactory.create())
	.addCallAdapterFactory(RxJavaCallAdapterFactory.create()) // 添加RxJava支持, 这一行一定要放在最后添加
	.build();
6.3 接口设计
public interface GitHubService{
	@POST("/user")
	Observable<Result<List<User>>> getUsers();   // 返回值类型为 Observable 泛型为 List<User>类型
}
6.4 使用示例
GitHubService service = retrofit.create(GitHubService.class);
service.getUsers()
	.subscribeOn(Schedulers.io())
	.subscribe(new Subscriber<Result<List<User>>>(){
		@Override
		public void onCompleted(){
			// 完成
		}

		@Override
		public void onError(Throwable e){
			// 失败
		}

		@Override
		public void onNext(Result<List<User>> responseStr){
			// 成功
		}
});如果我们想使用响应的Header和响应码。可以使用下面的两种解决方案
01. 使用Observable<Response<T>>,这里的Response指的是retrofit2.Response。
02.使用Observable<Result<T>> 代替Observable<T>,这里的Result是retrofit2.adapter.rxjava.Result,这个Result中包含的是Response的实例。
7、自定义Converter
7.1 Converter接口及其作用:
public interface Converter<F, T>{
	// 实现从F类型到T类型的转换,F(from) T(To)
	T convert(F value) throws IOException;

	// 用于向Retrofit提供相应的Converter的工厂
	abstract class Factory {
		// 这里创建从ResponseBody其他类型的Converter,如果不能处理,就返回null
		// 主要用于响应体的处理
		public Converter<ResponseBody, ?> responseBodyConverter(Type type, Annotation[] annotations, Retrofit retrofit){
			return null;
		}

		// 在这里创建 从自定义类型到ResponseBody 的 Converter, 不能处理就返回null,
		// 主要用于对Part、 PartMap、Body注解的处理
		public Converter<?, RequestBody> requestBodyConverter(Type type, Annotation[] parameterAnnotations, Annotation[] methodAnnotations, Retrofit retrofit){
			return null;
		}

		// 这里用于对Field、FieldMap、 Header、Path、Query、QueryMap注解的处理
		public Converter<?, String> stringConverter(Type type, Annotation[] annotations, Retrofit retrofit){
			return null;
		}
	}

}7.2 自定义StringConverter
public class StringConverter implements Converter<ResponseBody, String> {

	// 创建单一实例
	public static final StringConverter instance = new StringConverter();

	// 重写转换的方法
	@Override
	public String convert(ResponseBody resBody) throws IOException{
		// resBody 非空
		return resBody.string();
	}

}
7.3 使用自定义的转换器
首先,我们需要一个 StringConverterFactory 来向Retrofit注册 StringConverter。我们先创建一个StringConverterFactory继承我们写的Converter接口中的抽象类Factorypublic class StringConverterFactory extends Converter.Factory {
public static final StringConverterFactory INSTANCE = new StringConverterFactory();
public static StringConverterFactory create(){
return INSTANCE;
}
// 我们只关心实现从ResponseBody到String类型 的转换,所以其他的方法可以不用重写
// 这个方法 可以把ResponseBody类型的转换到其他类型
@Override
public Converter<ResponseBody, ?> responseBodyConverter(Type type, Annotation[] annotations, Retrofit retrofit){
if(type == String.class){
return StringConverter.INSTANCE; // 将StringConverter注册进来
}
// 其他的不处理,我们直接返回null
return null;
}
}Retrofit retrofit = new Retrofit.Builder()
.baseUrl("http://localhost:8848/")
.addConverterFactory(StringConverterFactory.create()) // 这行代码一定要放在 添加Gson类型相关的Converter之前
.addConverterFactory(GsonConverterFactory.create())
.build();import java.io.IOException; import java.lang.annotation.Annotation; import java.lang.reflect.Type; import okhttp3.ResponseBody; import retrofit2.Call; import retrofit2.Callback; import retrofit2.Converter; import retrofit2.Response; import retrofit2.Retrofit; import retrofit2.converter.gson.GsonConverterFactory; import retrofit2.http.GET; import retrofit2.http.Path; /** * 自定义 Converter */ public class ExampleTest{ // 我们还使用GitHubService,GitHubService中的方法的返回值假设是Call<String> private GitHubService service; public void test(){ Retrofit retrofit = new Retrofit.Builder() .baseUrl("http://localhost:8848/") .addConverterFactory(StringConverterFactory.create()) .addConverterFactory(GsonConverterFactory.create()) .build(); service = retrofit.create(GitHubService.class); Call<String> call = service.getUsers(); call.enqueue(new Callback<String>(){ @Override public void onResponse(Call<String> call, Response<String> response){ // 成功}@Overridepublic void onFailure(Call<String> call, Throwable t){// 失败}});}}response.body();
8、自定义CallAdapter
public interface CallAdapter<T> {

	//  真正的数据类型是 我们实现Adapter的时候 设置的泛型
	// 这个T会作为Converter.Factory.responseBodyConverter 的第一个参数
	// 可以参照上面定义的Converter
	Type responseType();

	<R>  T adapt(Call<R> call);

	/**
	 * 用于向Retrofit提供CallAdapter的工厂类
	 */
	abstract class Factory {
		// 在这个方法中判断是否是我们支持的类型,returnType 即Call<RequestBody> 和 Observable<RequestBody>中的ResponseBody
		// RxJavaCallAdapterFactory 就是判断returnType 是不是 Observable<?> 类型
		// 不支持返回null
		public abstract CallAdapter<?> get(Type returnType, Annotation[] annotations, Retrofit retrofit);

		// 用于获取泛型的参数, 比如:Call<RequestBody> 中的RequestBody
		protected static Type getParameterUpperBound(int index, ParameterizedType type) {
			return Utils.getParameterUpperBound(index, type);
		}

		// 获取泛型的原始类型, 比如:Call<RequestBody> 中的Call
		protected static Class<?> getRawType(Type type) {
			return Utils.getRawType(type);
		}

	}

}public class CustomCall<R> {
public final Call<R> call;
public CustomCall(Call<R> call){
this.call = call;
}
public R get () throws IOException {
return call.execute().body();
}
}public class CustomCallAdapter implements CallAdapter<CustomCall<?>> {
private final type responseType;
// 下面的 responseType 方法需要数据的类型
CustomCallAdapter(Type responseType){
this.responseType = responseType;
}
/*
* 重写responseType() 方法
*/
@Override
public Type responseType(){
return responseType;
}
/**
* 重写adapt()方法
*/
@Override
public <R> CustomCall<R> adapt(Call<R> call) {
// 由 CustomCall 决定如何使用
return new CustomCall<>(call);
}
}
adapter创建好了之后,使用之前我们需要创建一个CustomCallAdapterFactory 用于向Retrofit提供CustomCallAdapter:
public class CustomCallAdapterFactory extends CallAdapter.Factory {

	public static final CustomCallAdapterFactory INSTANCE = new CustomCallAdapterFactory();

	@Override
	public CallAdapter<?> get(Type returnType, Annotation[] annotations, Retrofit retrofit){

		// 获取原始类型
		Class<?> rawType = getRawType(returnType);

		// 返回值必须是CustomCall并且带有泛型
		if(rawType == CustomCall.class && returnType instanceof ParameterizedType){
			Type callReturnType = getParameterUpperBound(0, (ParameterizedType) returnType);
			return new CustomCallAdapter(callReturnType);
		}

		return null;
	}
}Retrofit retrofit = new Retrofit.Builder()
.baseUrl("http://localhost:8848/")
.addConverterFactory(StringConverterFactory.create())
.addConverterFactory(GsonConverterFactory.create())
.addCallAdapterFactory(CustomCallAdapterFactory.INSTANCE) // 注册 CustomCallAdapter
.build();public class ExampleCallAdapteTest{
private GitHubService service; // 别忘记在接口中新增一个返回值类型是CustomCall<String> 类型的方法getUsers
public void test () {
Retrofit retrofit = new Retrofit.Builder()
.baseUrl("http://localhost:8848/")
.addConverterFactory(StringConverterFactory.create())
.addConverterFactory(GsonConverterFactory.create())
.addCallAdapterFactory(CustomCallAdapterFactory.INSTANCE)
.build();
service = retrofit .create(GitHubService.class);
// Call<String> call = service.getUsers();
CustomCall<String> call = service.getUsers();
try{
// String result = call.execute().body();
String result = call.get();
} catch (Exception e) {
e.printStackTrace();
}
}
}下面我们在补充点东西:
我们先介绍一下:Retrofit
compile 'com.squareup.retrofit2:retrofit:2.1.0'
compile 'com.squareup.retrofit2:converter-gson:2.1.0'
compile 'com.squareup.retrofit2:adapter-rxjava:2.1.0'
使用Call实例完成同步和异步请求
异步请求:
call.enqueue(new Callback<BookSearchResponse>(){

	@Override
	public void onResponse(Call<String> call, Response<String> response){
		// 获取请求结果
		String resultStr = response.body();
	}

		@Override
public void onFailure(Call<BookSearchResponse> call, Throwable t){
}
});

取消请求:调用取消方法的前提条件是该请求还没有执行。
call.cancel();
添加请求参数的方式:
		private static OkHttpClient getNewClient(){
    			HttpLoggingInterceptor logging = new HttpLoggingInterceptor(); // 网络请求日志
    			logging.setLevel(HttpLoggingInterceptor.Level.BODY);
    			return new OkHttpClient.Builder()
           			.addInterceptor(new CustomInterceptor())
           			.addInterceptor(logging)
           			.connectTimeout(DEFAULT_TIMEOUT, TimeUnit.SECONDS)
           			.build();
}compile 'com.squareup.okhttp3:logging-interceptor:3.4.1'添加请求头的方式:
	@Header("Content-type : audio/wav")
	@Headers("Content-type : audio/wav", "Authorization : token")
	Observable<Result<List<User>>> getUser();
	public class RequestInterceptor implements Interceptor {

		@Override
		public Response intercept(Chain chain) throws IOException {
			Request original = chain.request();
			Request request = original.newBuilder()
				.header("User_Agent", "app_name")
				.header("Accept", "application/vnd.yourapi.v1.full+json")
				.method(original.method(), original.body())
				.build();
			return chain.proceed(request);
		}

}private static OkHttpClient getNewClient(){
return new OkHttpClient.Builder()
.addInterceptor(new RequestInterceptor())
.connectTimeout(DEFAULT_TIMEOUT, TimeUnit.SECONDS)
.build();
}上传操作:
public class MultiplePartUtil {

	private static final String MULTIPART_FORM_DATA = "mutilpart/form-data";

	private Context context;

	public MultiplePartUtil(Context context){
		this.context = context;
	}

	@NonNull
	private RequestBody createPartFormString(String descriptionString){
		return RequestBody.create(MediaType.parse(MULTIPART_FORM_DATA), descriptionString);
	}

	@NonNull
	private MultipartBody.Part prepareFilePart(String partName, Uri fileUri) {

		File file = FileUtils.getFile(context, fileUri);
		// 为file建立RequestBody实例
		RequestBody requestFile = RequestBody.create(MediaType.parse(MULTIPART_FORM_DATA), file);

		// MultipartBody.Part借助文件名完成最终的上传
		return MultipartBody.Part.createFormData(partName, file.getName(), requestFile);
	}
}public class TestActivity extends BaseActivity {
private Uri file01Url = ...; // 从文件选择器或者摄像头中获取
private Uri file02Url = ...; //
private MultiplePartUtil partUtil = new MultiplePartUtil(this);
// 创建上传的service实例
private FileUploadService service = ServiceGenerator.createService(FileUploadService.class);
// 创建文件 Part (可以是photo、video、doc、amr等)
MultipartBody.Part body1, body2;
//
private RequestBody requestBody;
@Override
protected void onCreate(Bundle savedInstanceState) {
super.onCreate(savedInstanceState);
body1 = partUtil.prepareFilePart("video", file01Uri);
body2 = partUtil.prepareFilePart("thumbnail", file02Uri);
requestBody = partUtil.createPartFromString("hello, test");
Call<ResponseBody> call = service.uploadMultipleFiles(description, body1, body2);
call.enqueue(new Callback<ResponseBody>(){
@Override
public void onResponse(Call<ResponseBody> call,Response<ResponseBody> response) {
Log.v("Upload", "success");
}
@Override
public void onFailure(Call<ResponseBody> call, Throwable t) {
Log.e("Upload error:", t.getMessage());
}
});
}
}Retrofit.Builder的其他方法:
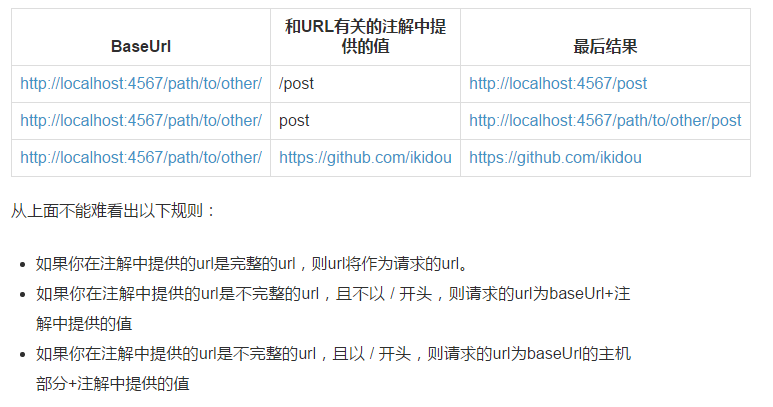
Retrofit的Url组合规则:


 2286
2286

 被折叠的 条评论
为什么被折叠?
被折叠的 条评论
为什么被折叠?
 到【灌水乐园】发言


