


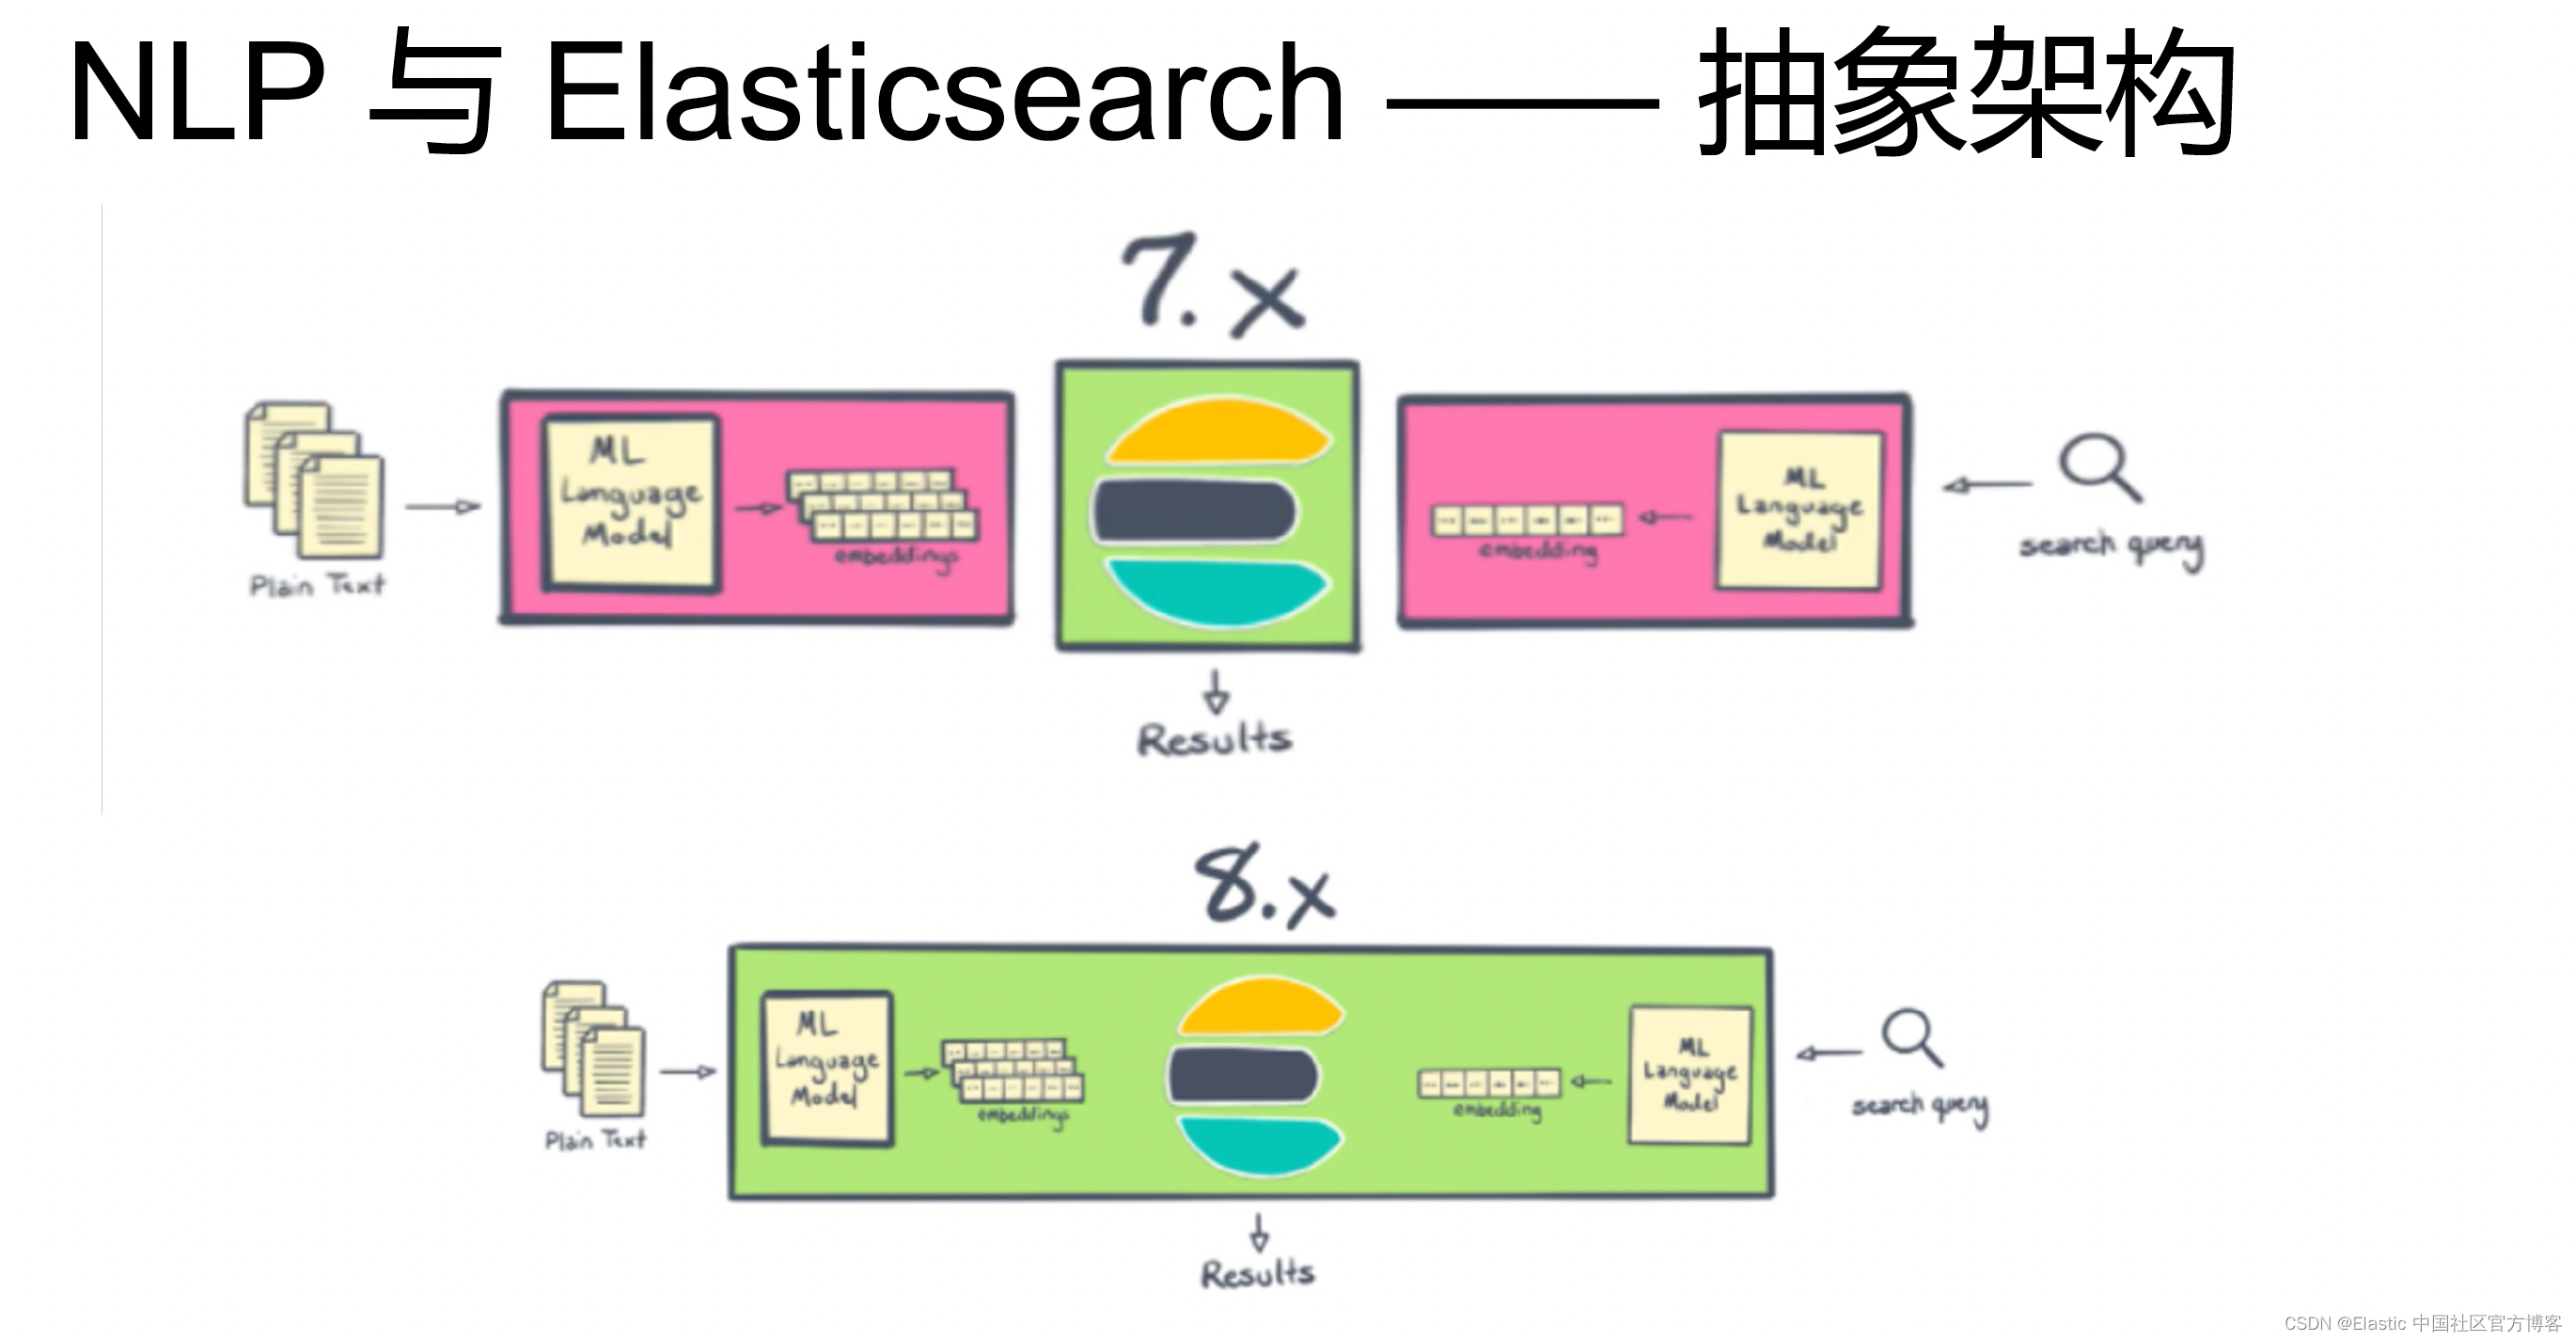
特别指出:这篇文章的内容适合 Elastic Stack 7.x 的发布。在最新的 Elastic Stack 8.x 的发布中,我们不需要安装任何的 NLP plugin。
通过 NLP,我们可以把我们导入的文档进行丰富,从而有更多内容供我们进行搜索,为我们更为精准的搜索打下基础。在今天的文章里,我来介绍一下 NLP 在 Elasticsearch 中的实际应用。我们可以看一下如下的一个例子。比如有一下的两个文档:
I personally like a sweet apple
Sweet, please come over here
假如我们把上面的两行分别作为两个文档导入到 Elasticsearch 之中,而当我们对我们的索引进行搜索 sweet 时:
GET test/_search
{
  "query": {
    "match": {
      "message": "sweet"
    }
  }
}
那么我们到底是想要得到哪个文档呢,或者是哪个文档更具有更好的相关性呢?在第一个句子中,我们看到 sweet 是一个形容词,而在第二个句子中,sweet 是一个人的名称,或是对一个喜欢人的昵称。我们更想得到那个文档呢?当然如果我们不做任何的处理,我们将返回两个文档。
另外,我们看一下另外一种情况,假如现在有一个文档是:
I went to Wuhan and Beijing cities in September last year在上的文档中,有几个 entities:地点 (wuhan 和 Beijing) 及时间 (September last year)。通过 NLP 的处理,我们可以得到这个文档的更多信息,从而可以使得我们更加精确地搜索我们想要的文档。

在今天的练习中,我们将使用 https://github.com/spinscale/elasticsearch-ingest-opennlp ingest processor 来进行演示。目前这个 NLP 支持检测 Date, Person, Location, POS (part of speech) 及其它。在下面的练习中,我们将看到。
安装
如果你还没安装好自己的 Elasticsearch 及 Kibana,请参阅之前的文章 “Elastic:菜鸟上手指南” 来进行安装。在这里就不再累述了。我们接下来安装 openlp ingest processor。在 Elasticsearch 的安装目录下打入如下的命令:
bin/elasticsearch-plugin install https://github.com/spinscale/elasticsearch-ingest-opennlp/releases/download/7.8.0.1/ingest-opennlp-7.8.0.1.zip$ bin/elasticsearch-plugin install https://github.com/spinscale/elasticsearch-ingest-opennlp/releases/download/7.8.0.1/ingest-opennlp-7.8.0.1.zip
-> Installing https://github.com/spinscale/elasticsearch-ingest-opennlp/releases/download/7.8.0.1/ingest-opennlp-7.8.0.1.zip
-> Downloading https://github.com/spinscale/elasticsearch-ingest-opennlp/releases/download/7.8.0.1/ingest-opennlp-7.8.0.1.zip
[=================================================] 100%
-> Installed ingest-opennlp我们通过如下的命令来检查安装是否成功:
bin/elasticsearch-plugin list$ bin/elasticsearch-plugin list
ingest-opennlp上面显示我们的 ingest-opennlp 已经安装成功了。在这里必须指出的是:我们必须安装和自己的 Elasticsearch 一致的版本。
按照 https://github.com/spinscale/elasticsearch-ingest-opennlp 上面的要求,如果我们是运行 Elasticsearch 6.5.2 或更新的版本,我们需要从 sourceforge 下载最新的 NER 模型。我们在 console 中打入如下的命令:
bin/ingest-opennlp/download-models$ pwd
/Users/liuxg/elastic/elasticsearch-7.8.0
$ bin/ingest-opennlp/download-models
Downloading en-ner-persons.bin model... done
Downloading en-ner-locations.bin model... done
Downloading en-ner-dates.bin model... done
you can use the following configuration settings now
ingest.opennlp.model.file.persons: en-ner-persons.bin
ingest.opennlp.model.file.dates: en-ner-dates.bin
ingest.opennlp.model.file.locations: en-ner-locations.bin上面显示,我们已经成功地下载了 persons, dates 及 locations 的模型。
接下来,我们需要在 Elasticsearch 中为 opennlp 进行配置。我们需要在 config/elasticsearch.yml 中添加如下的配置:
ingest.opennlp.model.file.persons: en-ner-persons.bin
ingest.opennlp.model.file.dates: en-ner-dates.bin
ingest.opennlp.model.file.locations: en-ner-locations.bin这些模型可以在 config/ingest-opennlp 目录中找到。
$ pwd
/Users/liuxg/elastic/elasticsearch-7.8.0
liuxg:elasticsearch-7.8.0 liuxg$ ls config/ingest-opennlp/
en-ner-dates.bin     en-ner-locations.bin en-ner-persons.bin
配置完后,我们需要重新启动 Elasticsearch。
运用 opennlp
我们首先创建一个支持 NLP 的 pipeline。 在 Kibana 中运行如下的命令:
PUT _ingest/pipeline/opennlp-pipeline
{
  "description": "A pipeline to do named entity extraction",
  "processors": [
    {
      "opennlp" : {
        "field" : "message"
      }
    }
  ]
}
我们把刚开始的那个例子拿出来看看结果:
PUT /my-index/_doc/1?pipeline=opennlp-pipeline
{
  "message": "Shay Banon announced the release of Elasticsearch 6.0 in November 2017"
}
我们使用如下的命令来查看已经导入的文档:
GET my-index/_doc/1上面的命令显示的结果是:
{
  "_index" : "my-index",
  "_type" : "_doc",
  "_id" : "1",
  "_version" : 2,
  "_seq_no" : 1,
  "_primary_term" : 1,
  "found" : true,
  "_source" : {
    "entities" : {
      "dates" : [
        "November 2017"
      ]
    },
    "message" : "Shay Banon announced the release of Elasticsearch 6.0 in November 2017"
  }
}
我们再来试另外一个例子:
PUT /my-index/_doc/2?pipeline=opennlp-pipeline
{
  "message" : "Kobe Bryant was one of the best basketball players of all times. Not even Michael Jordan has ever scored 81 points in one game. Munich is really an awesome city, but New York is as well. Yesterday has been the hottest day of the year."
}
再用如下的命令查看已经导入的文档:
GET my-index/_doc/2上面的命令显示的结果是:
{
  "_index" : "my-index",
  "_type" : "_doc",
  "_id" : "2",
  "_version" : 1,
  "_seq_no" : 2,
  "_primary_term" : 1,
  "found" : true,
  "_source" : {
    "entities" : {
      "persons" : [
        "Kobe Bryant",
        "Michael Jordan"
      ],
      "dates" : [
        "Yesterday"
      ],
      "locations" : [
        "Munich",
        "New York"
      ]
    },
    "message" : "Kobe Bryant was one of the best basketball players of all times. Not even Michael Jordan has ever scored 81 points in one game. Munich is really an awesome city, but New York is as well. Yesterday has been the hottest day of the year."
  }
}
从上面显示的结果我们可以看出来,它正确地识别了 dates,persons 及 locations。刚才试了一些中文,对中文的支持不好。可能在 ingest processor 中需要加入对中文的支持。
你也可以在 pipeline 中支持你只想要的 entity,比如 names:
PUT _ingest/pipeline/opennlp-pipeline
{
  "description": "A pipeline to do named entity extraction",
  "processors": [
    {
      "opennlp" : {
        "field" : "message",
        "fields": ["persons"]
      }
    }
  ]
}
那么返回的结果将是:
{
  "_index" : "my-index",
  "_type" : "_doc",
  "_id" : "2",
  "_version" : 3,
  "_seq_no" : 7,
  "_primary_term" : 1,
  "found" : true,
  "_source" : {
    "entities" : {
      "persons" : [
        "Kobe Bryant",
        "Michael Jordan"
      ]
    },
    "message" : "Kobe Bryant was one of the best basketball players of all times. Not even Michael Jordan has ever scored 81 points in one game. Munich is really an awesome city, but New York is as well. Yesterday has been the hottest day of the year."
  }
}
在上面,我们可以看到只有 persons 这个 entity 被返回。
你还可以以带注释的 annotated text plugin 来丰富文档:
PUT _ingest/pipeline/opennlp-pipeline
{
  "description": "A pipeline to do named entity extraction",
  "processors": [
    {
      "opennlp" : {
        "field" : "message",
        "annotated_text_field" : "my_annotated_text_field"
      }
    }
  ]
}
那么返回的文档将是:
{
  "_index" : "my-index",
  "_type" : "_doc",
  "_id" : "2",
  "_version" : 4,
  "_seq_no" : 8,
  "_primary_term" : 1,
  "found" : true,
  "_source" : {
    "my_annotated_text_field" : "[Kobe Bryant](Person_Kobe Bryant) was one of the best basketball players of all times. Not even [Michael Jordan](Person_Michael Jordan) has ever scored 81 points in one game. [Munich](Location_Munich) is really an awesome city, but [New York](Location_New York) is as well. [Yesterday](Date_Yesterday) has been the hottest day of the year.",
    "entities" : {
      "persons" : [
        "Kobe Bryant",
        "Michael Jordan"
      ],
      "dates" : [
        "Yesterday"
      ],
      "locations" : [
        "Munich",
        "New York"
      ]
    },
    "message" : "Kobe Bryant was one of the best basketball players of all times. Not even Michael Jordan has ever scored 81 points in one game. Munich is really an awesome city, but New York is as well. Yesterday has been the hottest day of the year."
  }
}
在上面,我们开业看到一个叫做 my_annotated_text_field 的字段。它的内容如下:
"my_annotated_text_field" : "[Kobe Bryant](Person_Kobe Bryant) was one of the best basketball players of all times. Not even [Michael Jordan](Person_Michael Jordan) has ever scored 81 points in one game. [Munich](Location_Munich) is really an awesome city, but [New York](Location_New York) is as well. [Yesterday](Date_Yesterday) has been the hottest day of the year.",
上面标识识别的 persons, date 及 location 的地方。
用途
到目前为止可能你已经知道了 NLP 的基本用法了。那在实际的使用中有什么具体的用途呢?我个人觉得针对新闻工作者来说,其实还是蛮有用途的。比如,我们想搜索 yesterday 在 wuhan 或者 beijing 发生的新闻。我们可以通过 NLP 的方法把新闻的内容导入到 Elasticsearch 中,并使用 NLP 丰富 locations, dates 这样的字段。这样我们很容更加精准地搜索到我们想要的内容。
参考:
【1】 https://github.com/spinscale/elasticsearch-ingest-opennlp


 1389
1389


 被折叠的 条评论
为什么被折叠?
被折叠的 条评论
为什么被折叠?
 到【灌水乐园】发言


