


当我第一次接触Ubuntu Scope时,我发现这个Category Renderer太神奇。它可以把我们想要的数据很简单而直接的方式呈现给我们。但是由于资料的限制,我们很难知道它最终的显示的形式是什么样的。我们可以在我们的英文的网站的文章“Customization and branding”找到一下信息。但是总觉得意犹未尽,加之没有代码,有时很难理解它到底讲的是什么。在这篇文章中,我们来详细地介绍各种模版,并看看它们的显示格式。详细这对广大的开发者来说非常有用。我们可以修改这些模版来显示我们所需要的内容。


创建一个最基本的Scope
我们可以利用我们的Ubuntu SDK来创建一个最基本的Scope应用。为了说明问题的方便,我们在这个Scope里,不准备从网络上抓取任何的数据。所有的数据都是从本地来。为了达到这个目的,我们在我们的scope.cpp中做了如下的修改:
scope.cpp
sc::SearchQueryBase::UPtr Scope::search(const sc::CannedQuery &query,
                                        const sc::SearchMetadata &metadata) {
    const QString scopePath = QString::fromStdString(scope_directory());
    // Boilerplate construction of Query
    return sc::SearchQueryBase::UPtr(new Query(query, metadata, scopePath, config_));
}
在这里,我们加入了scopePath,并把它传人到query类中。
query.cpp
Query::Query(const sc::CannedQuery &query, const sc::SearchMetadata &metadata,
     QString scopePath, Config::Ptr config) :
    sc::SearchQueryBase(query, metadata), scopePath_(scopePath), client_(config) {

    for ( int i = 0; i < 8; i ++ ) {
        QString name = QString("image").append(QString::number(i+1)).append(".jpg");
        QString image = QString("file://%1/images/%2").arg(scopePath).arg(name);
        images_ << image;
    }

    for ( int i = 0; i < 10; i ++ ) {
        QString name = QString("pic").append(QString::number(i+1)).append(".jpg");
        QString image = QString("file://%1/images/%2").arg(scopePath).arg(name);
        icons_ << image;
    }

    background_ = QString("file://%1/images/%2").arg(scopePath).arg("background.jpg");

}
在这里,我们得到scope的路径。我们在scope的安装目录中加入一个 images的目录,并考入我们所需要的所有需要的文件:
liuxg@liuxg:~/scope/scopetemplates$ tree
.
├── cmake
│   ├── FindGMock.cmake
│   └── FindIntltool.cmake
├── CMakeLists.txt
├── CMakeLists.txt.user
├── data
│   ├── CMakeLists.txt
│   ├── icon.png
│   ├── images
│   │   ├── background.jpg
│   │   ├── image1.jpg
│   │   ├── image2.jpg
│   │   ├── image3.jpg
│   │   ├── image4.jpg
│   │   ├── image5.jpg
│   │   ├── image6.jpg
│   │   ├── image7.jpg
│   │   ├── image8.jpg
│   │   ├── pic10.jpg
│   │   ├── pic1.jpg
│   │   ├── pic2.jpg
│   │   ├── pic3.jpg
│   │   ├── pic4.jpg
│   │   ├── pic5.jpg
│   │   ├── pic6.jpg
│   │   ├── pic7.jpg
│   │   ├── pic8.jpg
│   │   └── pic9.jpg
│   ├── logo.png
│   ├── scopetemplates.liu-xiao-guo_scopetemplates.ini.in
│   └── screenshot.png
...
为了能够push数据到我们所需要的界面,我们设计了如下的helper方法:
void Query::pushResult(sc::SearchReplyProxy const& reply,
                       const string renderer, int i) {
    stringstream ss;
    ss << i;
    string str = ss.str();

    auto cat = reply->register_category( "id" + str, "Template " + str ,
                                         "", sc::CategoryRenderer(renderer) );
    sc::CategorisedResult r(cat);
    r.set_uri( URI.toStdString() );
    r.set_art( images_[0].toStdString() );
    r["subtitle"] = "Subtitle " + str;
    r.set_title("Title " + str);
    r["summary"] = "Summary: " + str;
    r["fulldesc"] = "fulldesc: " + str;
    r["mascot"] = icons_[0].toStdString();
    r["emblem"] = icons_[1].toStdString();
    r["background"] = background_.toStdString();
    r["overlay-color"] = "#FF0000";

    QString likes = QString("%1 %2").arg(qstr(u8"\u261d "), "100");
    QString views = QString("%1 %2").arg(qstr(u8"   \u261f "), "99");
    std::string both = qstr("%1 %2").arg(likes,views).toStdString();
    sc::VariantBuilder builder;
    builder.add_tuple({
        {"value", Variant(both)}
    });
    builder.add_tuple({
        {"value", Variant("")}
    });
    r["attributes"] = builder.end();

    if (!reply->push(r))
        return;
}

void Query::pushResult(sc::SearchReplyProxy const& reply,
                       const std::shared_ptr<const Category> *cat, int i) {

    stringstream ss;
    ss << i;
    string str = ss.str();

    sc::CategorisedResult r(*cat);
    r.set_uri( URI.toStdString() );
    r.set_art( images_[i].toStdString() );
    r["subtitle"] = "Subtitle " + str;
    r.set_title("Title " + str);
    r["summary"] = "Summary: " + str;
    r["fulldesc"] = "fulldesc: " + str;
    r["mascot"] = icons_[0].toStdString();
    r["emblem"] = icons_[1].toStdString();

    QString likes = QString("%1 %2").arg(qstr(u8"\u261d "), "100");
    QString views = QString("%1 %2").arg(qstr(u8"   \u261f "), "99");
    std::string both = qstr("%1 %2").arg(likes,views).toStdString();
    sc::VariantBuilder builder;
    builder.add_tuple({
        {"value", Variant(both)}
    });
    builder.add_tuple({
        {"value", Variant("")}
    });
    r["attributes"] = builder.end();

    if (!reply->push(r))
        return;
}
测试我们的CategoryRenderer模版
模版1
const static string CAT_RENDERER1
{
    R"(
    {
        "schema_version" : 1,
        "template" :
        {
            "category-layout" : "grid",
            "card-layout": "vertical",
            "card-size" : "large",
            "card-background": "#00FF00"
        },
        "components" :
        {
            "title" : "title",
            "art" : "art",
            "subtitle": "subtitle",
            "mascot": "mascot",
            "emblem": "emblem",
            "summary": "summary",
            "background": "background",
            "overlay-color": "overlay-color",
            "attributes": {
                "field": "attributes",
                "max-count": 2
            }
        }
    }
    )"
};
这个模版是一个非常全的模版,几乎涵盖了模版需要的所有的项。我们在可以通过如下的方式进行测试:
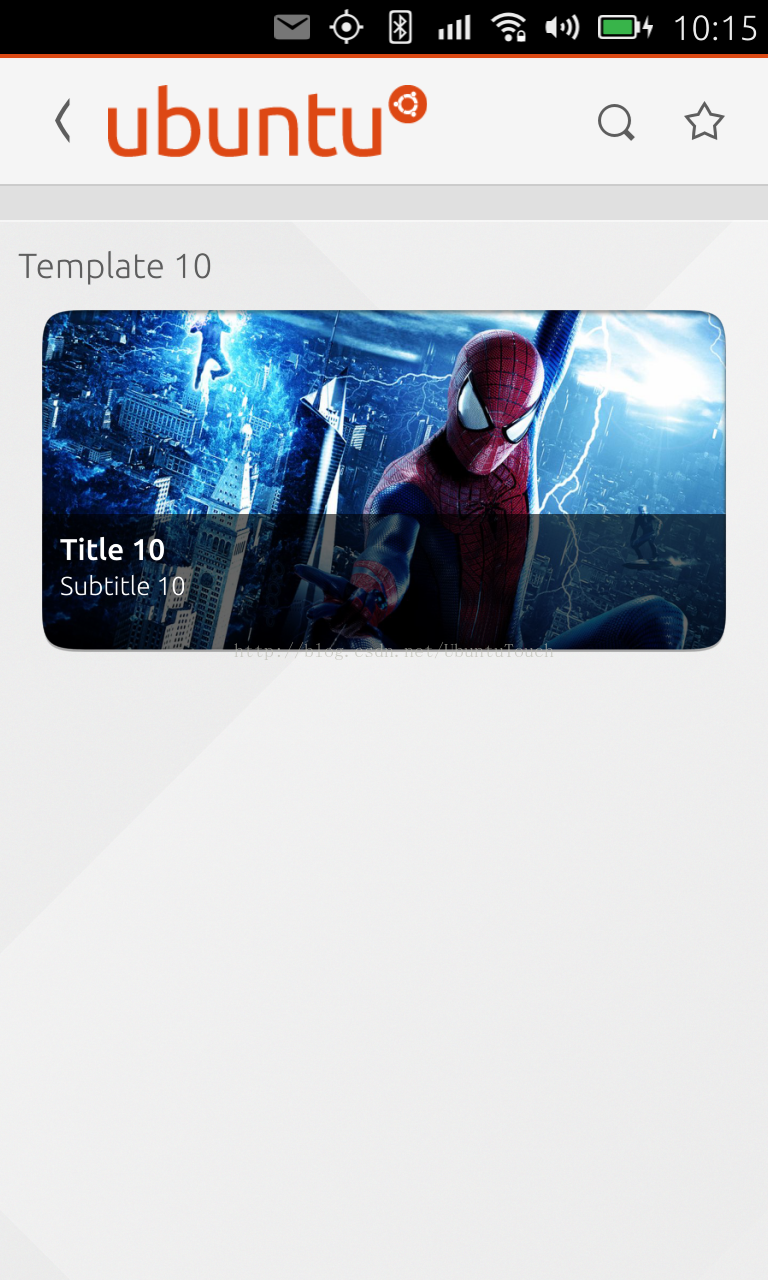
void Query::run(sc::SearchReplyProxy const& reply) {
    try {
        // The default is vertical
        pushResult(reply, CAT_RENDERER1, 1);


    } catch (domain_error &e) {
        // Handle exceptions being thrown by the client API
        cerr << e.what() << endl;
        reply->error(current_exception());
    }
}

从这里可以看出来,这是一个vertical的显示,上面是一个图片,下面是一些文字。几乎所有的东西它都有了。同时它使用了一个在上面右图显示的背景图作为背景图片。如果把背景图拿掉,这样看的更清楚一些,并使用“medium”大小的图片,显示的效果如下:
const static string CAT_RENDERER1
{
    R"(
    {
        "schema_version" : 1,
        "template" :
        {
            "category-layout" : "grid",
            "card-layout": "vertical",
            "card-size" : "medium",
            "card-background": "#00FF00"
        },
        "components" :
        {
            "title" : "title",
            "art" : "art",
            "subtitle": "subtitle",
            "mascot": "mascot",
            "emblem": "emblem",
            "summary": "summary",
            "overlay-color": "overlay-color",
            "attributes": {
                "field": "attributes",
                "max-count": 2
            }
        }
    }
    )"
};
模版2
const static string CAT_RENDERER2
{
    R"(
    {
        "schema_version" : 1,
        "template" :
        {
            "category-layout" : "grid",
            "card-layout": "horizontal",
            "card-size" : "large",
            "card-background": "#00FF00"
        },
        "components" :
        {
            "title" : "title",
            "art" : "art",
            "subtitle": "subtitle",
            "mascot": "mascot",
            "emblem": "emblem",
            "summary": "summary",
            "background": "background",
            "overlay-color": "overlay-color",
            "attributes": {
                "field": "attributes",
                "max-count": 2
            }
        }
    }
    )"
};
可以看出来,这是一个horizontal的显示。可以看出来,尽管我们设置了“large”的尺寸,但是最终显示的图片还是很小的。
模版3
const static string CAT_RENDERER3 = R"(
{
   "schema-version": 1,
    "template": {
        "category-layout": "grid",
        "card-layout": "horizontal",
        "card-size": "medium",
        "card-background": "#00FF00"
    },
    "components": {
        "title": "title",
        "art" : {
            "field": "art"
        },
       "subtitle": "subtitle",
        "overlay-color": "overlay-color",
        "attributes": {
            "field": "attributes",
            "max-count": 2
        }
    }
}
)";
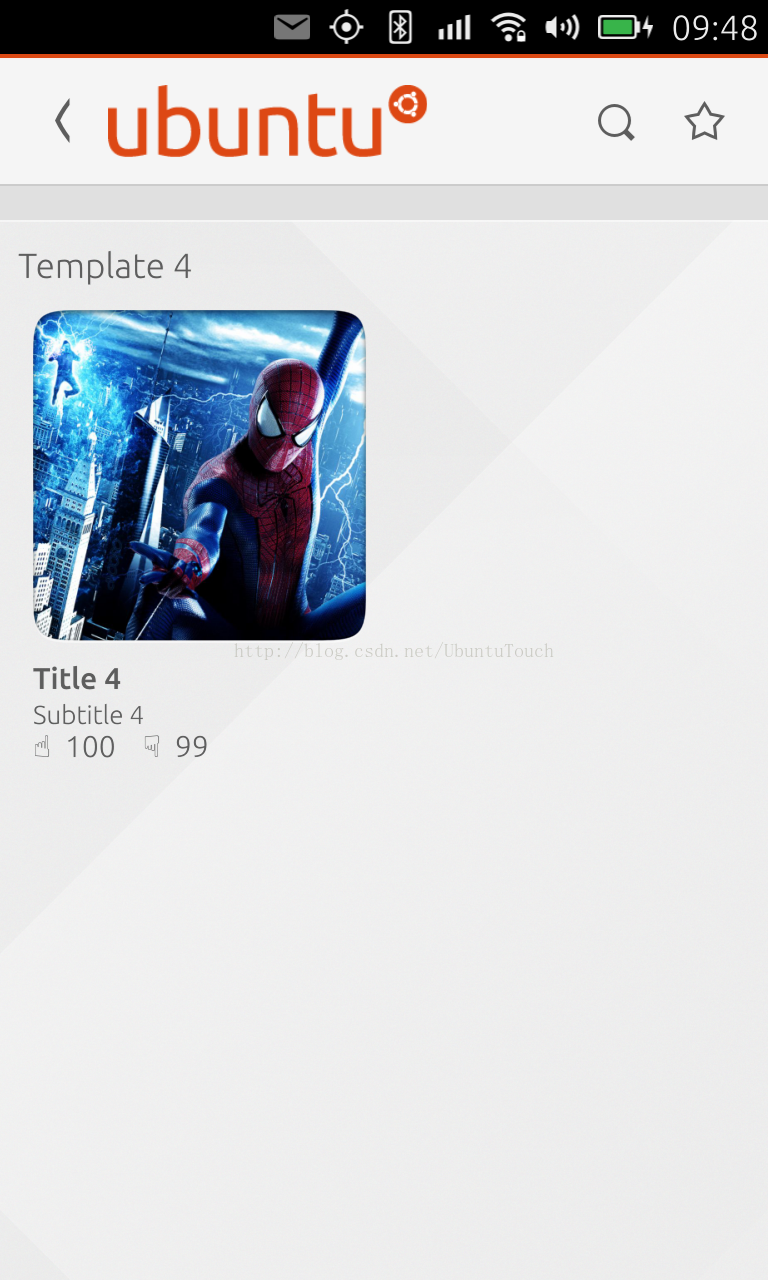
模版4
const static string CAT_RENDERER4
{
    R"(
    {
        "schema_version" : 1,
        "template" :
        {
            "category-layout" : "grid",
            "card-layout": "vertical",
            "card-size" : "medium"
        },
        "components" :
        {
            "title" : "title",
            "art" : "art",
            "subtitle": "subtitle",
            "overlay-color": "overlay-color",
            "attributes": {
                "field": "attributes",
                "max-count": 2
            }
        }
    }
    )"
};
模版5
const static string CAT_RENDERER5
{
    R"(
    {
        "schema_version" : 1,
        "template" :
        {
            "category-layout" : "grid",
            "card-layout": "vertical",
            "card-size" : "medium"
        },
        "components":
        {
          "title": "title",
          "subtitle": "subtitle",
          "overlay-color": "overlay-color",
          "art" : {
            "field": "art",
            "aspect-ratio": 2.0
          },
          "attributes": {
              "field": "attributes",
              "max-count": 2
          }
        }
    }
    )"
};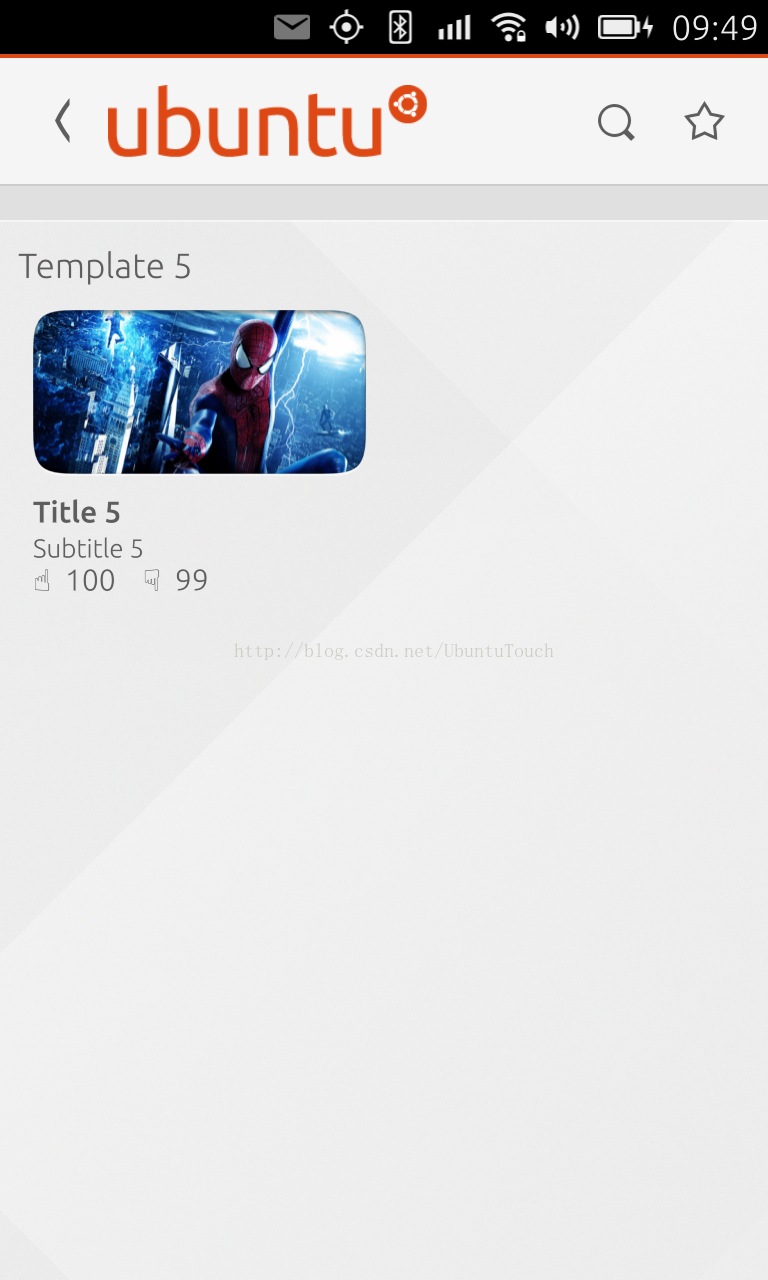
这里我们使用了"aspect-ratio": 2.0,开发者可以修改这个值看看有什么改变。
模版6
const static string CAT_RENDERER6
{
    R"(
    {
        "schema_version" : 1,
        "template" :
        {
            "category-layout" : "grid",
            "card-layout": "vertical",
            "card-size" : "medium"
        },
        "components":
        {
          "title": "title",
          "subtitle": "subtitle",
          "art" : {
            "field": "art",
            "aspect-ratio": 1.0
          },
          "overlay-color": "overlay-color",
          "attributes": {
              "field": "attributes",
              "max-count": 2
          }
        }
    }
    )"
};
模版7
const static string CAT_RENDERER7
{
    R"(
    {
        "schema_version" : 1,
        "template" :
        {
            "category-layout" : "grid",
            "card-layout": "vertical",
            "card-size" : "medium",
            "overlay": true

        },
        "components":
        {
          "title": "title",
          "subtitle": "subtitle",
          "art" : {
            "field": "art",
            "aspect-ratio": 1.0
          },
          "overlay-color": "overlay-color",
          "attributes": {
              "field": "attributes",
              "max-count": 2
          }
        }
    }
    )"
};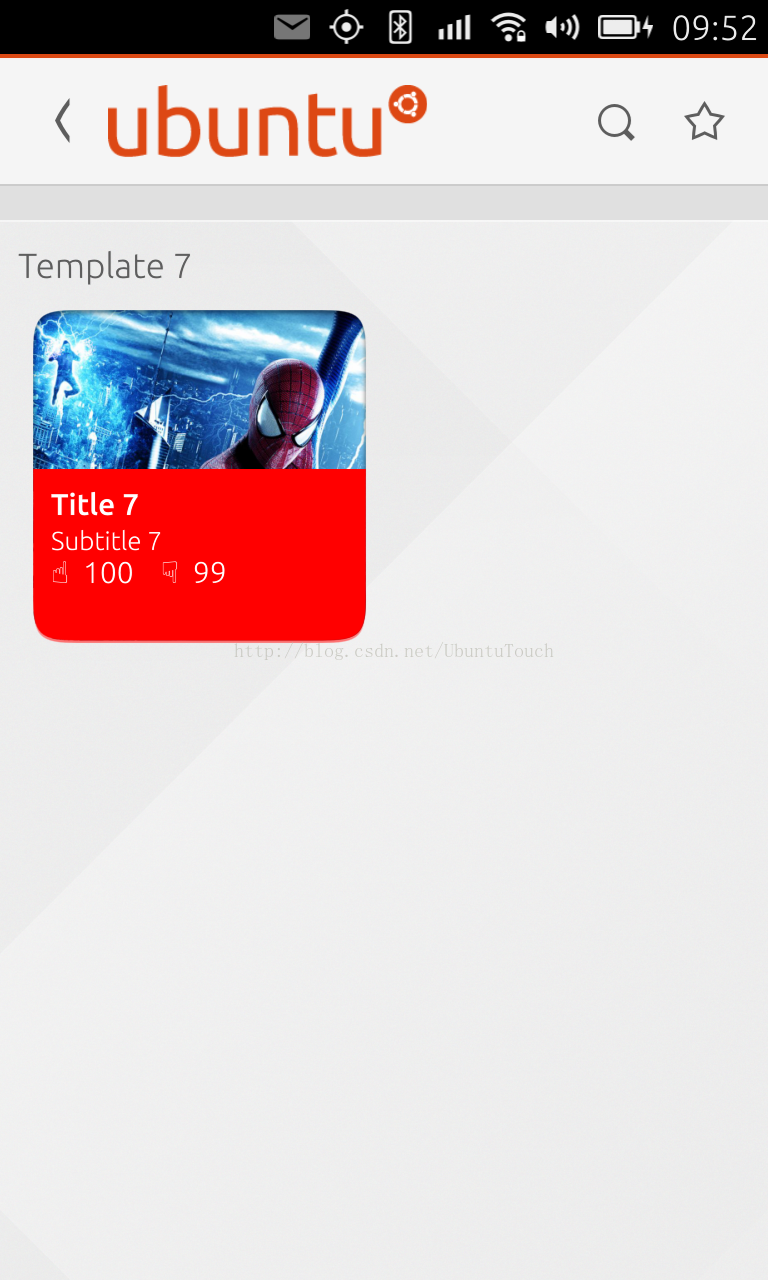
在这里,显示了一个
overlay的效果。同时我们也设置了一个overlay-color为
红色。其实这个选项,可以加到任何一个其它的模版中去。我们可以看到有不同的效果。这个练习让开发者自己去试吧。
模版8
const static string CAT_RENDERER8
{
    R"(
    {
        "schema_version" : 1,
        "template" :
        {
            "category-layout" : "grid",
            "card-layout": "vertical",
            "card-size" : "medium"
        },
        "components" :
        {
            "title" : "title",
            "art" : "art",
            "subtitle": "subtitle",
            "mascot": "mascot",
            "emblem": "emblem",
            "summary": "summary",
            "overlay-color": "overlay-color",
            "attributes": {
                "field": "attributes",
                "max-count": 2
            }
        }
    }
    )"
};
为了能对这个模版有多个显示,我特意添加了更多的数据显示,并使用如下的代码:
        auto cat = reply->register_category( "Grid", "Grid" ,
                                             "", sc::CategoryRenderer(CAT_RENDERER8) );

        for ( int i = 0; i < count/2; i ++ ) {
            pushResult( reply, &cat, i);
        }
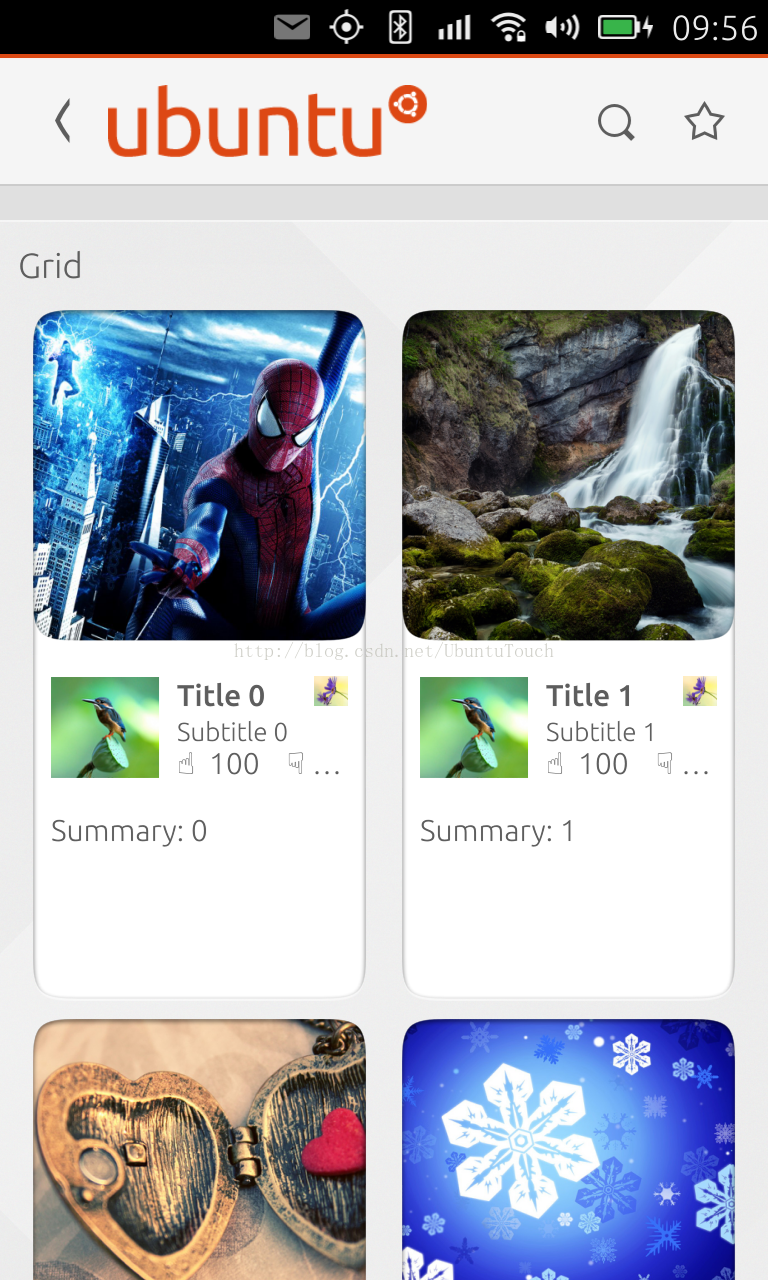
我们可以省去一些项使得显示更加人性化,从而得到不同的显示。
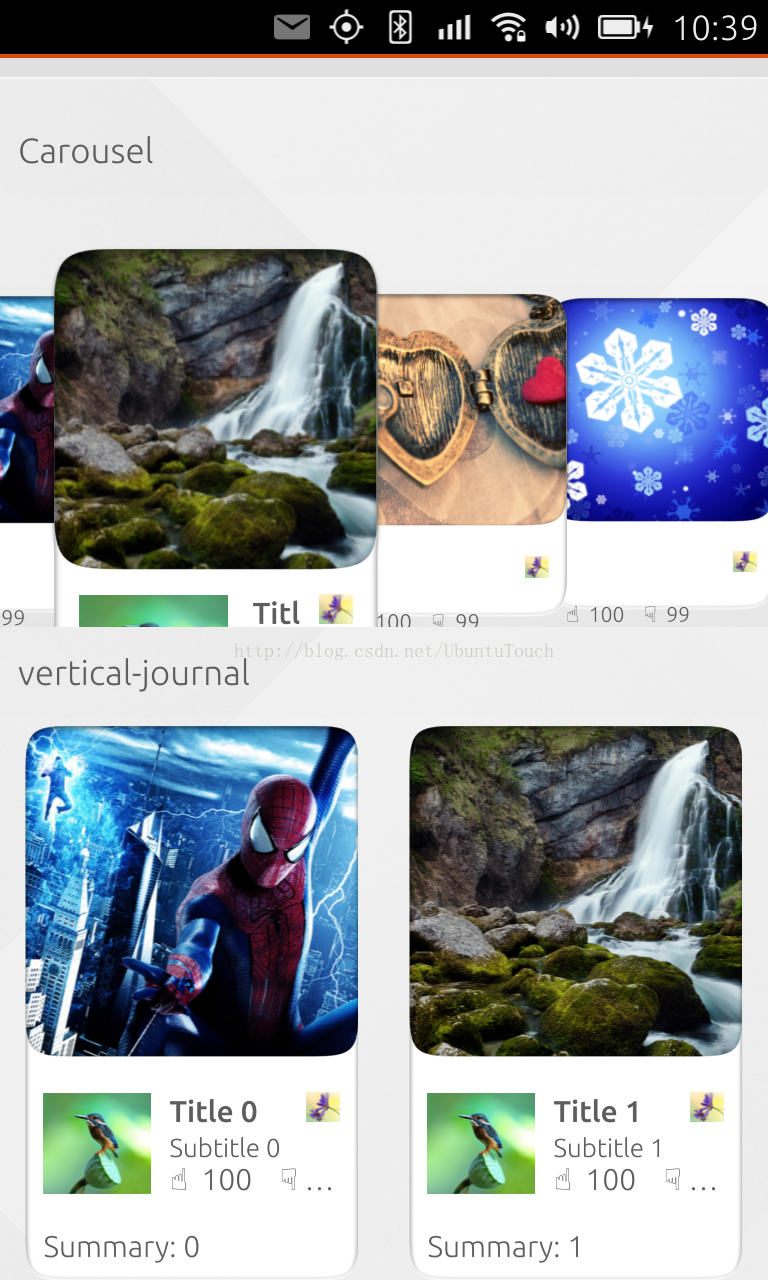
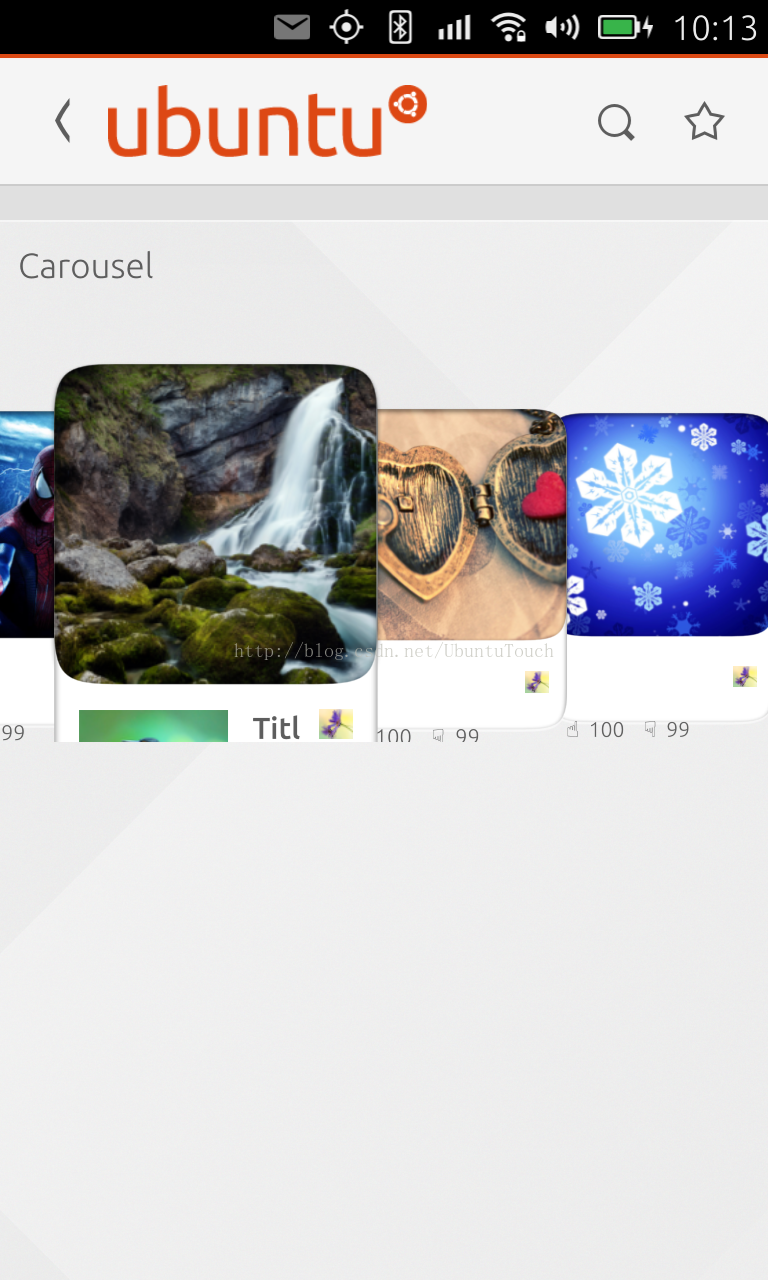
模版9
const static string CAT_RENDERER9
{
    R"(
    {
        "schema_version" : 1,
        "template" :
        {
            "category-layout" : "carousel",
            "card-layout": "vertical",
            "card-size" : "medium"
        },
        "components" :
        {
            "title" : "title",
            "art" : "art",
            "subtitle": "subtitle",
            "mascot": "mascot",
            "emblem": "emblem",
            "summary": "summary",
            "overlay-color": "overlay-color",
            "attributes": {
                "field": "attributes",
                "max-count": 2
            }
        }
    }
    )"
};
int count = images_.count();
auto cat = reply->register_category( "Carousel", "Carousel" ,
"", sc::CategoryRenderer(CAT_RENDERER9) );
for ( int i = 0; i < count; i ++ ) {
pushResult( reply, &cat, i);
}
模版10
const std::string CAT_RENDERER10 = R"(
{
  "schema-version": 1,
  "template": {
    "category-layout": "grid",
    "card-size": "large",
    "overlay": true
  },
  "components": {
    "title": "title",
    "subtitle": "subtitle",
    "art" : {
      "field": "art",
      "aspect-ratio": 2.0
    }
  }
}
在这个模版中,我们使用了"aspect-ratio": 2.0,这样我们得到一个从做到右的一个大的图片。我们也同时使用了overlay。
模版11
const std::string CAT_RENDERER11 = R"(
{
        "schema-version" : 1,
        "template" : {
            "category-layout" : "vertical-journal",
            "card-layout": "horizontal",
            "card-size": "small",
            "collapsed-rows": 0
        },
        "components" : {
            "title":"title",
            "subtitle":"subtitle",
            "summary":"summary",
            "art":{
                "field": "art",
                "aspect-ratio": 2
            }
        }
})";
模版12
const static string CAT_RENDERER12
{
    R"(
    {
        "schema_version" : 1,
        "template" :
        {
            "category-layout" : "vertical-journal",
            "card-layout": "vertical",
            "card-size" : "medium",
            "card-background": "#00FF00"
        },
        "components" :
        {
            "title" : "title",
            "art" : "art",
            "subtitle": "subtitle",
            "mascot": "mascot",
            "emblem": "emblem",
            "summary": "summary",
            "background": "background",
            "overlay-color": "overlay-color",
            "attributes": {
                "field": "attributes",
                "max-count": 2
            }
        }
    }
    )"
};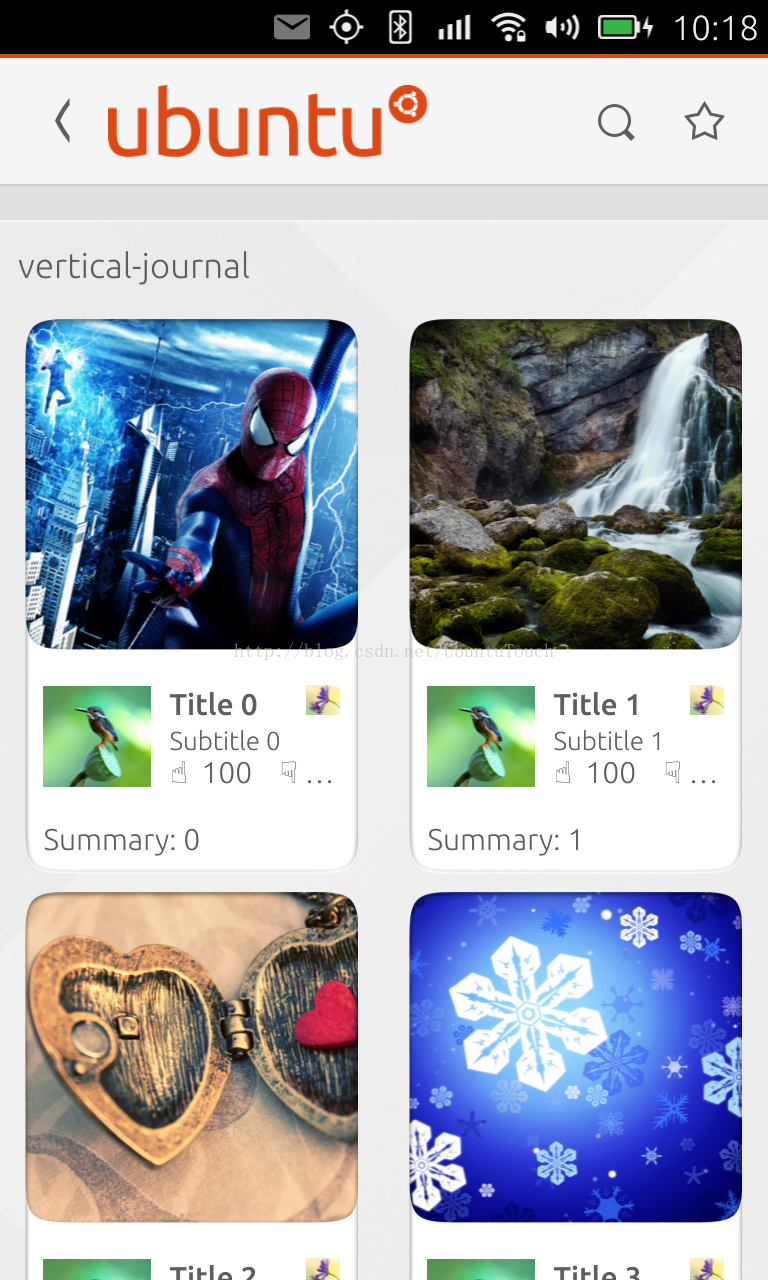
这是一个叫做“
vertical-journal”的layout。看起来和Grid有些类似。
模版13
const static string CAT_RENDERER13
{
    R"(
    {
        "schema_version" : 1,
        "template" :
        {
            "category-layout" : "horizontal-list",
            "card-layout": "vertical",
            "card-size" : "large",
            "card-background": "#00FF00"
        },
        "components" :
        {
            "title" : "title",
            "art" : "art",
            "subtitle": "subtitle",
            "mascot": "mascot",
            "emblem": "emblem",
            "summary": "summary",
            "background": "background",
            "overlay-color": "overlay-color",
            "attributes": {
                "field": "attributes",
                "max-count": 2
            }
        }
    }
    )"
};
        auto cat = reply->register_category( "horizontal-list", "horizontal-list" ,
                                         "", sc::CategoryRenderer(CAT_RENDERER13) );

        for ( int i = 0; i < count; i ++ ) {
            pushResult( reply, &cat, i);
        }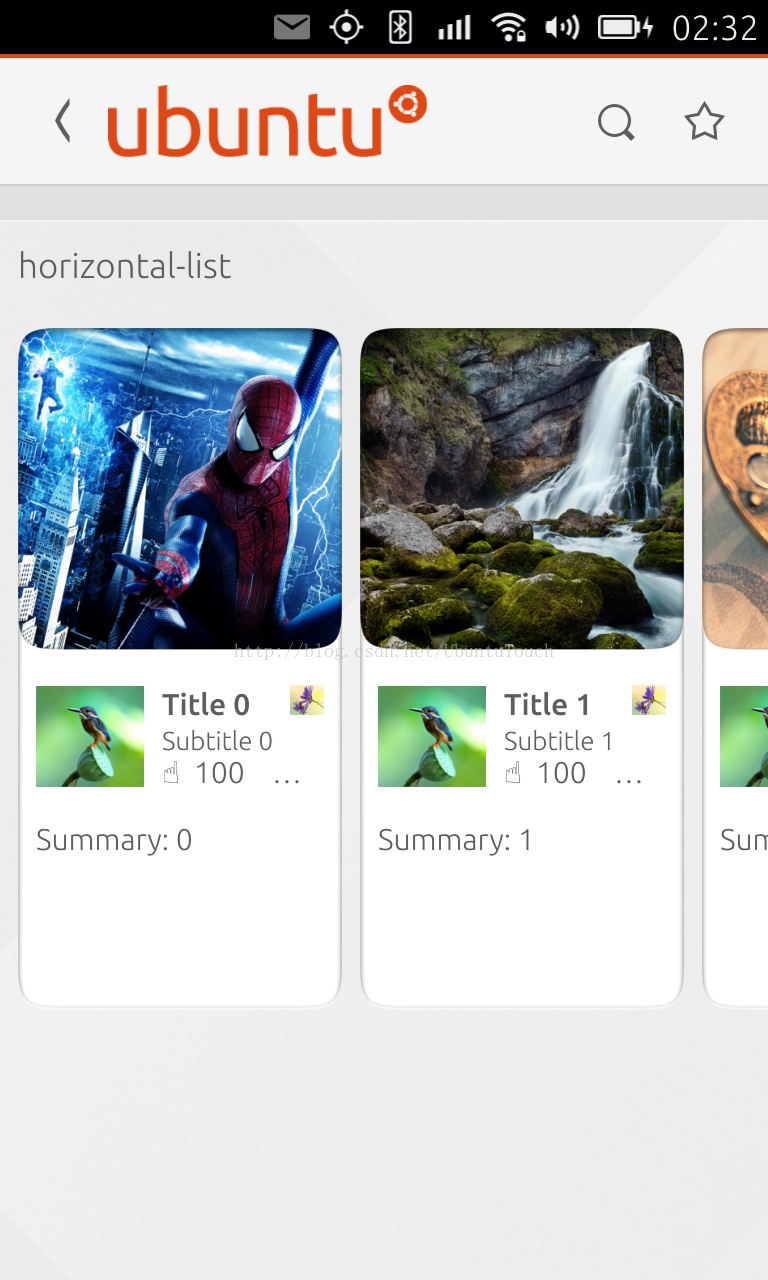
这是一个叫做“
horizontal-list”的layout。我们可以左右滑动来移动list。
开发者可以通过本例程,添加任何多的模版来做做展示。


 1580
1580


 被折叠的 条评论
为什么被折叠?
被折叠的 条评论
为什么被折叠?
 到【灌水乐园】发言


