


1、监听端口a1.sources.r1.type = netcat
配置文件nc-flume-console.conf
# Name the components on this agent a1 表示jvm进程名
a1.sources = r1
a1.sinks = k1
a1.channels = c1
# Describe/configure the source
a1.sources.r1.bind = node1
a1.sources.r1.port = 44444
# Describe the sink
a1.sinks.k1.type = logger
# Use a channel which buffers events in memory
a1.channels.c1.type = memory
a1.channels.c1.capacity = 1000 #1000个event
a1.channels.c1.transactionCapacity = 100
# Bind the source and sink to the channel
a1.sources.r1.channels = c1
a1.sinks.k1.channel = c1
flume-ng agent -n a1 -c conf/ -f /export/server/flume/job/nc-flume-console.conf
参数-n 表示jvm进程名 -c表示本次启动读取的配置文件conf目录下的文件 -f 表示具体执行的文件
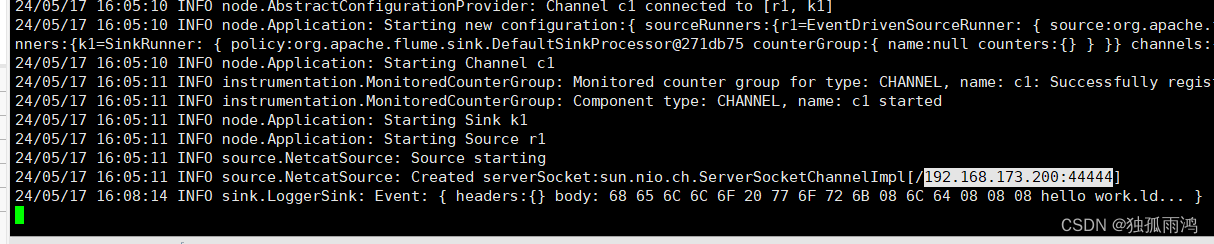
另开窗口输入内容后控制台会自动返回OK

2、实时监控单个追加文件
#Agent_name
a1.sources = r1
a1.sinks = k1
a1.channels = c1
#Sources
a1.sources.r1.type = exec
a1.sources.r1.command = tail -F /export/server/hive/logs/hive.log
#Channel
a1.channels.c1.type = memory
a1.channels.c1.capacity = 1000
a1.channels.c1.transactionCapacity = 100
#sinks
a1.sinks.k1.type = logger
#组合
a1.sources.r1.channels = c1
a1.sinks.k1.channel = c1
启动flume监听
flume-ng agent -c conf/ -f job/flume-exec-logger.conf -n a1
手动追加数据到hive.log文件 并查看监控窗口
echo INFO [main] spark.HiveSparkClientFactory >> logs/hive.log


动态添加数据到hive.log
连接hive 观察flume监控变化
beeline -u jdbc:hive2://node1:10000 -n ljr
show databases;


由此可见当我们操作hive的时候 hive.log 就更新,由于我们监控了hive.log文件所以当有新数据追加到hive.log的时候 就会监听到 并打印到控制台
3、实时监控单个追加文件,并将数据输出到hdfs
配置文件 flume-hivelogs-hdfs.con
# Name the components on this agent
a2.sources = r2
a2.sinks = k2
a2.channels = c2
# Describe/configure the source
a2.sources.r2.type = exec
a2.sources.r2.command = tail -F /export/server/hive/logs/hive.log
# Describe the sink
a2.sinks.k2.type = hdfs
a2.sinks.k2.hdfs.path = hdfs://node1:8020/flume/%Y%m%d/%H
#上传文件的前缀
a2.sinks.k2.hdfs.filePrefix = logs-
#是否按照时间滚动文件夹
a2.sinks.k2.hdfs.round = true
#多少时间单位创建一个新的文件夹
a2.sinks.k2.hdfs.roundValue = 1
#重新定义时间单位
a2.sinks.k2.hdfs.roundUnit = hour
#是否使用本地时间戳
a2.sinks.k2.hdfs.useLocalTimeStamp = true
#积攒多少个 Event 才 flush 到 HDFS 一次
a2.sinks.k2.hdfs.batchSize = 100
#设置文件类型,可支持压缩
a2.sinks.k2.hdfs.fileType = DataStream
#多久生成一个新的文件
a2.sinks.k2.hdfs.rollInterval = 60
#设置每个文件的滚动大小
a2.sinks.k2.hdfs.rollSize = 134217700
#文件的滚动与 Event 数量无关
a2.sinks.k2.hdfs.rollCount = 0
# Use a channel which buffers events in memory
a2.channels.c2.type = memory
a2.channels.c2.capacity = 1000
a2.channels.c2.transactionCapacity = 100
# Bind the source and sink to the channel
a2.sources.r2.channels = c2
a2.sinks.k2.channel = c2
启动flume监听,操作hive
flume-ng agent -n a2 -c conf/ -f flume-hivelogs-hdfs.con

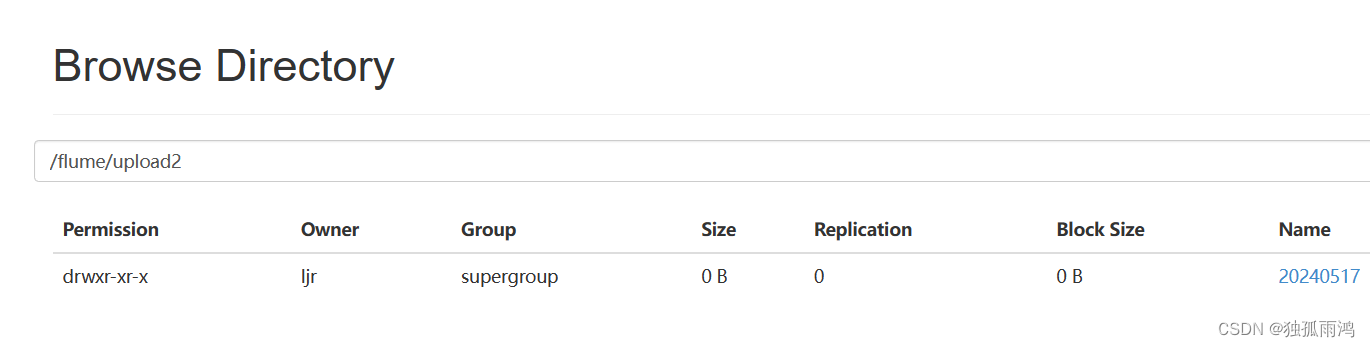
查看hdfs,有新文件产生

使用 Flume 监听整个目录(a3.sources.r3.type = TAILDIR)
的实时追加文件,并上传至 HDFS
实现步骤:
【1】创建被监控目录
我这里监控data目录 此目录需要提前创建
mkdir data
cd data
touch file1.txt
touch file2.txt
touch log2.txt
toch log1.txt
【2】创建文件 flume-taildir-hdfs.conf
a3.sources = r3
a3.sinks = k3
a3.channels = c3
# Describe/configure the source
#记录最后监控文件的断点的文件,此文件位置可不改
a3.sources.r3.positionFile = /export/server/flume/data /tail_dir.json
a3.sources.r3.filegroups = f1 f2
a3.sources.r3.filegroups.f1 = /export/server/flume/data/.*file.*
a3.sources.r3.filegroups.f2 =/export/server/flume/data/.*log.*
# Describe the sink
a3.sinks.k3.type = hdfs
# hdfs://node1:8020 可省略
a3.sinks.k3.hdfs.path = hdfs://node1:8020/flume/upload2/%Y%m%d/%H
#上传文件的前缀
a3.sinks.k3.hdfs.filePrefix = upload-
#是否按照时间滚动文件夹
a3.sinks.k3.hdfs.round = true
#多少时间单位创建一个新的文件夹
a3.sinks.k3.hdfs.roundValue = 1
#重新定义时间单位
a3.sinks.k3.hdfs.roundUnit = hour
#是否使用本地时间戳
a3.sinks.k3.hdfs.useLocalTimeStamp = true
#积攒多少个 Event 才 flush 到 HDFS 一次
a3.sinks.k3.hdfs.batchSize = 100
#设置文件类型,可支持压缩
a3.sinks.k3.hdfs.fileType = DataStream
#多久生成一个新的文件,单位是秒
a3.sinks.k3.hdfs.rollInterval = 3600
#设置每个文件的滚动大小大概是 128M,单位是byte
a3.sinks.k3.hdfs.rollSize = 134217700
#文件的滚动与 Event 数量无关
a3.sinks.k3.hdfs.rollCount = 0
# Use a channel which buffers events in memory
a3.channels.c3.type = memory
a3.channels.c3.capacity = 1000
a3.channels.c3.transactionCapacity = 100
# Bind the source and sink to the channel
a3.sources.r3.channels = c3
a3.sinks.k3.channel = c3
【3】启动flume监控
bin/flume-ng agent -c conf -f datas/flume-taildir-hdfs.conf -n a3
【4】向文件中追加内容


 2002
2002


 被折叠的 条评论
为什么被折叠?
被折叠的 条评论
为什么被折叠?
 到【灌水乐园】发言


